|
Bor
|
 |
« on: January 24, 2022, 12:29:44 PM » |
|
98 Tourer. 68k miles. When getting new tires installed, found the drive splines in a very sorry state. They look more like shark teeth than square splines. Also the cush drive rubbers were pretty bad and finally, the rear brake disk was under thickness. Sourced a used flange, final drive and brake disk from eBay. Getting ready to do the job. I have: Used, good condition parts: - Final drive
- Drive flange
- Brake disk
New OEM parts: - All 3 o-rings
- Teflon (?) thrust washer
- Replacement cush drive rubbers
- Replacement rear wheel bearings
- Brake disk bolts
- Dust Seal
- Oil seal and stopper ring for driveshaft
Tools/Supplies: - Moly paste, Loctite LB8012
- Final drive gear oil, Honda
- Bearing remover head, Honda 07746-0050600
- Bearing remover, Honda 07746-0050100
I also have access to a lift table at a friend's shop, but only for 1 or 2 days (the weekend essentially.) So I need the job to go pretty smoothly. So, what am I missing? TBH, the wheel bearings have me the most worried. It looks like they can be a bit tough to remove. How does that Honda Bearing remover work? Seems obvious, but you know what they say about assuming. |
|
|
|
|
 Logged
|
|
|
|
|
RonW
|
|
« Reply #1 on: January 24, 2022, 01:51:06 PM » |
|
I've never done a final drive rebuild but perhaps set up a laptop etc. when you're doing the project so you're able to live talk any snags with the forum members.
|
|
|
|
|
Logged
|
2000 Valkyrie Tourer
|
|
|
hubcapsc
Member

Posts: 16818
upstate
South Carolina
|
|
« Reply #2 on: January 24, 2022, 02:05:34 PM » |
|
I have used the bearing remover numerous times, I think it works great... 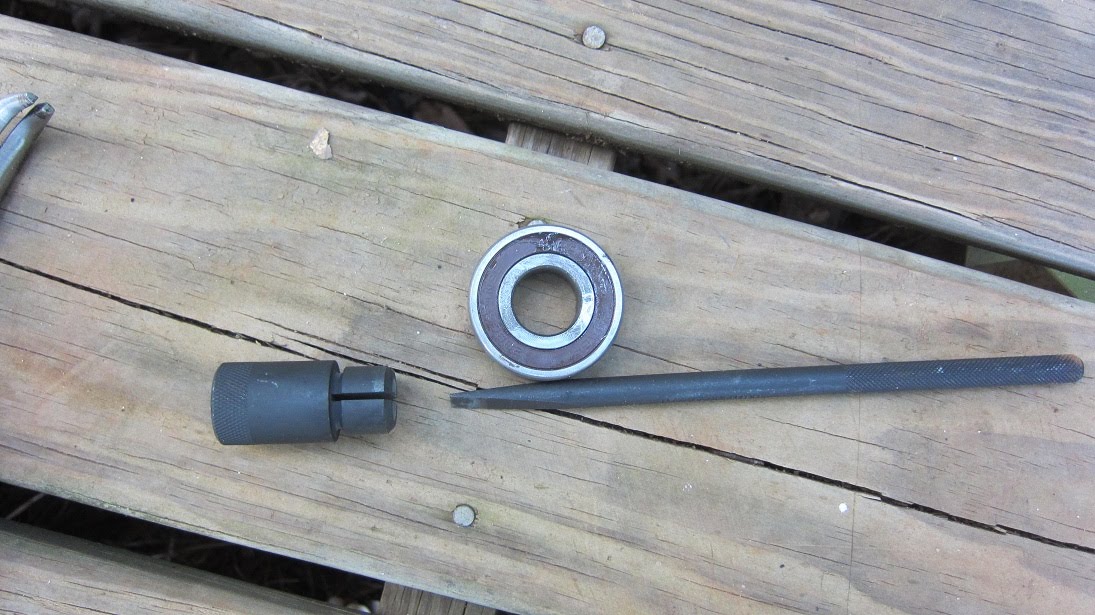 There's a driver handle with attachments sized for the various bearings, that's how I install the new bearings... careful use of the right sized socket works too. 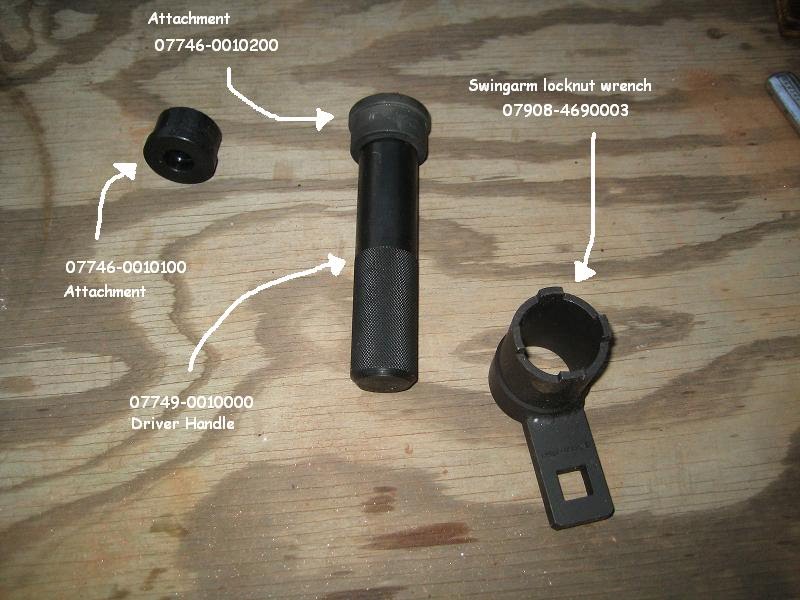 Are you sure your bearings need replaced? I remember replacing mine when I first got my bike, I doubt they needed it. And then I forgot to put the distance spacer back in. I made a lot of needless work for myself. And trips to the bearing house. You can probably do the whole thing in one day if you start early. After you've done it a few times, you'll be able to do it quicker than that. You have a good list of stuff. -Mike |
|
|
|
|
Logged
|
|
|
|
John Schmidt
Member
Posts: 15372
a/k/a Stuffy. '99 I/S Valk Roadsmith Trike
De Pere, WI (Green Bay)
|
|
« Reply #3 on: January 24, 2022, 02:38:44 PM » |
|
Mike, re. that Honda bearing tool, I have yet to get it to work for me when trying to remove a wheel bearing. I always take it with me on trips...along with a good size screwdriver with a slight bend in the end that will catch the edge of the bearing from the opposite side. I usually end up using the screwdriver. Once I get one side removed, I used a large pin with a beveled end that fits into the axle hole but won't pass through. A couple whacks and out comes the second bearing.
|
|
|
|
|
Logged
|
|
|
|
|
Chrisj CMA
|
|
« Reply #4 on: January 24, 2022, 02:44:00 PM » |
|
BOR. A lift table is of minimal help. You will still need to be able to raise the bike with the wheel off. Once you can do that with a motorcycle jack/lift or other jacks and jack stands you will see you really don’t need a lift table
|
|
|
|
|
Logged
|
|
|
|
|
Chrisj CMA
|
|
« Reply #5 on: January 24, 2022, 02:58:08 PM » |
|
Hopefully your new/used final drive and flange are a matched set, meaning they became used while mated together not separately. Also the sequence installing is critical. Sounds like the last person put it together poorly for the splines to be prematurely toast.
|
|
|
|
|
Logged
|
|
|
|
hubcapsc
Member
Posts: 16818
upstate
South Carolina
|
|
« Reply #6 on: January 24, 2022, 05:42:37 PM » |
|
Mike, re. that Honda bearing tool, I have yet to get it to work for me when trying to remove a wheel bearing. I always take it with me on trips...along with a good size screwdriver with a slight bend in the end that will catch the edge of the bearing from the opposite side. I usually end up using the screwdriver. Once I get one side removed, I used a large pin with a beveled end that fits into the axle hole but won't pass through. A couple whacks and out comes the second bearing.
I've changed the bearings in three, maybe four, Valkyrie wheels with that tool. A few good whacks and the blade expands the insert. Once the insert is wedged in the bearing, a few more whacks and the bearing pops out. You have to hold your mouth different during the expansion whacks than you do during the pop-out whacks  ... -Mike |
|
|
|
|
Logged
|
|
|
|
hubcapsc
Member
Posts: 16818
upstate
South Carolina
|
|
« Reply #7 on: January 24, 2022, 05:50:34 PM » |
|
Hopefully your new/used final drive and flange are a matched set, meaning they became used while mated together not separately. Also the sequence installing is critical. Sounds like the last person put it together poorly for the splines to be prematurely toast.
I found a good used flange for Pancho about ten years ago... I think he's still using it. Your flange in some other good final would be fine. I bought a good flange for $55 on ebay last week that I'd be happy to use anytime... mis-matched parts with obvious wear will probably eat each other up faster than normal... -Mike |
|
|
|
|
Logged
|
|
|
|
|
Jims99
|
|
« Reply #8 on: January 25, 2022, 05:14:31 AM » |
|
Don’t forget to use the right sequence and torque specs on axle and final drive bolts. Very important. Just take your time and ask questions if you’re not sure about something. Not a hard job but may be a little tricky the first time.
|
|
|
|
|
Logged
|
The light at the end of the tunnel, is a train.
99 tourer
00 interstate
97 standard
91 wing
78 trail 70
|
|
|
|
RonW
|
|
« Reply #9 on: January 25, 2022, 06:52:36 AM » |
|
Don’t forget to use the right sequence and torque specs on axle and final drive bolts. Very important. Just take your time and ask questions if you’re not sure about something. Not a hard job but may be a little tricky the first time.
Always a good reminder. Also, on having nothing wedging up the rear wheel when torqueing those 4 bolts.  |
|
|
|
« Last Edit: January 25, 2022, 07:05:24 AM by RonW »
|
Logged
|
2000 Valkyrie Tourer
|
|
|
|
Bor
|
|
« Reply #10 on: January 25, 2022, 08:39:54 AM » |
|
BOR. A lift table is of minimal help. You will still need to be able to raise the bike with the wheel off. Once you can do that with a motorcycle jack/lift or other jacks and jack stands you will see you really don’t need a lift table
The lift table is primarily to keep the work at a convenient height. I'm getting too old to work on the ground much anymore  I also have a "flat jack" that I will use to lift the bike on the lift table to get the rear wheel off. Planning to use the remove the shocks method to remove the rear wheel. That gets the axle just above the exhaust when I lower the rear of the bike. |
|
|
|
|
Logged
|
|
|
|
|
Bor
|
|
« Reply #11 on: January 25, 2022, 08:46:06 AM » |
|
Are you sure your bearings need replaced? I remember
replacing mine when I first got my bike, I doubt they needed
it. And then I forgot to put the distance spacer back in. I
made a lot of needless work for myself. And trips to the
bearing house.
I am not sure. In fact, at the tire change, the bearings felt fine. It was more of a "while I'm in there" thing. Perhaps I should not replace the bearings at this time (ain't broke, so don't fix it; just more opportunity for Murphy to strike). I can just keep them as spares for when they are needed. |
|
|
|
|
Logged
|
|
|
|
|
Chrisj CMA
|
|
« Reply #12 on: January 25, 2022, 08:47:54 AM » |
|
BOR. A lift table is of minimal help. You will still need to be able to raise the bike with the wheel off. Once you can do that with a motorcycle jack/lift or other jacks and jack stands you will see you really don’t need a lift table
The lift table is primarily to keep the work at a convenient height. I'm getting too old to work on the ground much anymore I also have a "flat jack" that I will use to lift the bike on the lift table to get the rear wheel off. Planning to use the remove the shocks method to remove the rear wheel. That gets the axle just above the exhaust when I lower the rear of the bike. Just be careful. Whenever the lift is not secure in a safety stop you risk a spontaneous lowering. It would be best to get a piece of wood that jams in the scissor securely to avoid the lift lowering and the bike falling off the elevated table |
|
|
|
|
Logged
|
|
|
|
|
Bor
|
|
« Reply #13 on: January 25, 2022, 09:14:41 AM » |
|
Don’t forget to use the right sequence and torque specs on axle and final drive bolts. Very important. Just take your time and ask questions if you’re not sure about something. Not a hard job but may be a little tricky the first time.
Always a good reminder. Also, on having nothing wedging up the rear wheel when torqueing those 4 bolts. So, rear wheel just lightly touching the floor/table when torqueing those 4 bolts? |
|
|
|
|
Logged
|
|
|
|
|
Chrisj CMA
|
|
« Reply #14 on: January 25, 2022, 01:27:23 PM » |
|
Don’t forget to use the right sequence and torque specs on axle and final drive bolts. Very important. Just take your time and ask questions if you’re not sure about something. Not a hard job but may be a little tricky the first time.
Always a good reminder. Also, on having nothing wedging up the rear wheel when torqueing those 4 bolts. So, rear wheel just lightly touching the floor/table when torqueing those 4 bolts? No! Rear tire NOT touching the floor during axle and then drive torquing |
|
|
|
|
Logged
|
|
|
|
|
turtle254
|
|
« Reply #15 on: January 25, 2022, 01:45:59 PM » |
|
Don’t forget to use the right sequence and torque specs on axle and final drive bolts. Very important. Just take your time and ask questions if you’re not sure about something. Not a hard job but may be a little tricky the first time.
Always a good reminder. Also, on having nothing wedging up the rear wheel when torqueing those 4 bolts. So, rear wheel just lightly touching the floor/table when torqueing those 4 bolts? No! Rear tire NOT touching the floor during axle and then drive torquing Can both shocks be in place before torqueing bolts? |
|
|
|
|
Logged
|
|
|
|
|
Chrisj CMA
|
|
« Reply #16 on: January 25, 2022, 01:53:38 PM » |
|
Don’t forget to use the right sequence and torque specs on axle and final drive bolts. Very important. Just take your time and ask questions if you’re not sure about something. Not a hard job but may be a little tricky the first time.
Always a good reminder. Also, on having nothing wedging up the rear wheel when torqueing those 4 bolts. So, rear wheel just lightly touching the floor/table when torqueing those 4 bolts? No! Rear tire NOT touching the floor during axle and then drive torquing Can both shocks be in place before torqueing bolts? Some do it that way. I prefer the right shock NOT attached. Of course the exhaust will be in the way for torquing the axle if you didn’t remove them. Some people remove the exhaust to service the rear end |
|
|
|
« Last Edit: January 25, 2022, 01:55:38 PM by Chrisj CMA »
|
Logged
|
|
|
|
|
RonW
|
|
« Reply #17 on: January 25, 2022, 01:58:21 PM » |
|
So, rear wheel just lightly touching the floor/table when torqueing those 4 bolts?I did not know this myself until other members stressed the step to me. For that matter, I don't even remember whether I wedged up the rear wheel to facilitate aligning the axle then left the wedges under the tire for the rest of the assembly. Maybe I didn't. When the shocks are removed as a step to raise the swingarm above the muffler, you'd have to use a strut or a ratchet strap to keep the swing arm at its elevated position. Or, if a scissors jack was used, then that's left in situ, however there's an angle that the swingarm shouldn't exceed, (I wasn't able to locate the post that talked about the angle). Either way, when inserting the axle into the elevated swingarm, the rear wheel is going to be hanging off the ground. The space between the bottom of rear tire and the ground shouldn't be wedged ..... when torqueing the 4 bolts (nuts).
|
|
|
|
|
Logged
|
2000 Valkyrie Tourer
|
|
|
|
RonW
|
|
« Reply #18 on: January 25, 2022, 02:11:13 PM » |
|
I have a question when using a strut or ratchet strap to keep the swingarm elevated above the mufflers. Things go easier if only the left swingarm is strapped, as a strap on the right swingarm will get in the way. However, doesn't strapping or using a strut only on the left swingarm cause the right swingarm to list to a point where the tilt would throw off the alignment of the pumpkin and the right swingarm? Or does the weight of the rear wheel have a negligible effect on an unsupported right swingarm? Just asking. |
|
|
|
|
Logged
|
2000 Valkyrie Tourer
|
|
|
|
Jess from VA
|
|
« Reply #19 on: January 25, 2022, 02:13:24 PM » |
|
A poor mans lift table might be a wide motorcycle ramp (except for a front wheel chock, though judicious use of tie downs might remedy that satisfactorily). You don't need the bike that high, in combination with a jack, so a ramp might be made to work, for much less money (and easier storage).
|
|
|
|
|
Logged
|
|
|
|
|
Chrisj CMA
|
|
« Reply #20 on: January 25, 2022, 02:29:37 PM » |
|
I have a question when using a strut or ratchet strap to keep the swingarm elevated above the mufflers. Things go easier if only the left swingarm is strapped, as a strap on the right swingarm will get in the way. However, doesn't strapping or using a strut only on the left swingarm cause the right swingarm to list to a point where the tilt would throw off the alignment of the pumpkin and the right swingarm? Or does the weight of the rear wheel have a negligible effect on an unsupported right swingarm? Just asking. I have been using a strut on the left side with the right side unsupported for years. The swing arm is stout enough to do that without sagging |
|
|
|
|
Logged
|
|
|
|
|
RonW
|
|
« Reply #21 on: January 25, 2022, 02:30:54 PM » |
|
okay
|
|
|
|
|
Logged
|
2000 Valkyrie Tourer
|
|
|
|
pancho
|
|
« Reply #22 on: January 26, 2022, 03:37:37 PM » |
|
I found a good used flange for Pancho about ten years ago... I think
he's still using it.
I am,,,, If I remember right, you found it for me for $20,, might need to pay a bit more now. It was used with a final drive that had a GW spline swap done on it. Total mismatch, but both pieces were in good condition to start with and have been kept in abundant amounts of moly paste since. Looked the same as the day I put them in the last time I had the wheel off several months ago. maybe 45K on the pieces since them.
|
|
|
|
|
Logged
|
The most expensive things you will purchase, are those things you would not have needed if you had listened and obeyed.
|
|
|
|
Bor
|
|
« Reply #23 on: February 01, 2022, 10:48:42 AM » |
|
So, rear wheel just lightly touching the floor/table when torqueing those 4 bolts?I did not know this myself until other members stressed the step to me. For that matter, I don't even remember whether I wedged up the rear wheel to facilitate aligning the axle then left the wedges under the tire for the rest of the assembly. Maybe I didn't. When the shocks are removed as a step to raise the swingarm above the muffler, you'd have to use a strut or a ratchet strap to keep the swing arm at its elevated position. Or, if a scissors jack was used, then that's left in situ, however there's an angle that the swingarm shouldn't exceed, (I wasn't able to locate the post that talked about the angle). Either way, when inserting the axle into the elevated swingarm, the rear wheel is going to be hanging off the ground. The space between the bottom of rear tire and the ground shouldn't be wedged ..... when torqueing the 4 bolts (nuts). Should one want to fabricate such a strut, what is the suggested center-to-center distance of the two holes? |
|
|
|
|
Logged
|
|
|
|
|
RonW
|
|
« Reply #24 on: February 01, 2022, 12:49:51 PM » |
|
Chrisj states center-to-center length as 10" heremello dude states 12" here (second pic) hubcapsc uses a turnbuckle, here *all links from same thread  |
|
|
|
|
Logged
|
2000 Valkyrie Tourer
|
|
|
|
Chrisj CMA
|
|
« Reply #25 on: February 02, 2022, 05:13:40 AM » |
|
So, rear wheel just lightly touching the floor/table when torqueing those 4 bolts?I did not know this myself until other members stressed the step to me. For that matter, I don't even remember whether I wedged up the rear wheel to facilitate aligning the axle then left the wedges under the tire for the rest of the assembly. Maybe I didn't. When the shocks are removed as a step to raise the swingarm above the muffler, you'd have to use a strut or a ratchet strap to keep the swing arm at its elevated position. Or, if a scissors jack was used, then that's left in situ, however there's an angle that the swingarm shouldn't exceed, (I wasn't able to locate the post that talked about the angle). Either way, when inserting the axle into the elevated swingarm, the rear wheel is going to be hanging off the ground. The space between the bottom of rear tire and the ground shouldn't be wedged ..... when torqueing the 4 bolts (nuts). Should one want to fabricate such a strut, what is the suggested center-to-center distance of the two holes? It’s slightly different depending on your pipes. Put the bike up on the lift. Remove the shocks place the swing arm/ rear wheel where you want it and take a measurement. Easy. |
|
|
|
|
Logged
|
|
|
|
|
clanky
|
|
« Reply #26 on: February 20, 2022, 07:44:31 AM » |
|
BOR, Chris has an excellent write up in the Shoptalk section of this website for rear end work. I followed his steps and it was easy !!
|
|
|
|
|
Logged
|
|
|
|
|


