|
Swinborg
|
 |
« on: March 25, 2023, 01:37:35 AM » |
|
Dear All,
Hoping you could help out with a challenge, a project and a whole bunch of questions.
I have just purchased a Valkyre ‘97, that hasn’t done many miles (18,000). It looks as if it’s been stored for a long time and hasn’t been cleaned in YEARS!
It’s in a whiole bunch of bits now, and I am hoping to go through it and get it running to ride down to southern Spain from the Uk on my birthday (end of May).
So I have never rebuilt a bike, never owned a Honda, never ridden a Valk and work long hours, so this is a early morning project!
This as you can now imagine is all about doing this in the SHORTEST possible amount of time with reliability and safety as the priority.
The Spain trip will be about 2,000 miles and nearly 60 hours on boats to get there!!!!
I do however have a good set of tools, a shop manual and pretty decent at wielding spanner’s!
I am hoping to is get a very concise step by step on how to rebuild a valkyre in the most limited time possible - I can work on it until 07:30 in the morning and maybe a little at night!
So first question on my first message, presume the engine and gear box are good, what do I have to check, and what do I have to rebuild!
I have no history with the bike, and I don’t think it’s been ridden in YEARS!
Max
|
|
|
|
|
 Logged
|
|
|
|
|
luftkoph
|
|
« Reply #1 on: March 25, 2023, 03:46:11 AM » |
|
Max it shouldn’t be any different than any other bike start with the basics, fuel,electrical, make sure the engine will run before tackling brakes, tires etc.
To do it by the end of may is a tall order, unless it turns out it’s in better shape than you suspected.
Good luck keep us informed should be interesting
|
|
|
|
|
Logged
|
Some day never comes
|
|
|
|
da prez
|
|
« Reply #2 on: March 25, 2023, 06:31:02 AM » |
|
Pull the spark plugs and front cover. Bar the engine over by hand at least four full revolutions. Disconnect the fuel line. Pull the tank. Remove the battery. Hook to a non-running vehicle. See if it turns over. This is the first thing I do with an unknown bike.
Keep us informed and K E E P asking. A shop manual is needed!
da prez
|
|
|
|
|
Logged
|
|
|
|
|
WintrSol
|
|
« Reply #3 on: March 25, 2023, 09:00:47 AM » |
|
You didn't say May of what year.  IF the internals aren't rusted and IF the clutch isn't stuck together, this May COULD be possible. But, you imply you have limited hours, which makes just over one month a challenge for someone experienced rebuilding an old bike. You may need to take some time off to meet that schedule. Good luck! |
|
|
|
|
Logged
|
98 Honda Valkyrie GL1500CT Tourer
Photo of my FIL Jack, in honor of his WWII service
|
|
|
|
Swinborg
|
|
« Reply #4 on: March 26, 2023, 03:14:10 PM » |
|
Bit of an update - few of the guys where extremely helpful in answering my questions around the diff - so thanks again. In order to get the diff sorted I had to get the old girl on a lift. I got one of the Abbasky lifts, wow that is a real game changer! https://abbastands.co.uk/product-detail.asp?item=sky-lift&pid=44But of course it’s needed an adapter plate. I welded on a couple of 75mm square bars to give the adaptor plate a bit more testosterone, and it seems to work well! With the diff off I figured to have a little lookie at the swing arm bearings and whilst I am there get the swing arm powder coated. If anyone is looking for a seriously talented powder coater in the UK check this guy out… https://performance-powder-coating-birmingham.business.site/?utm_source=gmb&utm_medium=referralThe diff looked shabby so a bit of paint stripper and polish is tomorrow mornings job! Shocks are shocking! So thinking about fournels air shocks as an interesting alternative anyone had any experience with them? Max |
|
|
|
|
Logged
|
|
|
|
|
RonW
|
|
« Reply #5 on: March 26, 2023, 03:55:36 PM » |
|
"I am hoping to is get a very concise step by step on how to rebuild a valkyre in the most limited time possible - I can work on it until 07:30 in the morning and maybe a little at night!"You might set up a 'Follow Along With Max' thread on the Valk forum. Make sure to start a 'new' thread for each individual project to keep the discussion organized. There's been new Valk owners that announced their Valk project, but post later about a snag they ran across instead of asking questions before hand. There are pitfalls and faster methods that aren't in the manual. I suggest that you take photos and even videos before disassembling anything. I would replace the tires regardless of the mileage unless they're only a few years old and low mileage. Valk tires last between 8K-10K in regards to your 2K itinerary. -------------------------------------------------------------------------------- Oh, wow! Never heard of an Abba sky lift before. 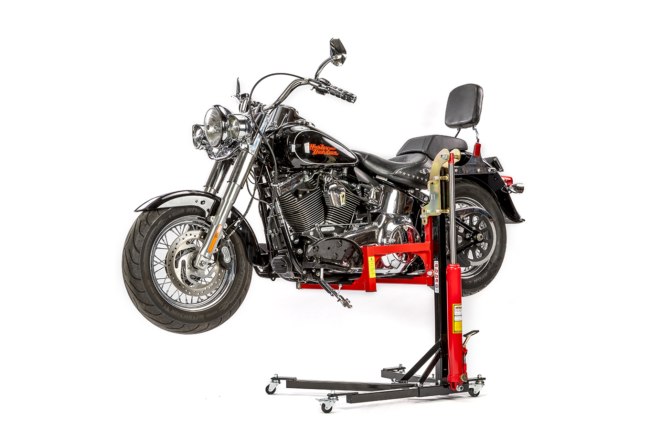 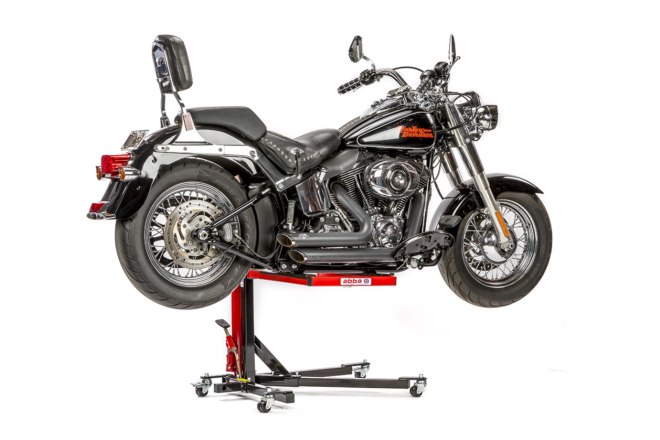 You can find plans for wooden adapters here. You're after the specs for the two vertical posts.  If any of the plans call for a 2 x 4 lumber (2-inch by 4-inch), in the US, 2x4's are 3½-inch by 1½-inch. (2 x 2's are 1½-inch by 1½-inch.) 
|
|
|
|
« Last Edit: March 26, 2023, 04:02:56 PM by RonW »
|
Logged
|
2000 Valkyrie Tourer
|
|
|
|
Jess from VA
|
|
« Reply #6 on: March 26, 2023, 04:18:45 PM » |
|
Great assist Ron.  Using 2 X 4's for the base is overkill, since the base is sandwiched between the motor and lift anyway. And it makes working it over the lift and under the bike harder. My base plate is one by stock (single board), and been working fine for 15 years. Like this. (I used pressure treat for the uprights, which carry the load) 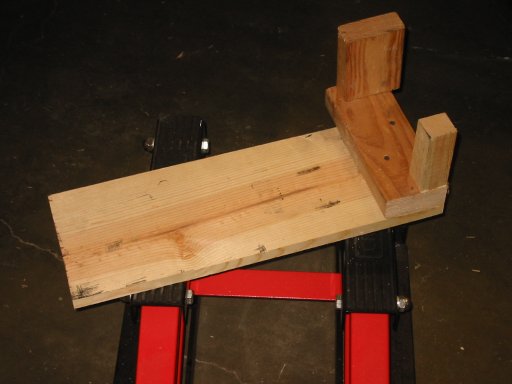 |
|
|
|
« Last Edit: March 26, 2023, 04:20:43 PM by Jess from VA »
|
Logged
|
|
|
|
|
The emperor has no clothes
|
|
« Reply #7 on: March 26, 2023, 05:29:27 PM » |
|
Great assist Ron. Using 2 X 4's for the base is overkill, since the base is sandwiched between the motor and lift anyway. And it makes working it over the lift and under the bike harder. My base plate is one by stock (single board), and been working fine for 15 years. Like this. (I used pressure treat for the uprights, which carry the load) I would add 3/4” plywood is even better. (I don’t know how many millimeters that is)  |
|
|
|
|
Logged
|
|
|
|
|
RonW
|
|
« Reply #8 on: March 26, 2023, 05:34:05 PM » |
|
I would also add using glue makes the wood joinery stronger. Except end grain.
|
|
|
|
|
Logged
|
2000 Valkyrie Tourer
|
|
|
|
Swinborg
|
|
« Reply #9 on: March 27, 2023, 12:55:14 AM » |
|
Hi All,
Happy to move post as anyone sees fit, just tell me the how’s!
Regarding the stand, I am quite sure the wooden ones are fit for the job. I figured that if I am under the bike, which the ABBA allows you to do I would have a metal one. Here is a picture of mine!
Max
|
|
|
|
|
Logged
|
|
|
|
|
RonW
|
|
« Reply #10 on: March 27, 2023, 03:14:22 AM » |
|
|
|
|
|
« Last Edit: March 27, 2023, 05:44:11 AM by RonW »
|
Logged
|
2000 Valkyrie Tourer
|
|
|
|
Hook#3287
|
|
« Reply #11 on: March 27, 2023, 04:24:19 AM » |
|
Great assist Ron. Using 2 X 4's for the base is overkill, since the base is sandwiched between the motor and lift anyway. And it makes working it over the lift and under the bike harder. My base plate is one by stock (single board), and been working fine for 15 years. Like this. (I used pressure treat for the uprights, which carry the load) Well, if we're gonna be technical, I believe your base is a 5/4x6Pt aka decking. Maybe not. That's what I've also used for 15 years. It makes positioning easier. 3/4 plywood would be even better. Looking forward to this rescue |
|
|
|
« Last Edit: March 27, 2023, 04:27:50 AM by Hook#3287 »
|
Logged
|
|
|
|
|
rug_burn
|
|
« Reply #12 on: March 27, 2023, 09:16:04 AM » |
|
What kind of shape are the carbs in?
After sitting that long, they could be badly gummed up with all rubber components in need of replkacement if the previous owner (PO) left gas in the carbs , to just dried out a lot, if he did drain them. The diaphragms could all need to be replaced too. If you're on a deadline, you ought to sub this out to a good carb guy.
And then all those 3.5mm and 4.5 mm hoses and caps probably need replacing, too.
I got a '97 also, with about 200k on it.
|
|
|
|
|
Logged
|
...insert hip saying here..
|
|
|
|
Jess from VA
|
|
« Reply #13 on: March 27, 2023, 09:21:13 AM » |
|
I concur the carbs (and associated bits) are likely the hardest part of any rehab.
|
|
|
|
|
Logged
|
|
|
|
|
Swinborg
|
|
« Reply #14 on: March 28, 2023, 04:34:28 PM » |
|
Uffa!
Long morning with a steam cleaner and a lot of degreaser!
Tank is off. Barred the engine round and seems good! I changed the plugs, and looked over hoses - most ok a few getting a bit tired so will replace later. Got a package today - 6 channel
Carb balanced and a BUNCH of bearings and seals the for swing arm
Oh air cleaner replaced. I think I am going to start engine next few days and see how the carb balance is. I figure if the carbs are gummed up it will show quick BEFORE I commit to taking them to bits.
Not sure if you have noticed but the diff question has sparked
a lot of fantastic info well worth a read - a massive thank you to all that have contributed!!!
05:30 starts are not fun….
Max
|
|
|
|
|
Logged
|
|
|
|
|
Jess from VA
|
|
« Reply #15 on: March 28, 2023, 05:15:09 PM » |
|
Looking at that picture just reminded me that the header nuts are only torqued to 7ft/lbs. Just snug. Snapping the studs off is to be avoided (and easy to do). Small exhaust leaks might be heard (later). If you go with new gaskets, make sure to pry the old ones out, many have doubled up unknowingly because the old ones are flat and easily missed. Now with new ones, the procedure is to just snug all, ride (heat up) then snug again, several times. I lost a couple of the fancy acorn nuts over the years. I sistered up two regualar nuts together and that works fine. Hopefully, no one has hacked up your exhaust internals (though many clip the three piggies back for a bit more rumble) One of those piggies is threaded to accept an 18" rear exhaust tip screw. http://www.valkyrieriders.com/shoptalk/Pipes101.htm |
|
|
|
« Last Edit: March 28, 2023, 05:18:10 PM by Jess from VA »
|
Logged
|
|
|
|
|
Pluggy
|
|
« Reply #16 on: March 28, 2023, 05:49:45 PM » |
|
Great assist Ron. Using 2 X 4's for the base is overkill, since the base is sandwiched between the motor and lift anyway. And it makes working it over the lift and under the bike harder. My base plate is one by stock (single board), and been working fine for 15 years. Like this. (I used pressure treat for the uprights, which carry the load) I would add 3/4” plywood is even better. (I don’t know how many millimeters that is) Make the adapter with a pair of 2x4 as a base and a Craftsman or similar jack will slip under the spring holding stud bolt. Won't collide. That's rather foolproof. Use 3/4 plywood and it is possible the jack can collide with the stud bolt. Not so foolproof. I like foolproof. |
|
|
|
« Last Edit: March 28, 2023, 06:18:17 PM by Pluggy »
|
Logged
|
|
|
|
|
RonW
|
|
« Reply #17 on: March 28, 2023, 07:15:18 PM » |
|
Apparently you didn't have trouble aligning the airbox snorkels to the carbs. Applauds! I use a 90° hose pick to insure the lip on the snorkel hasn't folded over. A mirror is good too.  Note the misalignment of the snorkel tabs. Dunno if it matters though. Just good practice I suppose.  |
|
|
|
« Last Edit: March 28, 2023, 07:23:35 PM by RonW »
|
Logged
|
2000 Valkyrie Tourer
|
|
|
|
Swinborg
|
|
« Reply #18 on: March 30, 2023, 12:24:01 PM » |
|
Well touched up the frame in this mornings instalment. I will powder coat next year, but as time is a ticking, a quick sand and blow over to address the rust is best policy I think….
(Paint used was a mixture of black, thinned out ALOT, as I have added a blue/green glitter)
….finished the diff, now awaiting a new dust cover.
|
|
|
|
« Last Edit: March 30, 2023, 12:30:25 PM by Swinborg »
|
Logged
|
|
|
|
|


