Valkyrie Riders Cruiser Club
June 17, 2025, 08:06:57 AM *
Welcome, Guest. Please login or register.

Login with username, password and session length
Ultimate Seats Link VRCC Store
Homepage : Photostash : JustPics : Shoptalk : Old Tech Archive : Classifieds : Contact Staff
News: If you're new to this message board, read THIS!
 
VRCC Calendar Ad
Pages: [1]   Go Down
Send this topic Print
Author Topic: Race Tech Gold Valve Emulators - Disassemble Cartridge  (Read 2194 times)
New to Metric
Member
*****
Posts: 5


« on: April 17, 2023, 06:10:33 AM »

I got a fork leak so I decided to install gold valve emulators while everything is apart. In the instructions, to disassemble the cartridge you have to push the compression valve body into the cartridge 5 mm to remove the wire clip.

I've tried pushing it in with my finger and then screwing in the bolt and pushing it down onto my vice but I haven't been able to get it to move. I've never taken a cartridge apart and am afraid of bending or damaging the cartridge body/rod. Has anyone installed these before on a Valk? How much force does it take?

Happy to read an existing thread if anyone knows of one but couldn't find one specific to the cartridge. Any info is appreciated.
Logged
hubcapsc
Member
*****
Posts: 16769


upstate

South Carolina


« Reply #1 on: April 17, 2023, 06:43:51 AM »


I've had my forks apart numerous times, but not to install that kit...

When you say cartridge, are you talking about what they call the
damper?


-Mike
Logged

New to Metric
Member
*****
Posts: 5


« Reply #2 on: April 17, 2023, 07:10:22 AM »

Good Morning Mike,

You are correct that I am talking about the damper. Also, when I talked about the bolt, I removed the oil lock piece off and screwed the socket bolt into the damper so that it had something to push the compression valve body into the damper but didn't have success. Thanks!

-Jeremy
Logged
hubcapsc
Member
*****
Posts: 16769


upstate

South Carolina


« Reply #3 on: April 17, 2023, 07:20:40 AM »


I know there's at least one guy that's on here pretty regularly who
has installed one or the other of the racetech kits... anywho... do
they want you to take the damper apart and install a part from the
kit in there? I've had the damper out numerous times, but never
had a reason to try to take it apart...

-Mike
Logged

New to Metric
Member
*****
Posts: 5


« Reply #4 on: April 17, 2023, 08:16:51 AM »

As long as I'm reading it correctly (always a chance I'm wrong), I have to take out the internal components of the damper and then replace it with the new shims/washers/valving.

Step 2 under disassembly: https://racetech.com/download/InstructPDF/IP%20FMGV%20S2042C.pdf

In looking at it, I wouldn't have guessed the damper is serviceable. If nothing else, I can just put it back together with the Race Tech springs and OEM damper but I'd rather not waste the $200.

Thanks,
Jeremy
Logged
hubcapsc
Member
*****
Posts: 16769


upstate

South Carolina


« Reply #5 on: April 17, 2023, 08:50:31 AM »

OK... now that I see your instructions I'm guessing they're talking about this:


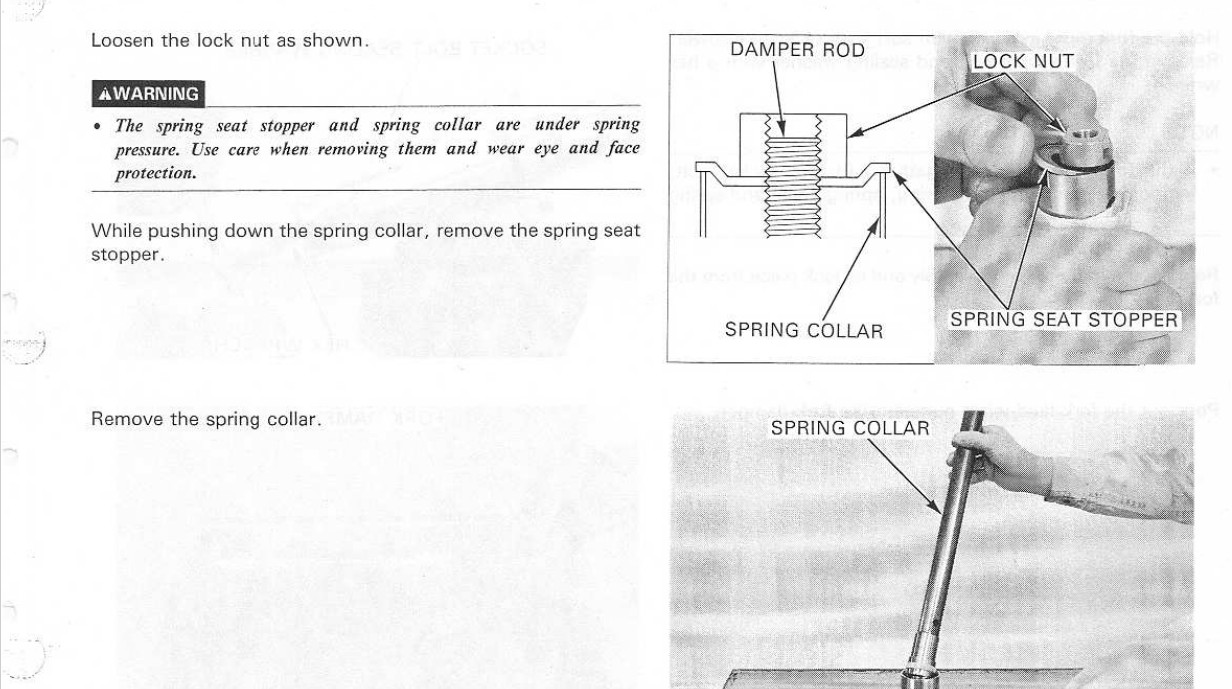
Working with that little washer/collar is indeed a fidgety part of getting
the forks apart because of the spring pressure... I'm trying to remember...
maybe you need to notice how much of the threaded part is sticking out of the
weird nut at the top, then back it off as much as possible without removing
it, and then there's enough slack in the spring-pressure to struggle the
collar off? Anywho... it will go on and off without damaging anything...

-Mike

EDIT: I used just Progressive springs in my forks and like the result. It seems
that the improved valving of the racetech kit along with the new racetech
spring would be a good thing... I hope you get the kit installed and make
a report ...
« Last Edit: April 17, 2023, 08:55:55 AM by hubcapsc » Logged

New to Metric
Member
*****
Posts: 5


« Reply #6 on: November 29, 2023, 09:42:21 AM »

Sorry about the delay in response. In addition to adding the information on disassembling the cartridge (fork damper), I also wanted to proactively review the ride.

To disassemble the cartridge (using the manual screen shot from a previous post):
1. pry off the oil lock piece which comes off easily
2. rethread the socket bolt back in to the compression valving assembly
3. lightly tap the compression valving assembly into the fork damper until you can access the retaining ring inside (I used the small hammer)
4. remove the retaining ring
5. use the rod of the fork damper as a slide hammer to gently knock the compression valving assembly back out.

Once this is done, you can remove the damper rod and replace the compression and rebound valving using race tech's directions. Just be sure you have a caliper that can measure tenths of a MM. You will need to measure shims' diameter and thickness. Reassembly is the above in reverse. The pictures attached show the old valving vs. the new valving.

I think the change is definitely worth the cost (assuming you're changing it yourself). The ride is much more controlled and responsive. It is hard to describe if you've never had performance suspension, but once you've had it it is hard to go back. While you might not feel the bumps less than stock, you certainly feel it return to normal much quicker than continuing to bounce down the road after a pothole.

I also received great customer service from race tech and they were quick to answer my email and actually answered the phone when I called.
Logged
New to Metric
Member
*****
Posts: 5


« Reply #7 on: November 29, 2023, 10:48:10 AM »

Pictures that didn't upload from the last post

Logged
Pages: [1]   Go Up
Send this topic Print
Jump to: