Valkorado
Member

Posts: 10517
VRCC DS 0242
Gunnison, Colorado (7,703') Here there be twisties.
|
 |
« on: June 11, 2023, 03:48:31 PM » |
|
Why is the little stuff the biggest PITA? I've spent a couple, few hours messing around with the Bullet's seat latch cable. Not sure how it came apart, but I've figured out how each end fits on the cables. Problem is, once I get either side cinched up, there's not enough stretch to get the opposite cable spindle in it's proper resting place. I've definitely invented some new profanities trying to get my seat lock back working.  Anyone else been there, done that and had success getting that cable back together? If so, how? |
|
|
|
|
 Logged
|
Have you ever noticed when you're feeling really good, there's always a pigeon that'll come sh!t on your hood? - John Prine 97 Tourer "Silver Bullet" 01 Interstate "Ruby"  |
|
|
hubcapsc
Member
Posts: 16817
upstate
South Carolina
|
|
« Reply #1 on: June 11, 2023, 04:58:25 PM » |
|
I remember taking a bunch of stuff apart in that area some number of years ago and laughing about how it seemed that half of Texas (we had recently returned from GOTF) was still in there. I even took this picture, which happens to show one end of the seat lock connection... 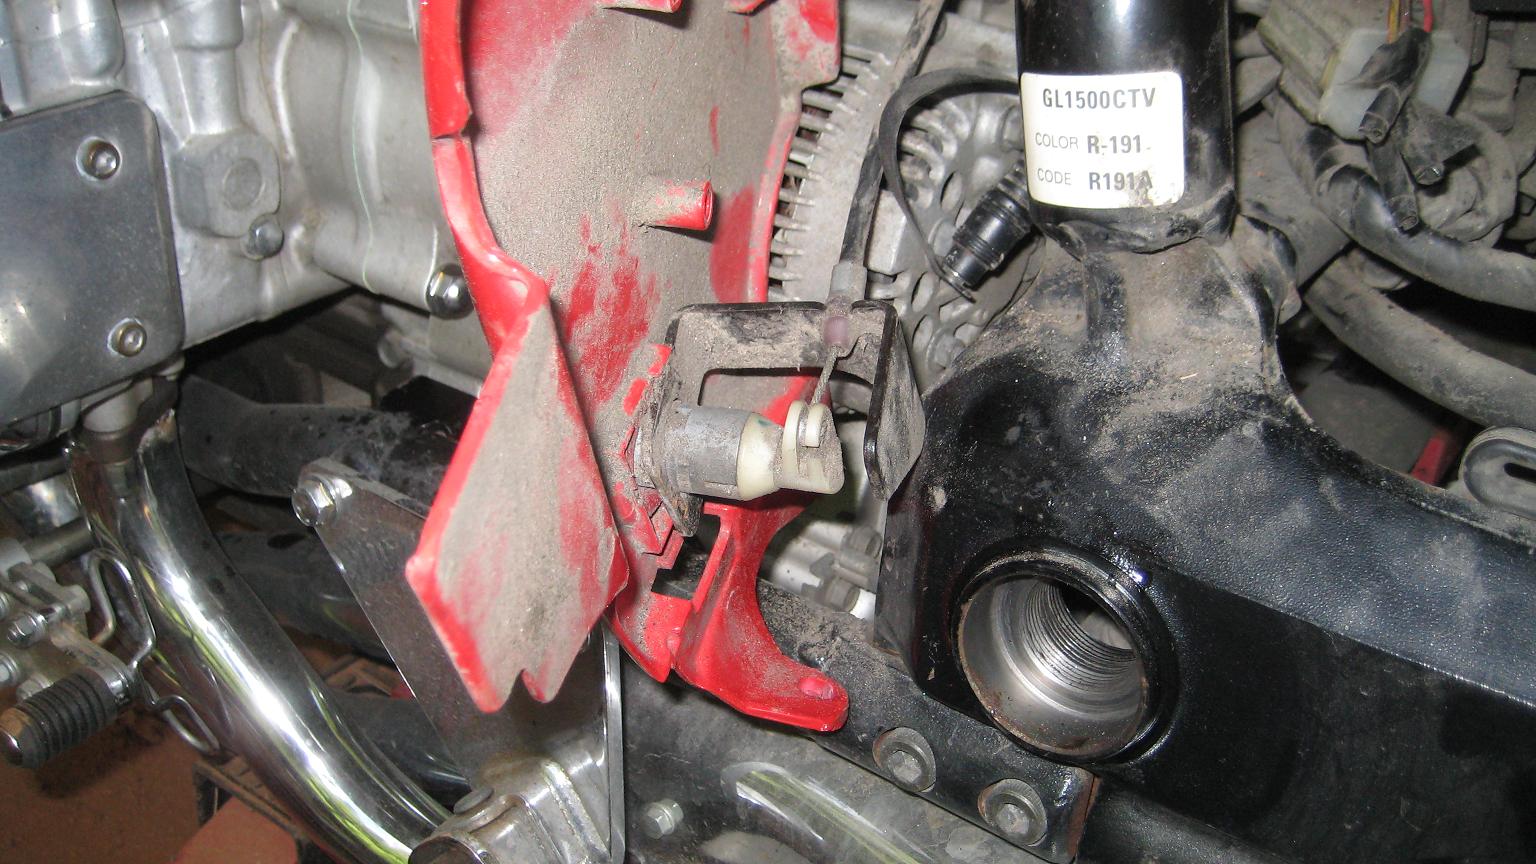 -Mike |
|
|
|
|
Logged
|
|
|
|
Valkorado
Member
Posts: 10517
VRCC DS 0242
Gunnison, Colorado (7,703') Here there be twisties.
|
|
« Reply #2 on: June 11, 2023, 05:54:11 PM » |
|
I remember taking a bunch of stuff apart in that area some number of years ago and laughing about how it seemed that half of Texas (we had recently returned from GOTF) was still in there. I even took this picture, which happens to show one end of the seat lock connection... -Mike Well, that's more than I'm wanting to do but it seems probably the only way to do it right. Your method could be on my to do list awhile. I'm thinking about industrial strength Velcro for now if I can find a mounting point.  I have two long locking hemostats. Only thing I could find that can get up there without going to the extent you did. Using those I've been able to get the cable attached properly with the swivel working one side of the cable at a time, but when it comes to the other end I'm literally coming up short. Can't get enough stretch. Once I bolt down the seat clasp, I can't pull the cable enough to set up the key side. Or vise versa. It's the tension of the cable that keeps the key mechanism properly "pulled" into the keyhole, there's no screw threads and nut.. Warning. Locking hemostats can unlock with great force when clasped over too large an object causing the user some pain. Just what I've heard anyway.  |
|
|
|
|
Logged
|
Have you ever noticed when you're feeling really good, there's always a pigeon that'll come sh!t on your hood? - John Prine 97 Tourer "Silver Bullet" 01 Interstate "Ruby" |
|
|
Willow
Administrator
Member

Posts: 16828
Excessive comfort breeds weakness. PttP
Olathe, KS

|
|
« Reply #3 on: June 11, 2023, 07:13:55 PM » |
|
Well, that's more than I'm wanting to do but it seems probably the only way to do it right. ... Perhaps unfortunately, that is the proper way to do it. It's not that difficult with the center piece loose. One has to wonder how you got it disconnected. You might check the key position to see that it's not in the release position. |
|
|
|
|
Logged
|
|
|
|
Valkorado
Member
Posts: 10517
VRCC DS 0242
Gunnison, Colorado (7,703') Here there be twisties.
|
|
« Reply #4 on: June 11, 2023, 09:58:58 PM » |
|
One has to wonder how you got it disconnected.
Been wondering that myself. Probably the Hartco seat I have that never fit into the clasp correctly. I had to push the seat down until it locked. I had noticed the under seat key release was feeling loose the last few times I'd pulled the seat off. |
|
|
|
|
Logged
|
Have you ever noticed when you're feeling really good, there's always a pigeon that'll come sh!t on your hood? - John Prine 97 Tourer "Silver Bullet" 01 Interstate "Ruby" |
|
|
|
RonW
|
|
« Reply #5 on: June 11, 2023, 10:28:41 PM » |
|
I've never removed the center cover, but wouldn't shifting the center cover to the Right side of the bike slacken the cable? Something like shifting the handlebars on the risers to gain slack for the respective cables. Momz (April 08, 2009) stated, ".....to gain the proper access to the latch and the cable sheath mount, you will need to remove the battery to gain access." Momz probably meant remove the battery box not just the battery. I gather the latch gets bolted on last with the cable already attached to it.  |
|
|
|
|
Logged
|
2000 Valkyrie Tourer
|
|
|
John Schmidt
Member
Posts: 15372
a/k/a Stuffy. '99 I/S Valk Roadsmith Trike
De Pere, WI (Green Bay)
|
|
« Reply #6 on: June 12, 2023, 07:43:12 AM » |
|
What my issue turned out to be was a major PITA as well. If you start messing with the latch system, you'll find the upper end of the cable fits into a "stay"(for lack of a better term) that holds the upper end of the outer casing stationary. If the casing comes out it doesn't allow the cable to pull, all that happens then is the casing moves with the cable and creates no pull on the latch itself. My fix...after it came loose 2-3 times, I mixed up some JB Weld and put the casing back in place after filling the slot where it sits with the JBW. Next I covered the area around that "stay" and the casing with the JBW, then used some safety wire to hold it all in place until dried. That sucker ain't coming out. As for keeping all moving parts of the latch in place while trying to reassemble, I just used some scotch tape to hold the sliding piece in place. If you ever have to replace the cable, either use a Dremel to cut the JBW out or cut off the lead plug on one end and remove the cable...leaving the casing in place. Get some new cable at Menards or Ace Hdw. and make your own. If interested in how to make the lead plugs for the end of various cables, let me know and I'll start a post elswhere to describe the process and the homemade tool. Rather easy to do.
|
|
|
|
|
Logged
|
|
|
|
Valkorado
Member
Posts: 10517
VRCC DS 0242
Gunnison, Colorado (7,703') Here there be twisties.
|
|
« Reply #7 on: June 12, 2023, 09:04:40 AM » |
|
What my issue turned out to be was a major PITA as well. If you start messing with the latch system, you'll find the upper end of the cable fits into a "stay"(for lack of a better term) that holds the upper end of the outer casing stationary. If the casing comes out it doesn't allow the cable to pull, all that happens then is the casing moves with the cable and creates no pull on the latch itself. My fix...after it came loose 2-3 times, I mixed up some JB Weld and put the casing back in place after filling the slot where it sits with the JBW. Next I covered the area around that "stay" and the casing with the JBW, then used some safety wire to hold it all in place until dried. That sucker ain't coming out. As for keeping all moving parts of the latch in place while trying to reassemble, I just used some scotch tape to hold the sliding piece in place. If you ever have to replace the cable, either use a Dremel to cut the JBW out or cut off the lead plug on one end and remove the cable...leaving the casing in place. Get some new cable at Menards or Ace Hdw. and make your own. If interested in how to make the lead plugs for the end of various cables, let me know and I'll start a post elswhere to describe the process and the homemade tool. Rather easy to do.
Great information John thank you. It'll be a project for sure. Both sides of my cable are currently unattached. As I mentioned, I've managed to get them individually attached on either end using the long hemostats. Getting both sides attached on each end with that technique is a seemingly impossible feat. |
|
|
|
|
Logged
|
Have you ever noticed when you're feeling really good, there's always a pigeon that'll come sh!t on your hood? - John Prine 97 Tourer "Silver Bullet" 01 Interstate "Ruby" |
|
|
|
Chrisj CMA
|
|
« Reply #8 on: June 12, 2023, 10:10:10 AM » |
|
I think you have to pop the center cover loose and remove the lock from the back of the cover. Get it all connected and then mount the lock back on the cover.
|
|
|
|
|
Logged
|
|
|
|
Valkorado
Member
Posts: 10517
VRCC DS 0242
Gunnison, Colorado (7,703') Here there be twisties.
|
|
« Reply #9 on: June 12, 2023, 11:23:06 AM » |
|
I think you have to pop the center cover loose and remove the lock from the back of the cover. Get it all connected and then mount the lock back on the cover.
Thanks. That seems logical, and will be my plan of attack when I get time to take another a stab at it. |
|
|
|
|
Logged
|
Have you ever noticed when you're feeling really good, there's always a pigeon that'll come sh!t on your hood? - John Prine 97 Tourer "Silver Bullet" 01 Interstate "Ruby" |
|
|
Skinhead
Member
Posts: 8753
J. A. B. O. A.
Troy, MI
|
|
« Reply #10 on: June 12, 2023, 02:40:09 PM » |
|
If you slip the cable sheath out of the stay, you can put the cable end in it's place, and then slip the cable sheath back in place in the stay.
|
|
|
|
|
Logged
|
 Troy, MI |
|
|
|
RonW
|
|
« Reply #11 on: June 12, 2023, 10:14:24 PM » |
|
I think you have to pop the center cover loose and remove the lock from the back of the cover. Get it all connected and then mount the lock back on the cover.Only a clip secures the lock to the center cover so it's simple to release the lock and hook the cable to the lock. The problem is the lock has to be re-inserted from the front of the center cover and the reclaimed cable has to be removed to do this. The lock has a larger diameter escutcheon. However, if the lock is un-clipped but not removed from the center cover, it's possible to angle or rotate the lock to get it nearer the cable. But then people would have tried it already. Why are people removing the center cover? Is there a secret compartment back there? 
|
|
|
|
« Last Edit: June 13, 2023, 03:00:41 AM by RonW »
|
Logged
|
2000 Valkyrie Tourer
|
|
|
|
da prez
|
|
« Reply #12 on: June 13, 2023, 05:16:05 AM » |
|
Just an FYI , lube the cable!
da prez
|
|
|
|
|
Logged
|
|
|
|
hubcapsc
Member
Posts: 16817
upstate
South Carolina
|
|
« Reply #13 on: June 13, 2023, 05:42:07 AM » |
|
Why are people removing the center cover? Is there a secret compartment back there?
My picture shows I've done it at least once. Unless the secret compartment was filled
with $100 bills, I'd rather not do it again. I was afraid I was going to break a tab or
scratch it all up. I covered it with painters tape when I was working with it.
-Mike
|
|
|
|
|
Logged
|
|
|
|
|
Mooskee
|
|
« Reply #14 on: June 13, 2023, 09:01:24 AM » |
|
It's like Honda hung that center cover on a string and then built a bike around it. I changed one to put in a chrome center cover once. I think the frustration of it has blocked the details from my memories
|
|
|
|
|
Logged
|
|
|
|
John Schmidt
Member
Posts: 15372
a/k/a Stuffy. '99 I/S Valk Roadsmith Trike
De Pere, WI (Green Bay)
|
|
« Reply #15 on: June 13, 2023, 09:06:28 AM » |
|
FWIW, I found the stay at the top created most of my problems. The casing wouldn't stay in place when slipped back into the stay and since it's under the framework for the latch mount, it's nearly impossible to get at. That's the reason I used JBWeld as described...the casing kept coming loose from the upper stay. Once the JBW dried, I then reattached the lower end which can test your religion at times.  The stay on the back of the center cover is like the upper one under the frame. Once the end of the casing is creased by pressing into the stays, if removed it often won't stay in place when reinserting. Again, FWIW, when messing with the center cover I got tired of fighting it, seems you need baby size hands with 14" fingers. So upon removal, I cut off the top portion of the cover. Doesn't hurt anything & you can't see it anyway. |
|
|
|
« Last Edit: June 13, 2023, 09:09:44 AM by John Schmidt »
|
Logged
|
|
|
|
Valkorado
Member
Posts: 10517
VRCC DS 0242
Gunnison, Colorado (7,703') Here there be twisties.
|
|
« Reply #16 on: June 13, 2023, 07:36:40 PM » |
|
Man oh man. Thanks for the replies. One of these days I'll try to muster enough patience to go at it again. I think I'd rather install another alternator than doing this, I don't remember cussing so much when doing that.
Where there's a will there's a way. Anyone seen Will?
|
|
|
|
|
Logged
|
Have you ever noticed when you're feeling really good, there's always a pigeon that'll come sh!t on your hood? - John Prine 97 Tourer "Silver Bullet" 01 Interstate "Ruby" |
|
|
|
RonW
|
|
« Reply #17 on: June 13, 2023, 11:19:27 PM » |
|
4. Pull the latch with cable now attached back into position and reinstall the bolt.Agreed, I think it's easier to attach the cable to the latch/stay then pull them as a unit because it provides a better grip. You'll have to unbolt the latch and stay from the frame but it beats pulling on the cable trying to stick the ferrel in the latch still bolted to the frame.  Has there been a problem with the latch slipping out of its stay? A tab on the stay is suppose to hold the latch in place.  
|
|
|
|
« Last Edit: June 14, 2023, 05:00:14 AM by RonW »
|
Logged
|
2000 Valkyrie Tourer
|
|
|
Valkorado
Member
Posts: 10517
VRCC DS 0242
Gunnison, Colorado (7,703') Here there be twisties.
|
|
« Reply #18 on: June 14, 2023, 05:17:38 AM » |
|
Thanks for the pictures Pluggy Ron, they really helped. They show I have some "missing" stuff. I'm starting to think the cable, fish and even key lock had been removed and reinstalled by a previous owner. A good possibility, since the bike was painted silver and the center panel, key latch and gas tank had to come off for that. The reason I say missing stuff is because there is no clip holding in the key lock, and there is no tab for holding the fish latch in to the stay. The one time I almost had everything together using my long hemostats method, the fish pulled out because of there is no stay, revealing the spring underneath. Thankfully I've managed to keep from losing the little spring, so far anyway.
It sounds like I may have to resort to John's technique, and dig out some scotch tape and JB Weld. Regardless, it will be a big challenge. Thanks very much for the replies.
|
|
|
|
« Last Edit: September 26, 2023, 06:10:18 PM by Valkorado »
|
Logged
|
Have you ever noticed when you're feeling really good, there's always a pigeon that'll come sh!t on your hood? - John Prine 97 Tourer "Silver Bullet" 01 Interstate "Ruby" |
|
|
Valkorado
Member
Posts: 10517
VRCC DS 0242
Gunnison, Colorado (7,703') Here there be twisties.
|
|
« Reply #19 on: June 14, 2023, 05:43:26 AM » |
|
Valkorado, Look over your bike. Consider ordering part number 1, 5 and possibly 7. Replacing those will probably make everything like new. It should be easy. https://www.partzilla.com/catalog/honda/motorcycle/1998/gl1500c-a-valkyrie/seatNow my pal Mr. Schmidt is an artist and sculptor with that JB weld stuff. I would make a flimsy mess. Ordering the correct replacement parts would be my path forward. Pluggy Good call! I would also likely permanently attach something in the wrong place using JB Weld.  Thanks again. |
|
|
|
|
Logged
|
Have you ever noticed when you're feeling really good, there's always a pigeon that'll come sh!t on your hood? - John Prine 97 Tourer "Silver Bullet" 01 Interstate "Ruby" |
|
|
John Schmidt
Member
Posts: 15372
a/k/a Stuffy. '99 I/S Valk Roadsmith Trike
De Pere, WI (Green Bay)
|
|
« Reply #20 on: June 14, 2023, 08:30:29 AM » |
|
4. Pull the latch with cable now attached back into position and reinstall the bolt.Agreed, I think it's easier to attach the cable to the latch/stay then pull them as a unit because it provides a better grip. You'll have to unbolt the latch and stay from the frame but it beats pulling on the cable trying to stick the ferrel in the latch still bolted to the frame. Has there been a problem with the latch slipping out of its stay? A tab on the stay is suppose to hold the latch in place. Take a look at the first picture, note the small white section in front of the nut looking thing on the end of the casing. On both ends of the casing, that is the portion that's slipped into the stays and has a tendency to slip out of the upper stay once removed and reinstalled. If that end of the casing does not remain in place in the stay, turning the key all day long won't pull on the latch because the casing will simply move forward instead of applying pulling power. I had that problem on two bikes, a lovely coincidence. No matter how I changed the position of the casing when trying to reinstall in the upper stay, that end of the casing always would return to the original position...the same crease in that white section. After 1-2 turns of the key, it slipped out so finally in frustration out came the JB weld. The upper end of the casing HAS to be stationary. |
|
|
|
|
Logged
|
|
|
|
|
ridingron
|
|
« Reply #21 on: June 14, 2023, 09:27:13 AM » |
|
I fought with the seat release cable and latch ass'y a couple years ago. I don't remember how I got it done but I did.
Mine did not have the locking tab to hold it together. I also worked on several seat latches on my ST1100s. Same part. They didn't have the tabs either. I wondered how they stayed together in the box on the assembly line.
|
|
|
|
|
Logged
|
|
|
|
|
RonW
|
|
« Reply #22 on: June 14, 2023, 02:24:10 PM » |
|
The groove on the cable fitting was intentionally left out on the earlier graphic (inset pic) because that'll be dealing with lines that are close to each other amounting to nothing more than clutter when generalizing the shape of parts usually suffices well enough. The groove on the fitting is for clipping the cable to a slot on the seat lock bracket.  |
|
|
|
« Last Edit: June 16, 2023, 02:43:06 AM by RonW »
|
Logged
|
2000 Valkyrie Tourer
|
|
|
Valkorado
Member
Posts: 10517
VRCC DS 0242
Gunnison, Colorado (7,703') Here there be twisties.
|
|
« Reply #23 on: June 14, 2023, 04:07:39 PM » |
|
I ordered the parts Pluggy recommended, and will get around to it. I'm thinking with all your great tips and advice, I should be able to get it back to a secure, locking seat. It is now getting into the short Western Colorado riding season, so this may be another fall project. I'll try to remember to update. Thanks again everyone for chiming in. |
|
|
|
|
Logged
|
Have you ever noticed when you're feeling really good, there's always a pigeon that'll come sh!t on your hood? - John Prine 97 Tourer "Silver Bullet" 01 Interstate "Ruby" |
|
|
Valkorado
Member
Posts: 10517
VRCC DS 0242
Gunnison, Colorado (7,703') Here there be twisties.
|
|
« Reply #24 on: September 26, 2023, 04:22:13 PM » |
|
A trial of patience, another couple hours or so. I discovered the most important part I was missing was the inexpensive clip that holds the key spindle and and the metal cable casing to the front panel (part 1 from Pluggy's post). It sure helped, but it didn't make it easy by any means. I'm guessing the clip was lost when the bike was painted. I had to start at the top, with my LED light shining up through the left side panel so I could see. I only hooked up the upper latch to the cable using a large set of hemostats and left it hanging. It was almost impossible to see what I was doing, so I fished around until I got a "hook". Then I concentrated on the lower side. Pulling the bolt from the right side of the front panel gave me just enough room to work. I worked the key spindle through the front panel and into the metal cable casing. Next I pulled the lower end of the cable with my hemostats to give me some slack to work. Then I had to wiggle and fudge the spindle around until I could find the best position for the cable to loop around the key spindle and into the hole. I rotated everything back around, making sure the notches for the key spindle and the cable housing were aligned with the groove on the right of the key hole on the front panel, and put the clip over both to snug them up to the inside of the panel. Going back to the top, I pulled the hanging latch with my long hemos to give me some cable slack at the top. I grabbed the hanging latch with hemostats, and holding it from underneath with my fingers until I could grab it from above with hemos through the top cutout by the latch bolt. I was then able to snap the latch casing back over the latch. I held it in position and bolted the latch housing back down. It works again! It'll all make sense if you ever have to do it!  This was a delicate operation and I'm glad it's done. Probably not the best way to do it, but it was a where there's a will there's a way to do it way! The thought of having to brake hard and going airborne while still mounted to my seat was kinda bugging me. |
|
|
|
« Last Edit: September 26, 2023, 09:20:57 PM by Valkorado »
|
Logged
|
Have you ever noticed when you're feeling really good, there's always a pigeon that'll come sh!t on your hood? - John Prine 97 Tourer "Silver Bullet" 01 Interstate "Ruby" |
|
|
|
RonW
|
|
« Reply #25 on: September 26, 2023, 09:41:13 PM » |
|
You don't have to answer, but how long did it take?
At work every room I work on, I have to jot down the hours, power tools, PPE, hazards, minutes spent scratching your S, on an invoice. If that piece of paper ain't on your tool wagon when the safety person passes by, you might get written up. There's reasons. But it's almost gestapo.
|
|
|
|
« Last Edit: September 27, 2023, 11:55:37 AM by RonW »
|
Logged
|
2000 Valkyrie Tourer
|
|
|
Valkorado
Member
Posts: 10517
VRCC DS 0242
Gunnison, Colorado (7,703') Here there be twisties.
|
|
« Reply #26 on: September 27, 2023, 11:35:34 AM » |
|
You don't have to answer, but how long did it take?
At work every room I work on, I have to jot down the hours, power tools, PPE, hazards, minutes spent scratching your S head, on an invoice. If that piece of paper ain't on your tool wagon when the safety person passes by, you might get written up. There's reasons. But it's almost gestapo.
I guess I can humble myself and say I probably spent around five or six hours between the two attempts to get the latch installed again.  But so much time was wasted the first attempt because I didn't have that clip, which was allowing the key spindle to move around inside the cable casing. Probably why it messed up to begin with. With the new clip -- once I figured out to clip it over both the spindle and the cable casing together (as shown beneath all the dirt in hubcap's picture above) -- it held everything tight in the proper place. That made it easier to work with that cable, but it sure could have been easier. Thanks to all again for the pics and suggestions! |
|
|
|
« Last Edit: September 27, 2023, 11:44:26 AM by Valkorado »
|
Logged
|
Have you ever noticed when you're feeling really good, there's always a pigeon that'll come sh!t on your hood? - John Prine 97 Tourer "Silver Bullet" 01 Interstate "Ruby" |
|
|
|


