|
Knights2theEnd
|
 |
« on: July 31, 2025, 04:30:27 PM » |
|
I am going to replace both my tires on my 2000 Honda Valkyrie interstate soon. I will be making a wooden adapter and buying a ATV/Motorcycle lift.
#1 How high do I have to lift the bike in order to remove/slip the rear tire from the bottom? (I do not want to remove the fender, etc)
#2 Using the information from my question above, I want to buy a lift that will lift to such a height. What lift do you recommend on buying?
|
|
|
|
|
 Logged
|
|
|
|
f6john
Member

Posts: 9973
Christ first and always
Richmond, Kentucky
|
|
« Reply #1 on: July 31, 2025, 05:36:51 PM » |
|
Any of the atv jacks will be sufficient for height capabilities. Been a long while since I changed a rear on the Valkyrie but once you remove the rear shocks you can manipulate the height up and down enough to take the rear axle out without removing the exhaust for clearance. When you actually remove the tire and rim you only need a few inches of clearance to get it free from the final drive and drop it on the floor taken you can raise the bike as high as deemed necessary to roll it out from under the rear fender after removing the lower part with the license plate and turn signals.
All this is subject to those who wrench on these bikes all the time. I just wanted to give you something to chew on until the “experts” show up!
|
|
|
|
|
Logged
|
|
|
|
|
klb
|
|
« Reply #2 on: July 31, 2025, 05:42:59 PM » |
|
I bought the Pittsburgh 1500 pound jack from Harbor Freight for $129.00. Works well.  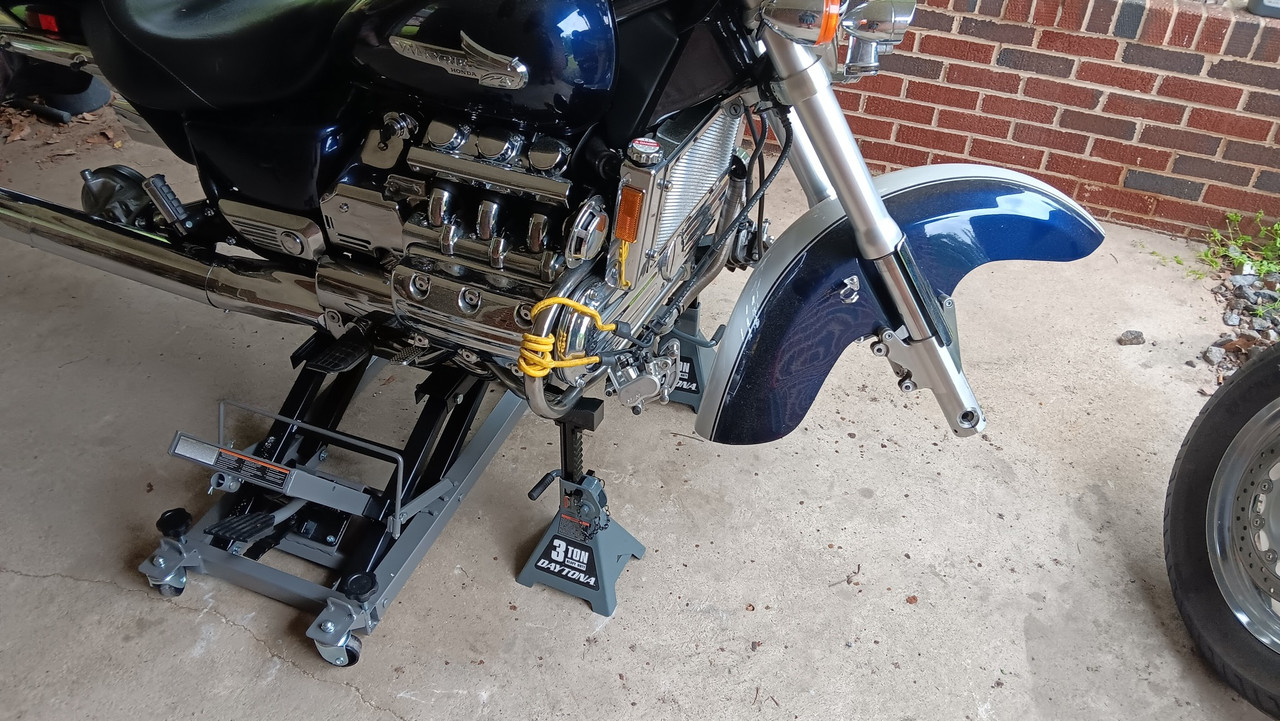 |
|
|
|
|
Logged
|
|
|
|
|
Knights2theEnd
|
|
« Reply #3 on: July 31, 2025, 05:51:07 PM » |
|
Thank you guys. I was thinking about using a scissor jack however there are alot of reviews online about scissor jacks failing. So I am leaning towards the harbor frieght jack mentioned above. Just takes up so much space and my garage barely has any room left lol.
|
|
|
|
|
Logged
|
|
|
|
|
Jess from VA
|
|
« Reply #4 on: July 31, 2025, 06:58:25 PM » |
|
Fully collapsed, I stand mine up under the work bench.
Make sure the safety bars catch on the nubs on the base. Mine have always been a bit crooked.
You must use jack stands under the engine guards with the jack. The idea is to jack it up, place the jack stands under the guards, then slowly lower it so the safety bars engage the nubs AND the bike rests firmly on the jack stands at the same time. So you get a solid 3-point hold.
Without jack stands, when you drop the rear wheel off the bike, it will begin to slowly fall forward off the jack with the loss of weight in the rear. Not a good kind of excitement.
|
|
|
|
|
Logged
|
|
|
|
|
Chrisj CMA
|
|
« Reply #5 on: August 01, 2025, 05:59:59 AM » |
|
A lift adapter is required for most bikes. Some seem to be able to squeak by without it. Not mine. I have the craftsman lift. It has three safety stops. I go to the second one. Use a tie down and find the best attachments and angle. You can get it rock solid with just the lift and one strap.  I have a permanent metal bolt on adapter Now. But this is what it looks like using the wooden one 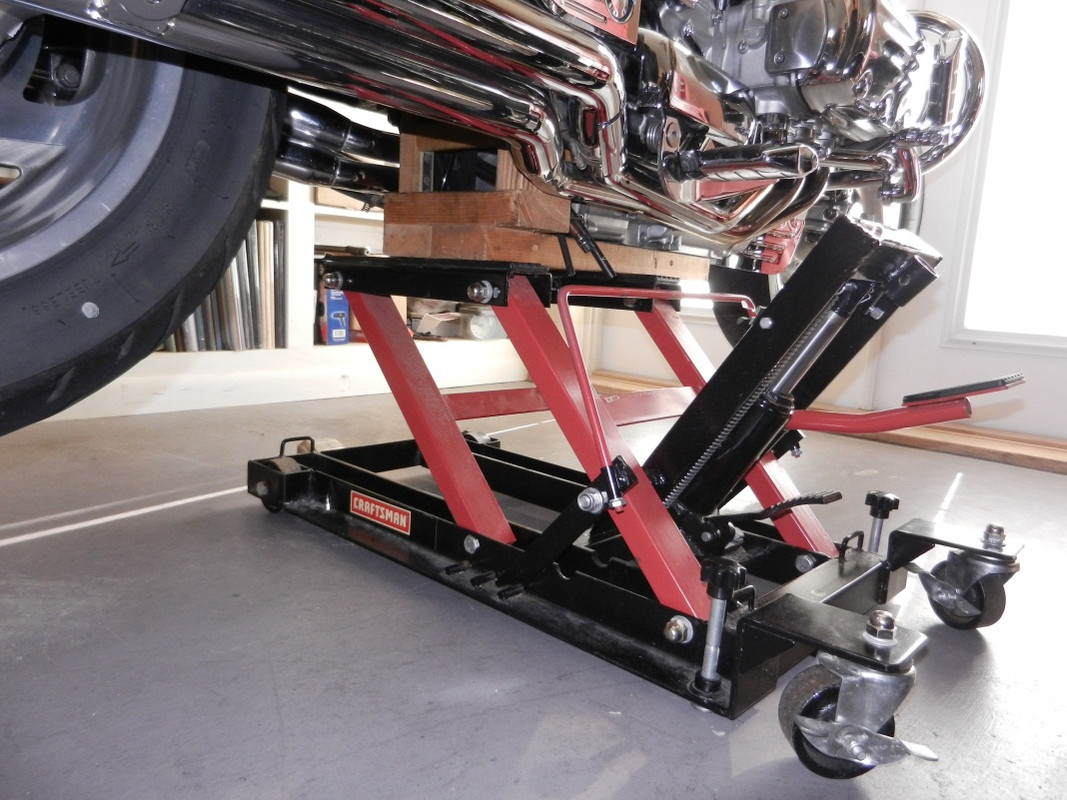 |
|
|
|
« Last Edit: August 01, 2025, 06:54:49 AM by Chrisj CMA »
|
Logged
|
|
|
|
|
Hook#3287
|
|
« Reply #6 on: August 01, 2025, 06:21:44 AM » |
|
I use the same type of lift that klb shows. I lift it to the highest it goes, use 2 jack stands on blocks to get the height needed for the stands to catch the bikes front guards and drop it down with the jack safety arms in place. Usually the safety arms connect with the lift jacks lower bar with the "Humps" while also sitting on the jack stands. Using a tire jack under the rear wheel, I can move it up and down as needed to remove shocks and axle. You'll have to use a wedge to move the exhaust out some to get the exhaust mount bolts to clear the swingarm. If you already haven't done so, review Jeff's excellent write up on rear end service. http://www.valkyrieriders.com/shoptalk/rear_end_service.pptx |
|
|
|
|
Logged
|
|
|
|
|
|
f6john
Member
Posts: 9973
Christ first and always
Richmond, Kentucky
|
|
« Reply #8 on: August 01, 2025, 06:53:54 AM » |
|
I bought this one off marketplace a few months ago. My old atv lift has taken semi permanent space under the Valkyrie. It seems many Wing owners prefer this style. I haven’t had occasion to use it yet but I find to be much more maneuverable and being mostly aluminum construction it is much lighter. I think they are over $200.00 at HF now but I gave $120.00 for this one. Just another option. 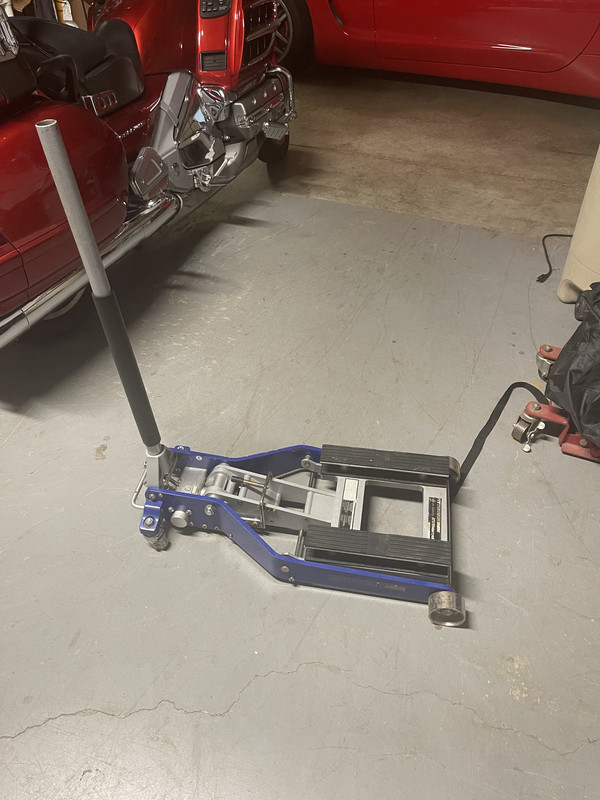 |
|
|
|
|
Logged
|
|
|
|
|
Chrisj CMA
|
|
« Reply #9 on: August 01, 2025, 07:05:01 AM » |
|
I think Jeff is the only guy who works on his bike in the living room.   Well, it bothered my first wife. Judy on the other hand appreciates that I may be spending hours on my mistress yet she can talk to me and sometimes hold a wrench or hand me stuff. She likes it. And I can work in A/C or heat, clean space and great lighting. It’s a win win. |
|
|
|
|
Logged
|
|
|
|
John Schmidt
Member
Posts: 15387
a/k/a Stuffy. '99 I/S Valk Roadsmith Trike
De Pere, WI (Green Bay)
|
|
« Reply #10 on: August 01, 2025, 08:14:42 AM » |
|
Once I got my centerstand mounted on the Tourer many years ago, I never raised the rear of the bike more than 3-4" off the floor. I'd remove the bags and rear section of the rear fender, put a floor jack under the swingarm and remove the shocks. Then I could raise/lower the rear as needed. Once done, you could just roll the rear wheel in/out leaving both hands free...no lifting involved. Since you didn't need to pull the rear that often, removing all the stuff mentioned gave me a chance to clean where you didn't normally reach. On the I/S, it would be a bit more difficult to do what I did unless you had done the SuperValk mod. With the trike I have now, it's even easier. Lift the front only to change that tire, to remove the rear I just jack up the entire back end and pull both wheels. It's a different world entirely.  |
|
|
|
|
Logged
|
|
|
|
|
Beer van Huet
|
|
« Reply #11 on: August 01, 2025, 08:36:38 AM » |
|
Just a heads up. When the rear wheel is removed to have the tire changed, you might as well replace the 3 O-rings https://www.valkyrieriders.com/shoptalk/Elusive%203rd%20O-Ring.htmAnd pack MSO2 paste into the O-ring groove in the driven flange I usually take out and check the drive shaft as well and apply MSO2 grease into the seal lip and pinion joint spline. I had the splines of the drive shaft completely worn one day during a trip. Somehow, the grease got away. When I put the engine into first gear, the bike wouldn't move and I heard a rattling sound from the drive shaft. The only thing you can do in that case, is to put the bike on a trailer and replace the shaft. |
|
|
|
|
Logged
|
|
|
|
Rams
Member
Posts: 16936
So many colors to choose from yet so few stand out
Covington, TN
|
|
« Reply #12 on: August 01, 2025, 07:52:06 PM » |
|
https://www.northerntool.com/products/ideal-atv-electric-lift-bench-with-retractable-ramp-system-2200-lb-capacity-47in-lift-model-a-2200ieh-xr-99226?cm_mmc=Bing-pla&utm_source=Bing_PLA&utm_medium=Automotive%20%3E%20Automotive%20Lifts%20%3E%20Motorcycle%20Lifts&utm_campaign=iDEAL%20by%20Tuxedo&utm_content=99226&cmpid=53403372&agid=3200075881&tgtid=pla-4577473070980994&prdid=99226&ogmap=SHP|PLA|BING|STND|c|SITEWIDE||Auto%20Repair%20-%20SC|Auto%20Repair%20-%20SC||53403372|3200075881&gclid=0ce6fcd269a71521addf945f12d33dcd&gclsrc=3p.ds&msclkid=0ce6fcd269a71521addf945f12d33dcd The iDEAL Electric-Hydraulic Lift is designed to lift the largest UTVs with a 2200 lbs. capacity and features a 65” x 88.6” table. It includes a retractable ramp system that folds down and out of the way, providing a safe and clean workspace. The lift is equipped with pivot ramps that can be adjusted for various lifting tasks, making it versatile for different applications. Additionally, it offers side extensions with center drop panels for easy access to service motorcycles without removing side extensions. This is what I have in my shop, I have another one like shown by Chrisj CMA but, it seems my son borrowed it and it can't seem to find it's way home. I bought the iDEAL lift shortly after getting the trike so now all my Fat Ladies can be elevated when necessary. My lift is a bit different than in the link, mine has fold down sides. I use my iDEAL lift for a lot of things, even working on my zero-turn mower. Sorry, have never figured out how to post my own pictures. Rams
|
|
|
|
« Last Edit: August 01, 2025, 07:59:39 PM by Rams »
|
Logged
|
VRCC# 29981
Learning the majority of life's lessons the hard way.
Every trip is an adventure, enjoy it while it lasts.
|
|
|
|
sandy
|
|
« Reply #13 on: August 01, 2025, 10:33:17 PM » |
|
I have used several lifts over the years. The upgraded HF lift is well worth the money. It's stonger and very stiff when elevated. https://postimg.cc/fVkGSgpS |
|
|
|
|
Logged
|
|
|
|
h13man
Member
Posts: 1903
To everything there is an exception.
Indiana NW Central Flatlands
|
|
« Reply #14 on: August 02, 2025, 06:56:29 AM » |
|
Fully collapsed, I stand mine up under the work bench.
Make sure the safety bars catch on the nubs on the base. Mine have always been a bit crooked.
You must use jack stands under the engine guards with the jack. The idea is to jack it up, place the jack stands under the guards, then slowly lower it so the safety bars engage the nubs AND the bike rests firmly on the jack stands at the same time. So you get a solid 3-point hold.
Without jack stands, when you drop the rear wheel off the bike, it will begin to slowly fall forward off the jack with the loss of weight in the rear. Not a good kind of excitement.
Mine fits under my steel work bench also from the side so don't trip over it. Your procedure is spot on. Its most intimidating lifting the 1st. time but after the trial run I'm settled in so to speak. High enough to drop the shocks allowing access to remove the axle. I don't remove the PITA fender thus I've used 3 different technique's doing this thus I'm not going divulge as its still under experimentation. I used use a engine hoist on both ends with lifting straps for 11 yrs. I also have the locking HF wheel chock with detachable outriggers for more support. |
|
|
|
« Last Edit: August 05, 2025, 04:58:15 AM by h13man »
|
Logged
|
|
|
|
|
TrapperAH1G
|
|
« Reply #15 on: August 04, 2025, 10:48:39 PM » |
|
Well, I guess I'm the odd man out here. I outfitted my shed and carport so I can use my come along to raise and lower my bikes. In the shed, I can raise front and rear at the same time. In the carport, I can raise either the front or rear with the other end stabilized.
Makes it very handy and I think it's very secure. Get them high enough I sit on a stool to do any work. In the case of tires, use a floor jack to raise the tire and lower the bike some for install.
All good as long as they work for you.
|
|
|
|
|
Logged
|
|
|
|
|
Chrisj CMA
|
|
« Reply #16 on: August 05, 2025, 04:55:16 AM » |
|
Well, I guess I'm the odd man out here. I outfitted my shed and carport so I can use my come along to raise and lower my bikes. In the shed, I can raise front and rear at the same time. In the carport, I can raise either the front or rear with the other end stabilized.
Makes it very handy and I think it's very secure. Get them high enough I sit on a stool to do any work. In the case of tires, use a floor jack to raise the tire and lower the bike some for install.
All good as long as they work for you.
As long as you’re not tightening the axle bolt with the wheel still on that floor jack |
|
|
|
|
Logged
|
|
|
|
|
TrapperAH1G
|
|
« Reply #17 on: August 05, 2025, 08:04:09 PM » |
|
Nope, absolutely not!
|
|
|
|
|
Logged
|
|
|
|
|
HayHauler
|
|
« Reply #18 on: August 06, 2025, 10:52:23 AM » |
|
Well, I guess I'm the odd man out here. I outfitted my shed and carport so I can use my come along to raise and lower my bikes. In the shed, I can raise front and rear at the same time. In the carport, I can raise either the front or rear with the other end stabilized.
Makes it very handy and I think it's very secure. Get them high enough I sit on a stool to do any work. In the case of tires, use a floor jack to raise the tire and lower the bike some for install.
All good as long as they work for you.
Wizard, God rest his soul, had a Harbor Freight winch mounted to the I-beam in his metal building. That thing had a brake that would hold the weight of the bike while you worked on it. We stabilized the front of the bike in a chock and raised the back with straps on both sides of the frame. This made it super easy to work on bikes and didn't take up any space on the floor like a bike lift would have. One Saturday, we mounted 5 different Valkyries with car tires using that method. Hay  Jimmyt |
|
|
|
|
Logged
|
|
|
|
|
Avanti
|
|
« Reply #19 on: August 06, 2025, 04:19:21 PM » |
|
Well, I guess I'm the odd man out here. I outfitted my shed and carport so I can use my come along to raise and lower my bikes. In the shed, I can raise front and rear at the same time. In the carport, I can raise either the front or rear with the other end stabilized.
Makes it very handy and I think it's very secure. Get them high enough I sit on a stool to do any work. In the case of tires, use a floor jack to raise the tire and lower the bike some for install.
All good as long as they work for you.
Wizard, God rest his soul, had a Harbor Freight winch mounted to the I-beam in his metal building. That thing had a brake that would hold the weight of the bike while you worked on it. We stabilized the front of the bike in a chock and raised the back with straps on both sides of the frame. This made it super easy to work on bikes and didn't take up any space on the floor like a bike lift would have. One Saturday, we mounted 5 different Valkyries with car tires using that method. Hay Jimmyt I lift my Interstate with an engine lift. Remove the seat and lift at the frame. |
|
|
|
|
Logged
|
|
|
|
|
Knights2theEnd
|
|
« Reply #20 on: August 19, 2025, 05:17:55 AM » |
|
[/quote]
As long as you’re not tightening the axle bolt with the wheel still on that floor jack
[/quote]
How should the wheel be when tightening the axle bolt? Can someone provide me with the proper alignment procedure?
I made the wooden adapter and purchased a Harbor Freight lift. Got tires...ordered the 3 O-Rings. Washer. And even the dust seal which I am unsure if I needed to order. Also ordered 2oz of ts-60 moly grease.
I'm either going to balance with center rib weights (anyone know of a good website to order them from?) OR I will use dynabeads. My concern with dynabeads is that they supposedly sandblast the inside. Is that true? Have ya'll noticed your rims sanded down or the inside of your tires?
|
|
|
|
|
Logged
|
|
|
|
h13man
Member
Posts: 1903
To everything there is an exception.
Indiana NW Central Flatlands
|
|
« Reply #21 on: August 19, 2025, 08:23:01 AM » |
|
Be sure driveshaft cover nuts at the punkin' are loose and tighten last before lowering to ride. Besure to get aquainted with the "3 o'rings" which better one's are available from https://redeye.ecrater.com/category.php. |
|
|
|
|
Logged
|
|
|
|
|
Knights2theEnd
|
|
« Reply #22 on: August 19, 2025, 08:54:52 AM » |
|
So these two steps...
2. Torque the axle to 81ftlbs while the final drive is loose and free and the 4 bolts are only finger tight
3. Torque the 4 Final Drive Bolts to 47ftlbs and now you have a properly aligned rear end.
Are done with the rear wheel in the air? Not touching the ground...not touching a floor jack...correct?
|
|
|
|
|
Logged
|
|
|
|
|
Chrisj CMA
|
|
« Reply #23 on: August 19, 2025, 09:35:33 AM » |
|
So these two steps...
2. Torque the axle to 81ftlbs while the final drive is loose and free and the 4 bolts are only finger tight
3. Torque the 4 Final Drive Bolts to 47ftlbs and now you have a properly aligned rear end.
Are done with the rear wheel in the air? Not touching the ground...not touching a floor jack...correct?
Yes. Perfect |
|
|
|
|
Logged
|
|
|
|
|
Knights2theEnd
|
|
« Reply #24 on: August 19, 2025, 10:47:44 AM » |
|
Thank you so much!
Anyone using dynabeads instead of weights? If so, how many ounces in the front and back?
If you are using center rib weights, where did you get them from?
|
|
|
|
|
Logged
|
|
|
|
h13man
Member
Posts: 1903
To everything there is an exception.
Indiana NW Central Flatlands
|
|
« Reply #25 on: August 20, 2025, 08:36:56 AM » |
|
2 oz. front and 3 oz. rear. Car tire don't know for sure. There different size beads available. The only draw back is they can get caught in valves making air checks a PITA. Rear tire needs to be @ 8-9 o'clock position, shoot air in 1st. to clear the valve and then check. Last week that procedure failed thus had take the needle out and replaced it with valve for bead use I had just in case of this situation. It seem air up slower but its in a 90 degree valve that might be causing interference also but it works.
|
|
|
|
« Last Edit: August 20, 2025, 08:42:24 AM by h13man »
|
Logged
|
|
|
|
|


