|
Scooter6
|
 |
« on: May 21, 2010, 08:10:43 AM » |
|
Went for a 250 mile ride yesterday and after 200 miles the steering started to feel heavy and it would feel unstabil in corners I stopped and checked the front tire and it was low, very low. I could smell the tire but it was not too hot to touch, I checked for nails or screws found none. Being that I was only 6miles from home I used 4 CO2 cartridges to put some pressure back in and limped it home.When I checked the tire for punchtures after I got it on the jack I found nothing I even squirted the tire with soapy water along with the valve.I found the the core on the air valve was alittle loose, another thing to check once a month or so . I have never checked the snugness of the core before because I never had a problem like this before . My son told me that I probably wrecked the tire by running it low for 50-60 miles, has anyone experienced this before. These tires were built flex even though I run 43lbs pressure in the front all the time. Anyone have any thoughts on this? Thanks, Scooter6
|
|
|
|
|
 Logged
|
|
|
|
hubcapsc
Member

Posts: 16816
upstate
South Carolina
|
|
« Reply #1 on: May 21, 2010, 08:51:18 AM » |
|
My buddy Henry's front tire went down on the way to Cheaha. We aired it up and started looking for the leak. We found no nail, and at first when
we put water around the valve, we didn't see bubbles, but when we pushed on the valve (one of those plastic OEM valves) a little, so much
air came out you could hear it... We had some of those Patchboy valves that people here like so much with us, and the tire went down
in a little town it Georgia a few blocks from the Honda shop, they fixed us up and we still made it to Cheaha no problem...
-Mike
|
|
|
|
|
Logged
|
|
|
|
|
Chrisj CMA
|
|
« Reply #2 on: May 21, 2010, 09:21:36 AM » |
|
Same happened to me a couple years ago.....air it up and move the valve stem around.....bet you find a leak!
|
|
|
|
|
Logged
|
|
|
|
|
Ricky-D
|
|
« Reply #3 on: May 21, 2010, 10:24:04 AM » |
|
It's a radial tire so running it low ought not harm it. Different with a bias tire.
***
|
|
|
|
|
Logged
|
2000_Valkyrie_Interstate
|
|
|
Tundra
Member
Posts: 3882
2014 Valkyrie 1800
Seminole, Florida
|
|
« Reply #4 on: May 21, 2010, 04:25:33 PM » |
|
The Honda OEM Valve stems can kill you if you don't change them out regular, (or at least check them) They are fairly expensive too. Patchboy with a little loc-tite, good to go many miles  Same problem twice on my front tire, even after changing it out it again went one year later. Now have 90 degree chrome patchboys. |
|
|
|
|
Logged
|
If you can't be a good example: be a WARNING!!
|
|
|
|
Thunderbolt
|
|
« Reply #5 on: May 21, 2010, 05:11:57 PM » |
|
still on the rim. If they flex at higher speeds, they will lose air. I had one go down and put super glue on it to limp me to a dealer. I use the 90 degree Patchboy stems now. If you stay with the OEM stems, change them when you change the tire.
|
|
|
|
|
Logged
|
|
|
|
Gunslinger
Member
Posts: 404
Brian Huntzinger, EMT-P
Wamego, KS
|
|
« Reply #6 on: May 21, 2010, 10:20:46 PM » |
|
Same thing happened to me (with the front tire) on the way to InZane last year. I put air in the tire, couldn't find a leak. Played with the valve stem, and POOF massive air loss. The OEM valve stem MUST have the plastic support in it or it WILL eventually crack at the base under the centrifugal force.
The valve stem is easy to replace with a couple C-Clamps, You should only need to break the bead on one side, and that makes reseating it very simple.
|
|
|
|
|
Logged
|
VRCC# 26468 VRCCDS# 0228  "Some learn by listening, Others learn by watching... The rest of us have to pee on the electric fence ourselves" |
|
|
|
Ricky-D
|
|
« Reply #7 on: May 22, 2010, 08:44:35 AM » |
|
If you simply push the air chuck upon the tire valve stem you most certainly will cause it to lunch after repeatedly doing it.
The smart thing is to support the valve stem with a finger behind the stem.
***
|
|
|
|
|
Logged
|
2000_Valkyrie_Interstate
|
|
|
Gunslinger
Member
Posts: 404
Brian Huntzinger, EMT-P
Wamego, KS
|
|
« Reply #8 on: May 23, 2010, 12:15:15 AM » |
|
The smart thing is to support the valve stem with a finger behind the stem.
***
I would argue the smarter thing is to replace the valve stems with 90 degree all metal stems. |
|
|
|
|
Logged
|
VRCC# 26468 VRCCDS# 0228 "Some learn by listening, Others learn by watching... The rest of us have to pee on the electric fence ourselves" |
|
|
bigdog99
Member
Posts: 584
1/1/2011 86,000 miles
Kouts Indiana
|
|
« Reply #9 on: May 23, 2010, 12:41:37 AM » |
|
are they all the same size hole diameter?  |
|
|
|
|
Logged
|
 VRCC#31391 VRCCDS0239 |
|
|
|
|
RTaz
Member
Posts: 1319
Michigan...Home of InZane X -XI
Oscoda, Michigan
|
|
« Reply #11 on: May 23, 2010, 05:48:32 AM » |
|
replace the valve stem....
|
|
|
|
|
Logged
|
 RTaz |
|
|
Gunslinger
Member
Posts: 404
Brian Huntzinger, EMT-P
Wamego, KS
|
|
« Reply #12 on: May 23, 2010, 07:23:52 AM » |
|
|
|
|
|
« Last Edit: May 23, 2010, 07:28:51 AM by Gunslinger »
|
Logged
|
VRCC# 26468 VRCCDS# 0228 "Some learn by listening, Others learn by watching... The rest of us have to pee on the electric fence ourselves" |
|
|
PAVALKER
Member
Posts: 4435
Retired Navy 22YOS, 2014 Valkyrie , VRCC# 27213
Pittsburgh, Pa
|
|
« Reply #13 on: May 23, 2010, 07:39:33 AM » |
|
Something to consider.... if it applies to you of course..... If you use Dyna Beads, a small bead could have got stuck in the valve stem core. That happened to me....
|
|
|
|
|
Logged
|
John  |
|
|
|
Ricky-D
|
|
« Reply #14 on: May 23, 2010, 09:18:44 AM » |
|
The smart thing is to support the valve stem with a finger behind the stem.
***
I would argue the smarter thing is to replace the valve stems with 90 degree all metal stems. Stock are 90 degrees and all metal stems. Have you never looked at them?? The smartest thing would be to never have to replace them! *** |
|
|
|
|
Logged
|
2000_Valkyrie_Interstate
|
|
|
Gunslinger
Member
Posts: 404
Brian Huntzinger, EMT-P
Wamego, KS
|
|
« Reply #15 on: May 23, 2010, 11:28:56 AM » |
|
The smart thing is to support the valve stem with a finger behind the stem.
I would argue the smarter thing is to replace the valve stems with 90 degree all metal stems. Stock are 90 degrees and all metal stems. Have you never looked at them?? The smartest thing would be to never have to replace them! *** I have inspected them in a most intimate and personal way.  The stem itself is metal, as is the base inside the rim. However, unlike the PatchBoy stems which are a solid piece through the rim, the OEM valve stems are two piece and separated by the rubber seal at the rim. 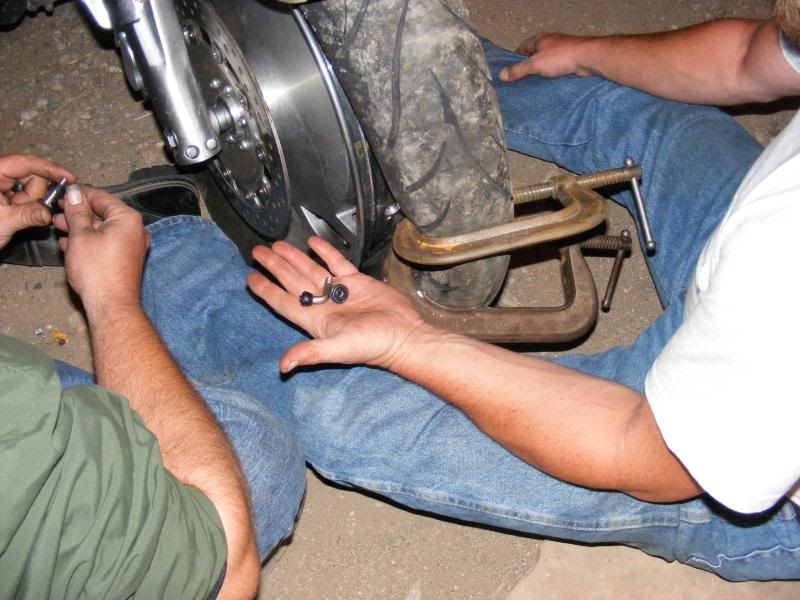 Note the two separate pieces in my hand in the picture (The interior part and the outside stem). This seal at the rim is where the crack was, and the cause of the sudden dramatic loss of air pressure at speed. |
|
|
|
|
Logged
|
VRCC# 26468 VRCCDS# 0228 "Some learn by listening, Others learn by watching... The rest of us have to pee on the electric fence ourselves" |
|
|
|
Chrisj CMA
|
|
« Reply #16 on: May 23, 2010, 11:51:17 AM » |
|
Stock are 90 degrees and all metal stems. Have you never looked at them?? The smartest thing would be to never have to replace them! *** [/quote] Ricky you are going to get somone stranded with that philosophy!!!! OEM valve stems WILL deteriorate and fail over time no matter how carefully you treat them. The Rubber base is what fails. Have you never actually looked at one? The All metal ones bolt onto the wheel instead of having a rubber base that plugs into the hole and therefore needs support. If you stay with OEM change them EVERYTIME THE TIRE GETS CHANGED. You cannot treat them nice enough to never change them |
|
|
|
« Last Edit: May 23, 2010, 01:26:25 PM by Chrisj CMA CR3M »
|
Logged
|
|
|
|
MP
Member
Posts: 5532
1997 Std Valkyrie and 2001 red/blk I/S w/sidecar
North Dakota
|
|
« Reply #17 on: May 23, 2010, 12:33:53 PM » |
|
It is not just stranded with Ricky's idea, it is potentially dead.
All metal with patchboy means ALL METAL.
All metal OEM means metal you see, then rubber actually holding it in the wheel. Which then fails, with potentially sudden and deadly results.
As noted above, either change OEM every time, or replace with Patchboy. If the rubber seal on the Patchboy fails, it leaks air. If OEM fails, it can essentially blow out!
MP
|
|
|
|
|
Logged
|
 "Ridin' with Cycho" |
|
|
|
roboto65
|
|
« Reply #18 on: May 23, 2010, 03:41:20 PM » |
|
And who can argue a 1.50$ ea
|
|
|
|
|
Logged
|
Allen Rugg VRCC #30806 1999 Illusion Blue Valkyrie Interstate 1978 Kawasaki KZ 650 project  |
|
|
miscott
Member
Posts: 350
Keep the rubber side down and hang on tight!
So. Central Kansas

|
|
« Reply #19 on: March 18, 2013, 01:24:38 PM » |
|
The smart thing is to support the valve stem with a finger behind the stem.
I would argue the smarter thing is to replace the valve stems with 90 degree all metal stems. Stock are 90 degrees and all metal stems. Have you never looked at them?? The smartest thing would be to never have to replace them! *** I have inspected them in a most intimate and personal way. The stem itself is metal, as is the base inside the rim. However, unlike the PatchBoy stems which are a solid piece through the rim, the OEM valve stems are two piece and separated by the rubber seal at the rim. Note the two separate pieces in my hand in the picture (The interior part and the outside stem). This seal at the rim is where the crack was, and the cause of the sudden dramatic loss of air pressure at speed. Hey Gunslinger, and anyone else with experience at this! lol In doing a search for info on changing the Valve stem, I cam across this thread. I had thought that I would have to take the tire off the bike and take it to a shop to get a new valve stem installed, but your pictures and the info I found during my search, have inspired me. Ordered some Patchboys from one of our vendors and they arrived today. Picked up some 8" C-clamps and am gonna try my hand at the install of the Front stem still on the Valk. My question is, in your pic, did you go ahead and break the bead all the way around that side of the rim? Did you just re-seat the part of the bead that you'd broke loose? This will be my first attempt at it and was just wondering the best way to go about this. I plan on breaking the bead there at the valve stem like your pic, and was wondering about how to go about cleaning the inside of the rim where the bead seats. I also assume that soapy water will help make re-seating the bead easier? You guys were right! Search is our friend! |
|
|
|
|
Logged
|
|
|
|
Gunslinger
Member
Posts: 404
Brian Huntzinger, EMT-P
Wamego, KS
|
|
« Reply #20 on: March 18, 2013, 02:31:57 PM » |
|
The smart thing is to support the valve stem with a finger behind the stem.
I would argue the smarter thing is to replace the valve stems with 90 degree all metal stems. Stock are 90 degrees and all metal stems. Have you never looked at them?? The smartest thing would be to never have to replace them! *** I have inspected them in a most intimate and personal way. The stem itself is metal, as is the base inside the rim. However, unlike the PatchBoy stems which are a solid piece through the rim, the OEM valve stems are two piece and separated by the rubber seal at the rim. Note the two separate pieces in my hand in the picture (The interior part and the outside stem). This seal at the rim is where the crack was, and the cause of the sudden dramatic loss of air pressure at speed. Hey Gunslinger, and anyone else with experience at this! lol In doing a search for info on changing the Valve stem, I cam across this thread. I had thought that I would have to take the tire off the bike and take it to a shop to get a new valve stem installed, but your pictures and the info I found during my search, have inspired me. Ordered some Patchboys from one of our vendors and they arrived today. Picked up some 8" C-clamps and am gonna try my hand at the install of the Front stem still on the Valk. My question is, in your pic, did you go ahead and break the bead all the way around that side of the rim? Did you just re-seat the part of the bead that you'd broke loose? This will be my first attempt at it and was just wondering the best way to go about this. I plan on breaking the bead there at the valve stem like your pic, and was wondering about how to go about cleaning the inside of the rim where the bead seats. I also assume that soapy water will help make re-seating the bead easier? You guys were right! Search is our friend! miscott: No we did not break the bead all the way around the rim, only on one side, and only far enough to access the valve stem. The pic was taken in '09 on the way to IZ in Frisco. Thanks to AAA I was able to make it to the cabin we were staying in and we managed the repair in the parking lot. As far as cleaning the rim, I would just wipe it with a rag dampened with some carb clean. A little soapy water will help in re-seating, as will rolling the bike a little to let gravity help spread the tire back onto the bead. the little 12v air compressor we had with us wasn't enough to get the bead re-seated, but the small compressor we borrowed from the owners of the cabins (those are his c-clamps as well if I remember correctly) popped it back on with no issues. |
|
|
|
|
Logged
|
VRCC# 26468 VRCCDS# 0228 "Some learn by listening, Others learn by watching... The rest of us have to pee on the electric fence ourselves" |
|
|
miscott
Member
Posts: 350
Keep the rubber side down and hang on tight!
So. Central Kansas
|
|
« Reply #21 on: March 18, 2013, 05:07:03 PM » |
|
Thanks Gunslinger! Was giving the Valk the once over before a ride in some unusually warm weather last week. Checked the tire pressure and it was low. When I went to air it up, discovered that the OEM Valve Stem had split at the base! Searched the boards and found out about the all Metal Stems and how to change em out! Hope to have her mobile again this evening, now that I have the info I was wondering about. Thanks for helping me get my gurl back on her feet! |
|
|
|
|
Logged
|
|
|
|
|


