custom1
Member

Posts: 333
01 Interstate
SW Pa
|
 |
« on: May 19, 2011, 02:19:49 PM » |
|
Warning: I may get a little long-winded here. I always wrench on my four wheeled vehicles and have done some work on a few of my previous bikes. Head gaskets and throttle cables on an 83 wing and such, but never needed to lift one. So I got a jack from sears and made the low buck adapter to look for the cause of some rumbling noise in the rear wheel. Found play in the left side bearing. It seemed a little unstable to me on the jack to remove the wheel tho and after watching Dag's video a few times decided to get a HF wheel chock and bolt that to the floor and just lift the back. 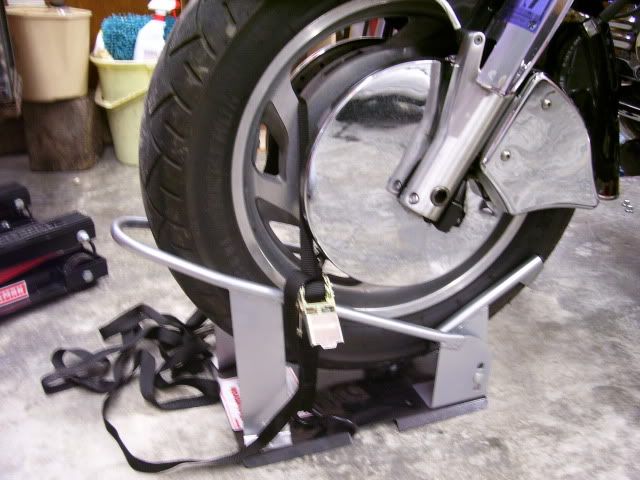 So I took the bags off and heat sheilds and exhaust tips/truck stacks. Got it in the air and set it on jack stands under the bag supports. Very solid. Took the shocks off and used the ratchet strap over the frame method I saw on here somewhere to raise the swing arm to remove the axle. At first I didn't think it would work with the bag rails on, but it does. 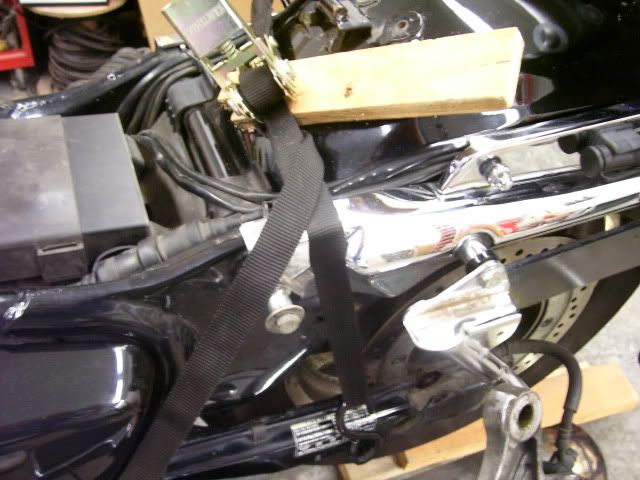 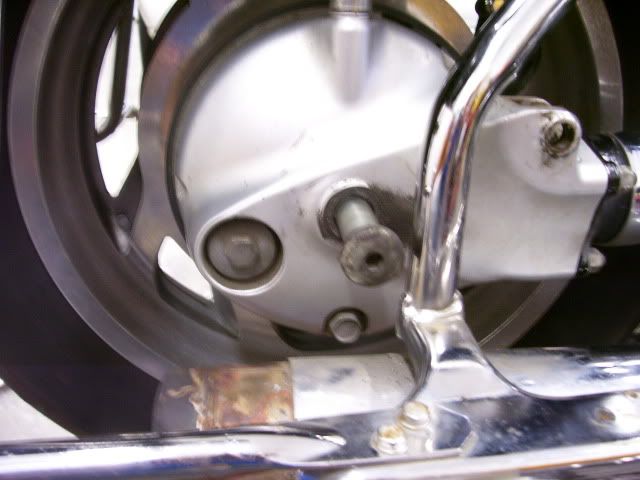 Moved the axle out enough to take the brake bracket out and slid the axle back in and slid the wheel to the left out of the splines. Then stacked some wood up under the tire and took the axle out and let the wheel down off the wood and out. had to go up about three more clicks on the jack stands to get it out, but it worked.    Not sure what kind of grease was in there. It's a red color where it slung out and was getting dried up but there was plenty of it. The splines look pretty good- not perfect. just shiny on the faces.   The brake shoes are another story. Never felt like the back brake was working right. 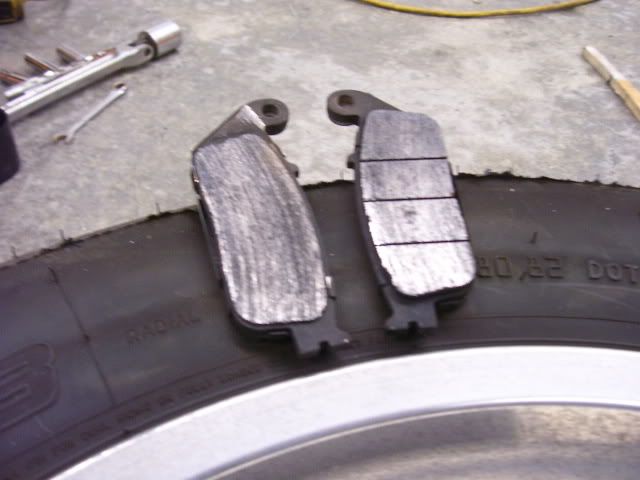 Found the pin they slide on completely stuck in the rubber bushing. So I'll be putting those on the parts list. 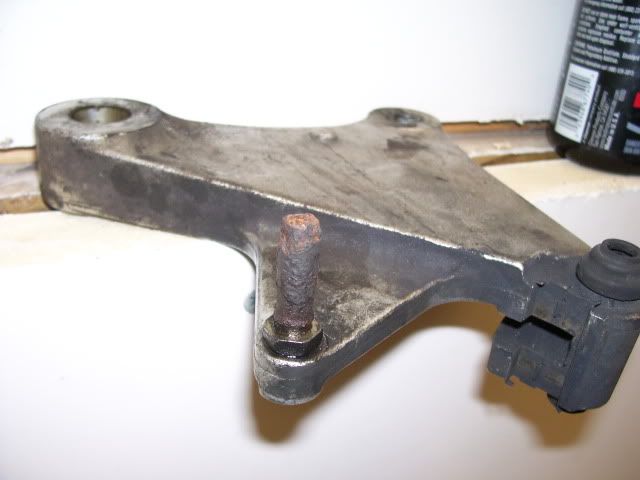 I'll have to finish this post later tonight. Gotta run for now. |
|
|
|
|
 Logged
|
John
|
|
|
|
alph
|
|
« Reply #1 on: May 19, 2011, 07:00:06 PM » |
|
spline looks good.
one thing that i think is important ('cause it cost me money last fall) is check the pinion cup/drive shaft for wear. some people will argue that the two little holes in the pinion cup don't lube the shaft at all, but they're there for a reason. get a (27mm i think) socket and remove the pinion cup and clean out those two little holes, DON'T over grease the cup/shaft spline, but give it judy enough to "wet" the spline of the drive shaft with grease. make sure that seal is good, you might want to replace it just to be on the safe side. check that universal joint, make sure it doesn't have any play in it, if it does, place an order and wait in line!!
i wish someone would have given me that advise last year when i replaced my rear wheel, it would have saved me over $200 in parts and work.
|
|
|
|
|
Logged
|
Promote world peace, ban all religion. Ride Safe, Ride Often!!   |
|
|
custom1
Member
Posts: 333
01 Interstate
SW Pa
|
|
« Reply #2 on: May 19, 2011, 10:05:13 PM » |
|
Installment #2. Thanks alph. I wasn't going to get into it any farther for now, but I may as well pull the final drive and have a look. I'll be able to sleep better then. So far my list of things to buy is Brake pads Dampers Brake caliper pin bolt and boot. May get a new collar to keep as an uncut spare. I already have the three o-rings and a 5204 bearing. The bearing I found on e-bay is a 1997 Federal Mogul with metal shields on both sides. Made in the USA. My only concern doing the bearing mod is loosing the dust seal. I'll try to remember to keep some grease on the exposed side.  I was able to remove the left bearing with a slide hammer. After I got it out there was some dried up grease on the lip of the wheel. I thought that was odd. As I was cleaning it off I found a little sliver of bearing race. The PO told me it has been changed before. I don't think the replacement was seated properly because of that sliver and that contributed to it's failure. I don't think I will mess with the bearing on the right side. It seems smooth and no play. Is this normal tire wear for an E3? I'm sure the bad bearing contributed some. 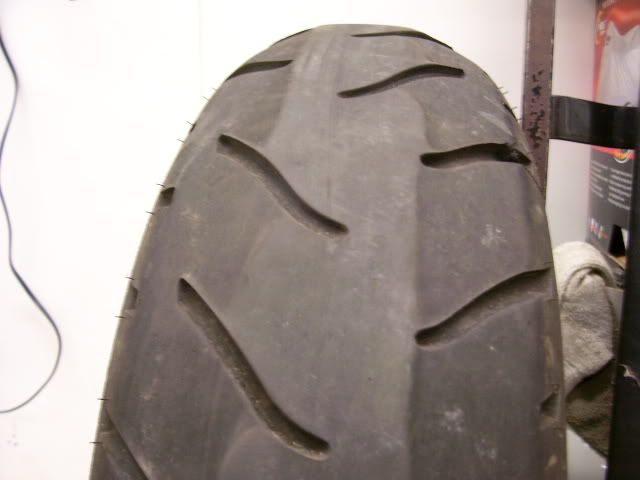 I could ramble on some more but it's late. Spent too much time searching pinion cups and the oil mist hole controversy.... I'll leave you with a pic of the general carnage. Not as bad a job as I thought it might be. Thanks to this forum I knew what to expect and have had no surprises yet. 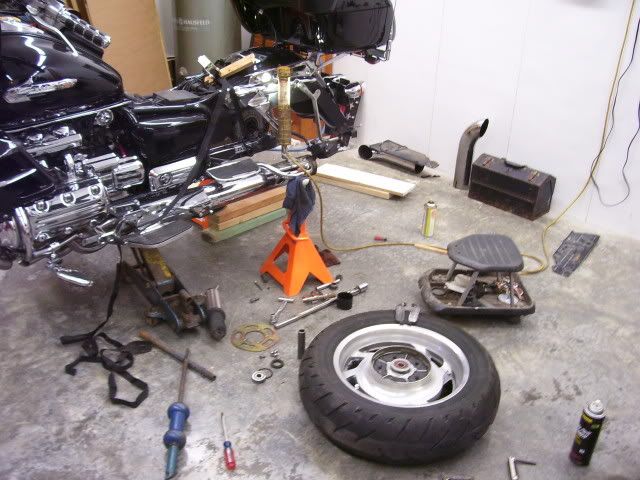 |
|
|
|
|
Logged
|
John
|
|
|
|
|
X Ring
Member
Posts: 3626
VRCC #27389, VRCCDS #204
The Landmass Between Mobile And New Orleans
|
|
« Reply #4 on: May 20, 2011, 06:14:26 AM » |
|
I already have the three o-rings and a 5204 bearing. The bearing I found on e-bay is a 1997 Federal Mogul with metal shields on both sides. Made in the USA. My only concern doing the bearing mod is loosing the dust seal. I'll try to remember to keep some grease on the exposed side. Wrong bearing. You need either a 3204-2RS or a 5204-2RS. Rubber seals on both sides of the bearing. I use the SKF 3204-2RS. 3204 is the European designation for the 5204 bearing. I just performed driveline maintenance on my rear wheel after 10K miles with the double row bearing mod. No problem with the bearing. Nice and tight plus smooth as silk. If you want you can get a Nylos Ring at the bearing house. It's a stamped sheetmetal shield you put on the outside of the bearing to protect it. Marty |
|
|
|
« Last Edit: May 20, 2011, 06:16:04 AM by X Ring »
|
Logged
|
People are more passionately opposed to wearing fur than leather because it's safer to harass rich women than bikers.  |
|
|
custom1
Member
Posts: 333
01 Interstate
SW Pa
|
|
« Reply #5 on: May 20, 2011, 07:06:00 AM » |
|
The tire wear is from the PO. I haven't got to ride it much for various reasons... Work, Rain, Needed a battery, Rain..Snow. I bought it in Nov, so it sat most of the time. The pressure was at 42 when I got it and I have kept it there. Actually it stayed there on it's own.
As far as the bearing. I was wondering how the seals work, either metal or rubber. It's a spinning part. How does the rubber stay sealed against both races? I guess I'll tear the old one apart and see. Probably a spring like in the dust seal. The factory bearing has rubber on the outside and metal inside.
I got the Federal Mogul for $12. Maybe I'll just order the factory 5204 with my other parts from HDL and find a cover as you suggest. Do you know of an online source for it?
Thanks
|
|
|
|
|
Logged
|
John
|
|
|
X Ring
Member
Posts: 3626
VRCC #27389, VRCCDS #204
The Landmass Between Mobile And New Orleans
|
|
« Reply #6 on: May 20, 2011, 07:19:45 AM » |
|
I buy my SKFs from Motion Industries and that's where I can get Nylos Rings also.
Marty
|
|
|
|
|
Logged
|
People are more passionately opposed to wearing fur than leather because it's safer to harass rich women than bikers. |
|
|
hubcapsc
Member
Posts: 16816
upstate
South Carolina
|
|
« Reply #7 on: May 20, 2011, 07:30:48 AM » |
|
I didn't think I needed to check my drive shaft when I put on my new tire before Cheaha last year... heck, I had just changed out the universal, drive shaft and pinion cup 2,000 miles before that.  When it came time for another tire later on last summer, I found that the seal had come out of the pinion cup, the pinion cup was full of rust and crap and both the pinion cup and the pinion end of the drive shaft were shot...  I'm now with the "check 'em every time" crowd... -Mike |
|
|
|
|
Logged
|
|
|
|
X Ring
Member
Posts: 3626
VRCC #27389, VRCCDS #204
The Landmass Between Mobile And New Orleans
|
|
« Reply #8 on: May 20, 2011, 07:35:57 AM » |
|
YIKES!!!!  Marty |
|
|
|
|
Logged
|
People are more passionately opposed to wearing fur than leather because it's safer to harass rich women than bikers. |
|
|
|
|
|
alph
|
|
« Reply #10 on: May 20, 2011, 09:35:31 PM » |
|
my drive shaft was all rusty like that also!!
i have a co-worker that has an '84 yamaha maxim 750, shaft drive. i asked him if he ever had issues with the final drive, he's NEVER taken it apart or EVER had a single issue with it!! he has 50,000 miles on it. he's the original owner.
now, why are WE all seeming to have problems???
|
|
|
|
|
Logged
|
Promote world peace, ban all religion. Ride Safe, Ride Often!! |
|
|
|
Chrisj CMA
|
|
« Reply #11 on: May 21, 2011, 05:17:51 AM » |
|
my drive shaft was all rusty like that also!!
i have a co-worker that has an '84 yamaha maxim 750, shaft drive. i asked him if he ever had issues with the final drive, he's NEVER taken it apart or EVER had a single issue with it!! he has 50,000 miles on it. he's the original owner.
now, why are WE all seeming to have problems???
Just because he doesnt know of any issues dont mean he has no issues. If hes never had it apart, he may be in for a surprise someday. Just about every Valk that I know about could easily have made it 50K from the factory set up without "seeming" to have issues......until the issues happen |
|
|
|
|
Logged
|
|
|
|
X Ring
Member
Posts: 3626
VRCC #27389, VRCCDS #204
The Landmass Between Mobile And New Orleans
|
|
« Reply #12 on: May 21, 2011, 06:01:23 AM » |
|
In my case, I didn't use any grease because our bearings our sealed. I'm just using it as an additional barrier between the environment and bearing. Marty |
|
|
|
|
Logged
|
People are more passionately opposed to wearing fur than leather because it's safer to harass rich women than bikers. |
|
|
Hoser
Member
Posts: 5844
child of the sixties VRCC 17899
Auburn, Kansas
|
|
« Reply #13 on: May 21, 2011, 06:03:45 AM » |
|
The job would have been a lot easier if you had removed the bag mounts, it's easy to remove them. JMHO. Hoser  |
|
|
|
|
Logged
|
I don't want a pickle, just wanna ride my motor sickle  [img width=300 height=233]http://i617.photobucket.com/albums/ |
|
|
custom1
Member
Posts: 333
01 Interstate
SW Pa
|
|
« Reply #14 on: May 21, 2011, 09:13:46 AM » |
|
Here is a quote about filling the ring with grease from this link from an earlier thread. http://mdmetric.com/prod/nilos/nilos3.htm"How they work The seal for a Nilos Ring is obtained when the leading edge of the seal, rotating under slight pressure, laps the surface of the inner or outer bearing ring. This lapping process creates the sealing surface which keeps grease in and contaminants out of the bearing. During the run-in process, microscopic metal particles are formed and deposited on the outside of the sealing lip. Those particles that do migrate into the sealing area are trapped in the grease within the recessed area of the Nilos Ring so as not to affect the bearing's performance." I think it would be best to have grease in there at first the insure the fine metal particles don't get into the new bearing. There were a couple reasons I didn't want to remove the bag rails. There is also a hitch mounted there and I just didn't want to get into removing all that if not absolutely necessary. Plus they are sitting on the jack stands. It is solid as a rock that way and with just me in the garage it seems way safer that way instead of just up on the jack under the center. Lets just say I opted for safety over convenience. I might finally get to work on it some more tonight and get the final drive off. |
|
|
|
|
Logged
|
John
|
|
|
X Ring
Member
Posts: 3626
VRCC #27389, VRCCDS #204
The Landmass Between Mobile And New Orleans
|
|
« Reply #15 on: May 21, 2011, 03:58:54 PM » |
|
Here is a quote about filling the ring with grease from this link from an earlier thread. http://mdmetric.com/prod/nilos/nilos3.htm"How they work The seal for a Nilos Ring is obtained when the leading edge of the seal, rotating under slight pressure, laps the surface of the inner or outer bearing ring. This lapping process creates the sealing surface which keeps grease in and contaminants out of the bearing. During the run-in process, microscopic metal particles are formed and deposited on the outside of the sealing lip. Those particles that do migrate into the sealing area are trapped in the grease within the recessed area of the Nilos Ring so as not to affect the bearing's performance." I think it would be best to have grease in there at first the insure the fine metal particles don't get into the new bearing. There were a couple reasons I didn't want to remove the bag rails. There is also a hitch mounted there and I just didn't want to get into removing all that if not absolutely necessary. Plus they are sitting on the jack stands. It is solid as a rock that way and with just me in the garage it seems way safer that way instead of just up on the jack under the center. Lets just say I opted for safety over convenience. I might finally get to work on it some more tonight and get the final drive off. You have obviously misses something VERY, VERY important. The Nilos Rings were designed to be used with non sealed, non shielded bearings and protect them from contamination. That's why the instructions tell you to pack them full of grease. Thanks to mirion's discovery of the Nilos Ring, we have ADAPTED them to our prupose. That is, use them as additional layer of protection for shielded, sealed bearings. There is NO reason to fill the Nilos Ring full of grease when all you are using for is an additional shield to protect them from objects that may strike them. If you need to, think of them as metal dust seals and you don't put gease in between dust seals and the bearings they protect. Here's a picture of my double row left hand bearing that went 10K miles WITHOUT a Nilos Ring and it is perfect. .jpg) Marty |
|
|
|
|
Logged
|
People are more passionately opposed to wearing fur than leather because it's safer to harass rich women than bikers. |
|
|
custom1
Member
Posts: 333
01 Interstate
SW Pa
|
|
« Reply #16 on: May 21, 2011, 09:32:28 PM » |
|
Thanks Marty. I wasn't thinking about the original intent of the rings. In your earlier post you said you can get the rings at Motion Ind, I thought you were using them. I'm learn'n |
|
|
|
|
Logged
|
John
|
|
|
X Ring
Member
Posts: 3626
VRCC #27389, VRCCDS #204
The Landmass Between Mobile And New Orleans
|
|
« Reply #17 on: May 21, 2011, 10:47:25 PM » |
|
Thanks Marty. I wasn't thinking about the original intent of the rings. In your earlier post you said you can get the rings at Motion Ind, I thought you were using them. I'm learn'n I didn't know about them when I originally did the mod. Mirion sent me one and I installed it last weekend. When I get done with the 50K mile service on Sandman, I'll be doing the double row mod on my I/S with the Nilos Ring. Here's a pic of the Nilos Ring installed: .jpg) Marty ETA: I did smear the interior and exterior surfaces of the Nilos Ring with light coat of grease to keep it from rusting. |
|
|
|
« Last Edit: May 22, 2011, 06:44:07 PM by X Ring »
|
Logged
|
People are more passionately opposed to wearing fur than leather because it's safer to harass rich women than bikers. |
|
|
custom1
Member
Posts: 333
01 Interstate
SW Pa
|
|
« Reply #18 on: May 23, 2011, 02:28:40 PM » |
|
Short update: Ordered my parts from HDL Ordered the nilos ring at Motion Ind. $9.89 to ship an $8.10 part. ARRGG! You know they could ship that for about $2.00. Found out Motion Ind is near me in Monroeville Pa but till I drive over there I'd still have $5 in gas and my time. Got my collar cut .270 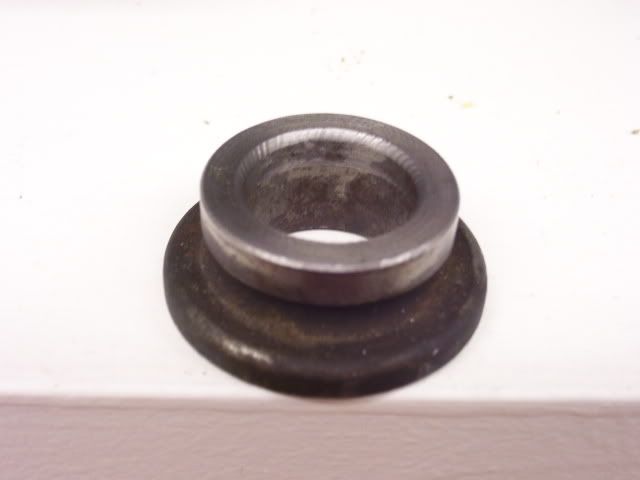 Took the final drive off all looks well. No rust anywhere. 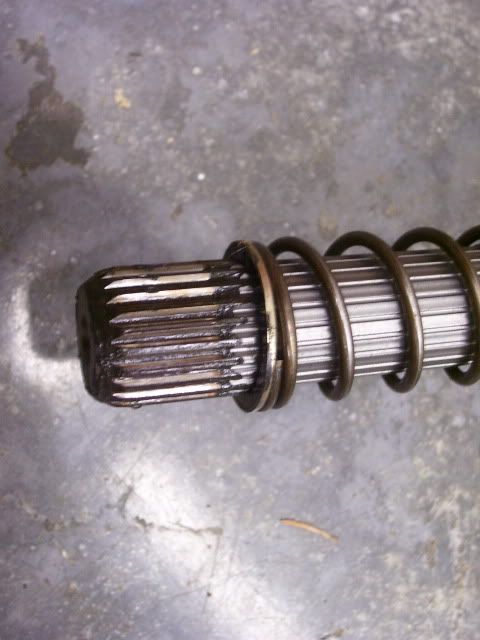  Just wait'n on parts to put it all back together. Thinking about polishing the wheel while it's off. What is the best way to remove the clear coat? I may just see if it will clean up first. The drive side isn't too bad but the brake side has seen better days. |
|
|
|
|
Logged
|
John
|
|
|
X Ring
Member
Posts: 3626
VRCC #27389, VRCCDS #204
The Landmass Between Mobile And New Orleans
|
|
« Reply #19 on: May 23, 2011, 04:15:07 PM » |
|
Is the clear coat on your wheels messed up? Reason I ask is the clear coated wheels were polished before they were clear coated. If the clear coat isn't too bad you could try polishing it instead using a good paint polish. If not, you're gonna have to remove it and that could be a chore by hand.
Marty
|
|
|
|
|
Logged
|
People are more passionately opposed to wearing fur than leather because it's safer to harass rich women than bikers. |
|
|
|
JetDriver
|
|
« Reply #20 on: May 23, 2011, 05:17:28 PM » |
|
Marty-
In your "Shoptalk" article on the bearing mod, you say your spacer was cut .270, but you recommend only cutting it .260. If the spacer is cut .260, will the Nylos ring still fit?
|
|
|
|
|
Logged
|
|
|
|
X Ring
Member
Posts: 3626
VRCC #27389, VRCCDS #204
The Landmass Between Mobile And New Orleans
|
|
« Reply #21 on: May 23, 2011, 07:23:02 PM » |
|
Marty-
In your "Shoptalk" article on the bearing mod, you say your spacer was cut .270, but you recommend only cutting it .260. If the spacer is cut .260, will the Nylos ring still fit?
If you're getting the spacer cut and you have or are considering installing a Nilos Ring, go ahead and have it cut .280". If you don't install the ring the extra .020" will be taken care of when you torque the axle nut. The .260" is the difference in thickness between the 3204/5204 and 6204 bearings. ETA: That recommendation to "only cut the spacer .260" was not me. That's was Scott, one of the administrators, who decided to interject his opinion into my article. As I stated in the article, the machinist recommended I cut .270" from the spacer and I have had NO, repeat NO problems with it in 10K miles. I'm fixing to update the article with my 10K mile update and the Nilos Ring. Marty |
|
|
|
« Last Edit: May 23, 2011, 07:47:05 PM by X Ring »
|
Logged
|
People are more passionately opposed to wearing fur than leather because it's safer to harass rich women than bikers. |
|
|
custom1
Member
Posts: 333
01 Interstate
SW Pa
|
|
« Reply #22 on: May 25, 2011, 09:20:17 AM » |
|
I received my nilos ring. Ordered it Monday morning and it was at my house Tuesday when I got home from work. Fast service from Motion Ind. I think I'm going to use the bearing I have, and fill the ring with grease. Machinist said the bearing is good quality and we should watch some of the bearings sold cheap online as they are meant for electric motors even tho they say 5204 they may not hold up as a wheel bearing. 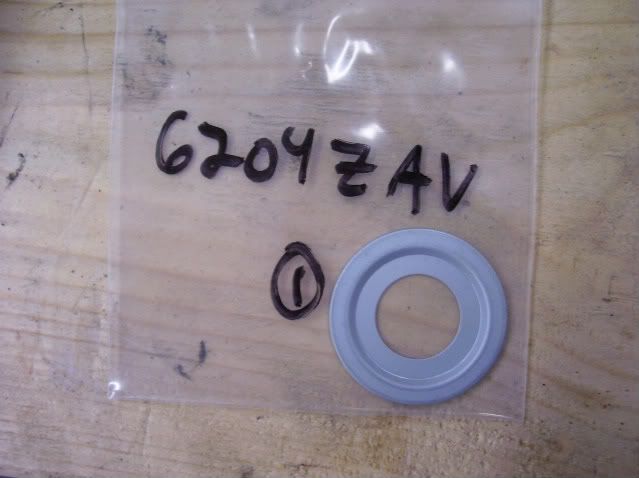 Can't put it together till I get my HDL order. Here are the parts stacked up tho.  Got one side of the wheel cleaned up. Started using a fine compound for paint and the rag was turning black so there must not be any clear coat on them. So I switched to Mothers and it's working pretty well. No pics of the wheel yet. May tackle the brake side tonight. |
|
|
|
|
Logged
|
John
|
|
|
X Ring
Member
Posts: 3626
VRCC #27389, VRCCDS #204
The Landmass Between Mobile And New Orleans
|
|
« Reply #23 on: May 25, 2011, 02:52:05 PM » |
|
Machinist said the bearing is good quality and we should watch some of the bearings sold cheap online as they are meant for electric motors even tho they say 5204 they may not hold up as a wheel bearing.
Iirc, Warlock ran into that when he did the Double Row Bearing Mod. The bearing he bought had phenolic bearing cages and weren't up to the task. The SKF 3204-2RS I chose has steel cages. The salesman at Motion Industries said I would probably never have to buy another bearing. I'm really picky about bearings. I won't buy cheap bearings. I only buy from a known top tier bearing manufacturer like SKF, Timken, etc. Btw, the vendor Honda uses is a top tier manufacturer and I would have no problem ordering them from HDL when they have sales on stock parts. Marty |
|
|
|
|
Logged
|
People are more passionately opposed to wearing fur than leather because it's safer to harass rich women than bikers. |
|
|
|
Ricky-D
|
|
« Reply #24 on: May 26, 2011, 08:44:40 AM » |
|
I don't think the material used for the bearing cages is indicative of anything.
Bearings inside the pumpkin have those plastic type bearing cages!
I do however feel that steel cages give me more mojo!
***
|
|
|
|
|
Logged
|
2000_Valkyrie_Interstate
|
|
|
|
John U.
|
|
« Reply #25 on: May 26, 2011, 06:06:31 PM » |
|
And where would we all be without mojo?  |
|
|
|
|
Logged
|
|
|
|
custom1
Member
Posts: 333
01 Interstate
SW Pa
|
|
« Reply #26 on: June 08, 2011, 12:20:12 PM » |
|
Final Installment. Got my HDL order. Finished polishing the wheel. And installed the new dampers. I put the new double row bearing in the freezer and the wheel in the sun for a couple of hours. Used a large socket (34mm?) so as not to hit on the inner race and taped it into the wheel. I remembered the spacer! No pic of that side. 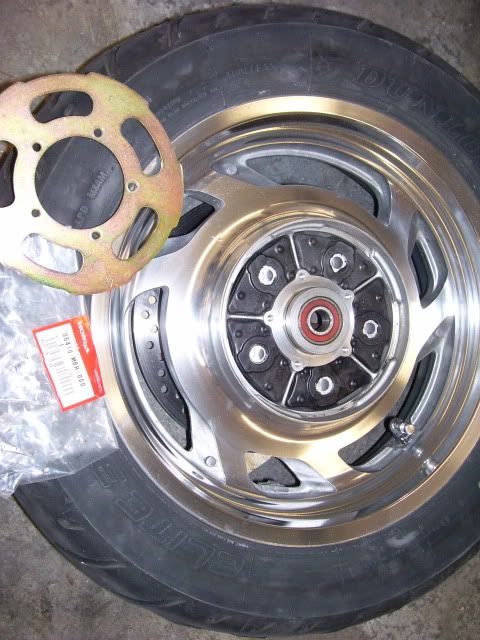 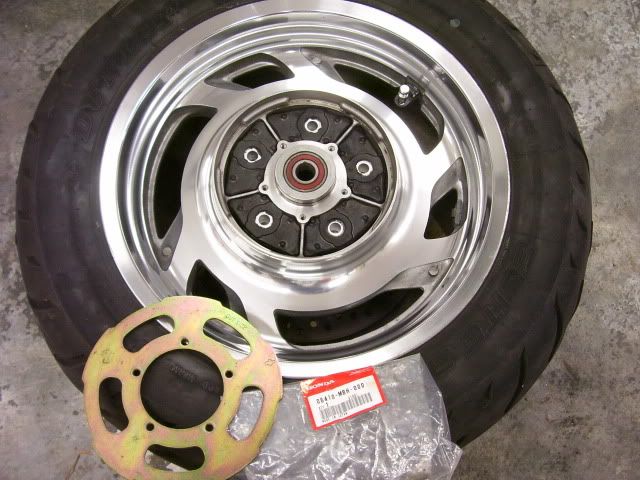 Cleaned up the rest of the parts. Installed a new pin for the brakes to float on. Also installed the three new o-rings.   On the brake caliper I put the old pads in and added a few wood shims so the pistons could move out a little but not fall out when I pressed the brake pedal. Cleaned them up with some brake cleaner and Q-tips. Pushed them in with a C-clamp and one of the old pads. Had the lid off of the rear reservoir and the fluid went right up to the full mark, glad to see no one had added any fluid as the brakes wore. 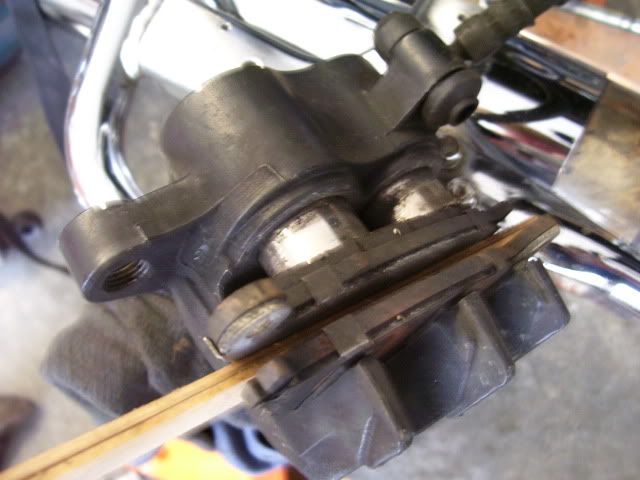 Didn't get any pics of it going back together(priorities u know), but I just reversed the process. Got the wheel in there and up on some wood blocks till it lined up with the swing-arm and put the axle in to line it up and slid it onto the splines. That was the hardest part but it wasn't too bad. Then pulled the axle out enough to get the nilos ring, collar and brake bracket in and slid the axle back in. Forgot to have the caliper on the bracket when I put it all together. (The manual says to remove the caliper remove the rear wheel.) Pretty sure you can unthread the pin and put it in the caliper and get it on that way but I didn't have the nut on the axle yet so I just slid it out enough to get the bracket back out and put the caliper on. Tightened the four final drive bolts last. Installed the new shoes and got the mityvac out and changed the fluid. 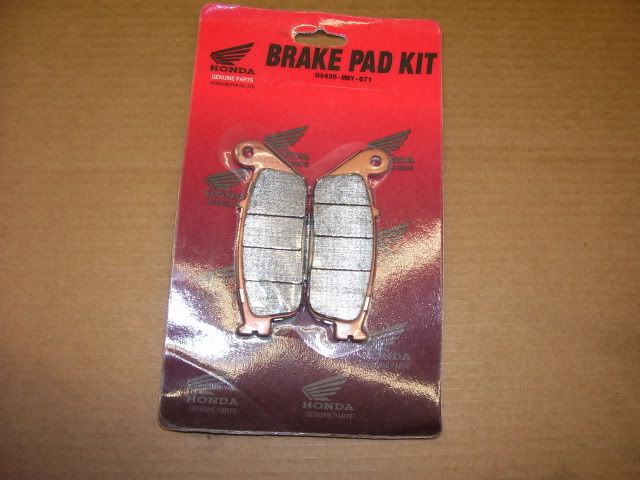 There are still some things that need detailed and now the front wheel looks bad in comparison, but that can all wait till winter. I probably wouldn't have tackled this if it wasn't for the things I learned on this forum. Hopefully this post will help someone else that wants to do this mod. Plus the money I saved from the dealer bought me some new toys/tools! |
|
|
|
|
Logged
|
John
|
|
|
|
Bone
|
|
« Reply #27 on: June 08, 2011, 01:01:47 PM » |
|
Your pictures back up your explanation of what you did to your bike. Very nice job |
|
|
|
|
Logged
|
|
|
|
X Ring
Member
Posts: 3626
VRCC #27389, VRCCDS #204
The Landmass Between Mobile And New Orleans
|
|
« Reply #28 on: June 08, 2011, 02:02:34 PM » |
|
Looks like you did good Custom.
Marty
|
|
|
|
|
Logged
|
People are more passionately opposed to wearing fur than leather because it's safer to harass rich women than bikers. |
|
|
|
JetDriver
|
|
« Reply #29 on: June 08, 2011, 08:11:26 PM » |
|
Final Installment. Got my HDL order. Finished polishing the wheel. And installed the new dampers. I put the new double row bearing in the freezer and the wheel in the sun for a couple of hours. Used a large socket (34mm?) so as not to hit on the inner race and taped it into the wheel. I remembered the spacer! No pic of that side.
LOL! |
|
|
|
|
Logged
|
|
|
|
fordmano
Member
Posts: 1457
San Jose, CA. 1999 I/S 232 miles when bought 11/05
San Jose, CA.
|
|
« Reply #30 on: June 09, 2011, 12:08:18 AM » |
|
Nice work. Much better description of what was done and also much better photo journal than my maintenance/upgrade thread was…. Well Done SIR! |
|
|
|
|
Logged
|
  83GS550 93XR650L TARD! 97WR250 99ValkyrieI/S Tri-tone 01YZ125(x2) 05DRZ-125 |
|
|
|
RonW
|
|
« Reply #31 on: June 09, 2011, 12:35:25 AM » |
|
there was a caveat I once read about installing the bottom bolt first on the right-side shock (the pumpkin), then the top bolt of the same shock. Or was it the other way around. Anybody? Thanks in advance.
[Edit] Forgot to mention....excellent write-up, Mr. custom1.
|
|
|
|
« Last Edit: June 09, 2011, 12:59:21 AM by RONW »
|
Logged
|
2000 Valkyrie Tourer
|
|
|
custom1
Member
Posts: 333
01 Interstate
SW Pa
|
|
« Reply #32 on: June 09, 2011, 08:49:40 AM » |
|
Thanks guys. I wanted to take more pics but you get on a roll assembling things and forget. As for the right lower shock bolt. I can see how that one would be easy to cross thread. The housing is aluminum. There is really no way to wiggle it around to line it up. You have to have the shock on the top mount so it is straight. Then move the swing-arm up or down to match the length of the shock till the bolt will start. There were marks on mine where someone had vise-grips on it at some point. Sometimes finesse is more productive than brute force. Also after getting an up close look at how something was maintained.... there is a difference between "If it ain't broke don't fix it"(A quote from the PO) and "If I don't look at it, it must not be broke." |
|
|
|
|
Logged
|
John
|
|
|
|


