Oss
Member

Posts: 12832
The lower Hudson Valley
Ossining NY Chapter Rep VRCCDS0141

|
 |
« on: June 03, 2011, 07:26:35 AM » |
|
I got the left saddlebag off the interstate, took off the screw and backed the pin out so I could inspect the inside brake pad
It is worn more than 90% there are still the little notches but I think the depth of the fingernail is all that is left. 68000 miles they are the original pads
Yeah I know....
My question is the new pad is obviously much thicker. How do I compress the pistons without taking the caliper off?
Is the one bolt that appears to be on the left all that is holding the caliper on?
Took the morning off to do this and then ride but now I am thinking better not to ride till I know my brakes are replaced properly
Thanks,
Oss
|
|
|
|
|
 Logged
|
If you don't know where your going any road will take you there
George Harrison
When you come to the fork in the road, take it
Yogi Berra (Don't send it to me C.O.D.)
|
|
|
hubcapsc
Member
Posts: 16816
upstate
South Carolina
|
|
« Reply #1 on: June 03, 2011, 07:45:16 AM » |
|
I'll bet you a quarter that your pistons are nasty and that if you mash them back into your caliper far enough to put new pads on, you'll be sorry... It is probably possible to clean them OK without taking the caliper apart, but the contamination on the pistons probably goes farther than you can reach... here some pistons I cleaned as well as possible, and then blew the pistons out further, and you can see what was still down inside. The upper parts of the cylinders are probably fouled and maybe even down in the grooves that the seals fit in.  I heard someone say that they took their old pads out and carefully mashed on the brake pedal to make the pistons come out far enough to clean better, but not so far that they popped out and fluid went everywhere... I'd probably make a big mess if I tried that  ... -Mike |
|
|
|
|
Logged
|
|
|
|
|
Ricky-D
|
|
« Reply #2 on: June 03, 2011, 07:56:35 AM » |
|
It would be worth a try to simply replace the pads with no additional work performed.
You can use a c-clamp and a piece of wood to push the pistons back into the caliper. Have to do both at the same time so one piston doesn't pop out while you push the other.
There's a good chance the job will be fine. If not the worse thing will be a little brake fluid leaking out over time from a leaky seal which will be easily detectable.
If you have been keeping up with the maintenance and filling the reservoir you must be sure when you compress the pistons that fluid will not overflow at the reservoir and make a mess.
No scare words here.
***
|
|
|
|
|
Logged
|
2000_Valkyrie_Interstate
|
|
|
|
Bobbo
|
|
« Reply #3 on: June 03, 2011, 08:00:12 AM » |
|
I usually use a small pry bar to slowly force between the back of the pad and the caliper. That will compress the pistons fully. Make sure the reservoir is not completely full before doing this. I usually remove most of the brake fluid, compress, install, and top off the fluid.
|
|
|
|
|
Logged
|
|
|
|
hubcapsc
Member
Posts: 16816
upstate
South Carolina
|
|
« Reply #4 on: June 03, 2011, 08:03:09 AM » |
|
There's a good chance the job will be fine. If not the worse thing will be a little brake fluid leaking out over time from a leaky seal which will be easily detectable.
The worst thing that happened to me when I mashed my dirty pistons back in the calipers
and slapped in new pads is that a week before Britman's Memorial Day Ride (a few years ago)
my rear brakes started hanging up and I missed the ride while I figured out what the deal
was and started learning how to rebuild a caliper (easy)...
-Mike
|
|
|
|
|
Logged
|
|
|
|
|
old2soon
|
|
« Reply #5 on: June 03, 2011, 08:16:21 AM » |
|
Had like 43000 on mine. Sucked all the fluid i could out of the master cylinder BEFORE pushing the pistons back in with the wood/c-clamp method. B T W my brakes are working just fine thank you very much. Get as much of the old brake fluid out b-4 mashing those pistons back. Your gonna want to do a fluid change anywho. New pads-new fluid. D O T-4. I knows ya can duz this oss. Good luck with it.  RIDE SAFE. |
|
|
|
|
Logged
|
Today is the tommorow you worried about yesterday. If at first you don't succeed screw it-save it for nite check. 1964 1968 U S Navy. Two cruises off Nam.
VRCCDS0240 2012 GL1800 Gold Wing Motor Trike conversion
|
|
|
|
Bobbo
|
|
« Reply #6 on: June 03, 2011, 08:20:27 AM » |
|
There's a good chance the job will be fine. If not the worse thing will be a little brake fluid leaking out over time from a leaky seal which will be easily detectable.
The worst thing that happened to me when I mashed my dirty pistons back in the calipers
and slapped in new pads is that a week before Britman's Memorial Day Ride (a few years ago)
my rear brakes started hanging up and I missed the ride while I figured out what the deal
was and started learning how to rebuild a caliper (easy)...
-Mike
If you have dirty pistons, that means your dust cover seals are bad. I usually rebuild the caliper every other pad replacement, as the seals don't last forever. If you see any cracks or tears in the dust cover, I recommend a rebuild. |
|
|
|
|
Logged
|
|
|
|
hubcapsc
Member
Posts: 16816
upstate
South Carolina
|
|
« Reply #7 on: June 03, 2011, 08:33:42 AM » |
|
If you have dirty pistons, that means your dust cover seals are bad. What are dust cover seals? As your pads wear down, there's more and more of the pistons left sticking out, until, when it is time to change the pads, a whole lot of your pistons are exposed... down there where the rubber meets the road (and the pads meet the rotor) is nasty brutal place to be exposed. I'd guess that the exposed part of everybody's pistons are dirty, but that's OK until you start mashing the dirt back inside the caliper to put on new pads... 
|
|
|
|
« Last Edit: June 03, 2011, 08:35:25 AM by hubcapsc »
|
Logged
|
|
|
|
Oss
Member
Posts: 12832
The lower Hudson Valley
Ossining NY Chapter Rep VRCCDS0141
|
|
« Reply #8 on: June 03, 2011, 09:30:35 AM » |
|
great responses but my main question was how to get the assembly off the rotor
my fault for not being clearer sorry
what I did was take out the big bolt and the pin so I could remove the old pads which were as stated well worn......... then put the outside pad back in and leaned on the assembly so the pistons moved back some, used a fine brush and poked around but no dirt dropped out on my clean paper I laid underneath so I put the old outside pad back in and leaned on it until the pistons were almost flush but not quite
Put the bolt part way in, put in 2 new pads and then sat the pin, tightened the big bolt then the pin and the little screw
is this the right sequence
I did not get to test ride but I did the fred flinstone test and the brake worked
Unfortunately I then noticed I had turned the key to the ON position this morning when moving the bike and the battery was (as they said in the wizard of oss) most definitely totally dead its now on the charger
|
|
|
|
|
Logged
|
If you don't know where your going any road will take you there
George Harrison
When you come to the fork in the road, take it
Yogi Berra (Don't send it to me C.O.D.)
|
|
|
|
Bobbo
|
|
« Reply #9 on: June 03, 2011, 10:49:17 AM » |
|
If you have dirty pistons, that means your dust cover seals are bad.
What are dust cover seals?
If you look on the microfiche, you will see a seal set for each piston. The seal set consists of a pressure seal which seals the fluid against the piston, and a dust seal, which prevents dirt from getting on the pressure seal and piston sealing area. This is important, since the piston retracts slightly when you release the brake. If the dust seal is bad you will get corrosion around the pressure seal, and it will hang, as you experienced. Oss: What you did will work, but you don't need to remove the caliper to change the pads. The pin is what retains the pads, and once the pistons are pushed back, you can pull the pads. If you decide to remove the caliper, be careful to not put too much stress on the hose, like letting the caliper hang from it. |
|
|
|
|
Logged
|
|
|
|
|
RonW
|
|
« Reply #10 on: June 03, 2011, 06:12:09 PM » |
|
Front caliper.....but shows the piston that presses the brake pad against the brake rotor, with it's dust seal and oil seal. [ Edit] I meant to add that I spend at least 20 minutes shoe shinning the piston with a thin strip of rag when I replace brake pads. I won't let anybody replace mines. I personally don't recommend the method of simply pulling the pin and slapping in new pads. If any crud scores the seals you're screwed. And about how often between pads replacement. 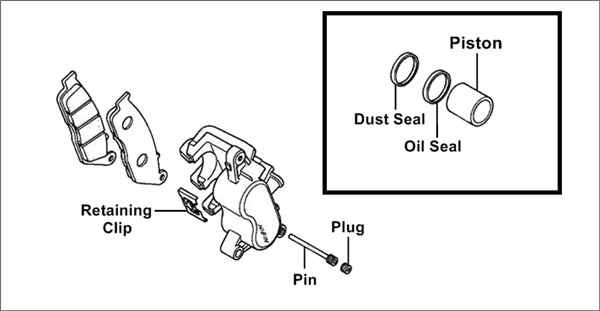 |
|
|
|
« Last Edit: June 03, 2011, 08:30:54 PM by RONW »
|
Logged
|
2000 Valkyrie Tourer
|
|
|
fudgie
Member
Posts: 10651
Better to be judged by 12, then carried by 6.
Huntington Indiana
|
|
« Reply #11 on: June 04, 2011, 05:56:07 AM » |
|
I just stick a screw driver in there and pry them back. Unless its off the bike then I use c clamps like i would on a truck.
|
|
|
|
|
Logged
|
 Now you're in the world of the wolves... And we welcome all you sheep... VRCC-#7196 VRCCDS-#0175 DTR PGR |
|
|
eric in md
Member
Posts: 2495
ride hard now we all can rest when were gone !!!
in the mountains .......cumberland md
|
|
« Reply #12 on: June 04, 2011, 06:07:17 AM » |
|
what are u talking about fudgeee
|
|
|
|
|
Logged
|
|
|
|
fudgie
Member
Posts: 10651
Better to be judged by 12, then carried by 6.
Huntington Indiana
|
|
« Reply #13 on: June 04, 2011, 08:59:57 AM » |
|
what are u talking about fudgeee
Getting the pistons pushed back in so the pads will slid into place. |
|
|
|
|
Logged
|
Now you're in the world of the wolves... And we welcome all you sheep... VRCC-#7196 VRCCDS-#0175 DTR PGR |
|
|
|
RonW
|
|
« Reply #14 on: June 04, 2011, 05:47:14 PM » |
|
just use the old pads between the pistons and the screwdriver when prying back the pistons. After polishing the walls of the pistons.
|
|
|
|
|
Logged
|
2000 Valkyrie Tourer
|
|
|
cutter
Member
Posts: 576
First Company in... Last Company out! VRCCDS0234
Plantersville, Texas
|
|
« Reply #15 on: June 04, 2011, 06:54:50 PM » |
|
I have rebuilt/replaced the pistons and seals once at around 190,000 on the rear. I just clean the pistons with brake cleaner and use the old pads and a C-clamp along with removing the resivior cover - slowly as not to spill fluid. If I'm not replaceing during a rear tire change then I remove the caliper to clean and reset pistons, easy to do.
|
|
|
|
|
Logged
|
On your tombstone there is a dash between the day you were born and the day you die. Make that dash count.  |
|
|
Oss
Member
Posts: 12832
The lower Hudson Valley
Ossining NY Chapter Rep VRCCDS0141
|
|
« Reply #16 on: June 05, 2011, 06:49:20 PM » |
|
had a nice ride today up the Goat Trail and north on 9D to Cold Spring and then east on 301 thru the Fahnstock State Park, around 80 miles then south on the Taconic to 129 and west to the Dam then home Brakes working just fine and dandy Never did get an answer to the question of is there anything else you need to remove beside the one large bolt and the pin thru the caliper to remove the caliper from the rotor. Therefore I did nothing to the pistons except to push them in using the old brake pads, no screwdriver needed I did use the handle of the ratchet to lever the force to get the pistons in Did not add any brake fluid she worked just great. Also what do you think of the wear on the tire? The center is now even to the wear bars but the rest of the tire has deep tread  Am supposed to ride up to Lake George for Americade and will put another 1000 miles on the tire if I do all the rides I have planned. Almost 200 miles there on the scenic route |
|
|
|
« Last Edit: June 05, 2011, 06:51:51 PM by Oss »
|
Logged
|
If you don't know where your going any road will take you there
George Harrison
When you come to the fork in the road, take it
Yogi Berra (Don't send it to me C.O.D.)
|
|
|
|
Bobbo
|
|
« Reply #17 on: June 05, 2011, 06:59:07 PM » |
|
Never did get an answer to the question of is there anything else you need to remove beside the one large bolt and the pin thru the caliper to remove the caliper from the rotor.
Besides the large bolt on the left, there is a small pin on the right that the caliper rides on. It is threaded onto the mounting bracket. You need to use an open end wrench to unscrew it before the caliper comes off. And yes, you are ready for a new tire, and I recommend taking more curvy roads instead of straight!  |
|
|
|
« Last Edit: June 05, 2011, 07:00:41 PM by Bobbo »
|
Logged
|
|
|
|
Dag
Member
Posts: 1779
I have a love affair with a bumblebee
Country Rep. Norway
|
|
« Reply #18 on: June 24, 2011, 05:07:18 PM » |
|
|
|
|
|
|
Logged
|
The question is not what you look at...but what you see...
|
|
|
|
JimC
|
|
« Reply #19 on: June 24, 2011, 06:01:42 PM » |
|
OSS,
I would strongly consider changing that tire prior to a 1,000 mile ride. I have read here numerous times were people tried a long ride like that and ended up with the cords showing when they got to their destination. It seems that once they are down that far, they wear very quick from that point.
I know Black Dog had to be brought back in a trailer from Indiana when he took a chance on one like that. Maybe he will chime in.
Jim
|
|
|
|
|
Logged
|
Jim Callaghan SE Wisconsin
|
|
|
|
Ricky-D
|
|
« Reply #20 on: June 25, 2011, 11:21:04 AM » |
|
Oss, a lot of things to help you determine whether or not to keep that tire on for the trip would be especially your experience on your bike.
If you have already worn out a rear tire and know how many miles you got on it and now apply it to the tire you are now using will be an important factor. That's why keeping records is important.
Different riders get different mileage from the same tires. And the range is huge! There are some that get as little as 7 thousand miles from a rear tire and there are other that report getting more that 20 thousand miles from a rear tire.
So your past experience is what needs to have input into the question.
I think you'll have no problem with the tire making it another trip but where you'll be riding should have some weight and also if you think there will be rain since the wear bars really are for adaptability of the tire to run on rain soaked roads.
What speeds you will be experiencing should also influence your decision.
Finally, if you do put a new tire on the rear I would suggest you save that tire to again be installed for riding locally. They are too expensive to be trash canned at such an early point.
***
|
|
|
|
|
Logged
|
2000_Valkyrie_Interstate
|
|
|
|
The Anvil
|
|
« Reply #21 on: June 25, 2011, 12:34:47 PM » |
|
I usually use a small pry bar to slowly force between the back of the pad and the caliper. That will compress the pistons fully. Make sure the reservoir is not completely full before doing this. I usually remove most of the brake fluid, compress, install, and top off the fluid.
That's pretty much exactly how I do it. |
|
|
|
|
Logged
|
Boxer rebellion, the Holy Child. They all pay their rent.
But none together can testify to the rhythm of a road well bent.
Saddles and zip codes, passports and gates, the Jones' keep.
In August the water is trickling, in April it's furious deep.
1997 Valk Standard, Red and White.
|
|
|
Dag
Member
Posts: 1779
I have a love affair with a bumblebee
Country Rep. Norway
|
|
« Reply #22 on: June 25, 2011, 03:35:06 PM » |
|
You can remove the caliper without removing the bracket. Remove the oil bolt, sealing washers and brake hose. (collect the brake fluid) / you will get air in the brake fluid. Remove the caliper pin boot from the bracket. Remove the pad spring and boot from the caliper body.  |
|
|
|
|
Logged
|
The question is not what you look at...but what you see...
|
|
|
|


