|
Lost Valk
|
 |
« on: July 02, 2011, 12:22:17 PM » |
|
I would love some advice about how to back out some rusted bolts holding in the plates for the clutch and brake fluid on the. I tried to remove them a few years back to change the clutch fluid and one stripped. Needless to say i have not changed my clutch fluid in probably 4-5 years  I included a pic. Let me know what you think i can do. Ok i tried to include a pic. I could not figure it out.  |
|
|
|
|
 Logged
|
|
|
|
|
Grumpy
|
|
« Reply #1 on: July 02, 2011, 12:32:26 PM » |
|
Take a phillips screw driver bit, type you would use in a drill etc. Set it in the screw and smack it a couple times with a small hammer. The shock should break the rust free and allow you to remove them.
|
|
|
|
|
Logged
|
 Life is like a hot bath. It feels good while you’re in it, but the longer you stay in, the more wrinkled you get. |
|
|
|
Lost Valk
|
|
« Reply #2 on: July 02, 2011, 12:43:14 PM » |
|
and if it is stripped?
|
|
|
|
|
Logged
|
|
|
|
|
Chrisj CMA
|
|
« Reply #3 on: July 02, 2011, 12:53:07 PM » |
|
and if it is stripped?
Still do the tap thing. then get an easy out, probably have to drill a small hole in the screw, but that is a soft metal screw. The other thing is to use a properly fitting sharp bladed screwdriver. Many people choose a driver that is too small and dont care that it is worn slap out and then wonder why they ended up with a mess |
|
|
|
|
Logged
|
|
|
|
|
Lost Valk
|
|
« Reply #4 on: July 02, 2011, 01:10:40 PM » |
|
well the hammering worked on the rusted ones that were not stripped. I will go look at getting an easy out from harbor freight. Before i get to far though, where can i get replacement bolts/screw that will not rust and fit the reservoirs?
|
|
|
|
|
Logged
|
|
|
|
|
9Ball
|
|
« Reply #5 on: July 02, 2011, 01:24:59 PM » |
|
you can always drill the head off the screw....it's a tapered head. Once the head pops off, remove the cover and use a pair of pliers to remove the remaining part of the screw. You can then use the excuse to get a new set of chrome reservoir covers.....  |
|
|
|
|
Logged
|
VRCC #6897, Joined May, 2000
1999 Standard
2007 Rocket 3
2005 VTX 1300S
|
|
|
|
Lost Valk
|
|
« Reply #6 on: July 02, 2011, 01:27:37 PM » |
|
any cheap simple places i can get replacement screws/bolts without trying to find them on the internet? I remember seeing an ace hardware with a whole bunch of chrome bolts for motorcycles and cars. I hate to drill it out and have no way to put it back on for a while
|
|
|
|
|
Logged
|
|
|
|
|
9Ball
|
|
« Reply #7 on: July 02, 2011, 02:41:54 PM » |
|
Ace should have these metric screws....I bought SS ones from them and polished the heads.
They're 4 x 12 mm tapered head (flat) screws.
|
|
|
|
|
Logged
|
VRCC #6897, Joined May, 2000
1999 Standard
2007 Rocket 3
2005 VTX 1300S
|
|
|
|
Lost Valk
|
|
« Reply #8 on: July 02, 2011, 03:42:04 PM » |
|
with some work i was able to get them out. I broke a left handed drill bit or 2 in the process. I think i might have also spun my resivor a bit with all the hammering. I also found the screws that are close at lowes. The heads are tapered but they end up not being flush with the lid. I used M4-.7 x 12 as you said. It does not look perfect but it works. Good to know.
The fluid was pretty bad. mostly sludge. The level was also really low. I could not tell this as the view window has yellowed pretty bad with time. Changing the fluid also fixed a problem i was having with the clutch not disengaging. It also really changed where the level is when the clutch releases. SO much so that i thought the bike was in neutral because the lever had to be so far out. wild.
|
|
|
|
|
Logged
|
|
|
|
Tropic traveler
Member

Posts: 3117
Livin' the Valk, er, F6B life in Central Florida.
Silver Springs, Florida
|
|
« Reply #9 on: July 02, 2011, 04:45:23 PM » |
|
Ace should have these metric screws....I bought SS ones from them and polished the heads.
They're 4 x 12 mm tapered head (flat) screws.
Same here. No rust, no stripped, no error. |
|
|
|
|
Logged
|
'13 F6B black-the real new Valkyrie Tourer
'13 F6B red for Kim
'97 Valkyrie Tourer r&w, OLDFRT's ride now!
'98 Valkyrie Tourer burgundy & cream traded for Kim's F6B
'05 SS 750 traded for Kim's F6B
'99 Valkyrie black & silver Tourer, traded in on my F6B
'05 Triumph R3 gone but not forgotten!
|
|
|
|
9Ball
|
|
« Reply #10 on: July 03, 2011, 03:21:06 AM » |
|
with some work i was able to get them out. I broke a left handed drill bit or 2 in the process. I think i might have also spun my resivor a bit with all the hammering. I also found the screws that are close at lowes. The heads are tapered but they end up not being flush with the lid. I used M4-.7 x 12 as you said. It does not look perfect but it works. Good to know.
The fluid was pretty bad. mostly sludge. The level was also really low. I could not tell this as the view window has yellowed pretty bad with time. Changing the fluid also fixed a problem i was having with the clutch not disengaging. It also really changed where the level is when the clutch releases. SO much so that i thought the bike was in neutral because the lever had to be so far out. wild.
to put your reservoir back where it's needed, just loosen the top bolt on the clamp and rotate to where the lever feels comfortable, then re-tighten. it shouldn't need much movement to get it back into position. |
|
|
|
|
Logged
|
VRCC #6897, Joined May, 2000
1999 Standard
2007 Rocket 3
2005 VTX 1300S
|
|
|
fordmano
Member
Posts: 1457
San Jose, CA. 1999 I/S 232 miles when bought 11/05
San Jose, CA.
|
|
« Reply #11 on: July 03, 2011, 03:44:06 AM » |
|
This is what my screws looked like when I was working on my Multipoint upgrade project. 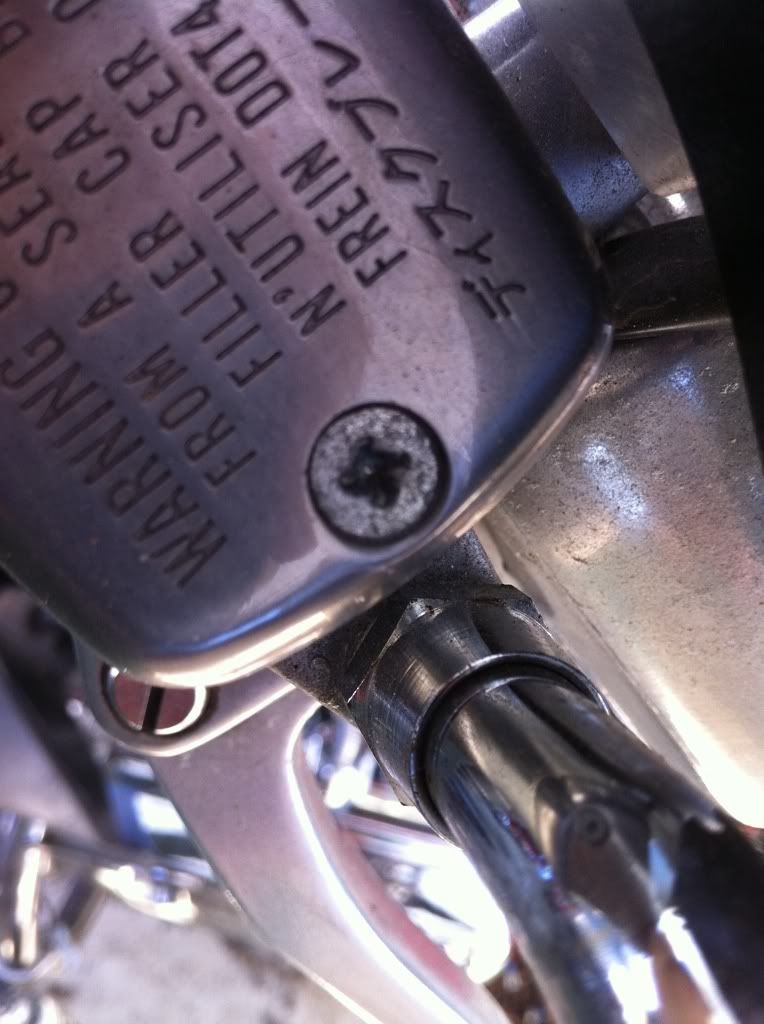 I gave up before I completly ruined the screw heads. I went over to Sears and picked this up. 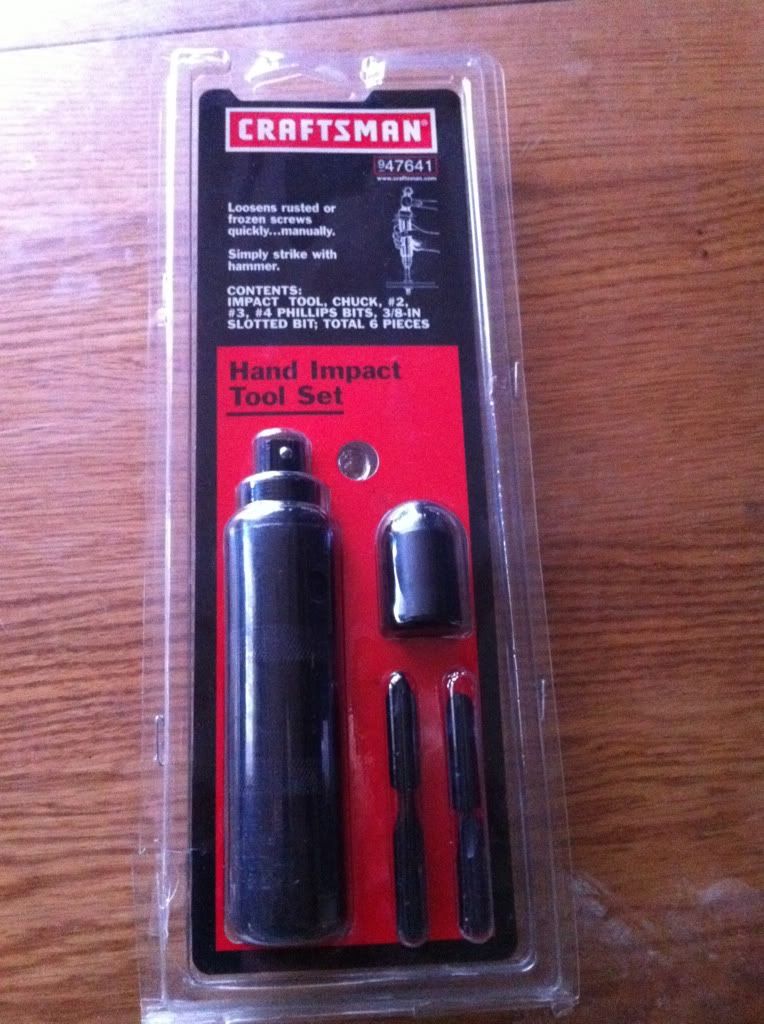 A tool that every Moto Mechanic should have at his disposal. 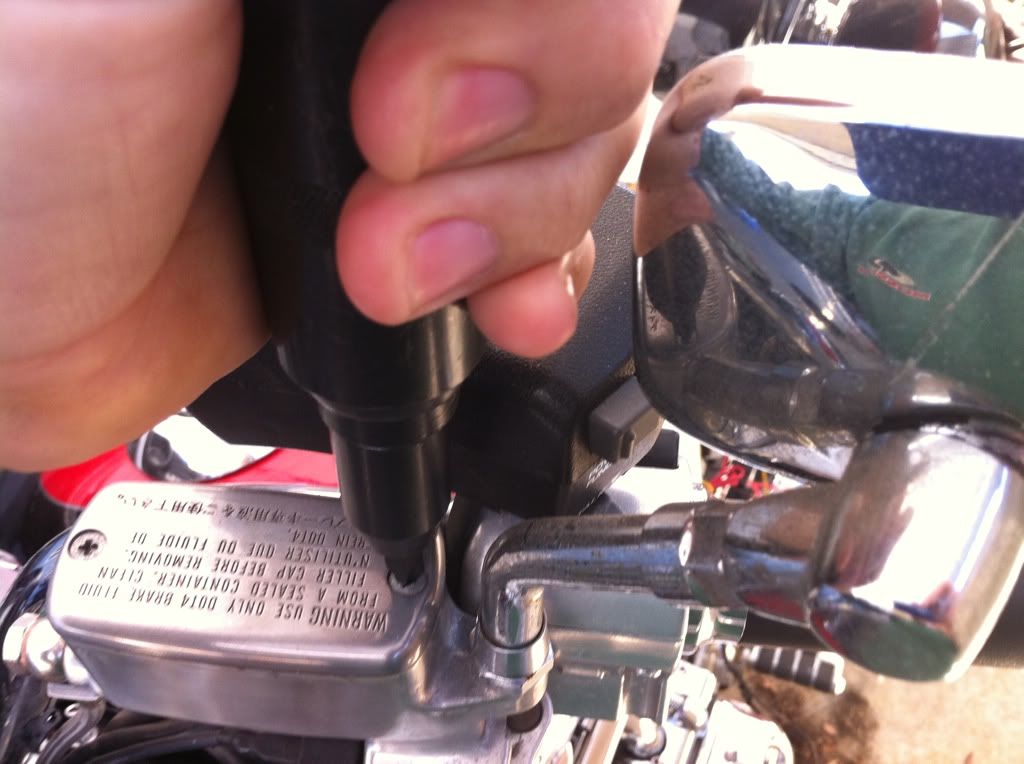 And then after all was said and done with them soft stock screws starting to strip out, and then the finished product.  Much nicer. I just wish I could get the entire reservoir chromed on both sides. Maybe next year. |
|
|
|
|
Logged
|
  83GS550 93XR650L TARD! 97WR250 99ValkyrieI/S Tri-tone 01YZ125(x2) 05DRZ-125 |
|
|
|
designer
|
|
« Reply #12 on: July 03, 2011, 07:25:38 AM » |
|
Trick I learned when working on cars. Exhaust manifolds are brutal and will snap more often then not on older cars. Take an arc welder and tap the head a couple times.... Not trying to weld it, just get some current going through it. Then turn with a wrench. Don't know if that will help you with your project.
|
|
|
|
|
Logged
|
2002 Valkyrie Std
K&N Filter, Audiovox Cruise, I/S bags and trunk, Cee Bailey shield +2, ECT mod, radiator pods, driving lights, rattlebars kick shifter ,I/S ICM
|
|
|
valkyriemc
Member
Posts: 392
2000 blu/slvr Interstate, 2018 Ultra Limited
NE Florida
|
|
« Reply #13 on: July 03, 2011, 09:49:45 AM » |
|
Ace should have these metric screws....I bought SS ones from them and polished the heads.
They're 4 x 12 mm tapered head (flat) screws.
+1 did same thing. |
|
|
|
|
Logged
|
Veteran USN '70-'76
|
|
|
|
Ricky-D
|
|
« Reply #14 on: July 03, 2011, 10:25:08 AM » |
|
Those are such tiny screws.
No need to torque them down.
Snug is the practice, you're squeezing a rubber gasket. That's all!
***
|
|
|
|
|
Logged
|
2000_Valkyrie_Interstate
|
|
|
|


