|
grennels
|
 |
« on: July 10, 2011, 11:11:33 AM » |
|
Starter switch went bad. Fooled with it but can't get it working. Will replace with new.
When you buy a new switch I assume it comes with wiring attached? Where does this
wiring unplug from the harness? I can't seem to find a disconnect point.
Where is the best place to buy the switch?
|
|
|
|
|
 Logged
|
|
|
|
|
|
Fudd
Member

Posts: 1733
MSF RiderCoach
Denham Springs, La.
|
|
« Reply #2 on: July 10, 2011, 12:22:59 PM » |
|
And to think my fire suit is at the cleaners.....Here goes anyway.
If the 4 contact points are in good shape in the "fixed" part of the switch, I'd be tempted to just change the moveable "wiper" portion inside.
It's a shame you have to buy the whole durn assembly, when it's just the wiper that goes bad.
|
|
|
|
« Last Edit: July 10, 2011, 12:26:40 PM by Fudd »
|
Logged
|
 Save a horse, ride a Valkyrie |
|
|
|
grennels
|
|
« Reply #3 on: July 10, 2011, 01:24:21 PM » |
|
Mine looks fine inside. No melting, no corrosion. Before disassembly of the actual switch
I could squeeze it together, the contacts would make and the bike would start. After
disassembly, light cleaning and reassembly it won't work at all. If I jumper the two fixed contact points
it starts right up. I tried shimming up the piece the moveable contacts ride in but no luck.
Ordered new switch assembly. $71 and change.
|
|
|
|
|
Logged
|
|
|
|
Fudd
Member
Posts: 1733
MSF RiderCoach
Denham Springs, La.
|
|
« Reply #4 on: July 10, 2011, 01:45:49 PM » |
|
Pry the switch apart and bend the contact wipers back with fine tipped needle nose pliers. Complete instructions in shop talk. It'll take you 10 minutes to fix it.
|
|
|
|
|
Logged
|
Save a horse, ride a Valkyrie |
|
|
Snoopy
Member
Posts: 31
multi year nam vet AC130 (puff)
Jacksonville Beach, Fl/ Pickens,SC
|
|
« Reply #5 on: July 10, 2011, 03:47:39 PM » |
|
I put a small piece of plastic under the slider like kids toys are packaged in. Works great
|
|
|
|
|
Logged
|
Multi year nam vet AC130 (Puff) All gave some, some gave all
|
|
|
|
grennels
|
|
« Reply #6 on: July 10, 2011, 04:22:28 PM » |
|
Tried the piece of plastic. Didn't work. Didn't try bending the contacts out. Already ordered
new switch. Oh well.
|
|
|
|
|
Logged
|
|
|
|
|
RonW
|
|
« Reply #7 on: July 11, 2011, 01:09:41 AM » |
|
If you like, you can swap out the movable contact part until you have more time to install the entire replacement unit. 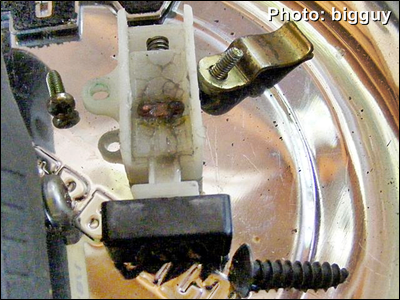 |
|
|
|
« Last Edit: July 11, 2011, 01:20:13 AM by RONW »
|
Logged
|
2000 Valkyrie Tourer
|
|
|
|
grennels
|
|
« Reply #8 on: July 11, 2011, 04:39:05 PM » |
|
Now THERE"S a cool idea!!!!
|
|
|
|
|
Logged
|
|
|
|
captsharky
Member
Posts: 189
Been riding Honda since 1972.
Sunrise, Florida
|
|
« Reply #9 on: July 12, 2011, 06:55:15 AM » |
|
To keep both sides looking the same I just switch out the part of the switch, and saved the rest for if I ever need to replace the whole thing.
|
|
|
|
|
Logged
|
2001 Valk black Interstate,
1998 T Cobra light bar, Corbin seats Tank bib, baker air wings, lockable hard bags, luggage rack and trunk. Woody's faring, cruise throttle lock.
|
|
|
|
Jim Ross
|
|
« Reply #10 on: July 12, 2011, 12:51:14 PM » |
|
I did this job just a couple of weeks ago.
Yes, the wiring harness plug is inside the headlight housing and it is not at all difficult to access. It may take a little bit of gently moving some wires around in order to fish the new harness plug into the back side of the headlight housing, but nothing too difficult.
I did as mentioned in a post up above and kept my original handlebar housing and just replaced the push button and internal parts.....that way I did not have to take my throttle cables loose or end up with a housing that did not match my left handlebar housing for color.
Now, replacing just the push button and internal parts IS a tedious job. It is not particularly complicated, but with the housing still attached to the handlebar, it is a bit of a challenge to get the new parts into place and connected. Just take your time, go carefully and you can do it. Keep something clean and white under the work are in case you drop a small part....makes it easier to find; I know!
One more thing. I tested my new wiring harness/button before I completely reassembled everything. It is good to know it will work before you get it all put back together.
|
|
|
|
|
Logged
|
El Cazador, VRCC#1002
Ams/Oil Dealer;
'98 Valk Tourer with too much stuff to list;
'94 Toyota RegCab short bed 4WD, 4 cyl, 5 spd;
'04 "hot rod" Ram 3500 SRW, CCSB , Cummins, 4WD with too much stuff to list;
'05 Silverado RegCab short bed 4WD, 4.3, 5 spd;
'14 Sierra SLT K1500, CCSB, 5.3, Z/71
|
|
|
hubcapsc
Member
Posts: 16816
upstate
South Carolina
|
|
« Reply #11 on: July 12, 2011, 12:54:30 PM » |
|
Keep something clean and white under the work are in case you drop a small part...I'm sure me and that little spring would part ways almost right away...  -Mike
|
|
|
|
|
Logged
|
|
|
|
|
RonW
|
|
« Reply #12 on: July 12, 2011, 07:17:24 PM » |
|
a minor point, but when you insert the stationary-contact plate (black rectangle with the wires, bigguy) into z nylon box, make absolutely sure that it's fully mated into all 4 slots on the sidewalls of the nylon box. I had the good fortune to notice that mines hadn't. |
|
|
|
« Last Edit: July 12, 2011, 07:21:03 PM by RONW »
|
Logged
|
2000 Valkyrie Tourer
|
|
|
Airetime
Member
Posts: 156
U Never See a Valk Parked @ a Psychiatrist Office
Anacortes, WA
|
|
« Reply #13 on: July 12, 2011, 08:13:57 PM » |
|
Starter switch went bad. Fooled with it but can't get it working. Will replace with new.
When you buy a new switch I assume it comes with wiring attached? Where does this
wiring unplug from the harness? I can't seem to find a disconnect point.
Where is the best place to buy the switch?
Before you replace the switch check out the Starter Relay to make sure that isn't the culprit! Scroll to the bottom of the link.  http://www.rattlebars.com/mtz/starter.html http://www.rattlebars.com/mtz/starter.html |
|
|
|
|
Logged
|
|
|
|
|
grennels
|
|
« Reply #14 on: July 13, 2011, 10:38:49 AM » |
|
I am assuming that since when I jumper the contact points in the switch it starts right
up that the problem is indeed the switch.
|
|
|
|
|
Logged
|
|
|
|
Fudd
Member
Posts: 1733
MSF RiderCoach
Denham Springs, La.
|
|
« Reply #15 on: July 13, 2011, 12:45:36 PM » |
|
I am assuming that since when I jumper the contact points in the switch it starts right
up that the problem is indeed the switch.
I agree with the logic of your troubleshooting. While I'm here. I'm glad the plastic shim fixed the switch for Snoopy, but I'm not sure how it did it. The contacts on the slide inside the switch normally get bent down into a grove below the flush surface on the topside the slide. I don't see how any amount of shiming would get them back touching the 4 fixed contacts on the switch outer housing. The "only" fix I can see working for any legnth of time is bending the contacts back into position, which is fairly easy to do. |
|
|
|
|
Logged
|
Save a horse, ride a Valkyrie |
|
|
|
grennels
|
|
« Reply #16 on: July 13, 2011, 05:47:15 PM » |
|
I tried shimming thinking IF it worked it would be more permanent than bending the points.
I think they would quickly bend back. The shimming did NOT work for me. This switch
is a pretty cheesy bit of engineering IMO.
|
|
|
|
|
Logged
|
|
|
|
bigguy
Member
Posts: 2684
VRCC# 30728
Texarkana, TX

|
|
« Reply #17 on: July 14, 2011, 07:17:33 AM » |
|
I tried shimming thinking IF it worked it would be more permanent than bending the points.
I think they would quickly bend back. The shimming did NOT work for me. This switch
is a pretty cheesy bit of engineering IMO.
+1 And from what I can tell, it's the exact same unit as on my 3rd gen Magna V45 I bent up the tabs on my Valk's switch and that is working for now, but I'm sure that is a best a temporary solution. Bending the tabs certainly didn't fix what ever caused it to get so hot in the first place. I'm sure there's a new switch in my future. I'll think about adding the starter relay when I put in the new switch. |
|
|
|
« Last Edit: July 14, 2011, 01:16:17 PM by bigguy »
|
Logged
|
Here there be Dragons.  |
|
|
|
bfn
|
|
« Reply #18 on: August 09, 2012, 11:01:33 AM » |
|
l've cleaned my switch, not burnt etc, all looks fine, but still the occasional no start...so ordered a new switch assembly.....thanks for the advice on where the wires go......might try, as per advice, just changing the internal parts, minimizing the job, for now......or might just wait till it's next trip into a shop and have a 'real' mechanic do it....  any more advice out there? |
|
|
|
|
Logged
|
|
|
|
mmurffy03
Member
Posts: 791
03 standard
toms river new jersey
|
|
« Reply #19 on: August 09, 2012, 11:44:30 AM » |
|
when my switch went out the headlight went out also but i started it by jumping across the starter selenoid under the right side cover to get home it was daytime so no headlight made matters worse
|
|
|
|
|
Logged
|
|
|
|
|
Chrisj CMA
|
|
« Reply #20 on: August 09, 2012, 12:50:08 PM » |
|
Mine looks fine inside. No melting, no corrosion. Before disassembly of the actual switch
I could squeeze it together, the contacts would make and the bike would start. After
disassembly, light cleaning and reassembly it won't work at all. If I jumper the two fixed contact points
it starts right up. I tried shimming up the piece the moveable contacts ride in but no luck.
Ordered new switch assembly. $71 and change.
most likely the little brass tits dont bounce up and down (ya I know) you have to clean out the rectangular holes it rides in....straighten the ears....but make sure it springs back up when you press it down......yours is stuck down and making no contact buying a new one wont eliminate this problem. I had to buy a new one because of a little emergency and the new one was stuck down worse that some old ones I have seen |
|
|
|
« Last Edit: August 09, 2012, 12:52:41 PM by Chrisj CMA »
|
Logged
|
|
|
|
|


