|
bg
|
 |
« on: July 21, 2011, 07:51:18 AM » |
|
mine started acting up the other day.
i checked shoptalk and saw the article on repairing it.
ok, here's my ?.
can a non mechanical type like me do this?
i don't want to take it apart and have springs flying all over the place and not be able
to get things reassembled properly.
i can take anything apart, it's getting it all back together that's my problem.
it sounds relatively easy but wanted to check anyway.
|
|
|
|
|
 Logged
|
|
|
|
|
Momz
|
|
« Reply #1 on: July 21, 2011, 08:24:30 AM » |
|
It is an easy repair.
Take your time and don't be itimidated by a mere switch.
Also check that your starter relay is not damaged; pull off your side cover and have a look and a smell. A burned relay is going to be quite evident.
Good luck
|
|
|
|
|
Logged
|
 ALWAYS QUESTION AUTHORITY! 97 Valk bobber, 98 Valk Rat Rod, 2K SuperValk, plus several other classic bikes |
|
|
JC
Member

Posts: 321
The Beast
Franklin, TN
|
|
« Reply #2 on: July 21, 2011, 08:28:31 AM » |
|
If you've read the shoptalk and take your time then you should be fine. This is one of the easier fixes, and hopefully you'll gain enough confidence to take on the next problem that comes along. Most of the work on the Valk is relatively simple if you research it here go at it slowly.  |
|
|
|
|
Logged
|
Damn thing gives me the grins every time I get on it!
|
|
|
|
Bone
|
|
« Reply #3 on: July 21, 2011, 08:32:05 AM » |
|
[can a non mechanical type like me do this?
i can take anything apart, it's getting it all back together that's my problem.[/quote]
Sweep the floor under the bike first.
Look at the directions a couple of times before you begin.
Look at the pictures if available and see where the parts are located.
Take it apart slowly one piece at a time.
Lay out a clean shop towel.
The first piece you remove lay it arms length away on the towel.
Remove the second piece laying it next to the first and continue until disassembled.
You've probably figured the first part to be assembled is the part nearest to you.
|
|
|
|
|
Logged
|
|
|
|
|
bg
|
|
« Reply #4 on: July 21, 2011, 10:02:29 AM » |
|
thanks guys,
i'll give it a go in the next couple days.
|
|
|
|
|
Logged
|
|
|
|
R J
Member
Posts: 13380
DS-0009 ...... # 173
Des Moines, IA
|
|
« Reply #5 on: July 21, 2011, 03:36:58 PM » |
|
Let us know how ya make out.
|
|
|
|
|
Logged
|
44 Harley ServiCar   |
|
|
|
RonW
|
|
« Reply #6 on: July 21, 2011, 03:50:47 PM » |
|
To get to the switch, you'll first have to remove two screws that hold the two halves of the right housing together. The screws are different lengths. I wouldn't rely on memory here. When you're facing the front of the bike than the back, all the while working from below the handlebars, so forth, it'll throw things off. It's a minor hassle but you'll want to finish up in style instead of fumbling around like an idiot. I forget but, I believe that the two tiny screws inside housing are different lengths too (Screw A and Screw B in photo below). Go easy on those. The phillips head are easy to round off. Or if you like, apply red Titelock® on them like I did and use a vice-grip to remove them later. Why do the threadlock tubes use the same color for different strengths made by the same brand. Also, there is an alignment knob molded into the lower housing that mates into a hole in the bottom surface of the handlebar. More photos here (bigguy). 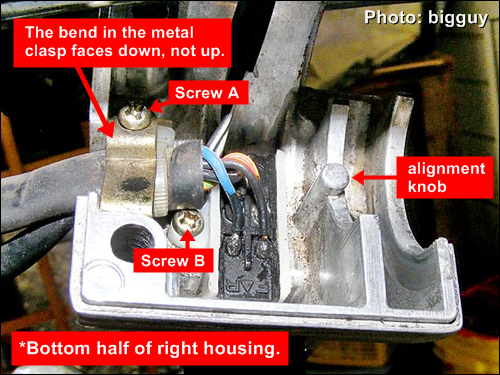 |
|
|
|
|
Logged
|
2000 Valkyrie Tourer
|
|
|
SANDMAN5
Member
Posts: 2176
Mileage 65875
East TN
|
|
« Reply #7 on: July 22, 2011, 05:46:26 AM » |
|
I've done it several times and I'm about as "non-mechanically inclined" as anybody on this board!! Just take your time. |
|
|
|
|
Logged
|
"Evolution" is a dying religion being kept alive with tax dollars.  |
|
|
bigguy
Member
Posts: 2684
VRCC# 30728
Texarkana, TX

|
|
« Reply #8 on: July 22, 2011, 06:44:42 AM » |
|
The hardest part is going to be finding the screws WHEN you drop them.  There's one spot in particular right behind the radiator where you can see the screw, but can't reach it with anything. That's the spot the top housing screw loves. A magnetic tip long shank screwdriver helps. Getting it apart and back together is pretty easy. The test will be what you find inside. A common problem on the standards and tourers seems to be the contacts melted into the slider.  Tourers and Standards don't have the starter relay found on Interstates. As a result, a lot of current runs through that switch. I've seen this exact problem on two other bikes, and read about it on several more. With luck though, you can get by with just cleaning off the contacts. Clean both these and the ones they contact on the bottom of the upper contact plate.  Let us know what you find. |
|
|
|
« Last Edit: July 22, 2011, 06:46:36 AM by bigguy »
|
Logged
|
Here there be Dragons.  |
|
|
|
bg
|
|
« Reply #9 on: July 26, 2011, 06:04:21 AM » |
|
ok, i got the top part of the housing unscrewed and off but can't get the bottom half loose from the handle bar to gain access to the starter button slide.
what am i not doing?
i'm afraid to put too much pressure on it to break it loose. it feels pretty tight but i don't see any other screw/screws that could be holding it.
|
|
|
|
|
Logged
|
|
|
|
SANDMAN5
Member
Posts: 2176
Mileage 65875
East TN
|
|
« Reply #10 on: July 26, 2011, 09:24:38 AM » |
|
Two screws should be all that holds it. Might just be stuck...or maybe
the PO glued it for some reason?
|
|
|
|
|
Logged
|
"Evolution" is a dying religion being kept alive with tax dollars. |
|
|
|
bg
|
|
« Reply #11 on: July 26, 2011, 10:10:46 AM » |
|
i bought this new in 2000 and am the only owner.
thanks, may others will pipe in with ideas.
|
|
|
|
|
Logged
|
|
|
|
bigguy
Member
Posts: 2684
VRCC# 30728
Texarkana, TX
|
|
« Reply #12 on: July 26, 2011, 12:00:25 PM » |
|
Unless there is something unusual about yours, it should come off. Just wiggle it a couple of times to see if there's any play. Also, push the throttle grip toward the bike as you try to remove it. My guess is the cable, or cable guide is hung. It should break loose with gentle persuasion.
|
|
|
|
|
Logged
|
Here there be Dragons. |
|
|
|
bg
|
|
« Reply #13 on: July 26, 2011, 12:10:43 PM » |
|
i'll try pushing the throttle, maybe it will relieve some of the pressure.
i can get the lower half to wiggle some but it will not come off with the pressure i've put on it.
don't want to force too much.
off to the garage to wiggle some.
|
|
|
|
|
Logged
|
|
|
|
|


