|
RonW
|
 |
« on: October 04, 2011, 01:37:50 AM » |
|
Just to make sure that the front axle is fully seated in the recess on the left fork I tighten down the axle shaft using wrenches on both sides of the bike (pinch bolts loosened). Facing the bike, since I'm right-handed, I rotate the wrench on the speedo-housing end of the axle with my right hand with the opposite side wrench held stationary. This has more to do with the final ½ rotation of the axle shaft givin it an extra crank. 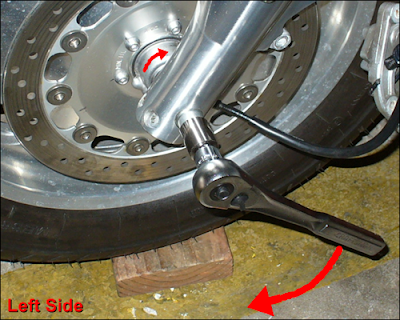 The problem with this is that rotating the axle shaft clockwise from the speedo housing side also rotates the 'knob' on the speedo housing clockwise away from it's 12 o'clock stop. Probably because of friction or something but it does. This was late last night so I probably wouldn't have overlooked the misalignment during the day. Or maybe I would have. Anyways, at least with my bike, the speedo housing does not self-rotate back counter-clockwise against it's stop .... it stays at it's misaligned position. As in, now my speedometer isn't working and I'll have to order myself a new speedo cable ($18.00). 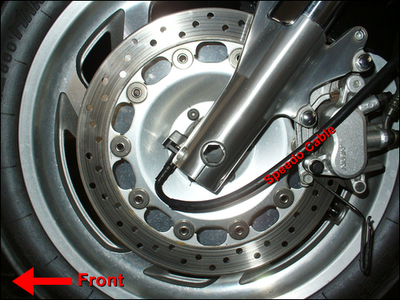  |
|
|
|
« Last Edit: November 27, 2011, 06:44:37 AM by RONW »
|
 Logged
|
2000 Valkyrie Tourer
|
|
|
|
BonS
|
|
« Reply #1 on: October 04, 2011, 04:24:52 AM » |
|
I just hold the axle stationary with a hex wrench and tighten the nut from the opposite side. Doing this, the speedometer housing remains stationary just behind its lug.
|
|
|
|
|
Logged
|
|
|
|
|
old2soon
|
|
« Reply #2 on: October 04, 2011, 06:28:27 AM » |
|
I just hold the axle stationary with a hex wrench and tighten the nut from the opposite side. Doing this, the speedometer housing remains stationary just behind its lug.
+1  RIDE SAFE. |
|
|
|
|
Logged
|
Today is the tommorow you worried about yesterday. If at first you don't succeed screw it-save it for nite check. 1964 1968 U S Navy. Two cruises off Nam.
VRCCDS0240 2012 GL1800 Gold Wing Motor Trike conversion
|
|
|
|
Ricky-D
|
|
« Reply #3 on: October 04, 2011, 06:45:29 AM » |
|
I just hold the axle stationary with a hex wrench and tighten the nut from the opposite side. Doing this, the speedometer housing remains stationary just behind its lug.
That is the way I do it also. I received some condemnation when I proposed this very thing some time ago. The reasoning was that it is not according to the directions in the manual and it was wrong to suggest not following the manual. Some got pretty bent out of shape about bouncing the front end of the bike. I've always held that tightening the nut instead of tightening the bolt is the preferred way when possible. It just seems to make much better sense to me! Of course, having some mechanical aptitude is always a plus when working on the Valkyrie. *** |
|
|
|
|
Logged
|
2000_Valkyrie_Interstate
|
|
|
R J
Member

Posts: 13380
DS-0009 ...... # 173
Des Moines, IA
|
|
« Reply #4 on: October 04, 2011, 07:20:13 AM » |
|
I just hold the axle stationary with a hex wrench and tighten the nut from the opposite side. Doing this, the speedometer housing remains stationary just behind its lug.
That is the way I do it also. I received some condemnation when I proposed this very thing some time ago. The reasoning was that it is not according to the directions in the manual and it was wrong to suggest not following the manual. Some got pretty bent out of shape about bouncing the front end of the bike. I've always held that tightening the nut instead of tightening the bolt is the preferred way when possible. It just seems to make much better sense to me! Of course, having some mechanical aptitude is always a plus when working on the Valkyrie. *** +1 on what Ricky-D says. If you have wrenched for a good deal of your life, the manual can say one thing and in practicality a good tech will find a better and easier way. The tech can't make any $$$ if he follows the manual to a 'T'. A tech working on a unit is 110% more effective than a behind the desk type writer based on what a design engineer says. NO practical experience, just this is the way it should be done based on my engineering. Typical example, the Valkyrie manual says to remove the exhaust to remove the rear wheel. I did it once, and that was 14 1/2 years ago. I don't even drop the muffler off my Viking headers to change the rear tire. YES. I do loosen the 4 cap screws on the rear housing, and I'll kick anyone's arse who works on my bike out on the road who doesn't. |
|
|
|
|
Logged
|
44 Harley ServiCar   |
|
|
PAVALKER
Member
Posts: 4435
Retired Navy 22YOS, 2014 Valkyrie , VRCC# 27213
Pittsburgh, Pa
|
|
« Reply #5 on: October 04, 2011, 07:29:44 AM » |
|
Hold the left side stationary, with speedo cable housing in place and tighten from the right side. You may have caused damage to your cable, but then again the cable casing might just be stretched enough and you may be able to rectify the speedo issue by putting it back to it's proper position and tightening in place.
|
|
|
|
|
Logged
|
John  |
|
|
hubcapsc
Member
Posts: 16816
upstate
South Carolina
|
|
« Reply #6 on: October 04, 2011, 08:14:12 AM » |
|
I think the order in the manual is 1. left pinch bolts 2. axle 3. bounce around some 4. right pinch bolts.
When I was doing it this weekend, I used the axle nut to pull the axle through all the way and then I
backed off on the axle bolt, before I did #1 and once the axle was in all the way and nothing was tightened
down, it was easy to make sure the speedo frob was in the right place... you have to remember that the axle
is not in all the way until it is flush, a lot of us have tighted everything down with the axle almost in - it sure
seems in - but it has to be flush...
-Mike
|
|
|
|
|
Logged
|
|
|
|
|
RP#62
|
|
« Reply #7 on: October 04, 2011, 06:08:47 PM » |
|
I just hold the axle stationary with a hex wrench and tighten the nut from the opposite side. Doing this, the speedometer housing remains stationary just behind its lug.
That is the way I do it also. I received some condemnation when I proposed this very thing some time ago. The reasoning was that it is not according to the directions in the manual and it was wrong to suggest not following the manual. Some got pretty bent out of shape about bouncing the front end of the bike. I've always held that tightening the nut instead of tightening the bolt is the preferred way when possible. It just seems to make much better sense to me! Of course, having some mechanical aptitude is always a plus when working on the Valkyrie. *** You must have a different manual than me. Mine says: "Install the front wheel between the fork legs. Install the front axle. Position the lug on the speedometer gear box against the back of stopper on the fork leg. Tighten the left axle pinch bolts to the specified torque. TORQUE: 22 N-m (2.2 kgf-m, 16 lbf-ft) Install the bolt caps onto the left axle pinch bolts. Install and tighten the axle bolt to the specified torque. TORQUE: 90 N-m (9.2 kgf-m, 67 lbf-ft) Install the brake caliper onto the fork leg. Install and tighten the new caliper mounting bolts to the specified Torque. TORQUE: 30 N-m (3.7 kgf-m, 22 lbf.ft) GLI 500C/CT: Connect the speedometer cable to the speedometer gearbox. Install and tighten the screw. GL1500CF: Install a new O-ring onto the speed sensor. Install the speed sensor and tighten the set screw. With the front brake applied, pump the fork several times to seat the axle and check brake up and down operation. Tighten the right axle pinch bolts to the specified torque. TORQUE: 22 N-m (2.2 kgf-m, 76 lbf-ft) lnstall the bolt caps onto the right axle pinch bolts" Don't see anything about torquing the axle, only the axle bolt. The only think I find lacking in the Honda procedure is that it leaves you to find the proper location of the axle by trial and error. It should tell you to note the depth/protrusion of the axle in the left fork and reinstall it in the same position. -RP |
|
|
|
|
Logged
|
|
|
|
|
Brian
|
|
« Reply #8 on: October 04, 2011, 06:53:58 PM » |
|
First time I did my front tire I followed book, I had no problem at all. That was 8,000 miles ago. Not to mention having some mechanical ability to think what was I doing to even question the manual.
|
|
|
|
|
Logged
|
|
|
|
|
RonW
|
|
« Reply #9 on: October 04, 2011, 11:52:01 PM » |
|
To update, the cable is indeed broken. I pulled it out of its sleeve to confirm. I don't know for sure whether the cable is designed to break at a stress point .... I was a little worried that the cable broke something inside the speedo unit on the dashboard. Fortunately it didn't.
I followed the procedure this morning when putting the front wheel on. The left pinch bolts held the axle firm enough that no hex wrench would have been required. I suppose the hex wrench is needed as bikes may not always grip the axle that tight.
That's hazarding a one-wrench two-wrench debate. Just trying to be humorous. The reason I used a hex wrench on the left side of the wheel is to draw the axle fully into it's recess all pinch bolts loosen of course. You can't see the shoulder on the axle bottoming out. It's not meant as a deviation from standard procedure. I re-loosen the axle bolt. Then follow the order of the steps per manual tightening the axle bolt a second time. Again, the speedo housing, or it's lug, rotated away from the stop because I wrenched the axle shaft from the left side of the wheel (see original post). Thusly, to make it easy to remember when using two wrenches .... the right wrench to turn is the right side wrench. The end of the axle seats flush with the left fork on mines. |
|
|
|
|
Logged
|
2000 Valkyrie Tourer
|
|
|
|
RonW
|
|
« Reply #10 on: October 05, 2011, 03:03:02 AM » |
|
Anyone. The OEM parts page shows an 'inner cable' (#17). Is this all that's needed to fix the speedo cable? I don't want to spend $18 for the speedo cable assembly when the only part I actually need costs $6.00. 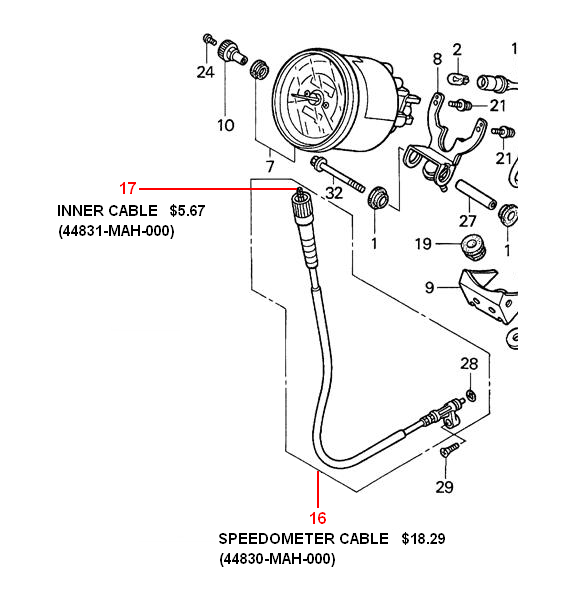 |
|
|
|
|
Logged
|
2000 Valkyrie Tourer
|
|
|
|
quexpress
|
|
« Reply #11 on: October 05, 2011, 05:29:58 AM » |
|
Anyone. The OEM parts page shows an 'inner cable' (#17). Is this all that's needed to fix the speedo cable? I don't want to spend $18 for the speedo cable assembly when the only part I actually need costs $6.00. It's possible to do that but I would purchase a whole new cable because it cable has been bent/kinked out of shape.  |
|
|
|
|
Logged
|
I still have a full deck.
I just shuffle slower ...
|
|
|
MP
Member
Posts: 5532
1997 Std Valkyrie and 2001 red/blk I/S w/sidecar
North Dakota
|
|
« Reply #12 on: October 05, 2011, 05:31:46 AM » |
|
Anyone. The OEM parts page shows an 'inner cable' (#17). Is this all that's needed to fix the speedo cable? I don't want to spend $18 for the speedo cable assembly when the only part I actually need costs $6.00. It's possible to do that but I would purchase a whole new cable because it cable has been bent/kinked out of shape. I would too. The housing has probably been damaged. Also, be careful using the parts diagrams to put things together. There are several instances where parts are turned around, or in the wrong place, in the parts book. MP |
|
|
|
|
Logged
|
 "Ridin' with Cycho" |
|
|
John Schmidt
Member
Posts: 15367
a/k/a Stuffy. '99 I/S Valk Roadsmith Trike
De Pere, WI (Green Bay)
|
|
« Reply #13 on: October 05, 2011, 08:00:41 AM » |
|
Apparently you attached the cable before the entire installation was complete, so my first question is "WHY?" Second question would be...the speedo drive housing is adjacent to the spot where all the cranking was being done by you with your socket wrench. How could you not see that housing turning? I'm with Ricky-D, I've always held the axle and tightened the nut(for 60+ yrs. now)...and I'm also right handed.  If you tried to do otherwise on the rear axle for example, there is no way you'd ever get that nut torqued to 81 ft. lbs. with a small allen wrench stuck in the right side. On both axles; hold the axle, tighten the nut. |
|
|
|
|
Logged
|
|
|
|
|
RonW
|
|
« Reply #14 on: October 05, 2011, 02:53:54 PM » |
|
I removed the cable from the bike and then pulled out the inner cable from the sheathing and by the looks of it, indeed, it's possible to replace only the inner cable to repair thing back to working order. The inner cable only costs $6.00. I'm amazed that the inner cable is sold and available separately .... for example, to get a new start button you have to buy the entire control housing for the right handlebar. The only tools needed is a phillips screwdriver and a long-nose pliers.  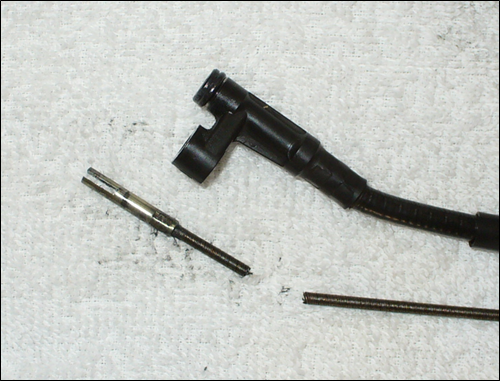  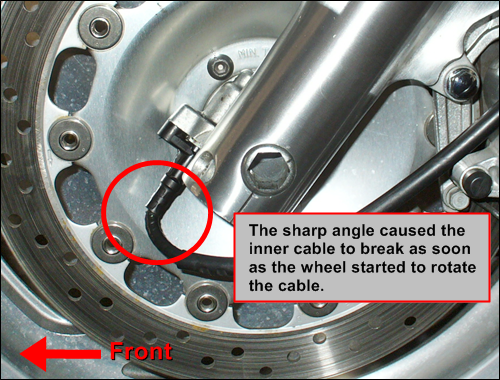
A little tap with a plastic-faced mallet bottoms the axle on the left side. EZ.
That's the way I USUALLY do it.
Second question would be...the speedo drive housing is adjacent to the spot where all the cranking was being done by you with your socket wrench. How could you not see that housing turning?
Apparently I must have blinked or perhaps becuz I was doing this at night and visibility was only 2 miles. I appreciate your concern. I meant this thread more as a cautionary tale. Btw, I bet 90 percent of the reason that the speedo cable breaks is from similar circumstance to mines. The other 10 percent from positioning the lug on the speedo housing on the wrong side of the stop.
On both axles; hold the axle, tighten the nut.
Also, there's something about torquing the bolt head gives incorrect ft-lbs reading because of the torsion in the bolt shaft when turning the head of the bolt. That's unless the factory factored in their specs torquing the bolt head instead of the nut. |
|
|
|
« Last Edit: October 05, 2011, 03:00:35 PM by RONW »
|
Logged
|
2000 Valkyrie Tourer
|
|
|
|
Brian
|
|
« Reply #15 on: October 05, 2011, 05:59:27 PM » |
|
My two cents here Ron, I would go with the whole new cable. You have no way of knowing what the interior of the sheath looks like. It could have a slight sharp edge that could wear on the new inner cable. This was a rather cheap teaching lesson that you will never do again. Nothing to be ashamed of, we have all learned the hard way, although some here may not admit it. This helps the newbies on the site. Good luck and thanks for the great pictures.
|
|
|
|
|
Logged
|
|
|
|
|
RonW
|
|
« Reply #16 on: October 05, 2011, 07:36:28 PM » |
|
no way, Brian. I ain't spending $18 when $6 will or might work. If I have to re-buy, I'm only out an extra $6. The speedo cable is a non-critical part. If it breaks again it won't damage anything. Anyways, I only need it's tripometer function and I can mange even without the tripometer if I have to.
|
|
|
|
|
Logged
|
2000 Valkyrie Tourer
|
|
|
|
Brian
|
|
« Reply #17 on: October 06, 2011, 07:14:21 PM » |
|
RONW,
It was only my two cents and I totally understand being frugal. I had speedo cable click that drove me crazy a few years ago on older vehicle. I didn't like driving around not knowing my speed when I disconnected it. I am glad to know the inner cable is available. The pictures seem to show a pretty good bend in the business end. Keep us posted.
|
|
|
|
|
Logged
|
|
|
|
|
Ken Tarver
|
|
« Reply #18 on: October 06, 2011, 07:23:48 PM » |
|
why not disconnect the cable from the speed box before you even remove the wheel? simple solution.
|
|
|
|
|
Logged
|
|
|
|
|
RonW
|
|
« Reply #19 on: October 07, 2011, 12:17:48 AM » |
|
why not disconnect the cable from the speed box before you even remove the wheel? simple solution.
Now you tell me. That's a more organized way especially when working late at night, the gremlins keep moving my tools and hiding the nuts and bolts. Brian, I fully appreciate the value of the 2¢. It's more related to the construction trade continuing to be 50-60 percent unemployed over here that makes me squeeze the nickel on a regular basis. |
|
|
|
|
Logged
|
2000 Valkyrie Tourer
|
|
|
|
Brian
|
|
« Reply #20 on: October 07, 2011, 06:50:39 PM » |
|
RONW,
Now I agree 100% with your decision. I sure hope things pick up for you.
|
|
|
|
|
Logged
|
|
|
|
|


