|
|
JC
Member

Posts: 321
The Beast
Franklin, TN
|
 |
« Reply #1 on: February 07, 2012, 07:56:51 PM » |
|
The Interstate uses a different set. One side is shorter because of the radiator covers.
|
|
|
|
|
 Logged
|
Damn thing gives me the grins every time I get on it!
|
|
|
|
CajunRider
|
|
« Reply #2 on: February 07, 2012, 07:57:15 PM » |
|
Not the best... but it's all I have at the moment...  |
|
|
|
|
Logged
|
Sent from my Apple IIe
|
|
|
wiggydotcom
Member
Posts: 3387
Do Your Best and Miss the Rest!
Yorkville, Illinois
|
|
« Reply #3 on: February 07, 2012, 08:01:00 PM » |
|
The Interstate uses a different set. One side is shorter because of the radiator covers.
Thanks for the heads up, JC...dern. I'll have to do some further checking for the correct ones. |
|
|
|
|
Logged
|
VRCC #10177 VRCCDS #239  |
|
|
John Schmidt
Member
Posts: 15372
a/k/a Stuffy. '99 I/S Valk Roadsmith Trike
De Pere, WI (Green Bay)
|
|
« Reply #4 on: February 07, 2012, 08:01:35 PM » |
|
You can use one from a Tourer or Std., just modify the length as needed. Not a big deal really, they're the same item but as stated...one is a bit shorter. Just cut it to length and apply some paint on the unfinished edge. It's covered so you can't see it anyway.
|
|
|
|
« Last Edit: February 07, 2012, 08:03:07 PM by John Schmidt »
|
Logged
|
|
|
|
|
CajunRider
|
|
« Reply #5 on: February 07, 2012, 08:02:34 PM » |
|
Found a better pic for ya...  |
|
|
|
|
Logged
|
Sent from my Apple IIe
|
|
|
wiggydotcom
Member
Posts: 3387
Do Your Best and Miss the Rest!
Yorkville, Illinois
|
|
« Reply #6 on: February 07, 2012, 08:03:35 PM » |
|
Not the best... but it's all I have at the moment... I've got an idea of what they look like mounted. Thanks for taking the time to reply with the pic, Cajun. |
|
|
|
|
Logged
|
VRCC #10177 VRCCDS #239 |
|
|
|
ptgb
|
|
« Reply #7 on: February 07, 2012, 08:05:45 PM » |
|
You do not have to cut the ones for the Standard/Tourer to fit them on the Interstate.I have a set on my Interstate without modification. Once you put them on, you have to finagle the pods a little bit more to get them (the pods) on, but it is not a big deal at all. Best picture I have, sorry.... 
|
|
|
|
« Last Edit: February 07, 2012, 08:12:14 PM by ptgb »
|
Logged
|
 Lower Lakes 1000 - 07/07 & 09/10 * Bun Burner GOLD - 09/10 Lake Superior 1000 - 07/11 * Lake Michigan 1000 - 09/11 * Lake Huron 1000 - 09/11 Saddlesore 2000 - 09/11 * Ohio 1000 - 07/13 |
|
|
wiggydotcom
Member
Posts: 3387
Do Your Best and Miss the Rest!
Yorkville, Illinois
|
|
« Reply #8 on: February 07, 2012, 08:08:33 PM » |
|
You can use one from a Tourer or Std., just modify the length as needed. Not a big deal really, they're the same item but as stated...one is a bit shorter. Just cut it to length and apply some paint on the unfinished edge. It's covered so you can't see it anyway.
That's good to know they can be modified, John. I thought I screwed up. I found a set from a different vendor for 30 bucks cheaper and pulled the trigger on em. I should be able to modify them ok if needed. Thanks for the clarification.  |
|
|
|
|
Logged
|
VRCC #10177 VRCCDS #239 |
|
|
|
Grumpy
|
|
« Reply #9 on: February 07, 2012, 08:11:25 PM » |
|
The ones for the tourer and standard are longer, but will work on the Interstate. I have a set on mine, only difference is you will need to remove the radiator pods to install them, then put them back on. personally I like the longer ones better.
|
|
|
|
|
Logged
|
 Life is like a hot bath. It feels good while you’re in it, but the longer you stay in, the more wrinkled you get. |
|
|
wiggydotcom
Member
Posts: 3387
Do Your Best and Miss the Rest!
Yorkville, Illinois
|
|
« Reply #10 on: February 07, 2012, 08:15:30 PM » |
|
That's even better yet, ptgb, knowing I won't have to mod them. Your gauges look awesome!
You do not have to cut the ones for the Standard/Tourer to fit them on the Interstate.I have a set on my Interstate without modification. Once you put them on, you have to finagle the pods a little bit more to get them on, but it is not a big deal at all. Best picture I have, sorry.... |
|
|
|
|
Logged
|
VRCC #10177 VRCCDS #239 |
|
|
wiggydotcom
Member
Posts: 3387
Do Your Best and Miss the Rest!
Yorkville, Illinois
|
|
« Reply #11 on: February 07, 2012, 08:19:50 PM » |
|
The ones for the tourer and standard are longer, but will work on the Interstate. I have a set on mine, only difference is you will need to remove the radiator pods to install them, then put them back on. personally I like the longer ones better.
Thanks, Grumpy. I've had my pods off many, many times so that won't be an issue. I appreciate everyone's replies! |
|
|
|
|
Logged
|
VRCC #10177 VRCCDS #239 |
|
|
|
Jess from VA
|
|
« Reply #12 on: February 08, 2012, 08:54:17 AM » |
|
And just so you know, the shorter ones for Interstate are out of production, I'm pretty sure.
|
|
|
|
|
Logged
|
|
|
|
Smokinjoe-VRCCDS#0005
Member
Posts: 13846
American by Birth, Southern by the Grace of God.
Beautiful east Tennessee ( GOD'S Country )
|
|
« Reply #13 on: February 08, 2012, 02:03:41 PM » |
|
You DO NOT have to butcher these up ...The Standard / Tourer will fit the Interstate and it looks better than the cut-up ones made for the Interstate   |
|
|
|
|
Logged
|
 I've seen alot of people that thought they were cool , but then again Lord I've seen alot of fools. |
|
|
GJS
Member
Posts: 424
Today is the tomorrow you worried about yesterday.
Vancouver Island, BC, Canada
|
 |
« Reply #14 on: February 08, 2012, 03:01:45 PM » |
|
  I have the short Interstate version. I still needed to modify the left side to fit the Pod. Good luck. Glenn |
|
|
|
|
Logged
|
The tragedy of life is not that it ends so soon, but that we wait so long to begin it.
- W. M. Lewis
|
|
|
fordmano
Member
Posts: 1457
San Jose, CA. 1999 I/S 232 miles when bought 11/05
San Jose, CA.
|
|
« Reply #15 on: February 08, 2012, 11:16:41 PM » |
|
|
|
|
|
|
Logged
|
  83GS550 93XR650L TARD! 97WR250 99ValkyrieI/S Tri-tone 01YZ125(x2) 05DRZ-125 |
|
|
fordmano
Member
Posts: 1457
San Jose, CA. 1999 I/S 232 miles when bought 11/05
San Jose, CA.
|
|
« Reply #16 on: February 08, 2012, 11:23:18 PM » |
|
They are just easier to install around the intakes and also easier to install your plug wires but you really don't need to cut much off. 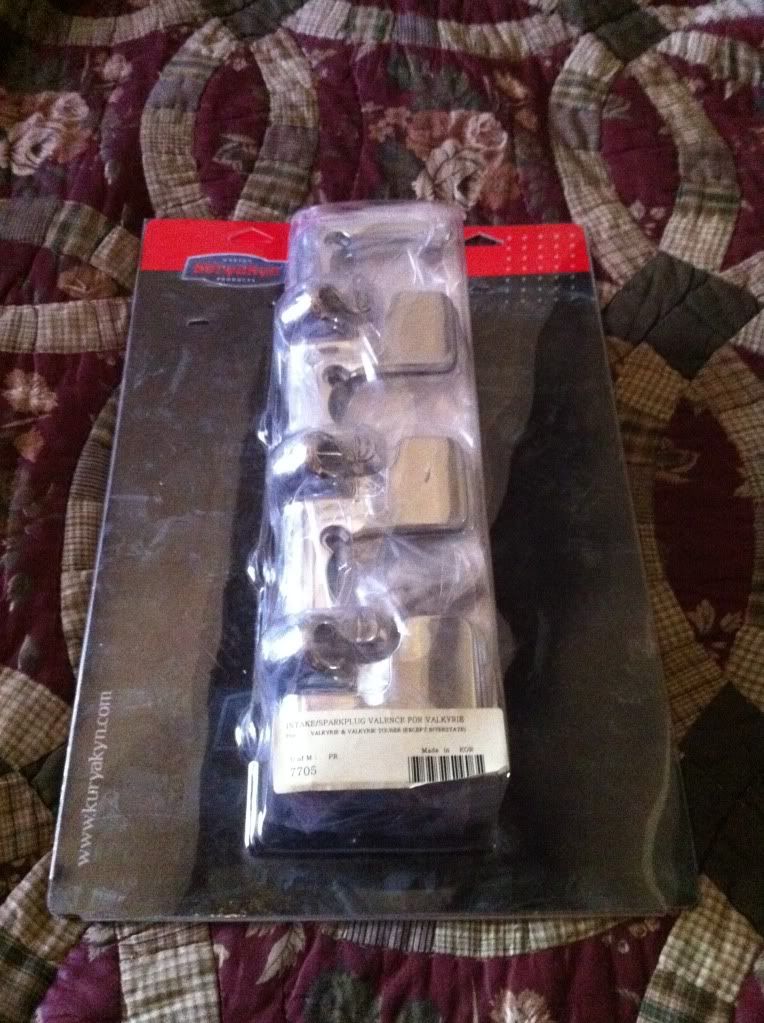 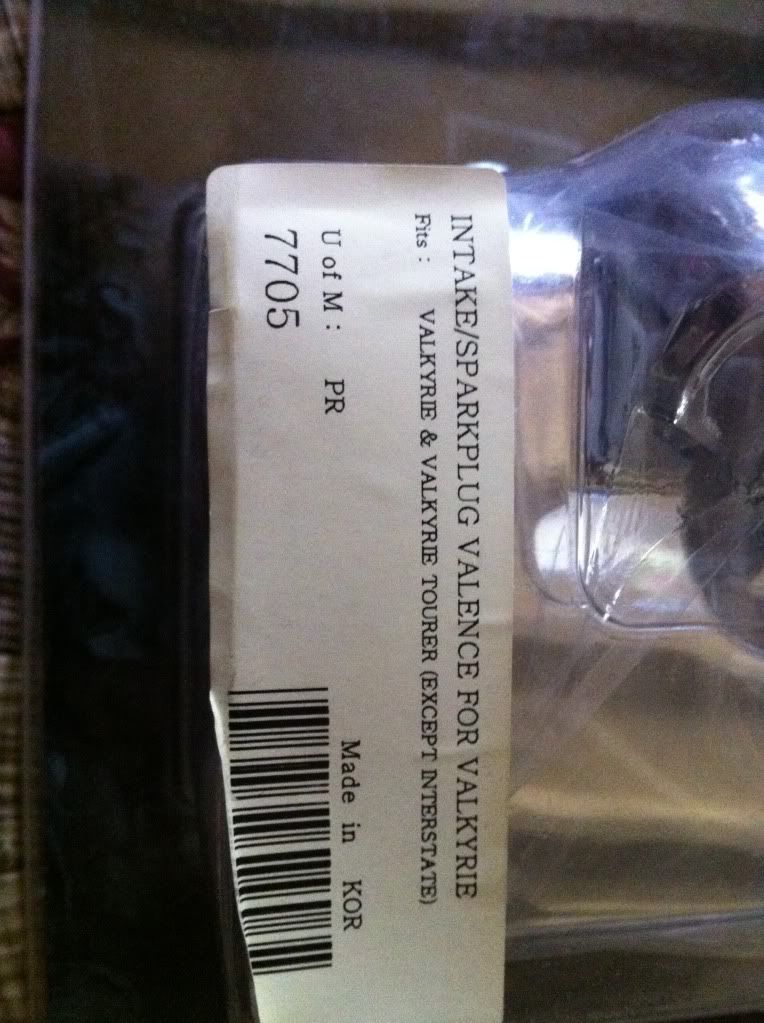 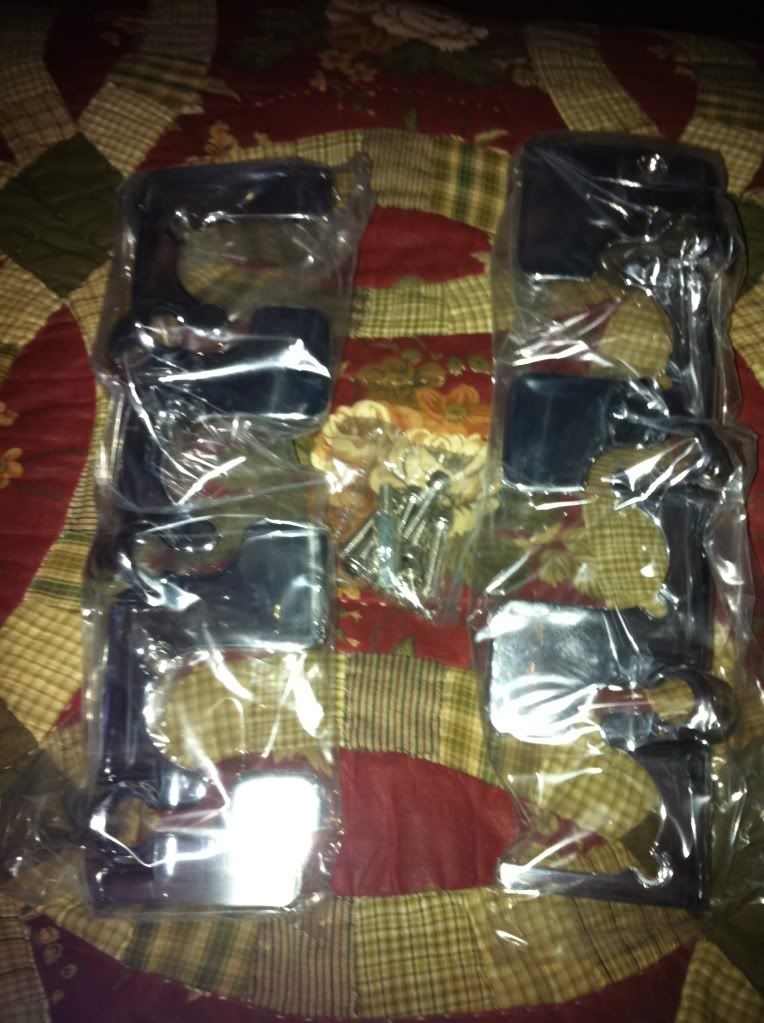 Here is the link to the entire library of pictures from all my Valkyrie projects that I did last year. http://s974.photobucket.com/albums/ae222/fordmano/Valkyrieupgradeprojects2010/ |
|
|
|
|
Logged
|
83GS550 93XR650L TARD! 97WR250 99ValkyrieI/S Tri-tone 01YZ125(x2) 05DRZ-125
|
|
|
salty1
Member
Posts: 2359
"Flyka"
Spokane, WA or Tucson, AZ
|
|
« Reply #17 on: February 09, 2012, 02:53:47 AM » |
|
You may already know that there are better prices out there then what you showed off of "flea" bay.
|
|
|
|
|
Logged
|
My rides: 1998 GL1500C, 2000 GL 1500CF,2006 GL 1800 3A   |
|
|
wiggydotcom
Member
Posts: 3387
Do Your Best and Miss the Rest!
Yorkville, Illinois
|
|
« Reply #18 on: February 09, 2012, 02:51:53 PM » |
|
Once again, thanks to all that responded. I'll try to write a group response so this thread doesn't go on forever...although I wouldn't mind. Jess; Thanks for letting me know they're out of production. Now I won't be peeved that I might have bought the "Tourer" version and might or might not have to modify. Smokinjoe; Thanks for confirming I don't have to do any modifying. I haven't received em yet, but when the valances come in, I'll see how they fit and where the clearance issues are, if any. If they need slight dremeling, I'm decent enough with that tool. I cut the inside of the pods ever so slightly to give my front velocity stack clearance and it isn't even noticable to look at it. GJS; Thanks for posting pics also. Your black I/S is beautiful. Are those switches on your left pod for the LEDs? That's a nice clean look. Fordmano; thanks for the detailed pics and offer to browse around. I need to ask you another question. Did you make or buy your Tube Toppers? Those look awesome. Chet used to sell them and I tried to get in on a couple of his orders, but I was never notified by Paypal when a "run" was done. In talking to someone at IZ last yr, possibly wild6, disco Dave or early bird, they stated they made theirs out of a "chrome" P trap...the kind that would go under a faucet...imagine that? And finally, Salty...I had to laugh at your reference to "Fleabay". The link I posted was the first set I came across. I did find another link that had brand new Kury's for 69, which is what I paid. I'm ok with that price considering the "bling" factor I'll receive. But thanks for the info! |
|
|
|
« Last Edit: February 09, 2012, 03:05:42 PM by wiggydotcom »
|
Logged
|
VRCC #10177 VRCCDS #239 |
|
|
fordmano
Member
Posts: 1457
San Jose, CA. 1999 I/S 232 miles when bought 11/05
San Jose, CA.
|
|
« Reply #19 on: February 10, 2012, 12:00:34 AM » |
|
Once again, thanks to all that responded. I'll try to write a group response so this thread doesn't go on forever...although I wouldn't mind. Fordmano; thanks for the detailed pics and offer to browse around. I need to ask you another question. Did you make or buy your Tube Toppers? Those look awesome. Chet used to sell them and I tried to get in on a couple of his orders, but I was never notified by Paypal when a "run" was done. In talking to someone at IZ last yr, possibly wild6, disco Dave or early bird, they stated they made theirs out of a "chrome" P trap...the kind that would go under a faucet...imagine that? The tube toppers came from a seller on FleaBay, I think they are Canadian? Cant remember for sure. They were $35 or $45 for the set of 6 and $10 or $15 for shipping, it has been a while since I picked them up but I think they are still available on Fleabay. I was told they go on just by flexing them a little bit then sliping them on,,, well I didn't have any luck with that procedure the one I tried would not spring back to it's original shape and was very loose. So I held off installing them until I did my big project list so while I had the intakes and carb rack out that's when I installed them and they truly just sliped on. Here they are, took me a few minutes to find them but they look to still be available. $45 total with shipping not cheap but they were worth it to me and they are very nicely made. http://www.ebay.com/itm/Honda-Valkyrie-carburator-insulator-covers-/190635989428?pt=Motorcycles_Parts_Accessories&vxp=mtr&hash=item2c62ca59b4 |
|
|
|
|
Logged
|
83GS550 93XR650L TARD! 97WR250 99ValkyrieI/S Tri-tone 01YZ125(x2) 05DRZ-125
|
|
|
Smokinjoe-VRCCDS#0005
Member
Posts: 13846
American by Birth, Southern by the Grace of God.
Beautiful east Tennessee ( GOD'S Country )
|
|
« Reply #20 on: February 10, 2012, 01:42:39 AM » |
|
Smokinjoe; Thanks for confirming I don't have to do any modifying. I haven't received em yet, but when the valances come in, I'll see how they fit and where the clearance issues are, if any. If they need slight dremeling, I'm decent enough with that tool. I cut the inside of the pods ever so slightly to give my front velocity stack clearance and it isn't even noticable to look at it.
No need to butcher them they will fit and look great...Remove pods and install then stand back and see how much better the bike looks with them on  |
|
|
|
|
Logged
|
I've seen alot of people that thought they were cool , but then again Lord I've seen alot of fools. |
|
|
GJS
Member
Posts: 424
Today is the tomorrow you worried about yesterday.
Vancouver Island, BC, Canada
|
|
« Reply #21 on: February 10, 2012, 07:19:43 AM » |
|
GJS; Thanks for posting pics also. Your black I/S is beautiful. Are those switches on your left pod for the LEDs? That's a nice clean look.
The left switch is for my Fog Lamps the right switch rocks forward to turn on ALL the Blue LEDs (approx 200) and rocks backward to turn on my 4-way flashers.  Cheers, Glenn |
|
|
|
|
Logged
|
The tragedy of life is not that it ends so soon, but that we wait so long to begin it.
- W. M. Lewis
|
|
|
wiggydotcom
Member
Posts: 3387
Do Your Best and Miss the Rest!
Yorkville, Illinois
|
|
« Reply #22 on: February 10, 2012, 05:34:48 PM » |
|
Ooops, I saw your post too late to get in on that auction/sale. At least I now know that someone is still cranking them out. I'm still intriqued to see if I can just make em out of P-trap material and a band saw. Thanks for doing the legwork. I appreciate it. Update: I just bought the set from the same vendor. He started a new sale. Thanks Fordmano![/quote] The tube toppers came from a seller on FleaBay, I think they are Canadian? Cant remember for sure. They were $35 or $45 for the set of 6 and $10 or $15 for shipping, it has been a while since I picked them up but I think they are still available on Fleabay. I was told they go on just by flexing them a little bit then sliping them on,,, well I didn't have any luck with that procedure the one I tried would not spring back to it's original shape and was very loose. So I held off installing them until I did my big project list so while I had the intakes and carb rack out that's when I installed them and they truly just sliped on. Here they are, took me a few minutes to find them but they look to still be available. $45 total with shipping not cheap but they were worth it to me and they are very nicely made. http://www.ebay.com/itm/Honda-Valkyrie-carburator-insulator-covers-/190635989428?pt=Motorcycles_Parts_Accessories&vxp=mtr&hash=item2c62ca59b4[/quote] |
|
|
|
« Last Edit: February 10, 2012, 05:41:53 PM by wiggydotcom »
|
Logged
|
VRCC #10177 VRCCDS #239 |
|
|
wiggydotcom
Member
Posts: 3387
Do Your Best and Miss the Rest!
Yorkville, Illinois
|
|
« Reply #23 on: February 10, 2012, 05:43:50 PM » |
|
As an industrial electrician myself, I can appreciate the beautiful job you did. Pretty creative to put the switches there.
GJS; Thanks for posting pics also. Your black I/S is beautiful. Are those switches on your left pod for the LEDs? That's a nice clean look.
The left switch is for my Fog Lamps the right switch rocks forward to turn on ALL the Blue LEDs (approx 200) and rocks backward to turn on my 4-way flashers. Cheers, Glenn |
|
|
|
|
Logged
|
VRCC #10177 VRCCDS #239 |
|
|
|
NITRO
|
|
« Reply #24 on: February 10, 2012, 06:20:39 PM » |
|
Make your own. Mine were about $5. Ooops, I saw your post too late to get in on that auction/sale. At least I now know that someone is still cranking them out. I'm still intriqued to see if I can just make em out of P-trap material and a band saw. Thanks for doing the legwork. I appreciate it. Update: I just bought the set from the same vendor. He started a new sale. Thanks Fordmano!The tube toppers came from a seller on FleaBay, I think they are Canadian? Cant remember for sure. They were $35 or $45 for the set of 6 and $10 or $15 for shipping, it has been a while since I picked them up but I think they are still available on Fleabay. I was told they go on just by flexing them a little bit then sliping them on,,, well I didn't have any luck with that procedure the one I tried would not spring back to it's original shape and was very loose. So I held off installing them until I did my big project list so while I had the intakes and carb rack out that's when I installed them and they truly just sliped on. Here they are, took me a few minutes to find them but they look to still be available. $45 total with shipping not cheap but they were worth it to me and they are very nicely made. http://www.ebay.com/itm/Honda-Valkyrie-carburator-insulator-covers-/190635989428?pt=Motorcycles_Parts_Accessories&vxp=mtr&hash=item2c62ca59b4[/quote] [/quote] |
|
|
|
|
Logged
|
When in doubt, ride.
|
|
|
GJS
Member
Posts: 424
Today is the tomorrow you worried about yesterday.
Vancouver Island, BC, Canada
|
|
« Reply #25 on: February 14, 2012, 08:39:34 AM » |
|
As an industrial electrician myself, I can appreciate the beautiful job you did. Pretty creative to put
the switches there.
Thanks, we all like our work appreciated. I am an electronics tech by trade. Have not been active for some years. Got into computers in the early 80's and have been immersed in that world ever since. Like many of us, I love the bike and like to tinker. Thanks again, Cheers, Glenn |
|
|
|
|
Logged
|
The tragedy of life is not that it ends so soon, but that we wait so long to begin it.
- W. M. Lewis
|
|
|
|
Steve-L
|
|
« Reply #26 on: August 16, 2016, 10:20:57 AM » |
|
I know this is an old thread but does anyone have an words of wisdom regarding adding grill material to the heat vents of an Interstate Pod?
I've also got a cigarette lighter that's all rusted out on the right hand pod and trying to figure out how to remove and replace it, while I'm doing the grill mesh bling.
|
|
|
|
|
Logged
|
|
|
|
|
The emperor has no clothes
|
|
« Reply #27 on: August 16, 2016, 10:35:24 AM » |
|
I know this is an old thread but does anyone have an words of wisdom regarding adding grill material to the heat vents of an Interstate Pod?
I've also got a cigarette lighter that's all rusted out on the right hand pod and trying to figure out how to remove and replace it, while I'm doing the grill mesh bling.
Hi Steve, hope you are still liking the LowBoy. I did the vents on my pods. I used some ridge vent screen on mine. It's very stiff and you can form it to the shape and trim it with some metal shears. There will be a couple Phillips screws you can remove and use to keep it in place. The hardest part is removing and installing the pods without cracking them. With the pod lights it's tight. If you don't have the lights it should be easier. Just don't force anything. You still thinking of making Oss's Catskills ride in October ? |
|
|
|
|
Logged
|
|
|
|
|
Steve-L
|
|
« Reply #28 on: August 17, 2016, 03:02:16 AM » |
|
I know this is an old thread but does anyone have an words of wisdom regarding adding grill material to the heat vents of an Interstate Pod?
I've also got a cigarette lighter that's all rusted out on the right hand pod and trying to figure out how to remove and replace it, while I'm doing the grill mesh bling.
Hi Steve, hope you are still liking the LowBoy. I did the vents on my pods. I used some ridge vent screen on mine. It's very stiff and you can form it to the shape and trim it with some metal shears. There will be a couple Phillips screws you can remove and use to keep it in place. The hardest part is removing and installing the pods without cracking them. With the pod lights it's tight. If you don't have the lights it should be easier. Just don't force anything. You still thinking of making Oss's Catskills ride in October ? Hi Rob, thanks for the info about using the screws to hold it in. That's the info I needed. Did you also screen the front small vent? I couldn't figure out how to do that one at all. I can't make Oss' run as the wife and I are going to be in Hawaii for our 40th anniversary at the same time. Sorry I'll miss you. I'm loving the low boy, although on a 250 mile or more trip I find myself wishing I had an tad more padding. But, form 95% of my riding it's perfect. |
|
|
|
|
Logged
|
|
|
|
|
The emperor has no clothes
|
|
« Reply #29 on: August 17, 2016, 04:11:10 AM » |
|
I know this is an old thread but does anyone have an words of wisdom regarding adding grill material to the heat vents of an Interstate Pod?
I've also got a cigarette lighter that's all rusted out on the right hand pod and trying to figure out how to remove and replace it, while I'm doing the grill mesh bling.
Hi Steve, hope you are still liking the LowBoy. I did the vents on my pods. I used some ridge vent screen on mine. It's very stiff and you can form it to the shape and trim it with some metal shears. There will be a couple Phillips screws you can remove and use to keep it in place. The hardest part is removing and installing the pods without cracking them. With the pod lights it's tight. If you don't have the lights it should be easier. Just don't force anything. You still thinking of making Oss's Catskills ride in October ? Hi Rob, thanks for the info about using the screws to hold it in. That's the info I needed. Did you also screen the front small vent? I couldn't figure out how to do that one at all. I can't make Oss' run as the wife and I are going to be in Hawaii for our 40th anniversary at the same time. Sorry I'll miss you. I'm loving the low boy, although on a 250 mile or more trip I find myself wishing I had an tad more padding. But, form 95% of my riding it's perfect. I didn't screen the fronts, just the sides. I did mine only because I didn't like seeing the pod lights and wiring. I think it might be harder to do the fronts. I don't remember anything there to hold them in place. Congratulations on the 40 years. Maybe a ride in the future. |
|
|
|
|
Logged
|
|
|
|
|
Steve-L
|
|
« Reply #30 on: August 17, 2016, 10:59:08 AM » |
|
Thanks Rob, what's the dates for Oss' ride again?
|
|
|
|
|
Logged
|
|
|
|
|
Bighead
|
|
« Reply #31 on: August 17, 2016, 11:33:41 AM » |
|
I know this is an old thread but does anyone have an words of wisdom regarding adding grill material to the heat vents of an Interstate Pod?
I've also got a cigarette lighter that's all rusted out on the right hand pod and trying to figure out how to remove and replace it, while I'm doing the grill mesh bling.
Hi Steve, hope you are still liking the LowBoy. I did the vents on my pods. I used some ridge vent screen on mine. It's very stiff and you can form it to the shape and trim it with some metal shears. There will be a couple Phillips screws you can remove and use to keep it in place. The hardest part is removing and installing the pods without cracking them. With the pod lights it's tight. If you don't have the lights it should be easier. Just don't force anything. You still thinking of making Oss's Catskills ride in October ? Hi Rob, thanks for the info about using the screws to hold it in. That's the info I needed. Did you also screen the front small vent? I couldn't figure out how to do that one at all. I can't make Oss' run as the wife and I are going to be in Hawaii for our 40th anniversary at the same time. Sorry I'll miss you. I'm loving the low boy, although on a 250 mile or more trip I find myself wishing I had an tad more padding. But, form 95% of my riding it's perfect. I didn't screen the fronts, just the sides. I did mine only because I didn't like seeing the pod lights and wiring. I think it might be harder to do the fronts. I don't remember anything there to hold them in place. Congratulations on the 40 years. Maybe a ride in the future. When doing the front vent just leave a bit of screen on either side to long and bend it around then use a dab if Hot Glue on them. |
|
|
|
|
Logged
|
1997 Bumble Bee
1999 Interstate (sold)
2016 Wing
|
|
|
|
Steve-L
|
|
« Reply #32 on: August 18, 2016, 04:17:42 AM » |
|
Thanks! I know I've seen pics with the fronts done. I'll give it a try.
|
|
|
|
|
Logged
|
|
|
|
|
Kunkies
|
|
« Reply #33 on: August 18, 2016, 04:32:01 AM » |
|
Before you install regardless of your approach, make sure you replace the intake runner gaskets. Will save you a lot of time and money on the long run.
|
|
|
|
|
Logged
|
|
|
|
|


