|
Stanley Steamer
|
 |
« on: May 16, 2009, 09:06:58 PM » |
|
Well, ...Mike Marshall came over today and we tore into the Valk...there were a few things we decided we'd do...replace the vacuum hoses, petcock vent hose, and we decided to replace the Intake O-rings after he noticed a little black stuff at the bottom of the tube on the right side...so off came the tank and we started taking clamps off of the intake tubes so we could pull them loose.... While we had those tubes out of the way, we did the string trick to pull the new vac hoses back to where they go...the one old tube on the middle carb on the left side was pinched together pretty close to being completely blocked...was THIS the culprit??..hummm...maybe... I'm SO glad we took as much stuff off as possible because it made a difficult job a LITTLE easier...putting the tube up on the pair valve was going to be REAL hard to do, SO, we decided to take some of the air box tubes loose to get some more room to work...and it worked fine...we never actually pulling the air box all the way out...and made sure we got the boots back on right before clamping them down again... 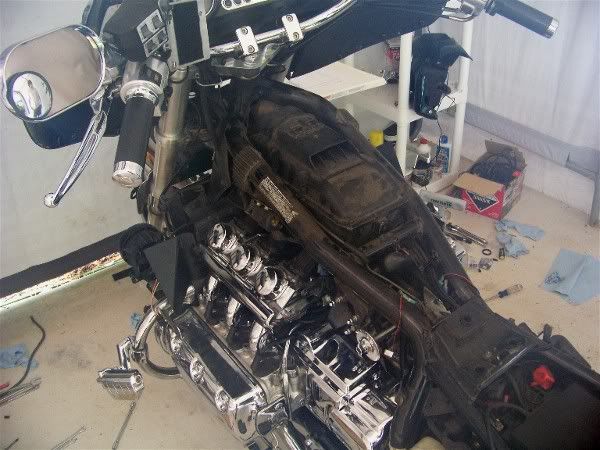 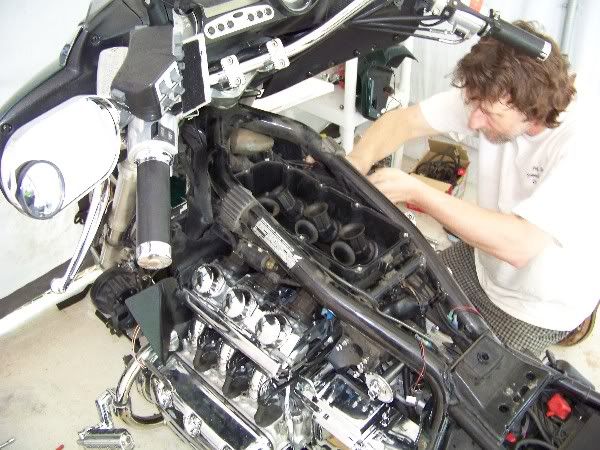 We got the new tubing run and connected and everything back together and only had the gas tank left to do, so before we re-installed the tank, Mike suggested we check the petcock functioning....GOOD thing we did....I used the Mighty Vac to apply a suction and it only dribbled gas out...that was NOT a good thing, SO...he took the petcock loose from the tank and took it apart, things looked ok until he noticed that the two rubber diaphragms were not connected to each other at the little rubber nipple....aaaaaHAAA....he put them back together and said it felt like it was too easy compared to others he'd checked before, but he put it all back together and we tested it again and WHAMMM...it was working again when we applied a vacuum.....now the hardest part of the WHOLE job came into play...getting the $%^&&^% darn tank petcock vacuum line and clamps back on...the fuel line went on ok, but trying to get the tank BACK on was definately the hardest part of the whole job...but we finally managed to without any evident kinks in the vacuum line to the #6 carb.....I put my spark plug covers back on so I could tighten up the other intake bolts and we were ready to test out our work...   After a few crank attempts to refill the carbs with fuel, she started up and ran strong again....HALLELUJAH!!!......THANKS MIKE!!!.... I'm just a little worried about WHY the thing came apart in the first place, and IF or WHEN it might do it again???.....one other thing that we noticed is that when I went to set the tank on it's nose to keep the vent tube in the air initially, gas came out from the gas cap...there was a little less than a half of a tank of gas in it when I took it off...shouldn't the rubber gasket inside the gas cap keep the gas fom leaking out??..I have heard of guys "glueing" additional rubber disks over the original one....since it doesn't look like HDL even lists that part on the microfische.... I will order a new petcock rebuild kit very soon, but this one was only put on back last August at Inzane by BigBF and it worked fine until last Saturday...  ....I'm not sure why it would have let go so soon??...  |
|
|
|
« Last Edit: May 16, 2009, 09:11:49 PM by Stanley Steamer »
|
 Logged
|
Stanley "Steamer" "Ride Hard or Stay Home"  |
|
|
|
Stanley Steamer
|
|
« Reply #1 on: May 16, 2009, 09:56:26 PM » |
|
off again???......  From: Grumpy (WGurney) 12:49 am To: CandyMan.... (StanSteamer) (2 of 3) 13531.2 in reply to 13531.1 Stan, the fuel valve is assembled wrong, I had the same problem last year. I had changed the diaphragm and made the round trip to Johnson city, a week after I got back the fuel stopped flowing, dismantled the valve and found the little aluminum piece was in backwards. It will fit either way, but if it is right it is hard to dislodge the diaphragm off of the plunger. If it is not correct, it will bite you again. Bill |
|
|
|
|
Logged
|
Stanley "Steamer" "Ride Hard or Stay Home" |
|
|
MP
Member

Posts: 5532
1997 Std Valkyrie and 2001 red/blk I/S w/sidecar
North Dakota
|
|
« Reply #2 on: May 17, 2009, 04:33:28 AM » |
|
I have found it pretty darn hard to put them together. If yours went easy, I would guess it is wrong. Sorry.
MP
|
|
|
|
|
Logged
|
 "Ridin' with Cycho" |
|
|
hubcapsc
Member
Posts: 16834
upstate
South Carolina
|
|
« Reply #3 on: May 17, 2009, 05:14:21 AM » |
|
Stanley... What Grumpy sez makes sense, but I'm unable to perceive a difference (or take a good picture of small things  )... if there is a difference, it seems it would have to be that little lip you can see on the inside in the picture on the left...  Perhaps Grumpy is right, or perhaps Grumpy had a bad experience with a poorly fitting coverset like you you have... It is hard to imagine that BigBF wouldn't know about the difference, or that he would assemble your cover set wrong, but anything is possible... Anyone else ever hear of this difference? I put a little rubbing alcohol on these old parts and put them together both ways several times... both sides seem similarly well stuck together...  Don't fret so much about the petcock vacuum line... remember it was easy after we ditched the impossible new spring clamp and used the old one... And... I've been thinking about this all night... did we replace bolt number 25?  Everybody... the inside of Stanley's airbox was very clean, but there was only one gasket (number 3)... there was one in the housing, but not in the cover. I made good time on the way home last night... I went down to Lexington and went all the way back to I85 on 77... Georgia has some of the best country roads I've been on... Carolyn's sitting next to me reading Daniel Meyer's book laughing... -Mike |
|
|
|
|
Logged
|
|
|
|
|
Stanley Steamer
|
|
« Reply #4 on: May 17, 2009, 05:25:59 AM » |
|
and check that bolt #25...because I think you are right and we didn't put it back??...I think I can get the vac hose back on with a little cussing...  ... I'm not worried about the air cleaner gasket since it was so clean inside the box... What I'm still not sure about is the little piece there with/without the "Lip"??....I guess I'll just have to take it all apart and check it again, because there's NO way I want it to pull apart and leave me on the side of the road again..... OH, and THANKS for ALL your help yesterday....I had intended to call you and make sure you got home ok, but Scooter had me distracted as he was trying to get all of my SECRETS from Abby....we had a good time visiting with them at supper last night, and stayed up late BS'ing with them.... I'd like to come over and visit you and Carolyn sometime also...if I bring Abby, maybe we could all go out and eat somewhere or something??... |
|
|
|
|
Logged
|
Stanley "Steamer" "Ride Hard or Stay Home" |
|
|
hubcapsc
Member
Posts: 16834
upstate
South Carolina
|
|
« Reply #5 on: May 17, 2009, 06:13:23 AM » |
|
What I'm still not sure about is the little piece there with/without the "Lip"??....I guess I'll just have to take it all apart and check it again, because there's NO way I want it to pull apart and leave me on the side of the road again.....
Remember to do that little test where you hook a clean tube to the vacuum, suck on it, and look down the gas port and see the little valve move... it's written up in that shoptalk article... saves you from putting stuff back together and finding out something's still wrong... If flipping the aluminum part around doesn't make it feel any tighter, you can probably get a new cover set in a few days and resolve any lingering doubt... I'd like to come over and visit you and Carolyn sometime also...if I bring Abby, maybe we could all go out and eat somewhere or something??...Sounds great... y'all will get to see our whacky unfinished house -Mike
|
|
|
|
|
Logged
|
|
|
|
|
Stanley Steamer
|
|
« Reply #6 on: May 17, 2009, 06:18:35 AM » |
|
What I'm still not sure about is the little piece there with/without the "Lip"??....I guess I'll just have to take it all apart and check it again, because there's NO way I want it to pull apart and leave me on the side of the road again.....
Remember to do that little test where you hook a clean tube to the vacuum, suck on it, and look down the gas port and see the little valve move... it's written up in that shoptalk article... saves you from putting stuff back together and finding out something's still wrong... If flipping the aluminum part around doesn't make it feel any tighter, you can probably get a new cover set in a few days and resolve any lingering doubt... I'd like to come over and visit you and Carolyn sometime also...if I bring Abby, maybe we could all go out and eat somewhere or something??...Sounds great... y'all will get to see our whacky unfinished house -Mike does it come with the little aluminum piece also??...my sheet is out in the building right now...I dread taking the tank off, but I need to check for that breather bolt anyways...and I will perform the little vac test you did while looking in the fuel nozzle(I printed that article out also)... Heck, I don't mind "whacky, unfinished houses"...that's just character!!...  |
|
|
|
|
Logged
|
Stanley "Steamer" "Ride Hard or Stay Home" |
|
|
Smokinjoe-VRCCDS#0005
Member
Posts: 13849
American by Birth, Southern by the Grace of God.
Beautiful east Tennessee ( GOD'S Country )
|
|
« Reply #7 on: May 17, 2009, 06:24:26 AM » |
|
I saw JP ( Hard 6 ) take the one out of Matt's ( TruckRacers) bike and sling it in the trash can he then filled the hole with JB Weld and Matt's bike fired right up. That was years ago at Dragons On The Beach and as far as I know its still that way. JP said his own motorcycle was done this way with zero problems. I've got JP's # Steamer if it comes down to it you can call and ask him details on the " fix". Matt's bike would not hit a lick but soon as JP did this it fired right up.
|
|
|
|
|
Logged
|
 I've seen alot of people that thought they were cool , but then again Lord I've seen alot of fools. |
|
|
|
Stanley Steamer
|
|
« Reply #8 on: May 17, 2009, 07:55:12 AM » |
|
Stanley... What Grumpy sez makes sense, but I'm unable to perceive a difference (or take a good picture of small things )... if there is a difference, it seems it would have to be that little lip you can see on the inside in the picture on the left... Perhaps Grumpy is right, or perhaps Grumpy had a bad experience with a poorly fitting coverset like you you have... It is hard to imagine that BigBF wouldn't know about the difference, or that he would assemble your cover set wrong, but anything is possible... Anyone else ever hear of this difference? I put a little rubbing alcohol on these old parts and put them together both ways several times... both sides seem similarly well stuck together... Don't fret so much about the petcock vacuum line... remember it was easy after we ditched the impossible new spring clamp and used the old one... And... I've been thinking about this all night... did we replace bolt number 25? Everybody... the inside of Stanley's airbox was very clean, but there was only one gasket (number 3)... there was one in the housing, but not in the cover. I made good time on the way home last night... I went down to Lexington and went all the way back to I85 on 77... Georgia has some of the best country roads I've been on... Carolyn's sitting next to me reading Daniel Meyer's book laughing... -Mike Mike, I took the tank and petcock off again....I took it all apart but couldn't get the rubber plunger off of the little aluminum piece so that I could look at the other side of it and I cant really tell from the pics you posted of it what the difference is....BUT, once I put the parts back together, I couldn't pull it apart again for fear of ripping a hole in the diaphragm...that's GOOD I think??...and once I put it all back together, the little vacuum test shows that the plunger is working to open and close the check valve.... I will install the petcock back on the tank and turn the knob to on and pull a vacuum and see if it opens up the gas again...I noticed when I took the petcock off, that there didn't appear to be an O-ring in there but there's one there around the fuel screen... I guess it's just flattened out...I'll put some more teflon tape on the threads and hand tighten it again ...before installing it on the tank.... I will still order a petcock cover-set and see if it has the little aluminum piece in it so that I can look at both sides and see if there's a difference.... ??? |
|
|
|
« Last Edit: May 17, 2009, 07:57:08 AM by Stanley Steamer »
|
Logged
|
Stanley "Steamer" "Ride Hard or Stay Home" |
|
|
hubcapsc
Member
Posts: 16834
upstate
South Carolina
|
|
« Reply #9 on: May 17, 2009, 09:51:35 AM » |
|
.BUT, once I put the parts back together, I couldn't pull it apart again for fear of ripping a hole in the diaphragm...that's GOOD I think??...and once I put it all back together, the little vacuum test shows that the plunger is working to open and close the check valve....
That sounds good to me. Stuck together good, and passes the "put it back on" test...
The aluminum frob must be is part of the coverset... that's why I have an old one...
When you get to putting the tank back on don't get frustrated by those hoses... remember
we hooked one or two of the hoses back with the tank sitting flat, and when we put the
vacuum hose back on, we had the little block of 2X2 under there... there's a way to
jiggle things so that none of those hoses are very hard to put back on... if one of the hoses
seems impossible, quit what you're doing, jiggle something and go after it a different way...
-Mike
|
|
|
|
|
Logged
|
|
|
|
|
Stanley Steamer
|
|
« Reply #10 on: May 17, 2009, 10:03:04 AM » |
|
.BUT, once I put the parts back together, I couldn't pull it apart again for fear of ripping a hole in the diaphragm...that's GOOD I think??...and once I put it all back together, the little vacuum test shows that the plunger is working to open and close the check valve....
That sounds good to me. Stuck together good, and passes the "put it back on" test...
The aluminum frob must be is part of the coverset... that's why I have an old one...
When you get to putting the tank back on don't get frustrated by those hoses... remember
we hooked one or two of the hoses back with the tank sitting flat, and when we put the
vacuum hose back on, we had the little block of 2X2 under there... there's a way to
jiggle things so that none of those hoses are very hard to put back on... if one of the hoses
seems impossible, quit what you're doing, jiggle something and go after it a different way...
-Mike
I did the "vac test" again and I could see the rubber piece opening and closing...and so I added more tape, stuck the petcock back in the tank, tightened it back up....and put the tank back on the bike...it went on much easier this time because I hooked the vent hose up first while holding the back of the tank WAY up(like 6")...and THEN slide the vacuum tube on the back of the petcock...no problem this time and then sat the tank down flat and pulled the fuel line and clamp back on....lifted the back again, tightened the big nut holding the petcock to the tank just a wee bit more and sat it back down on the frame....doubled checked all connections again, then fired her up..vroom, vroom, vroom....lol...so she's still working so far... I put that chrome sidecover back on around the ignition and put the top bolt in on it before putting the tank bolts back in...All I have to do now is go put the pods back on and do a final check of everything and go for a small test ride through the countryside... OH, thanks for reminding me to put that bolt BACK in the air cleaner box...we did forget to put it back in yesterday.... Thanks again for all the help and I'll post a few more pics later.... |
|
|
|
« Last Edit: May 17, 2009, 10:05:29 AM by Stanley Steamer »
|
Logged
|
Stanley "Steamer" "Ride Hard or Stay Home" |
|
|
X Ring
Member
Posts: 3626
VRCC #27389, VRCCDS #204
The Landmass Between Mobile And New Orleans
|
|
« Reply #11 on: May 17, 2009, 02:16:57 PM » |
|
If you had desmogged, you wouldn't have to worry about the vacuum lines. The only one you'd have left is the one for the petcock.
|
|
|
|
|
Logged
|
People are more passionately opposed to wearing fur than leather because it's safer to harass rich women than bikers.  |
|
|
fudgie
Member
Posts: 10661
Better to be judged by 12, then carried by 6.
Huntington Indiana

|
|
« Reply #12 on: May 17, 2009, 06:32:57 PM » |
|
Pingel time!
|
|
|
|
|
Logged
|
 Now you're in the world of the wolves... And we welcome all you sheep... VRCC-#7196 VRCCDS-#0175 DTR PGR |
|
|
|
Stanley Steamer
|
|
« Reply #13 on: May 17, 2009, 06:42:43 PM » |
|
awwww, it'd be bad....of course that can happen anyways..
|
|
|
|
|
Logged
|
Stanley "Steamer" "Ride Hard or Stay Home" |
|
|
MP
Member
Posts: 5532
1997 Std Valkyrie and 2001 red/blk I/S w/sidecar
North Dakota
|
|
« Reply #14 on: May 17, 2009, 08:28:04 PM » |
|
You do NOT need any tape on the threads. The little oring around the filter you mentioned is what seals the fuel tank. It is the only one there. Nothing gets to the threads. They hardly need to be snug.
Glad it is up and running. Thanks for the posts.
MP
|
|
|
|
|
Logged
|
"Ridin' with Cycho" |
|
|
|
Kaz
|
|
« Reply #15 on: May 18, 2009, 06:45:06 PM » |
|
Great news hearing the the Green Beastie lives again.
|
|
|
|
|
Logged
|
|
|
|
BigBF
Member
Posts: 814
Text message at 602-332-4872
Phx AZ
|
|
« Reply #16 on: May 26, 2009, 04:46:40 PM » |
|
Backward??? it look same on both end to me??? must have pop off? this is the first one I have heard? I will replace petcock vacuum kit this week so I will recheck to see what's the different on the aluminum piece on both end. Thanks for letting me know...
|
|
|
|
|
Logged
|
|
|
|
|
Stanley Steamer
|
|
« Reply #17 on: May 26, 2009, 05:35:37 PM » |
|
Backward??? it look same on both end to me??? must have pop off? this is the first one I have heard? I will replace petcock vacuum kit this week so I will recheck to see what's the different on the aluminum piece on both end. Thanks for letting me know...
This answer about it over on the tech side....that the little aluminum piece is the SAME on each side, but that the nipples on the diaphragm are different sizes...I didn't pay that close of attention when I had it apart again...but it was HARD to try to pull it apart after I pressed the two rubber pieces together again.. Quote from: lee on Today at 10:05:27 AM
In a recent post I think by Stanley Steamer the question of different size holes in the spacer that
holds the valve seal and the vacuum diaphragm came up. Maby everyone already knows this but
I figure it can't hurt to say it. There is no difference in the size or shape of the holes in the spacer.
However there is a difference in the size of the nipples on each side of the vacuum diaphragm.
The side with the large nipple goes into the spacer. The spring perch connects to the side with
the small nipple. I don.t think the diaphragm would even stay in the spacer if it was put together
wrong, but it would certainly pull out in short order if it did. Hope this helps someone. It sure helps me! Thanks!... I knew that the big diaphragm flap was different on each side, so I always
try to "put it back like it was"... If you are correct (and I bet you are) this information makes it
possible "get it right" without having to remember how it was and without searching
the tech archives for pictures... just pay attention to the nipples...
-Mike |
|
|
|
|
Logged
|
Stanley "Steamer" "Ride Hard or Stay Home" |
|
|
|
Mr.BubblesVRCCDS0008
|
|
« Reply #18 on: May 27, 2009, 08:31:52 AM » |
|
JP takes the guts out of the vac side of the switch and jb welds up the vac line port and the weep hole. The switch still work as normal just no automatic fuel shut off. Then he put in an electric in line fuel shut off wired to the key so it only opens when the key is in the on position. He is a very smart mechanic and a great person to know.
|
|
|
|
|
Logged
|
|
|
|
BigBF
Member
Posts: 814
Text message at 602-332-4872
Phx AZ
|
|
« Reply #19 on: May 30, 2009, 07:56:54 AM » |
|
Hey Stanley Steamer, I just changed new petcock vacuum kit yesterday and the aluminum spacer are same both side. Yes I am aware about the diaphragm are different on both side I guess it must be Inznae moment? BigBF Backward??? it look same on both end to me??? must have pop off? this is the first one I have heard? I will replace petcock vacuum kit this week so I will recheck to see what's the different on the aluminum piece on both end. Thanks for letting me know...
This answer about it over on the tech side....that the little aluminum piece is the SAME on each side, but that the nipples on the diaphragm are different sizes...I didn't pay that close of attention when I had it apart again...but it was HARD to try to pull it apart after I pressed the two rubber pieces together again.. Quote from: lee on Today at 10:05:27 AM
In a recent post I think by Stanley Steamer the question of different size holes in the spacer that
holds the valve seal and the vacuum diaphragm came up. Maby everyone already knows this but
I figure it can't hurt to say it. There is no difference in the size or shape of the holes in the spacer.
However there is a difference in the size of the nipples on each side of the vacuum diaphragm.
The side with the large nipple goes into the spacer. The spring perch connects to the side with
the small nipple. I don.t think the diaphragm would even stay in the spacer if it was put together
wrong, but it would certainly pull out in short order if it did. Hope this helps someone. It sure helps me! Thanks!... I knew that the big diaphragm flap was different on each side, so I always
try to "put it back like it was"... If you are correct (and I bet you are) this information makes it
possible "get it right" without having to remember how it was and without searching
the tech archives for pictures... just pay attention to the nipples...
-Mike |
|
|
|
|
Logged
|
|
|
|
BigBF
Member
Posts: 814
Text message at 602-332-4872
Phx AZ
|
|
« Reply #20 on: May 30, 2009, 08:04:08 AM » |
|
Yup that's old news about JB welded several years ago... It is good idea with good habit but other bad idea if biker forgot to turn off the petcock and boom several thousands dollar goes in trash (hydrolock)... Electric shut off valve is great idea ... One of guy who went to InZane last year in Tenn and has bad leaking that he has electric shut off valve I never find out what he do with it or fixed? I was concern if electric short out  BigBF JP takes the guts out of the vac side of the switch and jb welds up the vac line port and the weep hole. The switch still work as normal just no automatic fuel shut off. Then he put in an electric in line fuel shut off wired to the key so it only opens when the key is in the on position. He is a very smart mechanic and a great person to know.
|
|
|
|
|
Logged
|
|
|
|
|
Stanley Steamer
|
|
« Reply #21 on: May 30, 2009, 03:02:14 PM » |
|
Yup that's old news about JB welded several years ago... It is good idea with good habit but other bad idea if biker forgot to turn off the petcock and boom several thousands dollar goes in trash (hydrolock)... Electric shut off valve is great idea ... One of guy who went to InZane last year in Tenn and has bad leaking that he has electric shut off valve I never find out what he do with it or fixed? I was concern if electric short out BigBF I still think that IF the OEM petcock is working right, then the "Vacuum" line is "insurance" in case a person forgets to cut the gas off and has the bad luck to flood a cylinder if the floats were to hang up...would it be worth bypassing that safety feature then??......
Oh, and BigBF.....I'm not sure that YOU did put the diaphragm in backwards....I just didn't pay that close of attention to it when I had it apart...I've only seen one apart 3 times in total...I'll DANG sure be looking VERY closely at it this time around!!!......
I did run about 7-8oz's of Seafoam in the tank when it let go the first time a few weeks ago...but I ran the bike hard for 80+ miles before it left me on the side of the road...
And, I went for a ride last Monday and the bike ran as good/hard as it ever did...I thought I was good to go....then when I cranked it this morning, it cranked up fine, but never ran up hard like it normally does with the choke on...it started running rough as it wasn't getting the gas it should have been getting.... 
I'm not going to take the tank back off again until I have a new cover set for the petcock..but I am going to take the old one apart and inspect it very closely... JP takes the guts out of the vac side of the switch and jb welds up the vac line port and the weep hole. The switch still work as normal just no automatic fuel shut off. Then he put in an electric in line fuel shut off wired to the key so it only opens when the key is in the on position. He is a very smart mechanic and a great person to know.
|
|
|
|
« Last Edit: May 30, 2009, 03:05:52 PM by Stanley Steamer »
|
Logged
|
Stanley "Steamer" "Ride Hard or Stay Home" |
|
|
|


