|
jabster
|
 |
« on: May 09, 2012, 04:23:44 PM » |
|
Hi. So I got the petcock kit, and the parts don't quite seem to match my existing petcock parts. I this picture, the back is my petcock, and the front are the parts from the repair kit: 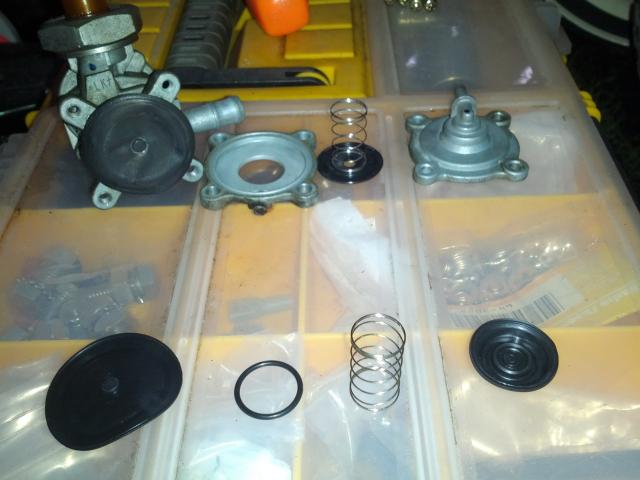 I don't see an o-ring on my petcock. And where does the piece on the front-right go? This? : 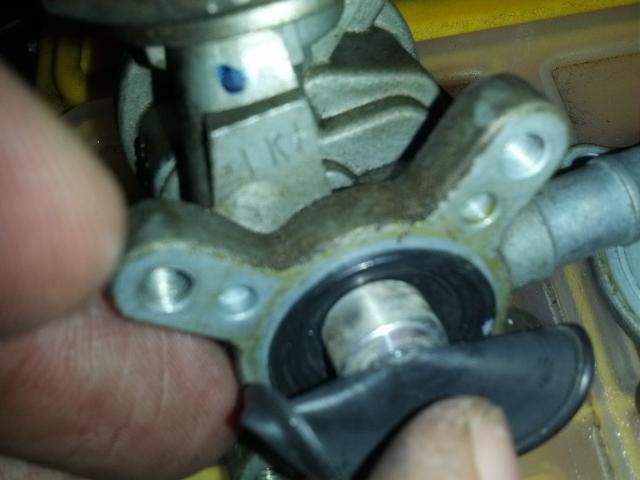 What exactly do I need to do to repair this thing? Does the old diaphragm just pull out and the new one push into place? Thanks, John |
|
|
|
|
 Logged
|
|
|
|
|
Thunderbolt
|
 |
« Reply #1 on: May 09, 2012, 04:49:12 PM » |
|
http://www.powersportsplus.com/parts/detail/honda/HP-16953-MBZ-B51.htmlIt has all the right parts, yours will not have an o-ring. Maybe someone will post a link to some pictures. The spring goes next to the cover with the vacuum line on it. Next is the hard plastic against the big rubber diaghragm. The big one and the small one that shuts off the fuel are attached to the small aluminum piece. Be careful assembling these parts, I usually lubricate the parts with spit to get it together. The hole on the metal piece goes down and the vacuum line of course goes to the front.
|
|
|
|
|
Logged
|
|
|
|
|
jabster
|
|
« Reply #2 on: May 09, 2012, 04:52:57 PM » |
|
TB,
I did take pics of the petcock as I took it apart, so I know how to reassemble it, assuming I get all the components correctly assembled. Does that cylinder behind and the diaphragm come out?
Thanks,
john
|
|
|
|
|
Logged
|
|
|
|
|
BamaDrifter64
|
|
« Reply #3 on: May 09, 2012, 05:35:29 PM » |
|
The o-ring is used on the bottom of the filter when you reinstall the filter and petcock.
Dave
|
|
|
|
|
Logged
|
|
|
|
|
Thunderbolt
|
|
« Reply #4 on: May 09, 2012, 05:43:06 PM » |
|
the diaphragm that is still installed in your picture is attached to the aluminum piece that I described. That part actually cuts off the fuel supply when there is no vacuum and yes it just pulls out. The part that usually fails is the large rubber diaphragm. If it fails, it usually gets worn near the center where repeated use wears through the rubber and will not allow the vacuum to hold the fuel diaphragm open.
|
|
|
|
|
Logged
|
|
|
|
custom1
Member

Posts: 333
01 Interstate
SW Pa
|
|
« Reply #5 on: May 10, 2012, 09:32:07 AM » |
|
Here is a diagram that I saved from another thread. Pay no mind to that second "modified" one. That is how you would move the spring if you wanted to disable the vacuum function. The nipples on the diaphragms "2" and "3" in the diagram fit firmly in the spacer "C". When vacuum is applied the vacuum pulls on diaphragm "3" which pulls on the spacer which pulls on diaphragm "2" to allow fuel to flow.  Did you get a new screen? The o-ring and screen stayed in the tank when I did mine. O-ring is sort of around the base of the screen. I had a hard time getting the old screen out of the tank. It was stuck in there pretty good. Used a trick someone on here suggested. Get a punch the same size as the inside of the screen and put it in there snug. Then you can get a hold of the little bit that sticks out with some pliers or vise grips without deforming the hell out of it. I found it easier to reassemble the new screen and o-ring on the petcock as a unit and then put the whole thing back in the tank at once.  |
|
|
|
|
Logged
|
John
|
|
|
|
jabster
|
|
« Reply #6 on: May 10, 2012, 10:09:20 AM » |
|
Thanks for the info, guys. Here's how my petcock came out of my tank: All in one piece: 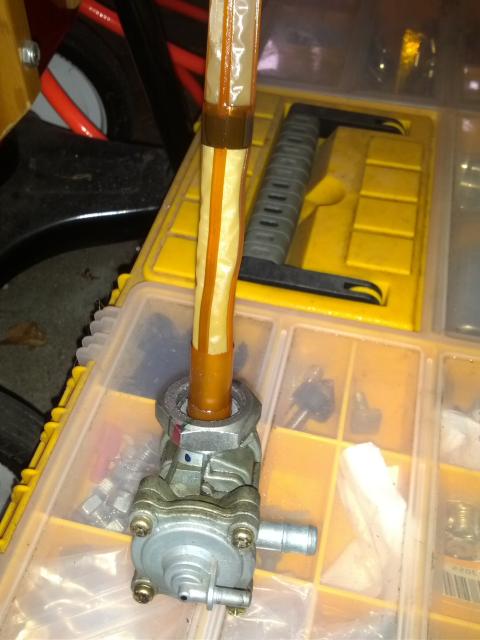 -john |
|
|
|
|
Logged
|
|
|
|
custom1
Member
Posts: 333
01 Interstate
SW Pa
|
|
« Reply #7 on: May 10, 2012, 10:57:17 AM » |
|
The o-ring goes around the base of the screen at the black arrow. Yours may be stuck in the grove in the tank. I don't see it in the pic. The screen sits in a little grove in the petcock. Mine was chewed up at the base from trying to get it out. I was glad I had a new one. Also if you take the screen off of the petcock it is hard to get the stand pipe back into the rubber spacer that is halfway up the screen. You can't really see in there and you don't want that to turn sideways in there and possibly block the fuel. I read on here that some don't use it. I'm not sure how important it is but I put it back. I put it on the pipe first then put the new screen down over it. Just make sure the screen is fully seated in the petcock, otherwise unfiltered fuel could get to the reserve hole. I think the spacer also helps keep the screen in place in the petcock.  |
|
|
|
|
Logged
|
John
|
|
|
|
jabster
|
|
« Reply #8 on: May 10, 2012, 11:12:49 AM » |
|
Thanks custom1. I will definitely check for that o-ring on the tank.
Do you know what that bottom-right piece is tho? Is that #2 in the sketch? How do I replace that?
|
|
|
|
|
Logged
|
|
|
|
custom1
Member
Posts: 333
01 Interstate
SW Pa
|
|
« Reply #9 on: May 10, 2012, 01:16:53 PM » |
|
Yes, If I'm looking at that right. That is the "2" diaphragm. It is laying with the nipple face down in the picture. In your first pic you don't have it completely apart yet. If you pull the old ones off the spacer you will see. The new ones are a tight fit in the spacer. I was afraid of tearing them. Someone said you can put some spit or something on them. I would only use something that will evaporate because you don't want them to slide back out. That's what makes it work. The spacer connects them together. Maybe "spacer" is the wrong word, maybe "connector" would be better.
|
|
|
|
|
Logged
|
John
|
|
|
|
jabster
|
|
« Reply #10 on: May 10, 2012, 08:33:42 PM » |
|
OK. I'm all good now. And yes, that inner seal and the cylinder are a tight fit, hence my hesitation in pulling it apart.
So now it's all back together. Just need to drain the tank and reinstall the petcock.
And I did find the old o-ring, still on the tank.
I do need to perform that final check still tho just to make sure it works.
Thanks,
John
|
|
|
|
« Last Edit: May 10, 2012, 08:35:42 PM by jabster »
|
Logged
|
|
|
|
custom1
Member
Posts: 333
01 Interstate
SW Pa
|
|
« Reply #11 on: May 11, 2012, 08:26:30 AM » |
|
Before you put the petcock back in the tank, you can check to see it work visually by looking down through the reserve hole(I think) and apply a light vacuum where the vacuum line attaches and you can see the diaphragm "2" move away from the manual side.
When you put it back in the tank make sure to get it oriented so the valve that the chrome knob attaches to is at a right angle to the center-line of the tank. With the tank being curved it is hard to judge. If it is in there crooked that will put a bind on the knob and may keep you from having that feel of when the selector clicks into the different positions.
After you get it back in the tank you can bench test it. You should only have fuel flow with the knob on (if you have that much fuel in it) or in reserve and vacuum applied. Any other combination no fuel should flow.
On and no vacuum= no flow. This tests that the diaphragm "2" is sealing against the manual side of the housing.
Off and vacuum applied= no flow. This tests that the ball in the manual valve is really sealing.
|
|
|
|
|
Logged
|
John
|
|
|
|
jabster
|
|
« Reply #12 on: May 11, 2012, 10:55:37 AM » |
|
Thanks.
I was planning on doing the bench test already as well. Much easier to find a problem before I reinstall the tank.
-John
|
|
|
|
|
Logged
|
|
|
|
|
Blackduck
|
|
« Reply #13 on: May 11, 2012, 06:45:53 PM » |
|
When you have it all back together check to make sure the chrome selector is not binding on the hanger bracket, you may have to loosen the petcock nut and turn it a bit.
Before connecting the fuel hose set the selector in the off position and apply vacuum to the petcock, fuel should not flow, if it does the selector is binding and putting side force on the petcock shaft.
Cheers Steve
|
|
|
|
|
Logged
|
2001 Standard, 78 Goldwing, VRCC 21411
|
|
|
|
jabster
|
|
« Reply #14 on: May 26, 2012, 02:55:55 PM » |
|
Hi again.
So I've got the whole bike back together now except for the tank.
I'm not getting fuel thru the petcock, and I don't see any obvious reason for it. I'm on a tabletop still, not on the bike.
I have about 1.25 gallons of gas in the tank, and it's set to reserve. If I suck on the vacuum line, I suck air. Oddly enough, if I put a hose on the bottom nipple of the petcock and suck on that one, gas flows.
Like I said, I don't see anything obviously wrong. Any ideas?
Thanks,
John
|
|
|
|
|
Logged
|
|
|
|
custom1
Member
Posts: 333
01 Interstate
SW Pa
|
|
« Reply #15 on: May 26, 2012, 03:42:29 PM » |
|
There is something wrong with diaphragm #3 in the diagram above. When you are applying vacuum to the vent on the bottom it is pulling directly on diaphragm #2 and the fuel flows. Maybe you didn't get the nipples of both diaphragms into the connector/spacer. But that doesn't explain where the air is coming from. Maybe #3 is not seated in the housing right or it is torn. I think you are going to have to take it apart to see. When you apply vacuum, plug the vent with your finger and see if the air stops.
|
|
|
|
|
Logged
|
John
|
|
|
|
jabster
|
|
« Reply #16 on: May 27, 2012, 07:48:52 AM » |
|
New problem. Now I'm getting fuel flowing without vacuum. Grrrr.
Which means what? #2 isn't properly sealing?
Original problem may have been my stupidity and not having the screws fully tightened. Used a larger philips and I was able to tighten the screws much more.
-john
|
|
|
|
|
Logged
|
|
|
|
custom1
Member
Posts: 333
01 Interstate
SW Pa
|
|
« Reply #17 on: May 27, 2012, 08:30:48 AM » |
|
Where are you located. Maybe someone close could look at it and see if it assembled correctly. If you are within a few hours of me I'll take a ride and look at it myself. If the screws were loose enough to allow air in, the diaphragms may have slipped out of position when you were applying the vacuum. Take it apart and make sure everything is in the correct position and neither diaphragm is torn and the nipples of both diaphragms are securely in the spacer/connector. Take some pics as you assemble it so we can see what is wrong.  I am usually a defender of the factory petcock, but in this case you might be farther ahead time vs. $ to just get a manual Pingle valve and move on. Just remember to turn it off every time. If you go that route mail me the old one. I'll pay the shipping. My brain wants to prove it can be fixed.  |
|
|
|
|
Logged
|
John
|
|
|
|
jabster
|
|
« Reply #18 on: May 27, 2012, 01:34:17 PM » |
|
custom1, I've taken it apart several times. Pics are below. 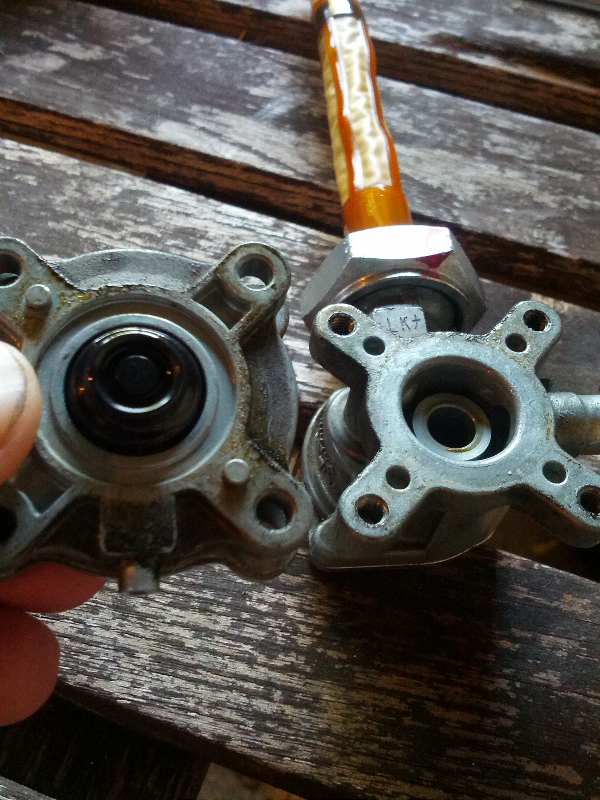 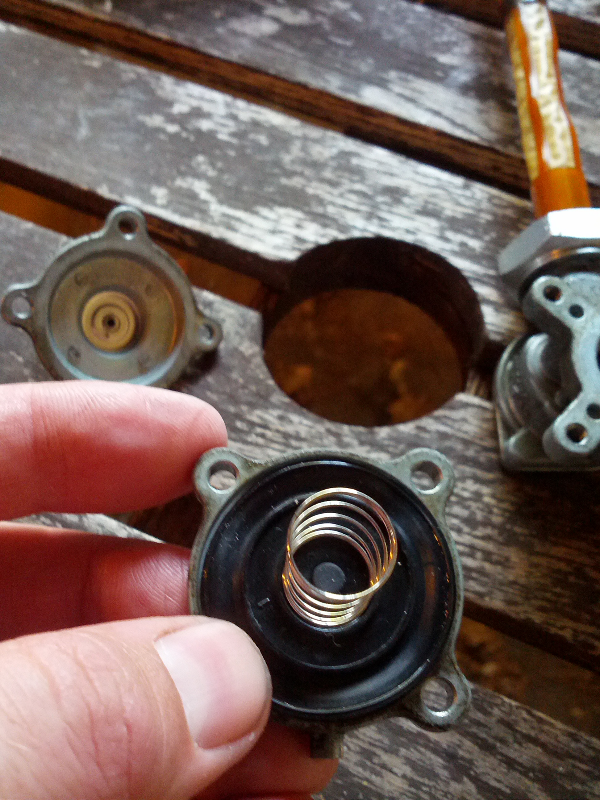 I'm thinking I'll just take it to the dealer Tuesday and see if they can quickly rectify my stupidity. I'm NW side of Chicago, btw. -John |
|
|
|
|
Logged
|
|
|
|
|
jabster
|
|
« Reply #19 on: May 27, 2012, 01:43:43 PM » |
|
P.S. How much less reserve is there with the Pingle? How many miles do you get on a Pingle-reserve?
|
|
|
|
|
Logged
|
|
|
|
custom1
Member
Posts: 333
01 Interstate
SW Pa
|
|
« Reply #20 on: May 27, 2012, 02:30:43 PM » |
|
It looks like in your first pic the diaphragm is on the wrong side of the center housing. The edge of the diaphragms seal each section. I would clean everything real good and move that diaphragm edge over(you have to push it through that hole. Look closely at the drawing above and you can see where each diaphragm seals. You can do this. Also in the second pic there is something that looks like the top of a small staple or something right above your thumb. Is that on the disc that the spring seats on? I don't remember seeing that on mine. Just make sure there is not a hole in that diaphragm where that is. I don't think I have ever typed the word "diaphragm" that many times ever before. A Pingle gives a good bit less reserve. Maybe a gallon or less, I'm not sure. People have extended the tube on the Pingle but then the screen doesn't fit and you have to use an inline filter. |
|
|
|
|
Logged
|
John
|
|
|
|
jabster
|
|
« Reply #21 on: May 27, 2012, 03:14:49 PM » |
|
Gah!! Nothing obviously wrong...until somebody points out what's obviously wrong.  That was it. After you wrote that I went back and looked at my original pictures again, and then I saw what was wrong. [EDIT] I'm not sure what the small "staple" is. It's on the hard piece of plastic under the spring. Either a trick of the light or something that is no longer there.[/EDIT] Thanks, John |
|
|
|
« Last Edit: May 27, 2012, 03:16:42 PM by jabster »
|
Logged
|
|
|
|
custom1
Member
Posts: 333
01 Interstate
SW Pa
|
|
« Reply #22 on: May 27, 2012, 03:56:06 PM » |
|
Glad you got it. Pics always help figure stuff out. Chicago is a bit far. Is it functioning correctly now? Only flowing when On or Reserve with the vacuum applied. |
|
|
|
|
Logged
|
John
|
|
|
|
jabster
|
|
« Reply #23 on: May 27, 2012, 04:17:27 PM » |
|
It's functioning correctly when vacuum is applied manually (orally?). IOW, when I orally stimulate the diaphragm, it works. :-) Doesn't seem to be functioning on the bike tho..... Back to my other thread! http://www.valkyrieforum.com/bbs/index.php/topic,32531.0.html-john |
|
|
|
« Last Edit: May 27, 2012, 04:29:23 PM by jabster »
|
Logged
|
|
|
|
rws
Member
Posts: 104
1997 Valkyrie Tourer
North Dakota
|
|
« Reply #24 on: May 28, 2012, 10:47:52 AM » |
|
P.S. How much less reserve is there with the Pingle? How many miles do you get on a Pingle-reserve?
on my Pingle CH-1311 I got just shy of 20 miles on reserve at 65 mph highway driving. |
|
|
|
« Last Edit: May 28, 2012, 10:51:17 AM by rws »
|
Logged
|
Original VRCC Member Number 697
1997 Honda Valkyrie Tourer - 2019 Honda CRF450L - 2021 Honda Rebel 1100 DCT
|
|
|
|
jabster
|
|
« Reply #25 on: May 28, 2012, 11:15:06 AM » |
|
Thanks rws. 17-20 is reasonable I guess.
I'll keep the pingle in mind if I ever have problems, but mine's working now and I don't see the need to drop another $100 on a petcock right now.
-john
|
|
|
|
|
Logged
|
|
|
|
|
Poor Ol Harry
|
|
« Reply #26 on: May 29, 2012, 01:48:12 PM » |
|
What a great find for me,as I got hydro lock a few days ago.......I ordered the petcock kit & Honda called this AM to let me know it was in.This post will be priceless to me soon.I'me going into the carbs this week. am armed with both shop manuels & a little savee so keep a watch for the guy with carb problems!!!l Thanks for all the info Harry
|
|
|
|
|
Logged
|
|
|
|
|


