Gryphon Rider
Member

Posts: 5234
2000 Tourer
Calgary, Alberta
|
 |
« on: September 26, 2012, 03:31:37 PM » |
|
I have a pair of small diameter headlights that I use as auxiliary lights, and the left one often is significantly dimmer than normal (I would guess 15% of normal light output). These lights have high/low 60W/55W H4 bulbs, with the high and low beam circuits switched separately by relays in the main headlight shell, powered by the battery through a fuse and a properly rated on/off toggle switch. The high beam relay is triggered by the wire that powers the main headlight high beam, and the low beam relay by the wire for the main headlight's low beam power. This allows the auxiliary lights to switch high/low with the main headlight, and also to be off when the starter button is pressed. Often recently when I start the bike the left light is dim. I can toggle the high/low switch, which makes it switch filaments as it should, but it remains dim. If, however, I rev the engine a bit (~1500 RPM), the bulb will properly brighten up when I toggle the high/low switch, and stay bright thereafter. What would cause this, and why would this only affect the left light? FWIW, the left light has acted up in the past, and that H4 bulb has recently burnt out an been replaced with a new one, after which the problem became more frequent. These photos show the proper operation of the lights when they were new. 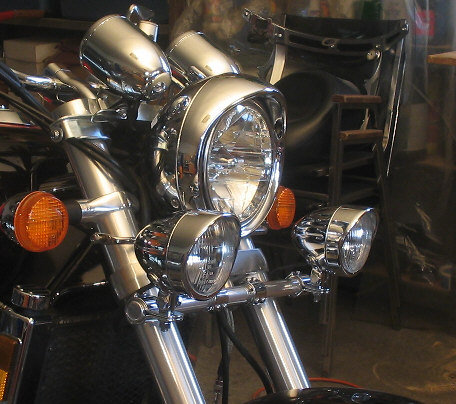 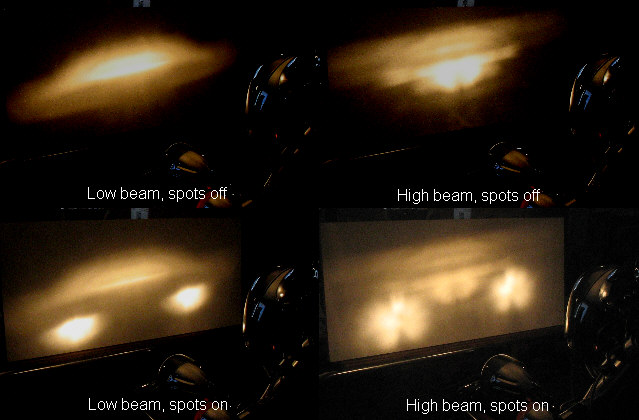 |
|
|
|
|
 Logged
|
|
|
|
MarkT
Member
Posts: 5196
VRCC #437 "Form follows Function"
Colorado Front Range - elevation 2.005 km

|
 |
« Reply #1 on: September 26, 2012, 03:58:22 PM » |
|
Assuming you have one relay powering both low spots, and another relay powering both high spots, but the problem happens only on the left spot with both hi & low - it's a problem you can isolate to one spot, and it's not the power supply. Look at the ground path for the left spot. Especially if it grounds to the chassis, and that ground is to aluminum (the forks?). Move the ground to steel if it's to aluminum. The official soln to this sort of problem, is to use a star washer to dig the ground into the aluminum, and coat the connection with dielectric grease. I find I can eliminate the problem for good if I just use a steel ground if one is available nearby. I have run into this problem in several places on the Valk - the most troublesome was the main battery ground being to the back of the aluminum engine block. I moved that one to the frame, and added a ground strap between the engine and frame. I also had a problem with my spots nearly the same as yours, of course on the road at Inzane I at Marysville. Took me a few minutes to find it, as it didn't make sense to me - but it was that cursed oxidizing aluminum. Moved the ground to steel and the problem was gone.
I installed hi-lo spots on the Magna, and designed a circuit that has a 3-pos sw to select the light source. With the sw up, the spots are on high beam, down they go to low, and in the middle, they follow the hi-lo dimmer sw along with the headlight. No sw to shut them off, though they go off along with the headlight when you hit the starter button - so just like the Valk, you can flash the lights off-on with the starter button while riding. It took 3 relays and a diode to set this up. One big advantage - if one of the spots loses a filiment, you can sw to the other filiment independent of the headlight high beam setting. That works OK, because with this particular brand of spots, there is almost no difference between the hi & lo setting on the spots - they didn't get the focus right. So basically it's instant backup spots on the road without stopping.
|
|
|
|
« Last Edit: September 26, 2012, 04:20:10 PM by MarkT »
|
Logged
|
|
|
|
|
Mr.BubblesVRCCDS0008
|
|
« Reply #2 on: September 26, 2012, 04:41:32 PM » |
|
I'm with Mark check the ground on the side that is dim.
|
|
|
|
|
Logged
|
|
|
|
|
olddog1946
|
|
« Reply #3 on: September 26, 2012, 05:00:56 PM » |
|
While I whole heartedly agree that most problems such as this are caused by inadequate grounds, take the time to check all your connections. Any bad/poor connection, whether ground or power supply can cause a problem....... but again 9.99 out of 10.001 are faulty grounds.
|
|
|
|
|
Logged
|
VRCC # 32473
US AIR FORCE E7, Retired 1965-1988
01 Valk Std.
02 BMW k1200LTE
65 Chevelle coupe, 1986 Mazda RX-7 with 350/5spd, 1983 Mazda RX-7 with FOMOCO 302/AOD project, 95 Mustang GT Convertible 5.0, 5 spd
Moses Lake, Wa. 509-760-6382 if you need help
|
|
|
|
valky1500
|
|
« Reply #4 on: September 26, 2012, 06:08:59 PM » |
|
I agree with Mark T on this one. Make sure your ground is not on Alum., it's a poor ground, and using star washers on the frame at body ground points is most effective.
|
|
|
|
|
Logged
|
'98 Standard '01 IS Yes I pull a trailer I have taken notice to those who use that word (Precautionary) and abide by it are not only very happy in life... but they also live long and prosper.  |
|
|
|
valky1500
|
|
« Reply #5 on: September 26, 2012, 06:15:50 PM » |
|
The fastest way to check your grounding point as being a good ground or not is to run a wire all the way to the ground at the battery. If it works then your grounding point is the cause.
|
|
|
|
|
Logged
|
'98 Standard '01 IS Yes I pull a trailer I have taken notice to those who use that word (Precautionary) and abide by it are not only very happy in life... but they also live long and prosper. |
|
|
|
dreamchaser
|
|
« Reply #6 on: September 26, 2012, 07:18:13 PM » |
|
There is an article in shop talk about needing to change halogen bulbs before they burn out, discussing how they get dimmer with age. It's under Daniel Meyer " Headlight Life". Perhaps you can change out the bulb if your circuit and ground testing proves fruitless. Its worth a shot(?).
Gary
|
|
|
|
|
Logged
|
|
|
|
|
valky1500
|
|
« Reply #7 on: September 26, 2012, 08:46:33 PM » |
|
@dreamchaser
That frame of thought is plausible.
Since they are H4 bulbs it might even be easier to simply switch left with right and see if it's the bulb or not.
|
|
|
|
|
Logged
|
'98 Standard '01 IS Yes I pull a trailer I have taken notice to those who use that word (Precautionary) and abide by it are not only very happy in life... but they also live long and prosper. |
|
|
|
|
|
valky1500
|
|
« Reply #9 on: September 27, 2012, 10:29:48 AM » |
|
BTW, if it's not left with right then it might be right with left. Flame away.  |
|
|
|
|
Logged
|
'98 Standard '01 IS Yes I pull a trailer I have taken notice to those who use that word (Precautionary) and abide by it are not only very happy in life... but they also live long and prosper. |
|
|
Gryphon Rider
Member
Posts: 5234
2000 Tourer
Calgary, Alberta
|
|
« Reply #10 on: September 27, 2012, 11:45:31 AM » |
|
Thanks for the ideas, folks. It'll be a week before I get to investigate this properly.
|
|
|
|
|
Logged
|
|
|
|
|
Regis
|
|
« Reply #11 on: September 27, 2012, 06:13:13 PM » |
|
use a multimeter and load test the light ! that will pinpoint ground or supply failure ! isolate the ground with a jumper wire , bypass the power supply wire with a jumper wire ! its really simple dc troubleshooting !
|
|
|
|
|
Logged
|
|
|
|
|
valky1500
|
|
« Reply #12 on: September 27, 2012, 06:41:00 PM » |
|
What's a multimeter pray tell,
Is it related to the slide rule or what?
|
|
|
|
|
Logged
|
'98 Standard '01 IS Yes I pull a trailer I have taken notice to those who use that word (Precautionary) and abide by it are not only very happy in life... but they also live long and prosper. |
|
|
GJS
Member
Posts: 424
Today is the tomorrow you worried about yesterday.
Vancouver Island, BC, Canada
|
|
« Reply #13 on: September 27, 2012, 09:20:00 PM » |
|
Another thought....
60watt bulb x 2= 120W
120W@12V=10amps
Make sure you are using a 14 gauge or bigger wire.
(small wire has a greater resistance then large wire at higher currents)
As well, look for any Copper/Aluminum junctions that are not soldered.
Copper against aluminum conducting 10amps will oxidize, get hot and become intermittent.
In really bad cases cause a fire. (I learned this the hard way)
If not soldering, use an antioxidant paste you can get at any electrical store that sells Breaker panels.
Going over the circuit end-to-end looking for corrosion, oxidation and a good ground will likely reveal the issue.
Good luck
GJS
|
|
|
|
« Last Edit: September 27, 2012, 09:22:07 PM by GJS »
|
Logged
|
The tragedy of life is not that it ends so soon, but that we wait so long to begin it.
- W. M. Lewis
|
|
|
|
Regis
|
|
« Reply #14 on: September 28, 2012, 07:18:12 AM » |
|
Valky1500, multimeter is a multi Function meter ! Amp meter,dc volt meter ,ac volt meter , diode tester, continuity tester , ohm meter etc... All in one ! $20 at sears ! To test the dc circuit disconnect the neg wire from light , run a jumper wire from neg post on battery to neg terminal of light and turn on . If light is bright - bad ground . If light is dim you can then disconnect pos wire from light use dc volt meter to check for 12v at pos wire . If reading is good 12v then hook pos wire up to light and turn on , recheck pos voltage on same wire with light turned on ( load test) if voltage drops you have supply problem in positive circuit . Run a jumper wire from pos battery post to light and it should be bright , if not the problem is in light itself
|
|
|
|
|
Logged
|
|
|
|
|
valky1500
|
|
« Reply #15 on: September 28, 2012, 04:49:19 PM » |
|
The first place one might think to best attach the ground when running new lights on the front would be in the headlight basket itself. After all this is where all of the wire harness connections meet and one might decide to take the shortest route possible and attach it there. But because the triple-clamps are made of aluminum alloy, both top and bottom, they would cut off the ground source from the frame at that point or anyplace beyond. For this reason attaching a ground on or forward of the forks, including inside the headlight basket, it would experience a bad ground which is at the frame. So it might be a good place to start looking. Of course using either your multimeter or brand new and fancy DMM to verify your ground is advisable before you start as mentioned above. |
|
|
|
|
Logged
|
'98 Standard '01 IS Yes I pull a trailer I have taken notice to those who use that word (Precautionary) and abide by it are not only very happy in life... but they also live long and prosper. |
|
|
|
valky1500
|
|
« Reply #16 on: September 28, 2012, 04:53:10 PM » |
|
Oh yes, and thank you kindly for that explanation Regis. Now I'm sure that we all understand it better  . |
|
|
|
|
Logged
|
'98 Standard '01 IS Yes I pull a trailer I have taken notice to those who use that word (Precautionary) and abide by it are not only very happy in life... but they also live long and prosper. |
|
|
|
Regis
|
|
« Reply #17 on: September 28, 2012, 04:58:29 PM » |
|
some people play dumb and some are ... well , not so well informed .If you know , you know , if you dont , ask . I wasnt trying to be mr. knowitall . I do this everyday in dc applications at work , you'd be surprised how many " mechanics" cant troubleshoot a simple circuit but get paid to know how .
|
|
|
|
|
Logged
|
|
|
|
|
Regis
|
|
« Reply #18 on: September 28, 2012, 05:18:48 PM » |
|
Valky1500 , if fumbling around checking grounds is the way some people want to start troubleshooting thats ok ,but a Cheap DMM saves time and will assure you that there is no mistake . you can make all the laffin smileys you like ! IDFC ! Seems like you just want to lift yourself by ridiculing others , maybe your friends care .
|
|
|
|
|
Logged
|
|
|
|
|
valky1500
|
|
« Reply #19 on: September 28, 2012, 05:22:59 PM » |
|
There was no offense taken, none given. There are those who like to see it all talked out by someone who really knows what they are talking about. Someone who can put that all into words and explain it better for them. This thread was started by someone with all of that in mind. Why else would anyone come in here to see a bunch of old farts with memories. Smile  |
|
|
|
|
Logged
|
'98 Standard '01 IS Yes I pull a trailer I have taken notice to those who use that word (Precautionary) and abide by it are not only very happy in life... but they also live long and prosper. |
|
|
|
Regis
|
|
« Reply #20 on: September 28, 2012, 05:29:36 PM » |
|
cool , sorry !
|
|
|
|
|
Logged
|
|
|
|
|
Ricky-D
|
|
« Reply #21 on: September 29, 2012, 12:27:01 PM » |
|
It would be smart to understand that Honda runs all the circuit grounding needs through the different wiring harnesses.
So if you are using some different grounding method that ultimately ends up seeking the ground through the harness, you can still have problems. The main problem being wire gauge within the harness not being of sufficient gauge to handle additional loads.
Relying on the steering head bearings for grounding purposes is not a good practice for many reasons.
***
|
|
|
|
|
Logged
|
2000_Valkyrie_Interstate
|
|
|
jer0177
Member
Posts: 556
VRCC 32975
Pittsburgh, PA
|
|
« Reply #22 on: September 29, 2012, 02:29:40 PM » |
|
Something I need to note here for everyone too. Electrons (the part of electricity that "flows") don't move from the positive post of the battery through the circuit to the negative side. Electrons have a negative charge - and they're what give the "negative" post on a battery it's name.
That being the case, all of the electrons needed for a particular circuit must come through the ground wire, then through the bulb (or other circuit), then a switch/relay, THEN the fuse and back into the positive post of the battery.
This means that if you tapped a ground wire that Honda used for something else, it may not be sufficient to carry the electrons you need for your additional light bulbs, and the whole circuit (anything "fed" by that ground wire) will suffer as a result.
|
|
|
|
|
Logged
|
|
|
|
|
valky1500
|
|
« Reply #23 on: September 29, 2012, 05:44:34 PM » |
|
That's a solid reason to be using a multimeter when trying to find your grounds between different circuits. Just as Regis was saying above.  |
|
|
|
|
Logged
|
'98 Standard '01 IS Yes I pull a trailer I have taken notice to those who use that word (Precautionary) and abide by it are not only very happy in life... but they also live long and prosper. |
|
|
Gryphon Rider
Member
Posts: 5234
2000 Tourer
Calgary, Alberta
|
|
« Reply #24 on: May 07, 2013, 06:59:56 AM » |
|
Well, I said I wouldn't be able to check it out for a week, but that week magically turned into half a year. The problem, no surprise, turned out to be a bad ground. When I tried to disconnect the ground wire, instead of disconnecting at the terminal, the wire pulled out of the terminal. Insufficient crimp. With a new terminal crimped on better (I hope), the lights now work properly.
What I don't yet understand is that with the ground completely disconnected, The bulbs would still illuminate dimly. Does an H4 bulb also ground through its housing/flange? I suppose I could Ohmmeter it myself and find out, but if someone knows for sure it would save me the trouble of doing it half a year from now.
|
|
|
|
|
Logged
|
|
|
|
gordonv
Member
Posts: 5766
VRCC # 31419
Richmond BC
|
|
« Reply #25 on: May 08, 2013, 08:32:27 PM » |
|
Thanks for the follow up, even being an old post it is nice to know what fixed it.
|
|
|
|
|
Logged
|
1999 Black with custom paint IS   |
|
|
|
valky1500
|
|
« Reply #26 on: May 08, 2013, 09:40:35 PM » |
|
Thanks for the follow up, even being an old post it is nice to know what fixed it.
It still hasn't been said "what fixed it" or what caused it. The fix is not using crimps for ground connections. |
|
|
|
|
Logged
|
'98 Standard '01 IS Yes I pull a trailer I have taken notice to those who use that word (Precautionary) and abide by it are not only very happy in life... but they also live long and prosper. |
|
|
t-man403
Member
Posts: 1689
Valk-a-maniac
Calgary, Alberta, Canada.
|
|
« Reply #27 on: May 08, 2013, 09:52:04 PM » |
|
I don't give a rats a.. that it's fixed, but I like your imagination on the light bar. Okay ........... I'm glad it's fixed as well. |
|
|
|
|
Logged
|
"Men are like steel. When they lose their temper, they lose their worth". Chuck Norris
|
|
|
|
PhredValk
|
|
« Reply #28 on: May 08, 2013, 10:37:32 PM » |
|
I use crimps for all of my connections; it holds the wire snugly in the connector while I solder the wire down.. Fred. |
|
|
|
|
Logged
|
Growing old is mandatory, growing up is optional.
VRCCDS0237
|
|
|
Mallett
Member
Posts: 511
Oh, what a ride!!!!
Laurel, Mississippi
|
|
« Reply #29 on: May 09, 2013, 04:58:40 AM » |
|
Gryphon Rider, I like your light bar & lights...where can I find that setup?
|
|
|
|
|
Logged
|
Any coward can fight a battle when he's sure of winning; but give me the man who has pluck to fight when he's sure of losing.
GEORGE ELIOT
|
|
|
Gryphon Rider
Member
Posts: 5234
2000 Tourer
Calgary, Alberta
|
|
« Reply #30 on: May 09, 2013, 10:14:16 AM » |
|
Gryphon Rider, I like your light bar & lights...where can I find that setup?
The light bar is home-made from 1" aluminum bar, based on "Bongo" light bar design. It seems the web page or it is no longer available. The lights are J&P Cycles: http://www.jpcycles.com/product/3100278 |
|
|
|
|
Logged
|
|
|
|
Gryphon Rider
Member
Posts: 5234
2000 Tourer
Calgary, Alberta
|
|
« Reply #31 on: May 09, 2013, 10:17:15 AM » |
|
I use crimps for all of my connections; it holds the wire snugly in the connector while I solder the wire down.. Fred. If there was an easy way to solder an insulated terminal, I would do it. |
|
|
|
|
Logged
|
|
|
|
Mallett
Member
Posts: 511
Oh, what a ride!!!!
Laurel, Mississippi
|
|
« Reply #32 on: May 09, 2013, 10:26:04 AM » |
|
Gryphon Rider, I like your light bar & lights...where can I find that setup?
The light bar is home-made from 1" aluminum bar, based on "Bongo" light bar design. It seems the web page or it is no longer available. The lights are J&P Cycles: http://www.jpcycles.com/product/3100278Thanks Gryphon Rider...nice setup... |
|
|
|
|
Logged
|
Any coward can fight a battle when he's sure of winning; but give me the man who has pluck to fight when he's sure of losing.
GEORGE ELIOT
|
|
|
|
Farther
|
|
« Reply #33 on: May 09, 2013, 11:26:40 AM » |
|
Gryphon Rider, I like your light bar & lights...where can I find that setup?
The light bar is home-made from 1" aluminum bar, based on "Bongo" light bar design. It seems the web page or it is no longer available. The lights are J&P Cycles: http://www.jpcycles.com/product/3100278 Ok, now you are going to have to do a write-up on the light bar build. |
|
|
|
|
Logged
|
Thanks,
~Farther
|
|
|
Gryphon Rider
Member
Posts: 5234
2000 Tourer
Calgary, Alberta
|
|
« Reply #34 on: May 09, 2013, 12:12:34 PM » |
|
Gryphon Rider, I like your light bar & lights...where can I find that setup?
The light bar is home-made from 1" aluminum bar, based on "Bongo" light bar design. It seems the web page or it is no longer available. The lights are J&P Cycles: http://www.jpcycles.com/product/3100278 Ok, now you are going to have to do a write-up on the light bar build. It's real simple: 1. Buy four clamps, some 1" aluminum bar, some lights, some bolts, and a switch. 2. Cut bar into two short pieces and one long piece. 3. Drill and tap the short pieces both ends, and file/grind some flats into one end so you can put a wrench on it. 4. Sand and polish aluminum bits using appropriate grit materials. 5. Assemble everything and wire up the lights. 6. Think about the concept of using a relay and a fuse, then post on VRCC tech board asking what are relays and fuses all about. Don't bother doing a search. |
|
|
|
|
Logged
|
|
|
|
Mallett
Member
Posts: 511
Oh, what a ride!!!!
Laurel, Mississippi
|
|
« Reply #35 on: May 09, 2013, 12:34:20 PM » |
|
Gryphon Rider, I like your light bar & lights...where can I find that setup?
The light bar is home-made from 1" aluminum bar, based on "Bongo" light bar design. It seems the web page or it is no longer available. The lights are J&P Cycles: http://www.jpcycles.com/product/3100278 Ok, now you are going to have to do a write-up on the light bar build. It's real simple: 1. Buy four clamps, some 1" aluminum bar, some lights, some bolts, and a switch. 2. Cut bar into two short pieces and one long piece. 3. Drill and tap the short pieces both ends, and file/grind some flats into one end so you can put a wrench on it. 4. Sand and polish aluminum bits using appropriate grit materials. 5. Assemble everything and wire up the lights. 6. Think about the concept of using a relay and a fuse, then post on VRCC tech board asking what are relays and fuses all about. Don't bother doing a search. Gryphon Rider, you wouldn't happen to have a better pic of it would you? What are the two short pieces for? |
|
|
|
|
Logged
|
Any coward can fight a battle when he's sure of winning; but give me the man who has pluck to fight when he's sure of losing.
GEORGE ELIOT
|
|
|
t-man403
Member
Posts: 1689
Valk-a-maniac
Calgary, Alberta, Canada.
|
|
« Reply #36 on: May 09, 2013, 01:53:44 PM » |
|
I think they'd be for spacers where it's mounted under the headlight.
|
|
|
|
|
Logged
|
"Men are like steel. When they lose their temper, they lose their worth". Chuck Norris
|
|
|
Gryphon Rider
Member
Posts: 5234
2000 Tourer
Calgary, Alberta
|
|
« Reply #37 on: May 09, 2013, 03:05:41 PM » |
|
Gryphon Rider, you wouldn't happen to have a better pic of it would you? What are the two short pieces for?
Here ya go:  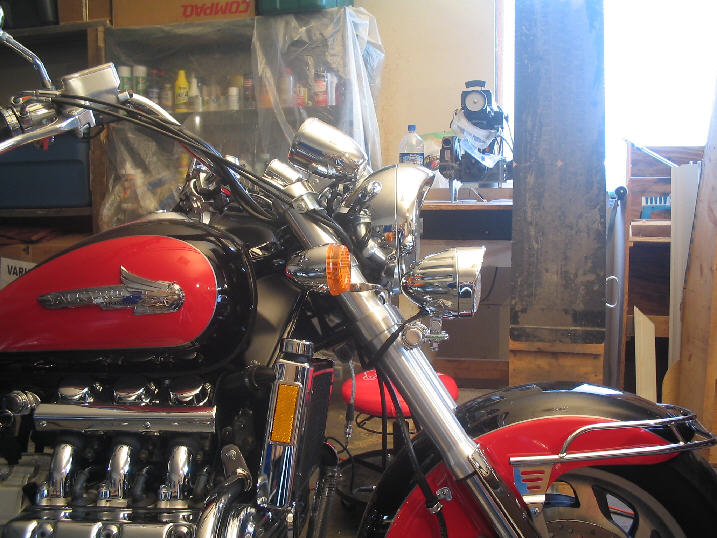 |
|
|
|
|
Logged
|
|
|
|
Mallett
Member
Posts: 511
Oh, what a ride!!!!
Laurel, Mississippi
|
|
« Reply #38 on: May 09, 2013, 03:26:09 PM » |
|
Thanks, Gryphon Rider
|
|
|
|
|
Logged
|
Any coward can fight a battle when he's sure of winning; but give me the man who has pluck to fight when he's sure of losing.
GEORGE ELIOT
|
|
|
|


