|
Rio Wil
|
 |
« on: June 03, 2013, 03:27:05 PM » |
|
|
|
|
|
|
 Logged
|
|
|
|
|
Ricky-D
|
|
« Reply #1 on: June 03, 2013, 03:52:00 PM » |
|
Find the end of the crack, the very end of the crack
and drill a nice clean hole.
About 3/16" is pretty good.
This will stop the crack from continuing on.
You can get the proper glue for the fairing at Lowes.
Fiberglass resin will not stick well to the fairing plastic.
***
|
|
|
|
|
Logged
|
2000_Valkyrie_Interstate
|
|
|
|
old2soon
|
|
« Reply #2 on: June 03, 2013, 04:34:34 PM » |
|
I just got done repairing a SEVERLY cracked saddle bag on my I/S. The good news is I did it myself with stuff available on line and at my local hardware store. Drilling the crack is an old trick from my aviation days in the U S Navy. The glue I used dries hard and is sandable and paintable. The glue I used is an Oatey product. The part # for a 4 fluid oz can is 30916. It cost less than 6 bucks. The cracks I had had a LOT of tension on them so after gluing up the crack and clamping with the same clamps you use for gluing up wood projects. On the inside of the bag I cut some 1 inch squares of eighth in thick A B S sheet and positioned them over the crack and glued those up and held them in place til they wouldn't slide on their own. The difficult part was waiting the 24 hrs for the glue to setup COMPLETELY. And when I released the clamp on the first repaired section it held-OH JOY.  You have to scuff up(read sand it out)the area you want the glue to adhere to. Like I said-this glue dries hard-sandable-paintable. And cheaper than a body shop.  RIDE SAFE. |
|
|
|
|
Logged
|
Today is the tommorow you worried about yesterday. If at first you don't succeed screw it-save it for nite check. 1964 1968 U S Navy. Two cruises off Nam.
VRCCDS0240 2012 GL1800 Gold Wing Motor Trike conversion
|
|
|
|
Rio Wil
|
|
« Reply #3 on: June 03, 2013, 05:02:04 PM » |
|
Thanks to both of you....I will take a look at that Oatey product and thanks for bringing up the material the fairing is made of.....don't know why my little mind went to fiberglass right away....
|
|
|
|
|
Logged
|
|
|
|
|
pancho
|
|
« Reply #4 on: June 03, 2013, 05:06:53 PM » |
|
Hey Rio,, That Oatey product referred to is ABS cement,, should be availabel at any home improvement outlet,, also Oatey #30889 in the 8 oz. can will work for your project,,,, it is the only stuff to use on ABS plastic parts for a permanent repair.
|
|
|
|
|
Logged
|
The most expensive things you will purchase, are those things you would not have needed if you had listened and obeyed.
|
|
|
|
Rio Wil
|
|
« Reply #5 on: June 03, 2013, 05:09:47 PM » |
|
This ought to slow it down til I can get around to it......Man! hate to have to pull the fairing off, don't think its a big deal......but still gotta do it.  |
|
|
|
|
Logged
|
|
|
|
|
pancho
|
|
« Reply #6 on: June 03, 2013, 05:19:05 PM » |
|
That will hold you temporally,,,,,,,,,,, the crack is certainly too big to forget about
|
|
|
|
|
Logged
|
The most expensive things you will purchase, are those things you would not have needed if you had listened and obeyed.
|
|
|
Tropic traveler
Member

Posts: 3117
Livin' the Valk, er, F6B life in Central Florida.
Silver Springs, Florida
|
|
« Reply #7 on: June 03, 2013, 05:45:26 PM » |
|
Search for my saddlebag repair thread from a month ago or so. Soldering iron & a can of the Oatey ABS cement mentioned is all I used. |
|
|
|
|
Logged
|
'13 F6B black-the real new Valkyrie Tourer
'13 F6B red for Kim
'97 Valkyrie Tourer r&w, OLDFRT's ride now!
'98 Valkyrie Tourer burgundy & cream traded for Kim's F6B
'05 SS 750 traded for Kim's F6B
'99 Valkyrie black & silver Tourer, traded in on my F6B
'05 Triumph R3 gone but not forgotten!
|
|
|
|
old2soon
|
|
« Reply #8 on: June 03, 2013, 06:29:42 PM » |
|
There are 4 yes 4 bolts that hold the fairing on. The S O B on pulling the fairing is all the electrical and speaker wires under there.  RIDE SAFE. |
|
|
|
|
Logged
|
Today is the tommorow you worried about yesterday. If at first you don't succeed screw it-save it for nite check. 1964 1968 U S Navy. Two cruises off Nam.
VRCCDS0240 2012 GL1800 Gold Wing Motor Trike conversion
|
|
|
|
Rio Wil
|
|
« Reply #9 on: June 03, 2013, 08:35:39 PM » |
|
It will likely be a few months before getting around to this.......but will add a summary of the repair then....Thanks for the advice..  |
|
|
|
|
Logged
|
|
|
|
LadyDraco
Member
Posts: 2054
TISE
Bastian, VA. Some of the best roads in the East
|
|
« Reply #10 on: June 04, 2013, 04:38:05 AM » |
|
I have a few cracks in my fairing.. And JB quick has done a bang up job for it.. I did smear (technical term) much wider then the crack.. And cleaned it good to de grease the area first.. Before applying .. The crack has NOT gotten bigger 5 yrs later 50 +k later ..  I can see where yours is cracked you'll have to maybe pull the whole fairing off.. And remove more... Yes there are a few elec. connections .And speakers... And while you are in there hit them all with a little dielectric grease ... I have had my fairing off a few times..  And yes just 4 bolts hole it just like the tour shields..  Here's a link on removing fairing ..I was doing a steering head bearing at this time.. Removing the fairing to replace steering Head bearing |
|
|
|
« Last Edit: June 04, 2013, 04:53:26 AM by LadyDraco »
|
Logged
|
Life is what you make of it~If it don't fit make alterations...
One does not speak unless one knows.
Never underestimate the power of a woman !
It's a Poor Craftsman who blames their Tools !
This is the way
|
|
|
Skinhead
Member
Posts: 8748
J. A. B. O. A.
Troy, MI
|
|
« Reply #11 on: June 04, 2013, 05:26:02 AM » |
|
From where that crack is located, it looks like your fairing may have a thin spot along that countour, due to the mold shifting during injection of the plastic, after glueing, I would cut, heat and form some ABS pieces (see this site for an explaination http://goldwingdocs.com/forum/viewtopic.php?f=11&t=690 ), and glue them to the inside of the fairing. Should fix you right up. |
|
|
|
|
Logged
|
 Troy, MI |
|
|
|
|
|
cookiedough
|
|
« Reply #13 on: June 04, 2013, 02:21:46 PM » |
|
I've used JB weld 2 part mix in the past one small tube is black resin and the whitish/gray hardener resin mix together and have about 5-10 minutes tops to work it on with say a toothpick. Don't need much but takes 24 hours to fully cure still a tad soft after a few hours of hardening but after say 10 minutes you cannot work it without messing it up worse. It settles smooth pretty well with a toothpick and don't need much to go over the tiny crack it will hold fine. It is paintable and sandable as well and has a very high psi strength once cured and dries medium gray finish. Would be best to do it from the inside but either bonds will work just fine to hold it. If you do it from the outside it will show no matter what you use since is not at all clear resin. If you don't care about looks you could do it from the outside???
|
|
|
|
|
Logged
|
|
|
|
|
BCoy
|
|
« Reply #14 on: June 04, 2013, 04:59:00 PM » |
|
Rio, Check out PlastiFix the complete rigid plastic repair kit. Repair cracks. Fill gaps. Rebuild tabs. Fix stripped threads. I used this to fix my batwing on my Electra Glide. For your repair you would cut a gouge along the crack to create a void, sprinkle in the provided plastic powder then add the liquid. A chemical reaction takes place and bonds the materials together like welding plastic. This product has too many applications to list. Check out their website. www.plastifix.comBill |
|
|
|
« Last Edit: June 04, 2013, 05:14:34 PM by BCoy »
|
Logged
|
1998 Valkyrie Tourer
|
|
|
Tropic traveler
Member
Posts: 3117
Livin' the Valk, er, F6B life in Central Florida.
Silver Springs, Florida
|
|
« Reply #15 on: June 04, 2013, 05:42:18 PM » |
|
From this... 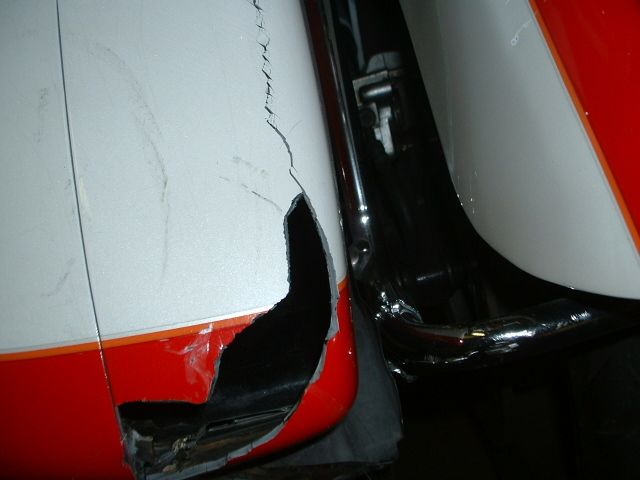 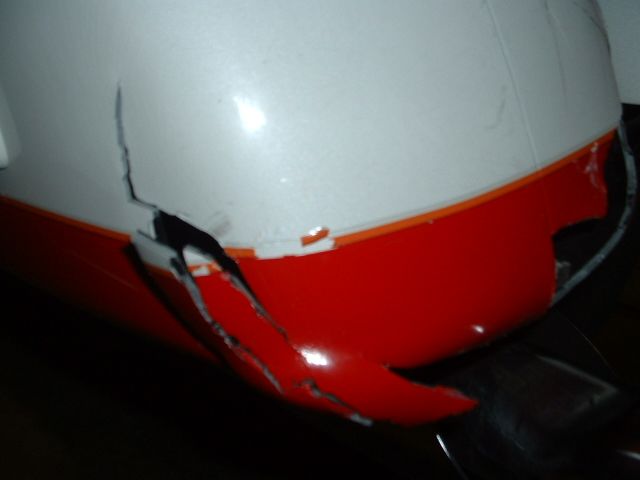 To this....  Using nothing but this....  And this....  $22 total cost with $11 of that being the orange pinstripe. Unless you have gaping holes there is no need for any other fillers, the ABS is very malleable when heated with the soldering iron. If you don't get too happy with the heat you might be able to get it from the backside w/o ruining the paint. Give it a shot! |
|
|
|
|
Logged
|
'13 F6B black-the real new Valkyrie Tourer
'13 F6B red for Kim
'97 Valkyrie Tourer r&w, OLDFRT's ride now!
'98 Valkyrie Tourer burgundy & cream traded for Kim's F6B
'05 SS 750 traded for Kim's F6B
'99 Valkyrie black & silver Tourer, traded in on my F6B
'05 Triumph R3 gone but not forgotten!
|
|
|
|
Rio Wil
|
|
« Reply #16 on: June 04, 2013, 07:22:15 PM » |
|
Wow......thats impressive, I am guessing you used a body filler before painting?
|
|
|
|
|
Logged
|
|
|
|
Tropic traveler
Member
Posts: 3117
Livin' the Valk, er, F6B life in Central Florida.
Silver Springs, Florida
|
|
« Reply #17 on: June 05, 2013, 09:34:57 AM » |
|
Wow......thats impressive, I am guessing you used a body filler before painting?
No, the ABS cement was my filler. The finish work & paint on this repair are by no means professional quality. Reason for not doing a proper finish job {other than me not being capable  } is that I plan a repaint with color change in the near future. I'll let a pro make my repair job purty. |
|
|
|
|
Logged
|
'13 F6B black-the real new Valkyrie Tourer
'13 F6B red for Kim
'97 Valkyrie Tourer r&w, OLDFRT's ride now!
'98 Valkyrie Tourer burgundy & cream traded for Kim's F6B
'05 SS 750 traded for Kim's F6B
'99 Valkyrie black & silver Tourer, traded in on my F6B
'05 Triumph R3 gone but not forgotten!
|
|
|
|
pancho
|
|
« Reply #18 on: June 05, 2013, 10:58:27 AM » |
|
I have a few cracks in my fairing.. And JB quick has done a bang up job for it.. I did smear (technical term) much wider then the crack.. And cleaned it good to de grease the area first.. Before applying .. The crack has NOT gotten bigger 5 yrs later 50 +k later .. I can see where yours is cracked you'll have to maybe pull the whole fairing off.. And remove more... Yes there are a few elec. connections .And speakers... And while you are in there hit them all with a little dielectric grease ... I have had my fairing off a few times.. And yes just 4 bolts hole it just like the tour shields.. Here's a link on removing fairing ..I was doing a steering head bearing at this time.. Removing the fairing to replace steering Head bearingJust something about a woman that understands machinery and knows how to use tools............... Good for you LadyDraco |
|
|
|
« Last Edit: June 05, 2013, 11:05:16 AM by pancho »
|
Logged
|
The most expensive things you will purchase, are those things you would not have needed if you had listened and obeyed.
|
|
|
|


