Valkyrie Riders Cruiser Club
July 27, 2025, 01:19:36 AM *
Welcome, Guest. Please login or register.

Login with username, password and session length
Ultimate Seats Link VRCC Store
Homepage : Photostash : JustPics : Shoptalk : Old Tech Archive : Classifieds : Contact Staff
News: If you're new to this message board, read THIS!
 
MarkT Exhaust
Pages: [1]   Go Down
Send this topic Print
Author Topic: clutch tool  (Read 4389 times)
elpaso jo
Member
*****
Posts: 97

Meath Co. Ireland


« on: September 19, 2013, 02:52:15 AM »

Hi Guys,
In the recent past someone sent me a picture of a home made tool that they used to line up the clutch into the basket.I have successfully replaced all discs and plates (with all your help) now Im ready to install. Hopefully someone might resend me the tool pic.
Much much obliged
Joe 
Logged
chrise2469
Member
*****
Posts: 295

Winnipeg Manitoba Canada


« Reply #1 on: September 19, 2013, 07:03:44 AM »

I'm not sure what tool you mean but  I aligned the clutch plates in the basket using two bushings and the M6 bolts from the lifter plate and some washers.

Here's a crappy video unedited and with poor sound showing the bushings and washers applied to the clutch pack.  If you watch the videos don't ask for the 5 minutes of your life back Wink
http://sdrv.ms/18cqzqf

Another video of aligning the tabs in the basket with the bolts and bushings in place.
http://sdrv.ms/1a6Mrmg


You can use anything that will fit over the posts in the pressure plate and be slightly higher to allow you to tighten and hold the clutch center.

The bushings I used were plumbing couplers from Home depot- I don't know what you have in Ireland but here's some photos.  I drilled the threads out of the couplers and ground down the corners so it would fit into the pressure plate squarely.


Is this what you had in mind or were you thinking of the tool to compress the flat springs and install the inner ring clip like this


If the video's don't work let me know and I will upload to youtube.
« Last Edit: September 19, 2013, 07:09:19 AM by chrise2469 » Logged
elpaso jo
Member
*****
Posts: 97

Meath Co. Ireland


« Reply #2 on: September 19, 2013, 09:07:37 AM »

Hi Chrise,
You might remember the thread where my Bike was belching out blue smoke and using oil etc.
Well, the problem was exactly as you and the guys said, it was sheared rivets and worn discs, the problem shifting gears , finding neutral had been there for a while until she (had enough).
My brother is away on vac so he told me to put the clutch together and have that much done until he gets back. The tool someone posted worked a treat but we used a plastic pipe about 1/4" thick and cut a section out of it, then used a serclip to expand/contract it to right dia.
Actually you are right, that is what i meant when I said tool, its bolts and washers, its just I lost that reply and photo, what you sent was good, but second video "froze" great if you posted it on youtube.
The first video, eh, what was the guy doing, eh, no way was that you!!!
Joe
Logged
F6Dave
Member
*****
Posts: 2269


« Reply #3 on: September 19, 2013, 10:22:27 AM »

After many months I finally got around to replacing the clutch on my ’98 Tourer.  As some others have experienced, the rivets in the damper plate failed.  This is not uncommon on some high mileage Valks.

The job took several hours, but was not difficult at all.  Getting the center plastic cover off was more of a PITA than any of the other work.  Clearance isn’t as good as in a bike with a more typical transversely mounted engine, but once you have it on a lift with a few pieces removed (I didn’t even remove the tank) there is plenty of clearance to remove the rear cover and clutch center pack without any special tools (not even a wobble joint for your ratchet).

Here are of a couple of things I learned:

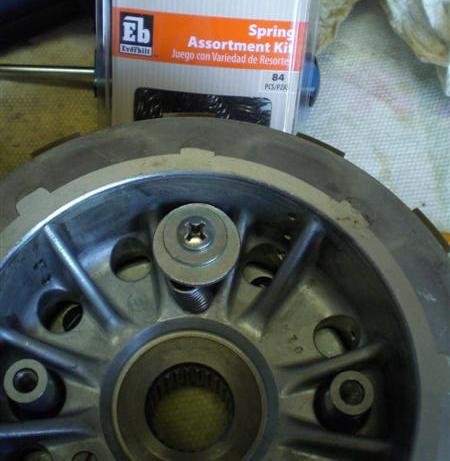
I’d read that the disk alignment must nearly perfect or the compressed clutch center pack will not fit back into the basket.  I used a couple of large washers and a spring in 2 places to hold the pack together with some light pressure.  This allowed me to align the disks in the basket, and keep them aligned when I compressed the diaphragm spring and replaced the circlip.


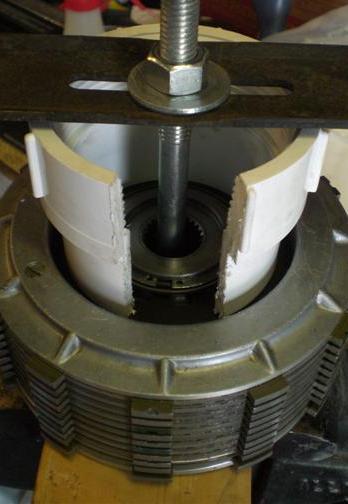
Speaking of compressing the spring, I made a simple tool out of a 2x4, long bolt, a plastic pipe fitting, and an old lawnmower blade.  I knew that blade would come in handy one day!  This allowed me to use straight tips on the circlip pliers which seem to work better than 90 or 45 degree tips.


While I used an impact wrench to remove the big clutch nut, I wanted to torque the new one to the Honda spec.  Here’s a simple clutch holder tool I made from another 2x4.

Logged
elpaso jo
Member
*****
Posts: 97

Meath Co. Ireland


« Reply #4 on: September 19, 2013, 10:45:30 AM »

Superb photos, dont know why its manual dont introduce clear photos like these, A photo explains a 1000 words.Now I know why I need to keep tabs in line.Am I right in saying that before placing the clutch into the basket, I must line up the tabs,then clamp the whole clutch assembly together so that they dont move out of alignment while installing?
Logged
F6Dave
Member
*****
Posts: 2269


« Reply #5 on: September 19, 2013, 11:05:18 AM »

First, I put the clutch pack together without the spring or circlip.  The tabs were roughly in alignment, but they need to be very precise.  Then I held it together lightly with those screws, washers, and springs you see in the first photo.  I did this in 2 places.  This let me place the pack into the clutch basket and slip the plates around as needed so it would slide all the way in.

Next I pulled the pack back out of the basket.  I very carefully removed the screws, washers, and springs so I wouldn't disturb the alignment.  Then I put the diaphram spring on, compressed it as shown in the second photo, and installed the circlip.  The perfectly aligned clutch pack now slipped easily into the basket.

I've heard of guys trying over and over to get the pack aligned.  This method worked the first time.
Logged
elpaso jo
Member
*****
Posts: 97

Meath Co. Ireland


« Reply #6 on: September 19, 2013, 12:10:04 PM »

Superb Dark here now in Ireland, so cant wait to get going at it tomorrow.
I will send a post and let you know how it went, Thank you all for your help. Indeed I may have more questions for you, as when she blew put so much smoke 3 weeks ago it "frightened the be- jesus" out of me.
Logged
chrise2469
Member
*****
Posts: 295

Winnipeg Manitoba Canada


« Reply #7 on: September 19, 2013, 01:41:11 PM »

Hi Chrise,
.
The first video, eh, what was the guy doing, eh, no way was that you!!!
Joe

The first video really sucks, it was shot with a helmet cam- the last 15 seconds are about the only good thing.  It shows the fitting of the bushings and the bolts.

The youtube clip is loading now, but i'm off to a 'net free area.  (should be up by 1615 cst 19Sep 13)This one shows aligning the disc's in the basket broken into two parts.  You can skip the last 20 seconds of the first video.
http://youtu.be/Tn0DvPT6agw
Valkyrie clutch part 1powered by Aeva

part 2, mercifully short
http://youtu.be/7M0Lpz9_-Tw
Valkyrie clutch part2powered by Aeva


I didn't remove the M6 bolts until I had put the springs and retaining clip back in.  

Make sure not to forget the spring seat b.  good luck
« Last Edit: September 20, 2013, 05:53:59 AM by chrise2469 » Logged
Pages: [1]   Go Up
Send this topic Print
Jump to: