Xtracho
Member

Posts: 1303
The Bosses
Florida's Emerald Coast
|
 |
« on: January 10, 2014, 08:20:44 PM » |
|
The Shiny Kit will be here next week along with my new pilot screws. Already have the PAIR valve off and the reed valve cases. Tomorrow I'll finish up the prep on the bike for installing the desmog kit. As I understand it, and I could be wrong, once the kit is installed, the only vacuum hose required will be the #10 hose from the #6 intake runner to the petcock? The remaining hoses can be removed from the bike? If that is the case I'll need to pick up a couple more vacuum plugs. The #1 and #5 are already blocked off. The #3 & #4 will be plugged with the plugs in the Shiny kit. So I really only need 1 more for the #2. If that sounds right please let me know. If not, let me know also. I really want to have everything I need to get it done when the kit arrives. Thanks again for everyone's help and advice.  |
|
|
|
|
 Logged
|
Mark
"To live you must be willing to die" - Amir Vahedi
My father gets smarter each day he is gone.
In the stable:
'84 GW Aspencade
'47 Indian Chief
'98 Valkyrie
|
|
|
|
Dozer
|
|
« Reply #1 on: January 10, 2014, 08:27:09 PM » |
|
True. I would suggest replacing ALL of the plugs. The vacuum line to the petcock can be installed on any runner you choose. After reinstalling everything you'll need several feet of vacuum line and a vacuum gauge to sync the carbs.
|
|
|
|
|
Logged
|
|
|
|
Xtracho
Member
Posts: 1303
The Bosses
Florida's Emerald Coast
|
|
« Reply #2 on: January 10, 2014, 08:54:42 PM » |
|
True. I would suggest replacing ALL of the plugs. The vacuum line to the petcock can be installed on any runner you choose. After reinstalling everything you'll need several feet of vacuum line and a vacuum gauge to sync the carbs.
Dozer, Can the sync be done with just the one vacuum gauge? I would think so once I get a reference from the #3 carb. If so, I'll just buy the tubing and gauge when I get the new vacuum plugs. And thanks so much for the guidance. |
|
|
|
|
Logged
|
Mark
"To live you must be willing to die" - Amir Vahedi
My father gets smarter each day he is gone.
In the stable:
'84 GW Aspencade
'47 Indian Chief
'98 Valkyrie
|
|
|
fordmano
Member
Posts: 1457
San Jose, CA. 1999 I/S 232 miles when bought 11/05
San Jose, CA.
|
|
« Reply #3 on: January 10, 2014, 09:49:00 PM » |
|
Yes it can be done with one gauge.
I can't do it with one gauge but others can and seem to do just fine using just one gauge.
|
|
|
|
|
Logged
|
  83GS550 93XR650L TARD! 97WR250 99ValkyrieI/S Tri-tone 01YZ125(x2) 05DRZ-125 |
|
|
hubcapsc
Member
Posts: 16816
upstate
South Carolina
|
|
« Reply #4 on: January 11, 2014, 04:35:00 AM » |
|
I'm desmogged. I replaced the #6 vacuum line, and all the caps recently, just because they were old and stiff and I was in there anyway... I was really happily surprised to find that my bike runs much better now Use good vacuum caps, sometimes all you can find is those thin vinyl ones at the autoparts store. Some guys make them from a bit of vacuum line with a bolt RTVd in. I used some OEM ones I had ordered a few years ago. -Mike |
|
|
|
|
Logged
|
|
|
|
Xtracho
Member
Posts: 1303
The Bosses
Florida's Emerald Coast
|
|
« Reply #5 on: January 11, 2014, 05:44:22 AM » |
|
Thanks folks. Ordered a set of the Viton-B caps and a new petcock vacuum hose from Shiny yesterday. Along with the two caps included in the desmog kit that gives me 5, enough to replace the old ones on the #1 & #5 and cap off the other 3 intake runners.
Another question: When syncing the #6, do I just move the petcock hose to another intake runner to keep the vacuum on the petcock?
|
|
|
|
|
Logged
|
Mark
"To live you must be willing to die" - Amir Vahedi
My father gets smarter each day he is gone.
In the stable:
'84 GW Aspencade
'47 Indian Chief
'98 Valkyrie
|
|
|
fordmano
Member
Posts: 1457
San Jose, CA. 1999 I/S 232 miles when bought 11/05
San Jose, CA.
|
|
« Reply #6 on: January 11, 2014, 05:53:58 AM » |
|
You can use a vaccum pump like a mightyvac to pull the vaccum then pinch the line with a pair of forceps. If you don't have those then yes you can just relocate the line to a different intake port. Happy synching too you!!!  |
|
|
|
|
Logged
|
83GS550 93XR650L TARD! 97WR250 99ValkyrieI/S Tri-tone 01YZ125(x2) 05DRZ-125
|
|
|
Patrick
Member
Posts: 15433
VRCC 4474
Largo Florida
|
|
« Reply #7 on: January 11, 2014, 07:41:01 AM » |
|
Yep, all intakes need to be capped. If using an OEM vacuum operated petcock then that'll be the only intake with a vacuum line.
Sync. ; She'll run long enough with the vacuum line removed to adjust that carburetor. But, as said, you can supply vacuum to the petcock anyway you want if you feel the need to do so.
I've made manifolds, etc to perform this sync thing. Honda spec is 1.6 in/hg which means this is really no big deal. Any way you decide to do it you can get all cylinders easily within a needle width [ .5 in/hg] .
All I do now is attach a length of marked hose from each cylinder to the rear long enough to have plenty of wiggle room and plug them with golf tee's. #3 line is attached to a ' T ' in the line to a single vacuum gauge. A pair of forceps are used to pinch off each line as needed. Adjust each carburetor to match #3 and it will not take much adjustment to do so. If you have to adjust a lot then there is something wrong somewhere. Just make sure to have the forceps in the right location so to read only one cylinder at a time.
It took longer to write this than to do the job and I go around each adjustment 2 if not 3 times to make sure they are all the same. Keep adjusting the idle speed to it appr the same thru out this procedure. If the fan comes on just wait till it stops before proceeding.
Oopps, almost forgot. Good vacuum gauges come with a snubber screw, but, if yours doesn't just use another pair of forceps and keep slowly pinching the line near the gauge just so the needle is barely wandering/fluctuating. I think the needle should move around a bit.
Sorry. I shouldn't have answered. You asked Dozer, I should have honored that and left it alone.
|
|
|
|
« Last Edit: January 12, 2014, 05:29:52 AM by Patrick »
|
Logged
|
|
|
|
Xtracho
Member
Posts: 1303
The Bosses
Florida's Emerald Coast
|
|
« Reply #8 on: January 11, 2014, 03:12:32 PM » |
|
No worries Patrick. I really appreciate all that chime in to assist me. The more the merrier IMO. The phat girl is ready for the kit now. Everything is off that should be off, carbs are ready to go as soon as the pilot screws arrive, and I picked up a sync gauge today as well. Tomorrow....just clean up that valley, do some piddling with some other stuff (new grommets on side covers, gotta fix the lid on left saddlebag). Looking forward to firing her up for a ride next weekend.
|
|
|
|
|
Logged
|
Mark
"To live you must be willing to die" - Amir Vahedi
My father gets smarter each day he is gone.
In the stable:
'84 GW Aspencade
'47 Indian Chief
'98 Valkyrie
|
|
|
|
Jess from VA
|
|
« Reply #9 on: January 11, 2014, 03:45:36 PM » |
|
Changing out all the intake Orings (with Viton B) too right?
I always thought that ought to be part of any desmog.
|
|
|
|
|
Logged
|
|
|
|
Xtracho
Member
Posts: 1303
The Bosses
Florida's Emerald Coast
|
|
« Reply #10 on: January 11, 2014, 04:26:12 PM » |
|
Yup...those are on the way as well Jess.
|
|
|
|
|
Logged
|
Mark
"To live you must be willing to die" - Amir Vahedi
My father gets smarter each day he is gone.
In the stable:
'84 GW Aspencade
'47 Indian Chief
'98 Valkyrie
|
|
|
salty1
Member
Posts: 2359
"Flyka"
Spokane, WA or Tucson, AZ
|
|
« Reply #11 on: January 11, 2014, 04:32:19 PM » |
|
Changing out all the intake Orings (with Viton B) too right?
I always thought that ought to be part of any desmog.
+1 Oreilly's has a good vacuum gauge that I've used for carb synchronization. You will need to dampen the vacuum pulses some so the needle doesn't jump all over. An airflow regulator form a pet store has been used by some. I have restricters in my lines. Also, I use forceps to close off lines as I go through the process.  |
|
|
|
|
Logged
|
My rides: 1998 GL1500C, 2000 GL 1500CF,2006 GL 1800 3A   |
|
|
Hoser
Member
Posts: 5844
child of the sixties VRCC 17899
Auburn, Kansas
|
|
« Reply #12 on: January 11, 2014, 04:44:25 PM » |
|
I have plugged all the vacuum intakes on the carbs and switched to a manual petcock. It's all so easy that way. All the tubes are gone, and plugged with freeze plugs. I could put a six pack where all the junk used to be under the air box. I am a simple man. When I desmog, I mean all of it. Hoser  Hoser |
|
|
|
|
Logged
|
I don't want a pickle, just wanna ride my motor sickle  [img width=300 height=233]http://i617.photobucket.com/albums/ |
|
|
Xtracho
Member
Posts: 1303
The Bosses
Florida's Emerald Coast
|
|
« Reply #13 on: January 11, 2014, 05:32:15 PM » |
|
I have plugged all the vacuum intakes on the carbs and switched to a manual petcock. It's all so easy that way. All the tubes are gone, and plugged with freeze plugs. I could put a six pack where all the junk used to be under the air box. I am a simple man. When I desmog, I mean all of it. Hoser Hoser Yeah...petcock is next on the list. Trying to decide on the Pingle or go with the Dan-Marc...or could I do both? And, can the Dan-Marc be wired without the toggle switch or relay? I'm not the most electrical savvy person in the world. |
|
|
|
|
Logged
|
Mark
"To live you must be willing to die" - Amir Vahedi
My father gets smarter each day he is gone.
In the stable:
'84 GW Aspencade
'47 Indian Chief
'98 Valkyrie
|
|
|
Gavin_Sons
Member
Posts: 7109
VRCC# 32796
columbus indiana
|
|
« Reply #14 on: January 11, 2014, 06:03:06 PM » |
|
You can do both. Im pretty sure you can use the auxiliary circuit behind the right side cover so the dan marc will turn on with the key.
|
|
|
|
|
Logged
|
|
|
|
fudgie
Member
Posts: 10651
Better to be judged by 12, then carried by 6.
Huntington Indiana

|
|
« Reply #15 on: January 11, 2014, 06:13:40 PM » |
|
I sync mine with 1 gauge. Only takes like 5 min to do them all. I have a brass needle valve inline to keep the needle of the gauge from bouncing. Hardware for like $5.
|
|
|
|
|
Logged
|
 Now you're in the world of the wolves... And we welcome all you sheep... VRCC-#7196 VRCCDS-#0175 DTR PGR |
|
|
|
Dozer
|
|
« Reply #16 on: January 11, 2014, 06:43:16 PM » |
|
True. I would suggest replacing ALL of the plugs. The vacuum line to the petcock can be installed on any runner you choose. After reinstalling everything you'll need several feet of vacuum line and a vacuum gauge to sync the carbs.
Dozer, Can the sync be done with just the one vacuum gauge? I would think so once I get a reference from the #3 carb. If so, I'll just buy the tubing and gauge when I get the new vacuum plugs. And thanks so much for the guidance. Yes, it can be done but you'll have to make up some kind of manifold or switch and plug vacuum lines manually as you go. You have read further down the thread and seen Patricks post. Patrick is the one who instructed me on how to do the desmog, carb ovh and sync. He was a great help and source on knowledge for me. After I did mine, I helped another forum member do the same to his ion his garage and it worked perfectly. This is an excellent forum and folks here are always happy to share their knowledge and experience. |
|
|
|
|
Logged
|
|
|
|
|
Dozer
|
|
« Reply #17 on: January 11, 2014, 06:48:39 PM » |
|
Yep, all intakes need to be capped. If using an OEM vacuum operated petcock then that'll be the only intake with a vacuum line.
Sync. ; She'll run long enough with the vacuum line removed to adjust that carburetor. But, as said, you can supply vacuum to the petcock anyway you want if you feel the need to do so.
I've made manifolds, etc to perform this sync thing. Honda spec is 1.6 in/hg which means this is really no big deal. Any way you decide to do it you can get all cylinders easily within a needle width [ .5 in/hg] .
All I do now is attach a length of marked hose from each cylinder to the rear long enough to have plenty of wiggle room and plug them with golf tee's. #3 line is attached to a ' T ' in the line to a single vacuum gauge. A pair of forceps are used to pinch off each line as needed. Adjust each carburetor to match #3 and it will not take much adjustment to do so. If you have to adjust a lot then there is something wrong somewhere. Just make sure to have the forceps in the right location so to read only one cylinder at a time.
It took longer to write this than to do the job and I go around each adjustment 2 if not 3 times to make sure they are all the same. Keep adjusting the idle speed to it appr the same thru out this procedure. If the fan comes on just wait till it stops before proceeding.
Oopps, almost forgot. Good vacuum gauges come with a snubber screw, but, if yours doesn't just use another pair of forceps and keep slowly pinching the line near the gauge just so the needle is barely wondering/fluctuating. I think the needle should move around a bit.
Sorry. I shouldn't have answered. You asked Dozer, I should have honored that and left it alone.
Yes you should have. You helped me do that same job and I am happy you chimed in with Mr X! We both thank you. |
|
|
|
|
Logged
|
|
|
|
Xtracho
Member
Posts: 1303
The Bosses
Florida's Emerald Coast
|
|
« Reply #18 on: January 11, 2014, 06:53:13 PM » |
|
Yep, all intakes need to be capped. If using an OEM vacuum operated petcock then that'll be the only intake with a vacuum line.
Sync. ; She'll run long enough with the vacuum line removed to adjust that carburetor. But, as said, you can supply vacuum to the petcock anyway you want if you feel the need to do so.
I've made manifolds, etc to perform this sync thing. Honda spec is 1.6 in/hg which means this is really no big deal. Any way you decide to do it you can get all cylinders easily within a needle width [ .5 in/hg] .
All I do now is attach a length of marked hose from each cylinder to the rear long enough to have plenty of wiggle room and plug them with golf tee's. #3 line is attached to a ' T ' in the line to a single vacuum gauge. A pair of forceps are used to pinch off each line as needed. Adjust each carburetor to match #3 and it will not take much adjustment to do so. If you have to adjust a lot then there is something wrong somewhere. Just make sure to have the forceps in the right location so to read only one cylinder at a time.
It took longer to write this than to do the job and I go around each adjustment 2 if not 3 times to make sure they are all the same. Keep adjusting the idle speed to it appr the same thru out this procedure. If the fan comes on just wait till it stops before proceeding.
Oopps, almost forgot. Good vacuum gauges come with a snubber screw, but, if yours doesn't just use another pair of forceps and keep slowly pinching the line near the gauge just so the needle is barely wondering/fluctuating. I think the needle should move around a bit.
Sorry. I shouldn't have answered. You asked Dozer, I should have honored that and left it alone.
Yes you should have. You helped me do that same job and I am happy you chimed in with Mr X! We both thank you. +1 |
|
|
|
|
Logged
|
Mark
"To live you must be willing to die" - Amir Vahedi
My father gets smarter each day he is gone.
In the stable:
'84 GW Aspencade
'47 Indian Chief
'98 Valkyrie
|
|
|
Patrick
Member
Posts: 15433
VRCC 4474
Largo Florida
|
|
« Reply #19 on: January 12, 2014, 05:37:33 AM » |
|
Yep, all intakes need to be capped. If using an OEM vacuum operated petcock then that'll be the only intake with a vacuum line.
Sync. ; She'll run long enough with the vacuum line removed to adjust that carburetor. But, as said, you can supply vacuum to the petcock anyway you want if you feel the need to do so.
I've made manifolds, etc to perform this sync thing. Honda spec is 1.6 in/hg which means this is really no big deal. Any way you decide to do it you can get all cylinders easily within a needle width [ .5 in/hg] .
All I do now is attach a length of marked hose from each cylinder to the rear long enough to have plenty of wiggle room and plug them with golf tee's. #3 line is attached to a ' T ' in the line to a single vacuum gauge. A pair of forceps are used to pinch off each line as needed. Adjust each carburetor to match #3 and it will not take much adjustment to do so. If you have to adjust a lot then there is something wrong somewhere. Just make sure to have the forceps in the right location so to read only one cylinder at a time.
It took longer to write this than to do the job and I go around each adjustment 2 if not 3 times to make sure they are all the same. Keep adjusting the idle speed to it appr the same thru out this procedure. If the fan comes on just wait till it stops before proceeding.
Oopps, almost forgot. Good vacuum gauges come with a snubber screw, but, if yours doesn't just use another pair of forceps and keep slowly pinching the line near the gauge just so the needle is barely wondering/fluctuating. I think the needle should move around a bit.
Sorry. I shouldn't have answered. You asked Dozer, I should have honored that and left it alone.
Yes you should have. You helped me do that same job and I am happy you chimed in with Mr X! We both thank you. +1 Well OK guys. If you have any questions, just ask, we'll get things squared away. Those instructions may be a little confusing. Just plug one vacuum line at a time to the ' T ' and make sure all others are capped/plugged off with something like a golf tee. Its easy to get carried away and stick the forceps one a wrong line. Again just make sure you are checking only one cylinder at a time. |
|
|
|
|
Logged
|
|
|
|
Xtracho
Member
Posts: 1303
The Bosses
Florida's Emerald Coast
|
|
« Reply #20 on: January 12, 2014, 05:26:07 PM » |
|
I have plugged all the vacuum intakes on the carbs and switched to a manual petcock. It's all so easy that way. All the tubes are gone, and plugged with freeze plugs. I could put a six pack where all the junk used to be under the air box. I am a simple man. When I desmog, I mean all of it. Hoser Hoser OK Hoser....took your advice. Ordered the Pingel 1311-CH. I like the idea of having a six pack on board!  |
|
|
|
|
Logged
|
Mark
"To live you must be willing to die" - Amir Vahedi
My father gets smarter each day he is gone.
In the stable:
'84 GW Aspencade
'47 Indian Chief
'98 Valkyrie
|
|
|
Wewaman
Member
Posts: 423
Dead Lakes Cruiser
Wewa, Fla.
|
|
« Reply #21 on: January 13, 2014, 06:13:50 PM » |
|
Help me please. I have looked at so many threads that I need some clarification. I have done the shiney kit and I have put vacuum plug's on all the carbs. I have 1 line that T's and runs to both bottom fuel rails, then I have 2 #6 lines that go to the top rail but it doesn't have a T it goes to a plastic diaphragm and I installed a crankcase filter on 1 port and put a vacuum plug on the small port. I have also put vacuum plugs on 5 intake runners, the 6th runner gets the hose from the petcock, Does that sound right? Now on the #3 carb there is a port on the bottom , what goes there and where does the other end go. I have removed the carbs and rebuilt them but it was last march so I don't remember so good.  Don't mean to hijack your post but there seems to be all the answers here, I just need some guidance. Thank-you |
|
|
|
|
Logged
|
If you please God it doesn't matter who you displease but if you displease God it doesn't matter who you please  |
|
|
hubcapsc
Member
Posts: 16816
upstate
South Carolina
|
|
« Reply #22 on: January 13, 2014, 06:26:31 PM » |
|
Help me please. I have looked at so many threads that I need some clarification. I have done the shiney kit and I have put vacuum plug's on all the carbs. I have 1 line that T's and runs to both bottom fuel rails, then I have 2 #6 lines that go to the top rail but it doesn't have a T it goes to a plastic diaphragm and I installed a crankcase filter on 1 port and put a vacuum plug on the small port. I have also put vacuum plugs on 5 intake runners, the 6th runner gets the hose from the petcock, Does that sound right? Now on the #3 carb there is a port on the bottom , what goes there and where does the other end go. I have removed the carbs and rebuilt them but it was last march so I don't remember so good. Don't mean to hijack your post but there seems to be all the answers here, I just need some guidance. Thank-you Did you read this thing: http://www.valkyrieriders.com/shoptalk/desmog.htm ? Regardless of whether you're using a kit or handrolling your de-smog, this should help you make sure you covered all the bases... -Mike |
|
|
|
|
Logged
|
|
|
|
Wewaman
Member
Posts: 423
Dead Lakes Cruiser
Wewa, Fla.
|
|
« Reply #23 on: January 18, 2014, 10:18:53 AM » |
|
got it thanks , heading out to shed to re install the carbs
|
|
|
|
|
Logged
|
If you please God it doesn't matter who you displease but if you displease God it doesn't matter who you please |
|
|
|
Daddie O
|
|
« Reply #24 on: January 25, 2014, 08:21:15 PM » |
|
Here is all the stuff we took off when we did a desmog on my '97 Std. California model: 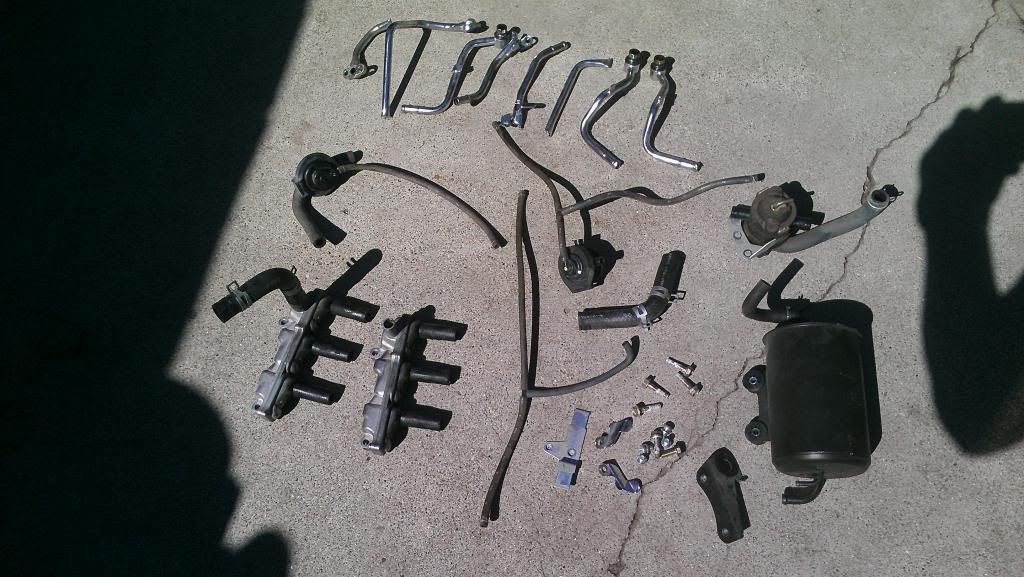 My '97  |
|
|
|
|
Logged
|
Light moves faster than sound. That's why some people appear bright until you hear them speak.
|
|
|
|


