Xtracho
Member

Posts: 1303
The Bosses
Florida's Emerald Coast
|
 |
« on: January 18, 2014, 06:11:18 AM » |
|
So I get home from Louisiana and out this morning early to put my carbs back together. Pilot screws came while I was over in LA. Problem is: Some of the screws will lightly seat into the bore after only a couple turns making it impossible to back them out the recommended number of turns after they seat. If I do that they are totally unscrewed out of the bore. Wondering if I buggered something up getting the pilot screws out last week as a couple of them were almost impossible to unseat from the bore and I ended up ruining them while getting them out (reason I ordered new pilot screws). I've looked into the bores with a light and cannot see anything that would obstruct the screws from going in as they should. Maybe I took too much metal off with the hacksaw while cutting the slot into the screws so I could back them out of the bore? Could it be that the new springs on the pilot screws are so stiff that they don't give as much as they should?  Once it warms up a little more I'm gonna go out to the shop and give it another try. |
|
|
|
« Last Edit: January 18, 2014, 06:14:08 AM by Xtracho »
|
 Logged
|
Mark
"To live you must be willing to die" - Amir Vahedi
My father gets smarter each day he is gone.
In the stable:
'84 GW Aspencade
'47 Indian Chief
'98 Valkyrie
|
|
|
|
sandy
|
|
« Reply #1 on: January 18, 2014, 06:53:16 AM » |
|
Something to try: Remove the springs and lube the threads. Insert them until they seat. If they screw down all the way, you'll know the springs are stiff and causing your issue.
|
|
|
|
|
Logged
|
|
|
|
Patrick
Member
Posts: 15433
VRCC 4474
Largo Florida
|
|
« Reply #2 on: January 18, 2014, 07:58:46 AM » |
|
Along with what Sandy has said, you could take an old pilot, cut it off just beyond the threads and try and use it as a chaser.
|
|
|
|
|
Logged
|
|
|
|
Xtracho
Member
Posts: 1303
The Bosses
Florida's Emerald Coast
|
|
« Reply #3 on: January 18, 2014, 03:55:36 PM » |
|
Well I was able to get the pilot screws in. Just took more muscle that I thought it would. Tight fit and that little stubby tool from Shiny worked like a charm. They are all backed out 2.25 turns from being seated. Got the carbs on the bike, desmog kit installed, Pingel installed and all looks pretty good. New caps on the intake runner vacuums. All that's left is putting the airbox and fuel tank back on. Fire her up, run her, then sync the carbs. I suppose I need to connect the 6 bowl drain hoses to the carb bowls also. If anyone has any guidance at this stage please let me know. Thanks again for all the help.  |
|
|
|
|
Logged
|
Mark
"To live you must be willing to die" - Amir Vahedi
My father gets smarter each day he is gone.
In the stable:
'84 GW Aspencade
'47 Indian Chief
'98 Valkyrie
|
|
|
wiggydotcom
Member
Posts: 3387
Do Your Best and Miss the Rest!
Yorkville, Illinois
|
|
« Reply #4 on: January 18, 2014, 09:29:40 PM » |
|
Well I was able to get the pilot screws in. Just took more muscle that I thought it would. Tight fit and that little stubby tool from Shiny worked like a charm. They are all backed out 2.25 turns from being seated. Got the carbs on the bike, desmog kit installed, Pingel installed and all looks pretty good. New caps on the intake runner vacuums. All that's left is putting the airbox and fuel tank back on. Fire her up, run her, then sync the carbs. I suppose I need to connect the 6 bowl drain hoses to the carb bowls also. If anyone has any guidance at this stage please let me know. Thanks again for all the help. You might be past that stage now...hard to tell from your description, but as long as you had the carbs out, did you check/install new intake tube O-rings? |
|
|
|
|
Logged
|
VRCC #10177 VRCCDS #239  |
|
|
Patrick
Member
Posts: 15433
VRCC 4474
Largo Florida
|
|
« Reply #5 on: January 19, 2014, 04:55:25 AM » |
|
When installing the airbox just take your time. Make sure the tubes are installed correctly and evenly, a good light source and mirror are pretty much necessary. Have enough beer with you, it'll be your friend. You'll end making up words that you've never heard before.
The only thing with the fuel tank is to make sure the vent line doesn't get kinked.
|
|
|
|
|
Logged
|
|
|
|
Xtracho
Member
Posts: 1303
The Bosses
Florida's Emerald Coast
|
|
« Reply #6 on: January 19, 2014, 05:44:23 AM » |
|
Well I was able to get the pilot screws in. Just took more muscle that I thought it would. Tight fit and that little stubby tool from Shiny worked like a charm. They are all backed out 2.25 turns from being seated. Got the carbs on the bike, desmog kit installed, Pingel installed and all looks pretty good. New caps on the intake runner vacuums. All that's left is putting the airbox and fuel tank back on. Fire her up, run her, then sync the carbs. I suppose I need to connect the 6 bowl drain hoses to the carb bowls also. If anyone has any guidance at this stage please let me know. Thanks again for all the help. You might be past that stage now...hard to tell from your description, but as long as you had the carbs out, did you check/install new intake tube O-rings? Yeah...forgot to add that. New Viton O-rings for the intake runners too. |
|
|
|
|
Logged
|
Mark
"To live you must be willing to die" - Amir Vahedi
My father gets smarter each day he is gone.
In the stable:
'84 GW Aspencade
'47 Indian Chief
'98 Valkyrie
|
|
|
Xtracho
Member
Posts: 1303
The Bosses
Florida's Emerald Coast
|
|
« Reply #7 on: January 19, 2014, 09:35:37 AM » |
|
Airbox??  Gonna leave it alone for a while before I break something. |
|
|
|
|
Logged
|
Mark
"To live you must be willing to die" - Amir Vahedi
My father gets smarter each day he is gone.
In the stable:
'84 GW Aspencade
'47 Indian Chief
'98 Valkyrie
|
|
|
|
whitestroke
|
|
« Reply #8 on: January 19, 2014, 10:48:47 AM » |
|
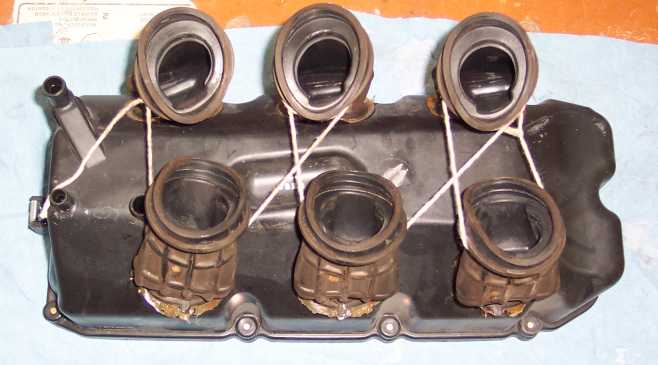
I've had good luck with the airbox just tying the tubes together with nylon ties. 2 ties for 1 and 2, 2 ties for 3 and 4, 2 ties for 5 and 6. Airbox will slip right in, remove one set of ties and install tubes
, then move on to the next set.
|
|
|
|
|
Logged
|
Minibike
Honda S90
Yamaha YL100
Bultaco 250 Matador
Bultaco 250 Pursang
Yamaha 250 YZ
Triumph 650 Bonni
Honda ATC 200
2 Kids 25 year break.
Suzuki GS 500
2003 VTX 1300S,
1998 Valk standard
2008 Goldwing
|
|
|
Patrick
Member
Posts: 15433
VRCC 4474
Largo Florida
|
|
« Reply #9 on: January 19, 2014, 11:20:59 AM » |
|
I've had good luck with the airbox just tying the tubes together with nylon ties. 2 ties for 1 and 2, 2 ties for 3 and 4, 2 ties for 5 and 6. Airbox will slip right in, remove one set of ties and install tubes
, then move on to the next set.
Well, thats different. I'll try it. |
|
|
|
|
Logged
|
|
|
|
Xtracho
Member
Posts: 1303
The Bosses
Florida's Emerald Coast
|
|
« Reply #10 on: January 19, 2014, 12:41:41 PM » |
|
No problem getting the airbox into the space. That was relatively easy. My issue is getting the rubber boots to line up with the carbs in order to tighten the clamps so they'll stay there without slipping off.
|
|
|
|
|
Logged
|
Mark
"To live you must be willing to die" - Amir Vahedi
My father gets smarter each day he is gone.
In the stable:
'84 GW Aspencade
'47 Indian Chief
'98 Valkyrie
|
|
|
Patrick
Member
Posts: 15433
VRCC 4474
Largo Florida
|
|
« Reply #11 on: January 19, 2014, 12:55:45 PM » |
|
No problem getting the airbox into the space. That was relatively easy. My issue is getting the rubber boots to line up with the carbs in order to tighten the clamps so they'll stay there without slipping off.
Yep, invented any new words yet ? |
|
|
|
|
Logged
|
|
|
|
Wewaman
Member
Posts: 423
Dead Lakes Cruiser
Wewa, Fla.
|
|
« Reply #12 on: January 19, 2014, 02:04:32 PM » |
|
Well X I did the exact thing as you so far, carb rebuild , shiney desmog etc. I used the zip straps to get it in there first then I took a piece of lumber aprox 2x2 and after I put the 6mm bolt on the rear of the airbox to keep it in place I pulled down on the 2x2 wedged in top to get the tubes lower and after I got one side connected and clamped I installed 1 Intake runner # 4 the center one and got it bolted in place and tightened the clamp. Then went to the other side and attached the other 3 airbox tubes to the carbs. with a little wiggleing of the stick I got them all on. Then I installed the 1, 3, 5 intake runners. Then went back to other side and did #2, #6. Working the intake runners into place was a bit more work, the new o'rings wanted to slip out so I used some grease to hold them in place, worked good. Now I have to find the 1 missing intake bolt and that will be done. then onto putting the tank back on. The tank has been off and full of non ethenol with seafoam in it not sure how long that will stay good. May just put that gas into lawnmower and start with some FRESH fuel, you know with all the work on the carbs and all..  Tony |
|
|
|
|
Logged
|
If you please God it doesn't matter who you displease but if you displease God it doesn't matter who you please  |
|
|
Xtracho
Member
Posts: 1303
The Bosses
Florida's Emerald Coast
|
|
« Reply #13 on: January 19, 2014, 02:44:41 PM » |
|
No problem getting the airbox into the space. That was relatively easy. My issue is getting the rubber boots to line up with the carbs in order to tighten the clamps so they'll stay there without slipping off.
Yep, invented any new words yet ? No new ones yet. Just a lot of repetition of the good old stand by's. Well X I did the exact thing as you so far, carb rebuild , shiney desmog etc. I used the zip straps to get it in there first then I took a piece of lumber aprox 2x2 and after I put the 6mm bolt on the rear of the airbox to keep it in place I pulled down on the 2x2 wedged in top to get the tubes lower and after I got one side connected and clamped I installed 1 Intake runner # 4 the center one and got it bolted in place and tightened the clamp. Then went to the other side and attached the other 3 airbox tubes to the carbs. with a little wiggleing of the stick I got them all on. Then I installed the 1, 3, 5 intake runners. Then went back to other side and did #2, #6. Working the intake runners into place was a bit more work, the new o'rings wanted to slip out so I used some grease to hold them in place, worked good. Now I have to find the 1 missing intake bolt and that will be done. then onto putting the tank back on. The tank has been off and full of non ethenol with seafoam in it not sure how long that will stay good. May just put that gas into lawnmower and start with some FRESH fuel, you know with all the work on the carbs and all.. Tony Maybe my problem is that I connected up all the intake runners first instead of the airbox boots? Sounds obvious to me since leaving the intake runners until last would give me much more free play to slide those rubber boots on and clamp them down? |
|
|
|
|
Logged
|
Mark
"To live you must be willing to die" - Amir Vahedi
My father gets smarter each day he is gone.
In the stable:
'84 GW Aspencade
'47 Indian Chief
'98 Valkyrie
|
|
|
salty1
Member
Posts: 2359
"Flyka"
Spokane, WA or Tucson, AZ
|
|
« Reply #14 on: January 19, 2014, 03:41:52 PM » |
|
Back to the beginning of your thread, did you make sure that the old washers and O-rings for the original pilots were removed? A little trick I found that works well to remove them is to take a straightened paper clip and put a 90 degree turn on the end of it and go fishing. FWIW.
|
|
|
|
|
Logged
|
My rides: 1998 GL1500C, 2000 GL 1500CF,2006 GL 1800 3A   |
|
|
Xtracho
Member
Posts: 1303
The Bosses
Florida's Emerald Coast
|
|
« Reply #15 on: January 19, 2014, 04:20:19 PM » |
|
Back to the beginning of your thread, did you make sure that the old washers and O-rings for the original pilots were removed? A little trick I found that works well to remove them is to take a straightened paper clip and put a 90 degree turn on the end of it and go fishing. FWIW.
That was done....except I used one of the wife's bobby pins with the 90 degree bend. |
|
|
|
|
Logged
|
Mark
"To live you must be willing to die" - Amir Vahedi
My father gets smarter each day he is gone.
In the stable:
'84 GW Aspencade
'47 Indian Chief
'98 Valkyrie
|
|
|
Wewaman
Member
Posts: 423
Dead Lakes Cruiser
Wewa, Fla.
|
|
« Reply #16 on: January 19, 2014, 07:01:33 PM » |
|
UH OH CORRECTION to my previous comment X. I'm not sure about how you did the desmog but upon closer inspection I discovered that I installed the bracket in the wrong direction. The short tube that came in the desmog to block off the bottom of the air box was hitting the bracket. It is the bracket that has the plastic diaphram that the 2 #6 hoses connect to. It has 2 screws that hold it to the top of the rail. After switching, it all became easy. I did find that attaching the intake runners to the carbs first was alot easier. Although I did use grease to hold the new o'rings in the runners but that gave me room to move the carbs and the runners making it easy to get the slots on the gasket to line up. Then you can feel the O'rings to make sure they are still in the right place and bolt them down. I did all that with the airbox sitting unconnected in the hole( Use the above suggestions about the zip straps) Then the airbox just takes a little pushing and tilting to get the tubes to line up. Getting new plugs tommorrow and then gonna attempt changing my rear tire and doing the whole rearend , final drive stuff then I will get some fresh gas and try it out. I'm Getting Excited |
|
|
|
|
Logged
|
If you please God it doesn't matter who you displease but if you displease God it doesn't matter who you please |
|
|
Xtracho
Member
Posts: 1303
The Bosses
Florida's Emerald Coast
|
|
« Reply #17 on: January 19, 2014, 08:40:03 PM » |
|
Wewa...as I understood your first post, you connected the boots from the airbox first then bolted down the intake runners....did I read that wrong?
BTW..check shoptalk for the rear end service. ChrisJ has a great Powerpoint on doing that.
|
|
|
|
|
Logged
|
Mark
"To live you must be willing to die" - Amir Vahedi
My father gets smarter each day he is gone.
In the stable:
'84 GW Aspencade
'47 Indian Chief
'98 Valkyrie
|
|
|
fudgie
Member
Posts: 10651
Better to be judged by 12, then carried by 6.
Huntington Indiana

|
|
« Reply #18 on: January 20, 2014, 05:21:01 AM » |
|
Maybe its just me but I've had my airbox off a half dozen times and it goes back together easily. I just keep downward pressure in the airbox as I line them up.
|
|
|
|
|
Logged
|
 Now you're in the world of the wolves... And we welcome all you sheep... VRCC-#7196 VRCCDS-#0175 DTR PGR |
|
|
Wewaman
Member
Posts: 423
Dead Lakes Cruiser
Wewa, Fla.
|
|
« Reply #19 on: January 20, 2014, 06:20:05 AM » |
|
Yes I did it that way the 1st time but when I went out the next day the 2,4,6 boots had come off the carbs. I figured I must have done something wrong thats when I found the short hose on the bottom of th airbox was PUSHING against the bracket and thus lifting the airbox free of the carbs. After switching the bracket it all went fine. I'm with Fudgie now it all went on pretty easy after that. I won't have any problem if I have to do that again should be fairly simple. Experience is a hard earned thing but a Wonderful teacher |
|
|
|
|
Logged
|
If you please God it doesn't matter who you displease but if you displease God it doesn't matter who you please |
|
|
|
Jetflyer
|
|
« Reply #20 on: January 25, 2014, 03:29:17 PM » |
|
 [/quote] i have had better luck using zip ties, to hog tie the legs of this beast |
|
|
|
|
Logged
|
I'm either driving a Valkyrie or an Airbus... it just depends on the day of the week.
|
|
|
salty1
Member
Posts: 2359
"Flyka"
Spokane, WA or Tucson, AZ
|
|
« Reply #21 on: January 25, 2014, 05:40:39 PM » |
|
Dag's video is quite helpful.
|
|
|
|
|
Logged
|
My rides: 1998 GL1500C, 2000 GL 1500CF,2006 GL 1800 3A |
|
|
|


