|
Bone
|
 |
« on: June 11, 2014, 12:07:47 PM » |
|
Removing the damper plate I had to tap it a little to rotate to a opening. I've done this few times but today it won't go back where I found it. How do you guys push it down I tapped on all the rubbers they seem seated but look high. This is the old dampers my new ones need 3 days to arrive. Thanks for any help I've noticed as I age I don't use any profanity during these special moments  |
|
|
|
|
 Logged
|
|
|
|
|
Chrisj CMA
|
|
« Reply #1 on: June 11, 2014, 12:13:20 PM » |
|
I found when they are "too big" like that putting them in the freezer for a few hrs REALLY helps. Also make sure they are not upside-down. Mine had the word OUT molded into the side you want facing UP
|
|
|
|
|
Logged
|
|
|
|
|
Bone
|
|
« Reply #2 on: June 11, 2014, 12:52:11 PM » |
|
Ok now I remember the freezer method. These are the old ones I was guessing the new ones would be the same size.
I saw the word OUT on them.
Thanks
|
|
|
|
|
Logged
|
|
|
|
|
cogsman
|
|
« Reply #3 on: May 15, 2016, 07:13:07 AM » |
|
Does this look normal? These indentations that conform to the shape of the dampers seem odd...  |
|
|
|
|
Logged
|
|
|
|
|
Jess from VA
|
|
« Reply #4 on: May 15, 2016, 07:39:46 AM » |
|
When I got my new dampners, the plate would not go on (sit flush) because I had them in upside down.
|
|
|
|
|
Logged
|
|
|
|
|
indybobm
|
|
« Reply #5 on: May 15, 2016, 12:28:50 PM » |
|
Does this look normal? These indentations that conform to the shape of the dampers seem odd...
Cogsman, I replied but put in your post about wheel bearings. |
|
|
|
|
Logged
|
So many roads, so little time
VRCC # 5258
|
|
|
|
cogsman
|
|
« Reply #6 on: May 15, 2016, 12:33:00 PM » |
|
Hi Indy, thanks for the post. Here are some pics. The splines look fine to me, unless I don't know what I'm looking at. Your opinions are welcome. As I pulled the final drive, I found the depths to which my mechanic had f****d me over. The damper plate was NOT bolted on. It was being held by friction only. There was NO thrust washer in the final driven gear and no O-ring around the flange. I looked at the other pic I posted with the bearing; while I noticed that the bearing lip inside the wheel was a bit mangled, it was there, and the bearing seems to be sitting solidly on it. as for the outer lip around the bearing once seated, there are a couple of dings but overall it doesn't look damaged. Again, assuming I am properly interpreting what I'm looking at. I certainly hope I don't need to replace the whole wheel for these things. I've ordered new bolts and based your message, a new damper plate as well. Do the dampers themselves look ok to you?      |
|
|
|
|
Logged
|
|
|
|
|
BradValk48237
|
|
« Reply #7 on: May 15, 2016, 01:50:24 PM » |
|
Those are trash.... you should not be seeing those metal "tabs"... rubber should be covering.... thats why the marks are on the cover plate... might want to replace that too....
B
|
|
|
|
|
Logged
|
|
|
|
|
Firefighter
|
|
« Reply #8 on: May 15, 2016, 02:03:30 PM » |
|
I don't trust any of the cycle shops in my area, that is one reason why I do my on work.
|
|
|
|
|
Logged
|
2000 Valkyrie Interstate, Black/Red
2006 Honda Sabre 1100
2013 Honda Spirit 750
2002 Honda Rebel 250
1978 Honda 750
|
|
|
|
Grumpy
|
|
« Reply #9 on: May 17, 2016, 06:01:26 PM » |
|
If you need a cover plate, I have a spare. Used but in excellent condition.
Just email me or personal message.
|
|
|
|
|
Logged
|
 Life is like a hot bath. It feels good while you’re in it, but the longer you stay in, the more wrinkled you get. |
|
|
|
BobB
|
|
« Reply #10 on: May 19, 2016, 07:09:35 AM » |
|
No one has mentioned it yet, but the rear end of your drive shaft does not look good. I see a lot of wear. Suggest you replace the shaft and pinion cup. I had this fail four years ago when I was 750 miles from home and it brings one to a dead stop...
|
|
|
|
|
Logged
|
|
|
|
Gryphon Rider
Member

Posts: 5234
2000 Tourer
Calgary, Alberta
|
|
« Reply #11 on: May 19, 2016, 07:40:11 AM » |
|
No one has mentioned it yet, but the rear end of your drive shaft does not look good. I see a lot of wear. Suggest you replace the shaft and pinion cup. I had this fail four years ago when I was 750 miles from home and it brings one to a dead stop...
You see a lot of wear, but how do you know how close to failure the wear shown indicates? Here's my wear before Inzane 14: 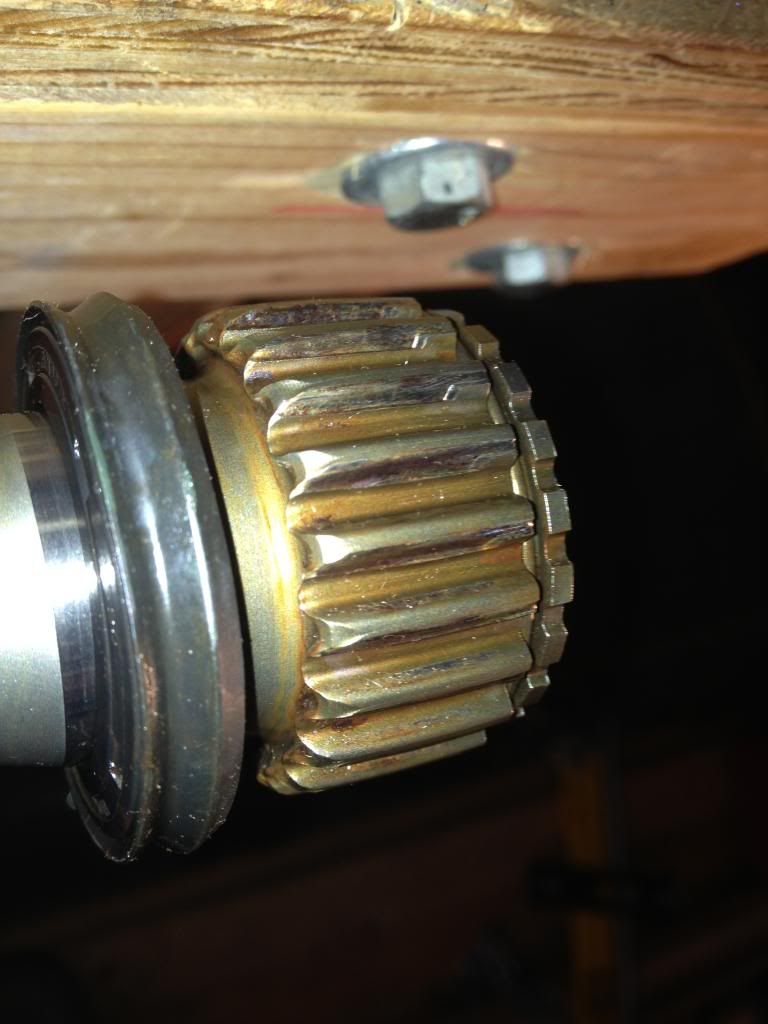 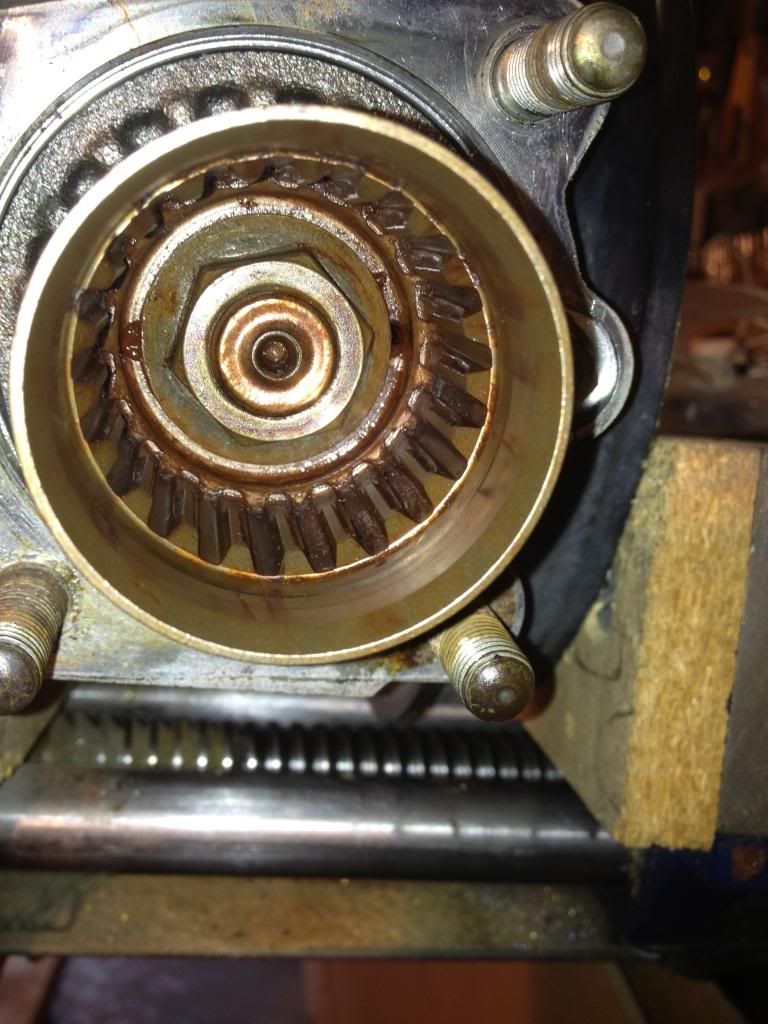 Here it is before Inzane 15: 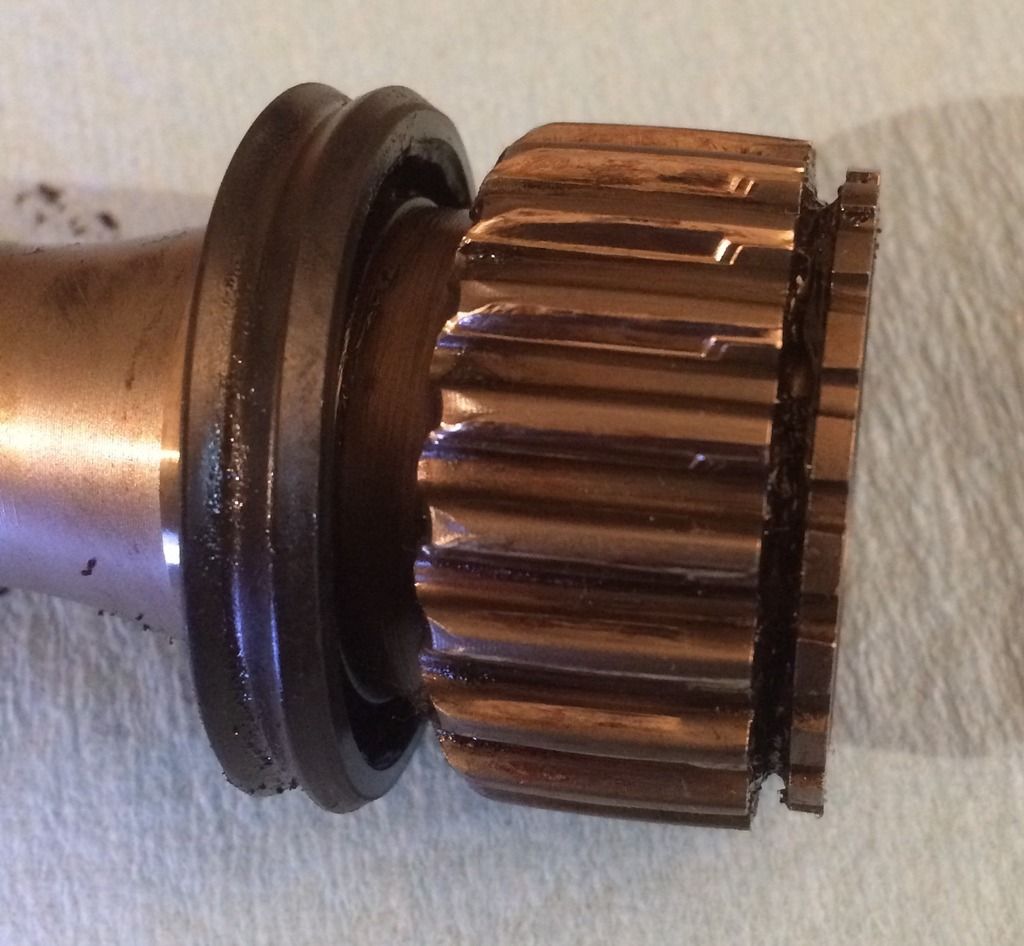 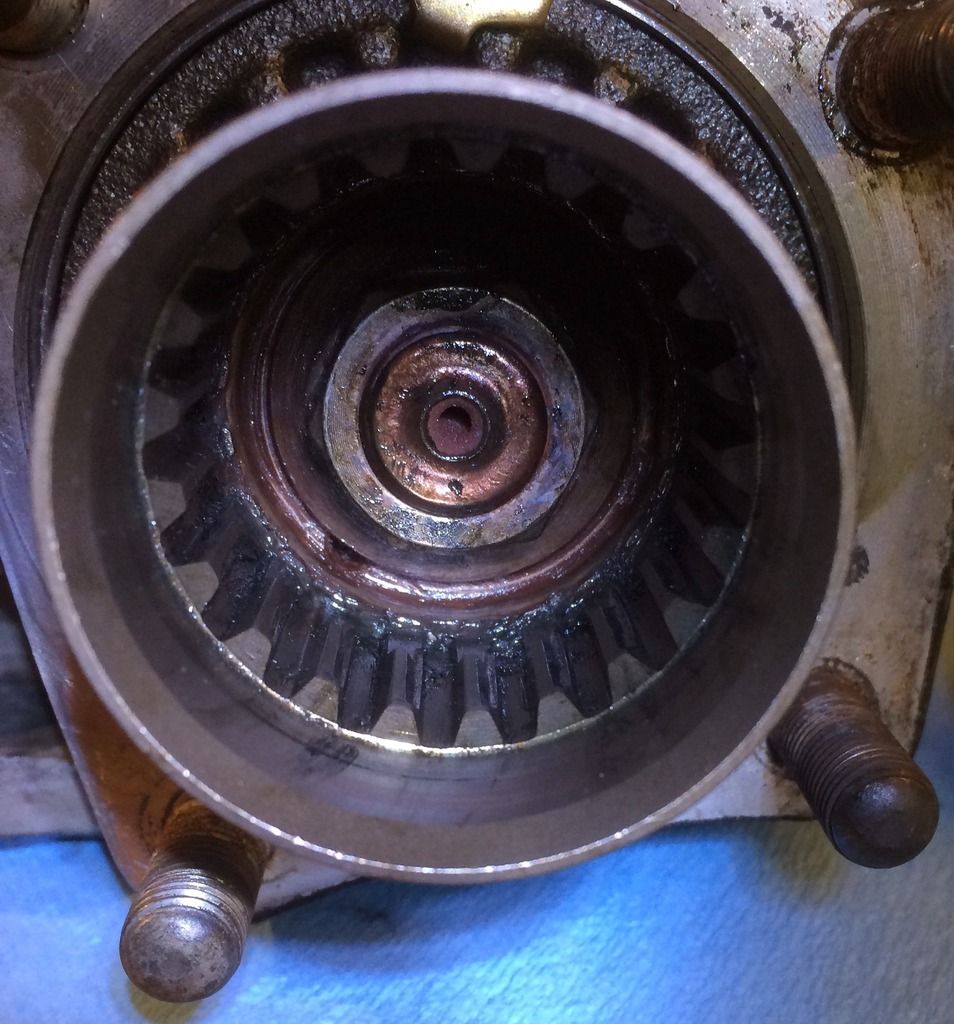 I am going to monitor the splines every time I have the back wheel off, and if the wear accelerates I will replace those parts. Otherwise, I'm not worried. |
|
|
|
|
Logged
|
|
|
|
|
cogsman
|
|
« Reply #12 on: May 19, 2016, 08:20:33 AM » |
|
If I wanted to swap out the entire final drive and shaft, are all years and models compatible?
|
|
|
|
|
Logged
|
|
|
|
hubcapsc
Member
Posts: 16817
upstate
South Carolina
|
|
« Reply #13 on: May 19, 2016, 08:27:39 AM » |
|
If I wanted to swap out the entire final drive and shaft, are all years and models compatible?
Yes, they all interchange, you could even luck onto one of the shiny clear-coated ones... Your flange doesn't look all that bad in the (dark) picture... it is pretty easy to change out the pinion cup on a final, if that is all that is wrong with it. -Mike |
|
|
|
|
Logged
|
|
|
|
|
BobB
|
|
« Reply #14 on: May 19, 2016, 08:48:42 AM » |
|
Here is what a failed shaft and cup look like, I carried them home from Nashville TN. 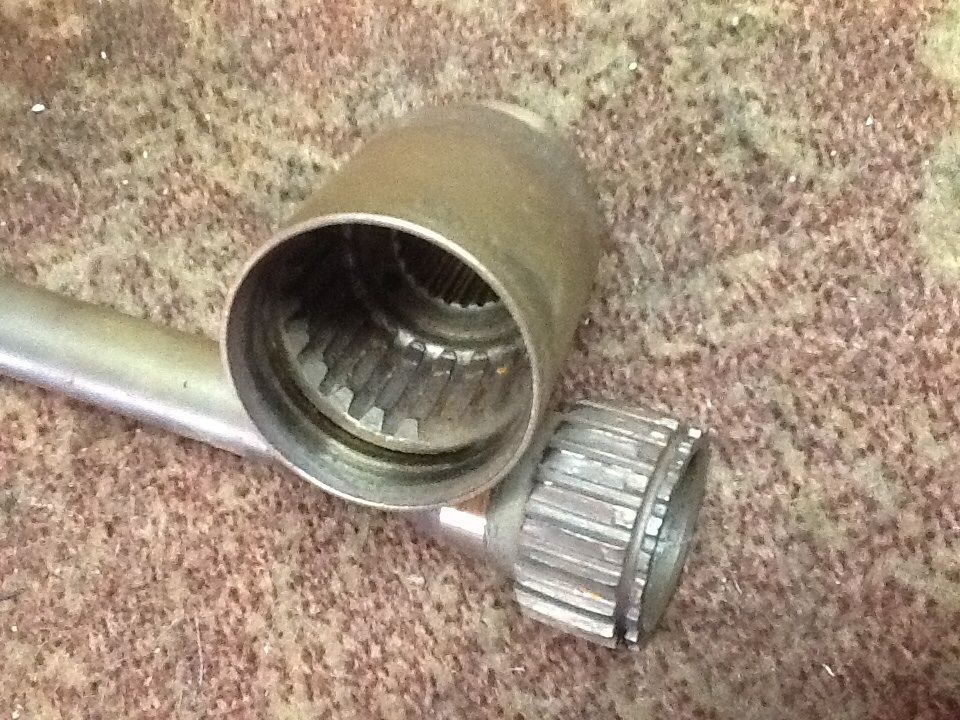 The problem is these parts mesh and move together. As time goes by and the wear becomes more evident, the amount of wear will accelerate, because the axial angle on the teeth is increasing. IMO, it is impossible to predict when failure will occur and the reprocussions are serious. Mine came to a complete stop 250 miles after experiencing the first clunk (a tooth slip) and I babied the throttle all that distance... |
|
|
|
« Last Edit: May 19, 2016, 08:50:15 AM by BobB »
|
Logged
|
|
|
|
|
cogsman
|
|
« Reply #15 on: May 19, 2016, 09:07:04 AM » |
|
I was worried about changing the pinion cup because the service manual was talking about a preload etc.
|
|
|
|
|
Logged
|
|
|
|
hubcapsc
Member
Posts: 16817
upstate
South Carolina
|
|
« Reply #16 on: May 19, 2016, 09:20:41 AM » |
|
I was worried about changing the pinion cup because the service manual was talking about a preload etc.
I don't remember that part... some people just brrrrrp them on and off with impact drivers. I got one too tight that way once, it was a hassle trying to get it back off later, and probably wasn't a "good thing" for the affected parts. I made a holder once that allowed me to loosen and tighten pinion cup nuts to (80?) the specified torque.  I busted the holder to flinders trying to loosen the overly tight impact-driven pinion cup :'( -Mike |
|
|
|
|
Logged
|
|
|
|
|


