gordonv
Member

Posts: 5766
VRCC # 31419
Richmond BC
|
 |
« on: February 14, 2015, 02:00:05 PM » |
|
Looks like I need to pull my alternator from my GW GL1500, and rebuild. Most likely new brushes.
I have no power coming from the alternator. It use to start working after the bike started, then after it warmed up. Now, nothing.
I've been reading about the how-to on the GW.
Seems they don't have too much trouble in putting the alternator back into the engine. They align the rubber dampeners so it is at a vertical/horizontal position. Alternator goes in, within minutes.
For those who have done the Valkyrie replacement, have you also aligned the dampeners, before replacing the alternator, or did you just try to replace it?
|
|
|
|
|
 Logged
|
1999 Black with custom paint IS   |
|
|
|
Chrisj CMA
|
|
« Reply #1 on: February 14, 2015, 02:12:23 PM » |
|
If you line up the blades with the spaces they fit into it goes in easier
|
|
|
|
|
Logged
|
|
|
|
Smokinjoe-VRCCDS#0005
Member
Posts: 13846
American by Birth, Southern by the Grace of God.
Beautiful east Tennessee ( GOD'S Country )
|
|
« Reply #2 on: February 14, 2015, 06:40:24 PM » |
|
Three words .... Its a bitch.
|
|
|
|
|
Logged
|
 I've seen alot of people that thought they were cool , but then again Lord I've seen alot of fools. |
|
|
|
BonS
|
|
« Reply #3 on: February 14, 2015, 07:20:25 PM » |
|
I simply left the vanes on the engine where they were when the alternator came out. I put a dab of grease on the rubber dampeners to hold them tight to their respective vane on the motor. I had watched carefully how the alternator came out and I mirrored the angle of attack when reinstalling it. Given the limited clearance I couldn't get the alternator vanes to interlock into the dampeners completely so I installed a couple of alternator bolts and gently pulled the alternator into place with a little "pop" when it interlocked properly. I guess it's just one of those things that either gives you fits or not.
|
|
|
|
|
Logged
|
|
|
|
|
Chrisj CMA
|
|
« Reply #4 on: February 15, 2015, 07:44:14 AM » |
|
I simply left the vanes on the engine where they were when the alternator came out. I put a dab of grease on the rubber dampeners to hold them tight to their respective vane on the motor. I had watched carefully how the alternator came out and I mirrored the angle of attack when reinstalling it. Given the limited clearance I couldn't get the alternator vanes to interlock into the dampeners completely so I installed a couple of alternator bolts and gently pulled the alternator into place with a little "pop" when it interlocked properly. I guess it's just one of those things that either gives you fits or not.
The "pop" you heard might have been one (or more) of the connector bands that hold the dampeners together snapping. Its best to take look inside, align the blades and slide it in without forcing it.  |
|
|
|
|
Logged
|
|
|
|
|
BonS
|
|
« Reply #5 on: February 15, 2015, 09:50:04 AM » |
|
I simply left the vanes on the engine where they were when the alternator came out. I put a dab of grease on the rubber dampeners to hold them tight to their respective vane on the motor. I had watched carefully how the alternator came out and I mirrored the angle of attack when reinstalling it. Given the limited clearance I couldn't get the alternator vanes to interlock into the dampeners completely so I installed a couple of alternator bolts and gently pulled the alternator into place with a little "pop" when it interlocked properly. I guess it's just one of those things that either gives you fits or not.
The "pop" you heard might have been one (or more) of the connector bands that hold the dampeners together snapping. Its best to take look inside, align the blades and slide it in without forcing it. I can see how one might think that. I had a pretty good visual alignment of the vanes so there's no chance that that happened. The sound was simply the alternator vane popping into place between the dampeners. I'll tell you what happens. The dampeners in the upper quadrants of the circle tend to move down toward the center of the hub. The grease that's applied is an attempt to stop this from happening. However, the jostling that occurs while fitting the alternator into the tight space can allow (or bump) one or two of the dampeners down toward the hub. The slots between the upper dampeners are now too small for the alternator vanes to easily fit. Using the bolts to pull the alternator into place pushes the dampeners apart and outwards until the vanes can slide into place. Actually there's so little room in the cavity that there's no way the alternator and dampeners are going to go into place incorrectly. It would turn into a major mash-up it one tried. |
|
|
|
|
Logged
|
|
|
|
hubcapsc
Member
Posts: 16816
upstate
South Carolina
|
|
« Reply #6 on: February 15, 2015, 09:55:36 AM » |
|
The dampeners in the upper quadrants of the circle tend to move down toward the center of the hub. The grease that's applied is an attempt to stop this from happening
I've only been in on one alternator replacement... we used grease too.
Since then, I've been imagining using a little dab of RTV to glue them in place for the install.
Not so little that it doesn't work, not so much that it causes a problem...
Won't know till later if it is a good idea...
-Mike
|
|
|
|
« Last Edit: February 15, 2015, 01:10:48 PM by hubcapsc »
|
Logged
|
|
|
|
|
quexpress
|
|
« Reply #7 on: February 15, 2015, 01:07:34 PM » |
|
The dampeners in the upper quadrants of the circle tend to move down toward the center of the hub. The grease that's applied is an attempt to stop this from happening
Since then, I've been imagining using a little dab of RTV to glue them in place for the install.
-Mike
I'll be doing one later on this winter and might try your " dab of RTV" idea. If I do, I'll let you know! |
|
|
|
|
Logged
|
I still have a full deck.
I just shuffle slower ...
|
|
|
|
3W-lonerider
|
|
« Reply #8 on: February 16, 2015, 02:12:50 PM » |
|
And what happens when that rtv breaks loose and gets into the oil pump. or the clutch scavage pump. I can see it now, blown engine.
|
|
|
|
|
Logged
|
|
|
|
|
Chrisj CMA
|
|
« Reply #9 on: February 16, 2015, 02:32:24 PM » |
|
And what happens when that rtv breaks loose and gets into the oil pump. or the clutch scavage pump. I can see it now, blown engine.
exactly what I was thinking. I have done a few alternators, never needed any goop to hold them things. Sometimes we make things harder than they are just by thinking its REALLY hard, a little concentration goes a long way...work smarter not harder |
|
|
|
|
Logged
|
|
|
|
|
Cracker Jack
|
|
« Reply #10 on: February 16, 2015, 04:20:04 PM » |
|
And what happens when that rtv breaks loose and gets into the oil pump. or the clutch scavage pump. I can see it now, blown engine.
Tell me more about that clutch scavage pump, didn't know we had such a thing. What does it do?  |
|
|
|
|
Logged
|
|
|
|
|
3W-lonerider
|
|
« Reply #11 on: February 16, 2015, 04:37:18 PM » |
|
ok..didn't mean to say pump. ment to say screen. thanks for pointing it out my mistake.
|
|
|
|
|
Logged
|
|
|
|
hubcapsc
Member
Posts: 16816
upstate
South Carolina
|
|
« Reply #12 on: February 16, 2015, 05:13:24 PM » |
|
The dampeners in the upper quadrants of the circle tend to move down toward the center of the hub. The grease that's applied is an attempt to stop this from happening
Since then, I've been imagining using a little dab of RTV to glue them in place for the install.
-Mike
I'll be doing one later on this winter and might try your " dab of RTV" idea. If I do, I'll let you know! Thanks -Mike |
|
|
|
|
Logged
|
|
|
|
gordonv
Member
Posts: 5766
VRCC # 31419
Richmond BC
|
|
« Reply #13 on: February 16, 2015, 07:07:56 PM » |
|
All a useful discussion. My original post was more about there not being an issue with regards to remounting an alternator into a GW engine, where in a Valkyrie there has been some lively discussion on it.
On the GW, there is the additional step of aligning the mount vertical/horizontal. I do not recall this being said for the Valkyrie at all.
I understand that there may be more room in the GW frame than the Valkyrie (not that there seems to be in the videos I've watched). I'll find out soon enough myself, as it looks like I need to rebuild my GW alt. I was just going to swap my IS alt into the GW, but they both have close to the same mileage anyways, so I would want to rebuild it first.
|
|
|
|
|
Logged
|
1999 Black with custom paint IS |
|
|
hubcapsc
Member
Posts: 16816
upstate
South Carolina
|
|
« Reply #14 on: February 16, 2015, 07:15:08 PM » |
|
I understand that there may be more room in the GW frame than the Valkyrie (not that there seems to be in the videos I've watched).
I watched a youtube of a 1500 wing alternator removal today... it seemed
like he took out three bolts, wiggled the alternator loose and just pulled it out.
I've heard of people (Mac, maybe) who can wiggle a Valkyrie alternator right out,
but it took a lot of patience when we got Stanley Steamer's in and out.
-Mike
|
|
|
|
|
Logged
|
|
|
|
|
HayHauler
|
|
« Reply #15 on: February 17, 2015, 08:45:50 PM » |
|
Buy new dampeners. They are relatively cheap and seem to stay put easier than the old, oil soaked ones. That is what I did. Hay  Jimmyt |
|
|
|
|
Logged
|
|
|
|
|
quexpress
|
|
« Reply #16 on: February 18, 2015, 06:06:40 AM » |
|
And what happens when that rtv breaks loose and gets into the oil pump. or the clutch scavage pump. I can see it now, blown engine.
Very good point! Note: I had Yamabond in mind ... just a very small film in the same fashion as when assembling crankcases. |
|
|
|
|
Logged
|
I still have a full deck.
I just shuffle slower ...
|
|
|
|
3W-lonerider
|
|
« Reply #17 on: February 18, 2015, 08:50:30 AM » |
|
yeah, but once that alternator is spinning that yama bond is going to break loose. unlike when you put it on gaskets and engine blocks there are no moving parts to break it loose.
|
|
|
|
|
Logged
|
|
|
|
|
quexpress
|
|
« Reply #18 on: February 18, 2015, 09:13:05 AM » |
|
yeah, but once that alternator is spinning that yama bond is going to break loose. unlike when you put it on gaskets and engine blocks there are no moving parts to break it loose.
I agree!  |
|
|
|
|
Logged
|
I still have a full deck.
I just shuffle slower ...
|
|
|
gordonv
Member
Posts: 5766
VRCC # 31419
Richmond BC
|
|
« Reply #19 on: February 18, 2015, 07:46:51 PM » |
|
1/2 hr to remove battery, take some pictures, remove the 3 alt bolts (one was corroded), pry it out, move the leads and the drool tube, unfasten the leads, and remove the alternator from the bike.
Now time to tear it apart, and inspect/rebuild it.
If I have any trouble, I'll reclock my IS alternator and install it back in.
|
|
|
|
|
Logged
|
1999 Black with custom paint IS |
|
|
gordonv
Member
Posts: 5766
VRCC # 31419
Richmond BC
|
|
« Reply #20 on: February 22, 2015, 02:00:09 PM » |
|
I was originally going to rebuild my Valk alt, and then swap it out in my GW. Then rebuild the GW and hang onto it as a spare. But with the GW crapping out, it's changed things. There are also no parts available locally, so I need to order and wait. I've decided to swap out the GW alt for the Valk one, rebuild the GW, and order an extra set of brushes for the Valk alt, and swap them again and replace the brushes in the Valk alt. It's been mentioned about buying a GW alt for the Valk, and reclocking. I'm sure everyone will figure out what needs to be done, since they'll have an alt of each kind in front of them, but here are some pictures to show you the comparison. Valk on the left, GW on the right with the capacitors.  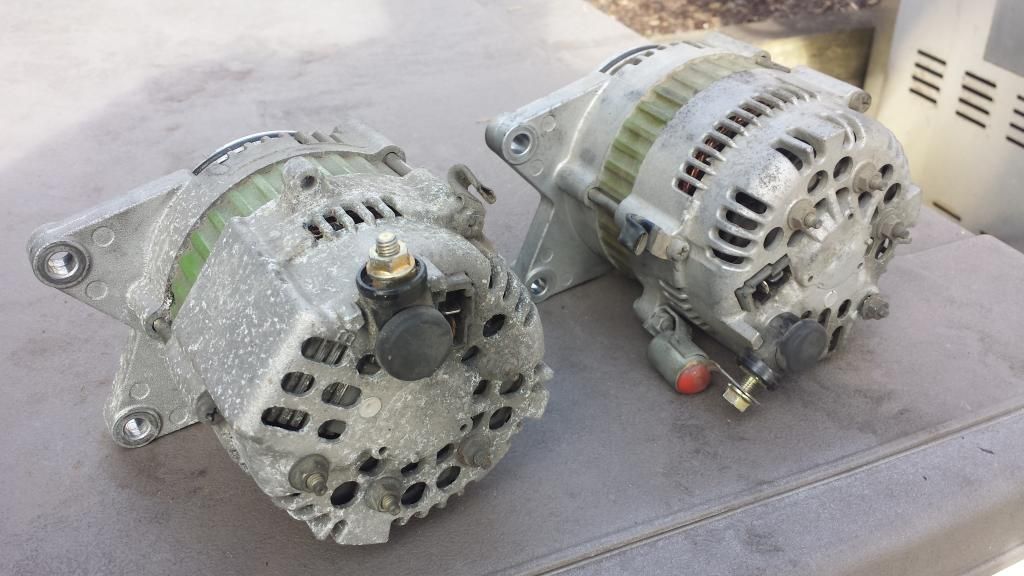 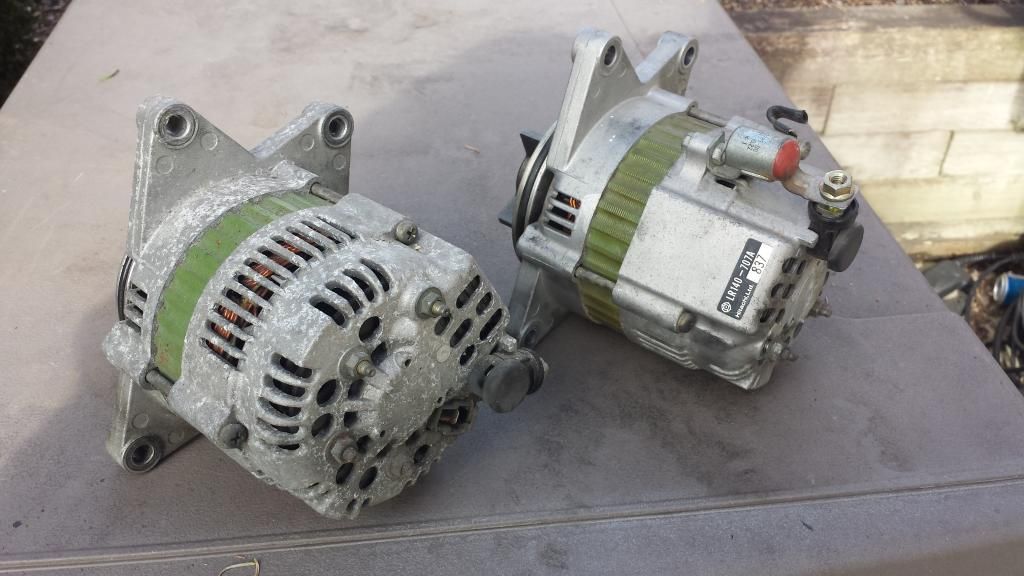 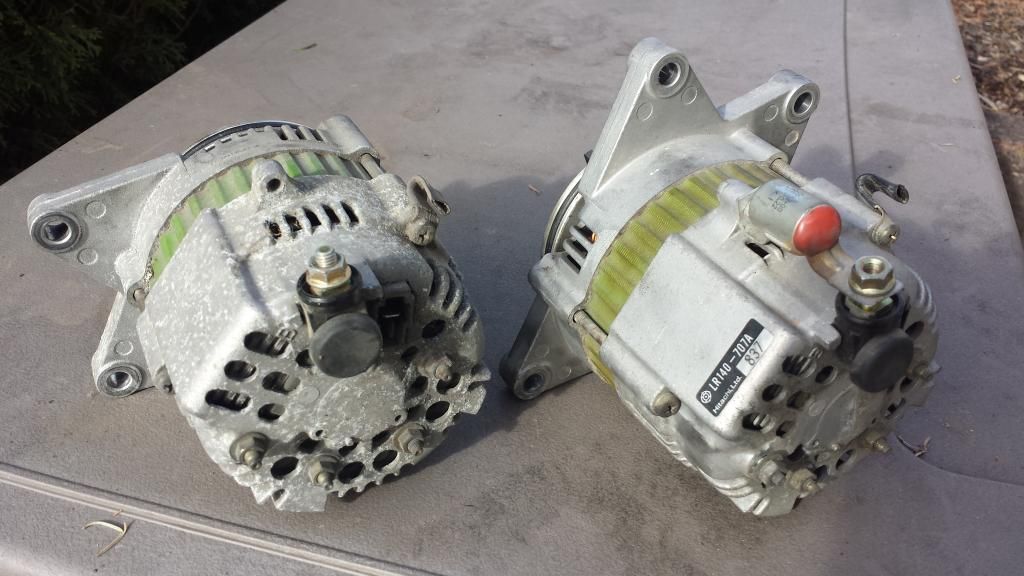 Since I'm putting the Valk alt in the GW, do I need to clock it? The cable is longer to reach the lug which is clocked 1/3 further from the battery, so why can't I just leave it where it is, and now have a cable that isn't being pulled? I did loosen it when I removed the alternator from the GW, but I could have just as easily done it after I removed the alt from the engine/frame, like I did with the little box that was connected to the alt? |
|
|
|
|
Logged
|
1999 Black with custom paint IS |
|
|
|
Red Diamond
|
|
« Reply #21 on: February 22, 2015, 03:18:31 PM » |
|
Don't shortcut, set the alternators side by side, remove the screws, rotate the head so that the GW body parts are in identical position to the Valkyrie or vice versa. Reinstall the screws and you are good to go.
|
|
|
|
|
Logged
|
 If you are riding and it is a must that you keep your eyes on the road, you are riding too fast. |
|
|
gordonv
Member
Posts: 5766
VRCC # 31419
Richmond BC
|
|
« Reply #22 on: February 23, 2015, 07:31:22 PM » |
|
After prying my Valk alt apart, breaking the 3 leads from the windings, I didn't like the instructions very good at all.
I then took apart my GW alt properly this time, and inspected. Found the brushes stuck in their slots. Used WD40 to flush it out and get them working again, put it back together. I put it back into the GW in 5 minutes!
I do need to replace the brushes, but they can wait.
I now need to try to unwind some of the winding from the Valk alt, and resolder it into the housing. If this works, then I can get it working again. I'll replace the brushes, and have one on the shelf for a spare. If not, I'll look for an inexpensive replacement.
|
|
|
|
« Last Edit: February 25, 2015, 08:10:14 PM by gordonv »
|
Logged
|
1999 Black with custom paint IS |
|
|
|
Pastor John
|
|
« Reply #23 on: March 02, 2015, 11:08:34 AM » |
|
OK,
I'm missing something here
I have the alternator out to about an 1/8" and can't seem to find the last 1/8" clearance I need to get the alternator out. If I can't get the OEM one out how in the heck am I ever gonna get the new one in?
I've read every article I can find on here and CLYMER's until I'm blue.....I'd rather be riding!
TIA!
|
|
|
|
|
Logged
|
|
|
|
hubcapsc
Member
Posts: 16816
upstate
South Carolina
|
|
« Reply #24 on: March 02, 2015, 11:28:17 AM » |
|
OK,
I'm missing something here
I have the alternator out to about an 1/8" and can't seem to find the last 1/8" clearance I need to get the alternator out. If I can't get the OEM one out how in the heck am I ever gonna get the new one in?
I've read every article I can find on here and CLYMER's until I'm blue.....I'd rather be riding!
TIA!
There's a way. You don't have to cut the frame  ... with patience, and if you hold your mouth right, you'll find that one way to "twist" it out. Hopefully you'll be paying attention and not just thrashing, because that's the same motion that will get it back in. There's some wires on the back, maybe remove them first. It might help to get the center cover out of the way, maybe just loosened and moved some. Maybe put some painter's tape on the center cover to keep from scratching it. Careful with the center cover, it looks like it is made from plastic, but it is really made from unobtainium ($), and it is in there tight like the alternator. -Mike |
|
|
|
|
Logged
|
|
|
|
|
Bone
|
|
« Reply #25 on: March 02, 2015, 12:53:22 PM » |
|
Everything Mike said patience is required. I pushed the back end of the Alt. into the opening towards the center post and let that end drop down. Then slowly twisted as I pulled the front end up and out. I couldn't believe the ease it came out. I stopped right there and tried to remember every twist and turn I made for the replacement later.
When I installed it I actually stuck the back end of the Alt. in aiming for the cavity (small) in front of the frames center post. Took me longer to install I didn't remember every move I made on the removal.
|
|
|
|
|
Logged
|
|
|
|
|
dpcarson
|
|
« Reply #26 on: March 02, 2015, 05:21:55 PM » |
|
I just put mine back in today. Sorry to say, but it was a piece of cake compared to the u-joint boot.  I put all new rubber dampners in it while i had it pulled apart. They hold themselves in place so all I needed was a good small flashlight to get everything lined up and it went in with no trouble at all. First time I had ever done it. If I can do it and call it easy..... and not break anything....... then it is definitely easy for the average guy. |
|
|
|
|
Logged
|
"""""""""""""""""""""""""""""" In war, there are no unwounded soldiers.  |
|
|
|
The emperor has no clothes
|
|
« Reply #27 on: March 02, 2015, 06:06:09 PM » |
|
I just put mine back in today. Sorry to say, but it was a piece of cake compared to the u-joint boot. I put all new rubber dampners in it while i had it pulled apart. They hold themselves in place so all I needed was a good small flashlight to get everything lined up and it went in with no trouble at all. First time I had ever done it. If I can do it and call it easy..... and not break anything....... then it is definitely easy for the average guy.  Yeah but you've got the engine out don't you ? Cheater |
|
|
|
|
Logged
|
|
|
|
|
dpcarson
|
|
« Reply #28 on: March 02, 2015, 06:24:29 PM » |
|
well........ that did make it much easier.
|
|
|
|
|
Logged
|
"""""""""""""""""""""""""""""" In war, there are no unwounded soldiers. |
|
|
|
Bone
|
|
« Reply #29 on: March 03, 2015, 01:55:26 AM » |
|
Why didn't I think of that, PULL the engine to remove the Alternator. Should make changing the boot on the drive train easier |
|
|
|
|
Logged
|
|
|
|
|
dpcarson
|
|
« Reply #30 on: March 03, 2015, 03:12:52 AM » |
|
Should make changing the boot on the drive train easier Hahaha. You would think.....right? Where is the smart ass smiley up there? |
|
|
|
|
Logged
|
"""""""""""""""""""""""""""""" In war, there are no unwounded soldiers. |
|
|
|
Bone
|
|
« Reply #31 on: March 03, 2015, 03:18:07 AM » |
|
I've replaced the u-joint on my 98 Tourer, I do have Boot experiance  |
|
|
|
|
Logged
|
|
|
|
|
Ricky-D
|
|
« Reply #32 on: March 03, 2015, 07:39:43 AM » |
|
If you remove the capacitor on the back of the alternator the install
is much easier. Moving the center cover out of the way also helps.
***
|
|
|
|
|
Logged
|
2000_Valkyrie_Interstate
|
|
|
|
The emperor has no clothes
|
|
« Reply #33 on: March 03, 2015, 08:54:14 AM » |
|
If you remove the capacitor on the back of the alternator the install
is much easier. Moving the center cover out of the way also helps.
***
+1, didn't move the center cover but HAD to remove capacitor and reinstall . |
|
|
|
|
Logged
|
|
|
|
|


