John Schmidt
Member

Posts: 15383
a/k/a Stuffy. '99 I/S Valk Roadsmith Trike
De Pere, WI (Green Bay)
|
 |
« on: March 18, 2015, 07:39:31 PM » |
|
Friend of mine owns Chopper Design up in Longwood. He's ordering two stock size tires for front and rear, the latest one on there now is just over ten years old. Once I get the rear mounted, I can finally put the back wheel on and except for installing brake pads when they arrive, the rear end will be done mechanically. Still have to mount lights and run the wiring inside the frame, and order/mount the fender, that's minor stuff. At least I won't have to pull the final and all the stuff attached. This is where I am at present. Used silver high temp engine paint (three coats) on the final drive and caliper, gives a nice contrast to the hammered black of the frame. The wheel and final were absolutely filthy and took a lot of work to get it right. Instead of powder coating the wheels, I just cleaned them good with a wire wheel on a drill, then polished and buffed the aluminum spokes. For the black part I just used some gloss black Rustoleum....and a lot of patience. I will relube everything before mounting the wheel, already replaced the three o-rings. I plan to use the same paint on the front calipers as well. I have the rear master cyl. painted, just a matter of installing the rebuild kit and bolting it in place. I'll first need to make a run to J&P Cycles in Daytona for brake lines and fittings. I've finish replacing the valve stem seals and just waiting for cam oil seals and a couple gaskets, then time it and button it up. I hope this is the last time I have to do anything with this engine. If not, does someone have a .357 I can borrow? I'll give the engine a decent sendoff.  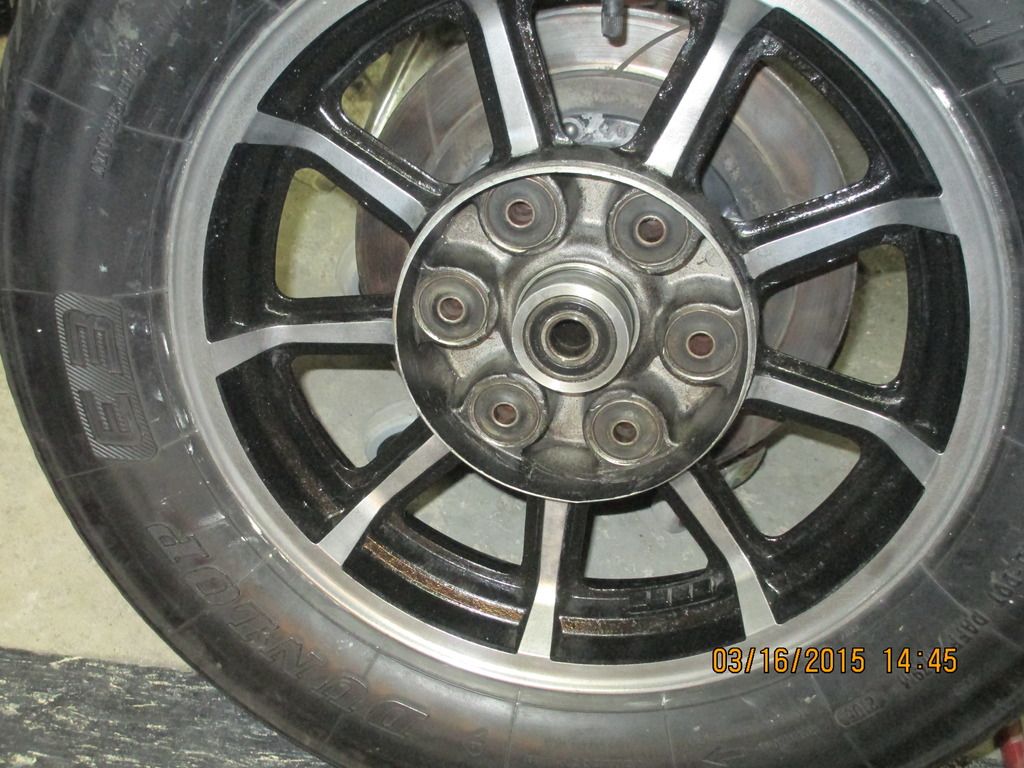  |
|
|
|
|
 Logged
|
|
|
|
|
Thunderbolt
|
|
« Reply #1 on: March 19, 2015, 03:53:40 AM » |
|
Looks good John. That rear end looks a lot like the Valkyrie unit.
|
|
|
|
|
Logged
|
|
|
|
Tundra
Member
Posts: 3882
2014 Valkyrie 1800
Seminole, Florida
|
|
« Reply #2 on: March 19, 2015, 04:03:26 AM » |
|
Looking good John. Those fingers gather no moss
|
|
|
|
« Last Edit: March 19, 2015, 04:05:16 AM by Tundra »
|
Logged
|
If you can't be a good example: be a WARNING!!
|
|
|
|
TJ
|
|
« Reply #3 on: March 19, 2015, 07:49:27 AM » |
|
|
|
|
|
|
Logged
|
|
|
|
John Schmidt
Member
Posts: 15383
a/k/a Stuffy. '99 I/S Valk Roadsmith Trike
De Pere, WI (Green Bay)
|
|
« Reply #4 on: March 19, 2015, 10:53:19 AM » |
|
The final actually isn't unique to the 1200. When I was trying to fit a set of Valk wheels in place(too big for the rear), I found the Valk flange drive fits just fine. Note the 1200 flange has six fingers whereas the Valk doesn't. So, I tried the Valk flange in the 1200 final and it fits fine. Only problem was the Valk wheel with the rotor mounted was about 1.5" too wide. No problem fitting the front wheel using the spare Valk forks and triple trees, but would look rather strange with two different wheels. Plus, the Valk front then would be bigger than the OEM rear on the 1200....really strange looking. So I opted to go with the OEM wheels on the 1200, sold the forks to Bert and kept the extra triple trees....which aren't exactly perfect. I found a lot of things on the 1200 are the same on the Valk, the steering neck bearings are one, the swingarm bearings and pivots. the rear master cylinder uses the same size rebuild kit as the 1500 Wing so I assume it's the same as the Valk. A couple of the wheel bearings are the same, as were 2 of 3 o-rings used in the final drive. The rear axle is the same diameter but goes in from the left instead of the right, makes it easier to assemble the rear especially since it has two spacers instead of one. Re. the final drive, I have a spare Valk swingarm which I could have used to mount the Valk rear wheel. But it would have involved cutting the cross braces, spreading the frame and rewelding it ~1.5" out for the wider s/a to fit. The bolt pattern for the two different finals aren't the same so that wasn't a possibility either. As I said....in the end I decided to stick with the OEM wheels. With my b'day coming up soon, I've dropped a not too subtle hint about the rear fender I want. So far no reaction. The item in the link is what I'm looking for, just not set quite so low in front and have the duckbill a little farther down in back. Figure I'll have the front edge even with the back of the s/a, fab a bracket to bolt it there for support, then add a vertical support on each side. I'll set it close to the tire and with it mounted as described it will move up/down with the swingarm and wheel. It will look somewhat like the picture, just not as low in front. At least that's my current plan. Still have the lights to mount in back and drill some tiny holes to run the wiring inside the frame. Next will be the front end, rebuild the forks and figure out what to do for a replacement for the abortive looking gauges. http://www.ebay.com/itm/361082450253?_trksid=p2055119.m1438.l2648&ssPageName=STRK%3AMEBIDX%3AIT |
|
|
|
|
Logged
|
|
|
|
John Schmidt
Member
Posts: 15383
a/k/a Stuffy. '99 I/S Valk Roadsmith Trike
De Pere, WI (Green Bay)
|
|
« Reply #5 on: March 22, 2015, 07:21:14 PM » |
|
Got the valve stem seals replaced on the left side this past week, finished putting it all back together this afternoon and have it running again. Rita says the external fuel tank with the hose running to the carbs looks like a catheter since it has a yellowish cast to the gas. Still have a problem with a cold engine which is really bugging me. When it's cold and I have the choke on, it won't let me advance the throttle. It will pop back mostly through #3 carb and die if I don't let off. After a good warmup, no problem, hit the starter one small bump and it fires right up. Reach down and goose it a bit and it goes right up. Let it sit and cool off and when you try to throttle up it wants to bog down, sits there and pops and coughs and will die. Really bugging me, I'm open to any suggestions of where to look. When it's cold it almost acts like the timing is to retarded, or possibly a vacuum leak in the system. But when it's warmed up none of that seems to apply. Got me guessing for sure. |
|
|
|
|
Logged
|
|
|
|
|
Pappy!
|
|
« Reply #6 on: March 22, 2015, 07:36:29 PM » |
|
John, you doing the single carb thing on the engine or did you go with individual carbs?
|
|
|
|
|
Logged
|
|
|
|
John Schmidt
Member
Posts: 15383
a/k/a Stuffy. '99 I/S Valk Roadsmith Trike
De Pere, WI (Green Bay)
|
|
« Reply #7 on: March 23, 2015, 08:02:11 AM » |
|
John, you doing the single carb thing on the engine or did you go with individual carbs?
I had the single up and running fine but it was a gas hog. I finally was able to scrounge up all the missing parts on the four OEM carb setup and ordered a set of rebuild kits. Went through them with a good soaking and cleaning, fired the bike up and except for a carb sync it ran great. With the single carb, I'd go through an external tank in 20 minutes. With the OEMs on there now I can run for an extended period(over an hour) and still have gas left. Also seems smoother. I posted the problem on the Naked GW forum and the first thing they told me is "that's pretty normal" because these engines tend to be cold blooded. Once warmed up they run great. I told the guys over there I guess I'll come up with a female name for the bike then.  Still don't think it should bog down even when cold. Might pull the top off #3 and see if the diaphragm has a leak. |
|
|
|
|
Logged
|
|
|
|
John Schmidt
Member
Posts: 15383
a/k/a Stuffy. '99 I/S Valk Roadsmith Trike
De Pere, WI (Green Bay)
|
|
« Reply #8 on: March 30, 2015, 06:22:03 PM » |
|
Got the tires mounted, looks good with new rubber. Finally have the entire rear end done except for a rear fender. My new brake pads came today to hooked up all the connections for the rear brake after installing the pads. NUTS, must have an air leak somewhere, I can't pull any fluid through to bleed it. Every time I pump the pedal I get some pretty good bubbles but can't get the fluid level to drop at all. I really hate the thought of pulling the rear m/c and pulling it apart again, I rebuilt it once already and all was working good. I put a small dumbbell on the pedal and will leave it overnight, see if any air in the line bleeds off. I even put the rubber grommets in the sides of the frame and slipped the side covers on. Rita walked in and said "wow, it's finally beginning to look like a motorcycle. But it still stinks when you run it." It sure is coldblooded, sits there and if you advance the throttle it still will pop back through a couple carbs until it's good and warm.
If anybody has any suggestions, I'm all ears.
|
|
|
|
|
Logged
|
|
|
|
|
Pappy!
|
|
« Reply #9 on: March 30, 2015, 07:29:17 PM » |
|
Use a mityvac and pull fluid through.
|
|
|
|
|
Logged
|
|
|
|
John Schmidt
Member
Posts: 15383
a/k/a Stuffy. '99 I/S Valk Roadsmith Trike
De Pere, WI (Green Bay)
|
|
« Reply #10 on: March 30, 2015, 08:06:58 PM » |
|
Pappy, I have both a MityVac and a larger unit that runs off my air compressor. The larger unit works great on cars and I've used it on the Valk. Neither will draw a drop so looks like I'll have to take the line loose on the m/c and first see if I can blow air through it. If so, then that pretty much leaves the m/c is not putting out.
Keep in mind, the rear m/c had a double output; one line to the rear caliper and one to the right front(believe that's the side). I'm doing away with the split braking and have plugged the one outlet that originally went to the front. I don't think that should create a problem but I've posed that question on the NGW board. I was hoping to be done with the rear end, leaving just the front end to rebuild and figure out the wiring mess the PO left for me. I think the only method he used to disconnect something was to use wire cutters. Glad I have a pretty good background in such stuff, still will be a challenge.
|
|
|
|
|
Logged
|
|
|
|
|
Pappy!
|
|
« Reply #11 on: March 30, 2015, 09:37:59 PM » |
|
The fact that you see bubbles means that fluid is displacing air somewhere.....
Just for the heck of it try the mityvac again but use the brake pedal at the same time. Check the fluid level or watch for a drop in vacuum on the mityvac gauge. That may tell you more about the MC. Just a thought?
|
|
|
|
|
Logged
|
|
|
|
John Schmidt
Member
Posts: 15383
a/k/a Stuffy. '99 I/S Valk Roadsmith Trike
De Pere, WI (Green Bay)
|
|
« Reply #12 on: March 31, 2015, 06:30:54 AM » |
|
"use the brake pedal at the same time" +++++++++++++++++++++++++++++++++++++++++++ Going to take some long arms. Bleeder is on one side in back, pedal is.....well!!  |
|
|
|
|
Logged
|
|
|
|
|
Pappy!
|
|
« Reply #13 on: March 31, 2015, 03:14:13 PM » |
|
LOL - Remember that game called "Twister" ??
Longer hose for the mityvac??......that statement should bring a comment or two!
|
|
|
|
« Last Edit: March 31, 2015, 03:15:44 PM by Pappy! »
|
Logged
|
|
|
|
John Schmidt
Member
Posts: 15383
a/k/a Stuffy. '99 I/S Valk Roadsmith Trike
De Pere, WI (Green Bay)
|
|
« Reply #14 on: March 31, 2015, 06:29:18 PM » |
|
Well, this evening I pulled the line off the m/c and there was nothing in it. I pumped the m/c and nothing came out, so....while muttering to myself I decided to pull the m/c and take it apart. That's when I discovered two problems; first, the snap ring that holds the entire guts in place had snapped(OK, it's a snap ring), second, it allowed the guts to be displaced internally and actually almost came out. The cup that applies pressure was turned sideways and the entire mess was only held in by the pushrod. Once I removed it from the pedal linkage it mostly came out in my hand except for the cup, which stayed in place but cockeyed. I dug around in my stash of stuff and found another snap ring that fit but was slightly heftier, took some doing to get it in but when it snapped in the groove you knew it was seated. I tested and bench bled(again) the m/c then mounted it, hooked everything up and filled the reservoir. Pumped the pedal a few times and no bubbles, then attached the mityvac. It sucked that thing down like a thirsty race horse. I have brakes in back, still need to do some more bleeding on the system, I'll use my air compressor unit tomorrow. That thing is so slick, just hook up the air hose, put the tube on the bleeder and pull the trigger. The air passing through it sucks the juice through like a kid on a straw. Stupid snap ring, what a PITA.  |
|
|
|
|
Logged
|
|
|
|
|


