Redeye
Member

Posts: 11
Shameless Pusher for "Red Eye Tech Services"
Overland Park, Kansas

|
 |
« on: September 16, 2009, 07:59:21 AM » |
|
Some of us North Americans invested in an aftermarket pilot screw adjusting tool, and it is bunging up the heads of the pilot screws. It does this because some of the pilot screws like to disappear down into the cone-shaped bottom of their hole, when you screw them in to 0 turns. You can salvage your extremely expensive tool by grinding a 45 degree chamfer onto the outside edge of the tool. This shapes the tool to match the hole, so the tool reaches in deeper. To illustrate, I have attached some microscopic pictures showing the details. The raw material and finished product are shown for Red Eye's pilot screw tool. The wall of the tube is .032" thick, and the chamfer eats up half of it, so the tool goes .016" or so deeper into the hole than the fat tube would. This isn't rocket science - all it takes is a grinder with a fine wheel on it. (Posted by Rich Byrne of Red Eye Tech Svcs)  |
|
|
|
|
 Logged
|
Cheers,
Rich
1999 Valkyrie Interstate
Mods: ECT timing mod with clutch switch mod, drilled baffles, gel pads in the seats, taller windscreen, longer kickstand, Metzler ME880 front, Dunlop OEM back.
|
|
|
|
1fastbob
|
|
« Reply #1 on: September 16, 2009, 08:22:02 AM » |
|
Some of us North Americans invested in an aftermarket pilot screw adjusting tool, and it is bunging up the heads of the pilot screws. It does this because some of the pilot screws like to disappear down into the cone-shaped bottom of their hole, when you screw them in to 0 turns. You can salvage your extremely expensive tool by grinding a 45 degree chamfer onto the outside edge of the tool. This shapes the tool to match the hole, so the tool reaches in deeper. To illustrate, I have attached some microscopic pictures showing the details. The raw material and finished product are shown for Red Eye's pilot screw tool. The wall of the tube is .032" thick, and the chamfer eats up half of it, so the tool goes .016" or so deeper into the hole than the fat tube would. This isn't rocket science - all it takes is a grinder with a fine wheel on it. (Posted by Rich Byrne of Red Eye Tech Svcs) I have what maybe a dumb question, but I am new to these Valkyries.....I currently have the carbs out of my bike cleaning them from the previous owner letting the bike set with stale fuel in it. I have a copy of the service manual and it shows where the pilot screws go, but my carbs look like they have a flat plug over the pilot screw. Is this a flat plug and is the pilot screw under it or am I missing something? Thanks Bob |
|
|
|
|
Logged
|
I'm on somebody's list! BFD!
|
|
|
|
FLAVALK
|
|
« Reply #2 on: September 16, 2009, 08:27:30 AM » |
|
The screw will look like a plug with a flat on one side. The purpose of the tool above is to fit over the plug and engage the flat
|
|
|
|
« Last Edit: September 16, 2009, 08:30:18 AM by FLAVALK »
|
Logged
|
Live From Sunny Winter Springs Florida via Huntsville Alabama
|
|
|
KY,Dave (AKA Misunderstood)
Member
Posts: 4146
Specimen #30838 DS #0233
Williamsburg, KY
|
|
« Reply #3 on: September 16, 2009, 08:36:22 AM » |
|
|
|
|
|
|
Logged
|
|
|
|
|
1fastbob
|
|
« Reply #4 on: September 16, 2009, 08:50:12 AM » |
|
Another question? Since I don't have a tool to remove the pilots and I am in the middle of cleaning the carbs can I get by spraying carb cleaner into the pilot opening in the throat of the carb rather than removing the pilots? Carbs were pretty clean except the low speed and the main jets were all plugged.
Thanks again for the help.
Bob
|
|
|
|
|
Logged
|
I'm on somebody's list! BFD!
|
|
|
|
FLAVALK
|
|
« Reply #5 on: September 16, 2009, 09:27:23 AM » |
|
Another question? Since I don't have a tool to remove the pilots and I am in the middle of cleaning the carbs can I get by spraying carb cleaner into the pilot opening in the throat of the carb rather than removing the pilots? Carbs were pretty clean except the low speed and the main jets were all plugged.
Thanks again for the help.
Bob
I don't think you need to remove the screws in order to clean the cabs thoroughly. Your problem is with the slow jets. |
|
|
|
|
Logged
|
Live From Sunny Winter Springs Florida via Huntsville Alabama
|
|
|
|
1fastbob
|
|
« Reply #6 on: September 16, 2009, 09:32:08 AM » |
|
Another question? Since I don't have a tool to remove the pilots and I am in the middle of cleaning the carbs can I get by spraying carb cleaner into the pilot opening in the throat of the carb rather than removing the pilots? Carbs were pretty clean except the low speed and the main jets were all plugged.
Thanks again for the help.
Bob
I don't think you need to remove the screws in order to clean the cabs thoroughly. Your problem is with the slow jets. Okay, the mains were solidly plugged also. I may try to put it back together and see how it runs. I'd hate to have to take it apart again. |
|
|
|
|
Logged
|
I'm on somebody's list! BFD!
|
|
|
|
Udo
|
|
« Reply #7 on: September 16, 2009, 11:33:12 AM » |
|
You could use a Dremel with a cutting wheel, and make a slot in the pilot screws. So you could use a flat screwdriver. Should work (Dremel) with the pilots in the carb body....
|
|
|
|
|
Logged
|
|
|
|
Kingbee
Member
Posts: 486
VRCC# 576
Northern Illinois
|
|
« Reply #8 on: September 16, 2009, 11:45:31 AM » |
|
Here's a shot of the D-shaped pilot screw. Pardon the dirt, those aren't my carbs 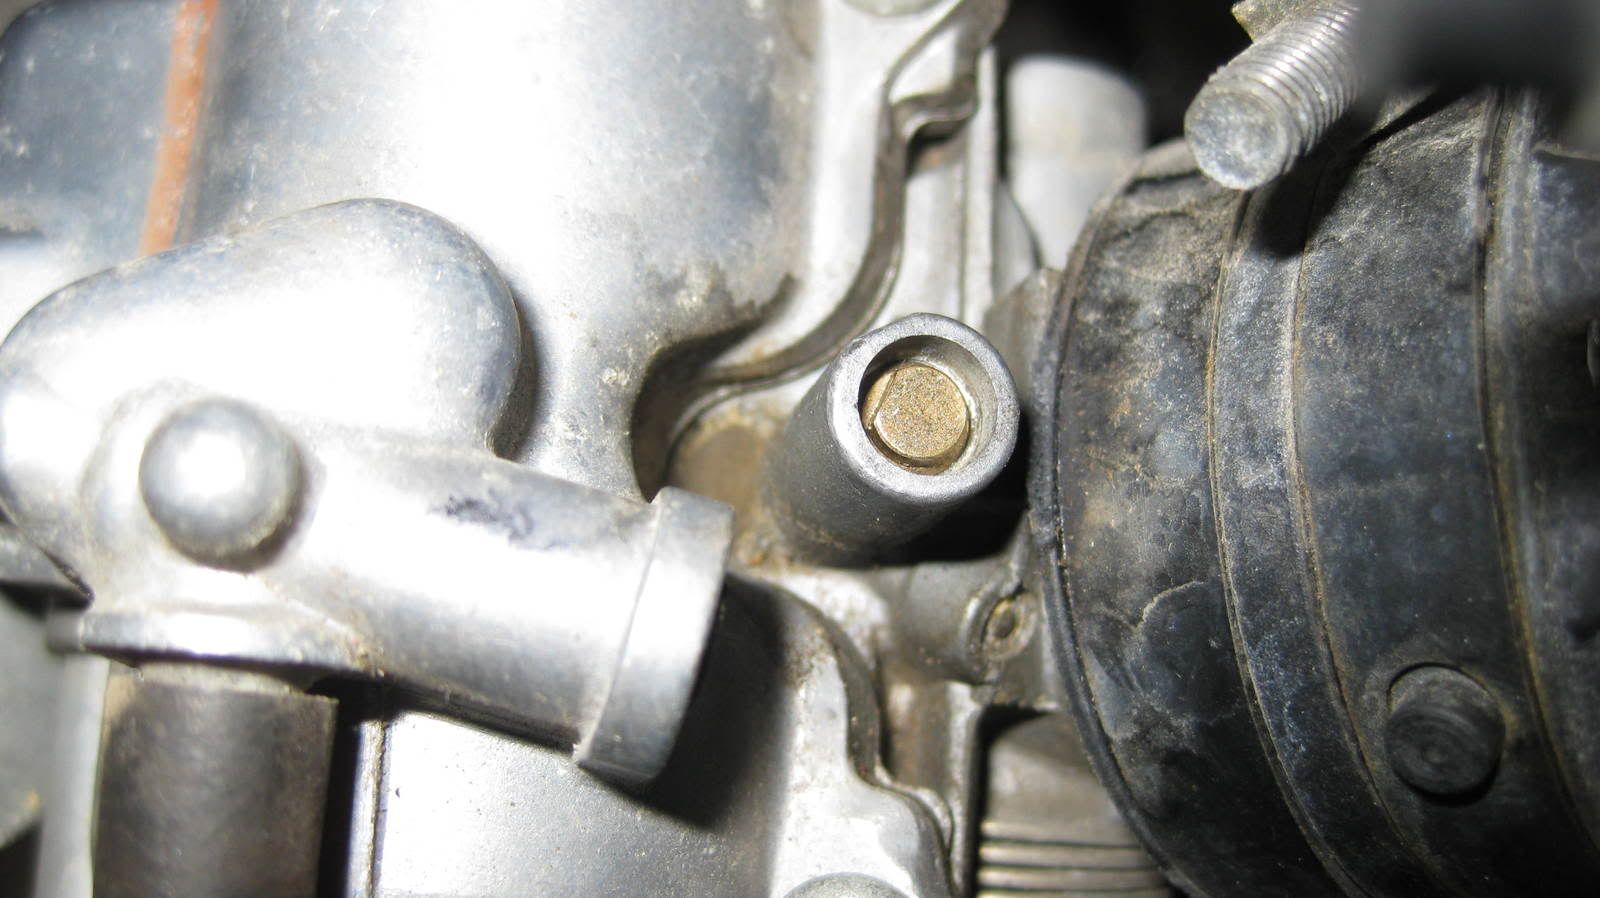 |
|
|
|
|
Logged
|
|
|
|
|
1fastbob
|
|
« Reply #9 on: September 16, 2009, 11:48:53 AM » |
|
Here's a shot of the D-shaped pilot screw. Pardon the dirt, those aren't my carbs I see why I thought it was a plug. Great photo, Thanks! Bob |
|
|
|
|
Logged
|
I'm on somebody's list! BFD!
|
|
|
|
PharmBoy
|
|
« Reply #10 on: September 16, 2009, 12:23:13 PM » |
|
Bob, if you changed to #38 slow jets the pilot screws will need to be reset to 1.5 to 1.75 turns out from lightly closed. Mine does better at 1.75 turns out. If you stayed with the standard slow jets, then the pilot screws should be fine where they are. If for any reason you should remove a pilot screw, take extra care not to loose the tiny o-ring on the end of the pilot screw....JTL
|
|
|
|
|
Logged
|
A politician is a fellow who will lay down your life for his country. ~Texas Guinan
4th Infantry Tet Vet
99 Interstate
97 Bumble Bee
97 Red & White
|
|
|
|
1fastbob
|
|
« Reply #11 on: September 16, 2009, 01:16:07 PM » |
|
Bob, if you changed to #38 slow jets the pilot screws will need to be reset to 1.5 to 1.75 turns out from lightly closed. Mine does better at 1.75 turns out. If you stayed with the standard slow jets, then the pilot screws should be fine where they are. If for any reason you should remove a pilot screw, take extra care not to loose the tiny o-ring on the end of the pilot screw....JTL
I will leave them as they are. It is better not to screw with things any more than necessary. I appreciate it! Maybe this beast will be running this weekend. Bob |
|
|
|
|
Logged
|
I'm on somebody's list! BFD!
|
|
|
|
BlueValk
|
|
« Reply #12 on: September 16, 2009, 01:54:24 PM » |
|
[/quote]Okay, the mains were solidly plugged also. I may try to put it back together and see how it runs. I'd hate to have to take it apart again.
[/quote]
FastBob,
I hate to put a damper on this. But, if your mains were plugged from old gas, I gotta bet that the pilot passages are too.
Someone had found a small tool from Freight Harbor that will fit the "d" shaped pilot screws.
I would be real surprised if the bike idled fine without pulling and cleaning them (and their passages).
Just my .02. Hope I'm wrong.
BlueValk
|
|
|
|
|
Logged
|
|
|
|
|
1fastbob
|
|
« Reply #13 on: September 16, 2009, 02:26:43 PM » |
|
Okay, the mains were solidly plugged also. I may try to put it back together and see how it runs. I'd hate to have to take it apart again. [/quote] FastBob, I hate to put a damper on this. But, if your mains were plugged from old gas, I gotta bet that the pilot passages are too. Someone had found a small tool from Freight Harbor that will fit the "d" shaped pilot screws. I would be real surprised if the bike idled fine without pulling and cleaning them (and their passages). Just my .02. Hope I'm wrong. BlueValk [/quote]Just finished ordering a pilot tool from Red Eye. Thanks! Bob |
|
|
|
|
Logged
|
I'm on somebody's list! BFD!
|
|
|
|
woefman
|
|
« Reply #14 on: September 18, 2009, 01:13:04 AM » |
|
Thanks for posting this but have you used it ? I just dont see the room to work with that long handle |
|
|
|
|
Logged
|
|
|
|
Dodis
Member
Posts: 251
'98 Blue & Cream
Texas City, TX
|
 |
« Reply #15 on: September 18, 2009, 07:14:25 AM » |
|
Just posted this on the Texas VRCC board also (under the Houston Meeting thread). For those that need a pilot tool and don't want to part with the cost of the Motion-Pro tool, here are the steps to make one. You do have to get your fingers in there to use it, so do it when the engine is cold... And I can do it with my size 14 fingers  I also marked mine with some reference lines for each 1/4 turn with a sharpie... 1. Purchase a 1/4" barbed hose to 1/4" pipe adapter.  2. Grind a flat on a piece of 3/16" rod, or even the back ond of an old drill bit. Insert it into the tip of the adapter and flatten the adapter on the rod with a hammer and punch (or old screwdriver).  3. Completed tool.  |
|
|
|
|
Logged
|
VRCC# 27132
mr_dodis(a)yahoo.com
DS#513 GY-TT 205/60 (still waiting for my cookie!)
|
|
|
|


