|
di1213
|
 |
« on: September 14, 2016, 07:36:30 AM » |
|
Gl1500 tourer fork seal was leaking. I bought a sealmate but seal did not work so I decided to replace the seal and dudt boot. I loosened the fork caps then removed both assemblies. Right was the leaking one so I removed the cap (holding the flat on the rod with a wrench) and used the tube like a slide hammer to pull it apart. No problem, installed old bushing with a split 1 1/4 pvc coupling held by hose clamps. Then installed the seal with the pvc coupling.
dust seal fron all balls was a bugger to install but finally got it in and put the assembly back in place. I had decided not to reseal the left side but I had removed it, took off the cap and drained the oil for changing..
Now I find the axle holes do not align, the right side hole is about 1/2" lower than the left. caps were reinstalled like my manual described, with left side lock nut all the way down, cap screwed on then locknut tightened. the right side rod was held with a wrench and cap tightened.
All seemed simple so what have I done wrong to end up with that misalignment.
|
|
|
|
|
 Logged
|
|
|
|
hubcapsc
Member

Posts: 16804
upstate
South Carolina
|
|
« Reply #1 on: September 14, 2016, 07:42:19 AM » |
|
If you take the caps back off you can adjust that difference out...
It has been a few years since I did it... there's some obvious
looking nuts on threaded rods that don't really tighten on anything,
they adjust the length of the fork internals... someone else will
remember better if that is too far off...
-Mike
|
|
|
|
|
Logged
|
|
|
|
|
di1213
|
|
« Reply #2 on: September 14, 2016, 09:35:09 AM » |
|
I would need to lenghten the left fork rod but that much adjustment would leave only a few treads in the cap. I realize that some misalignment can be ok but this is a good 1/2" . I have replaced tires, replaced strleering head bearings on this bike, but never had a problem with the axle lining up between the forks.
as it is now, I have to loosen the right pinch bolts, raise the fork, install the axle , bump the fork down and then tighten the pinch bolts. not good....
|
|
|
|
« Last Edit: September 14, 2016, 09:41:56 AM by di1213 »
|
Logged
|
|
|
|
|
Ricky-D
|
|
« Reply #3 on: September 14, 2016, 01:27:06 PM » |
|
Screw the cap which is on the right side shock absorber, down all the way on the damper rod. Start there!
***
|
|
|
|
|
Logged
|
2000_Valkyrie_Interstate
|
|
|
|
di1213
|
|
« Reply #4 on: September 14, 2016, 02:00:43 PM » |
|
Already done that. The right cap is bottomed, no more there.
|
|
|
|
|
Logged
|
|
|
|
|
Ricky-D
|
|
« Reply #5 on: September 15, 2016, 06:12:09 AM » |
|
I have never had the left side shock apart. Did you take it apart?
***
|
|
|
|
|
Logged
|
2000_Valkyrie_Interstate
|
|
|
|
di1213
|
|
« Reply #6 on: September 15, 2016, 06:55:04 AM » |
|
no, I only removed it, took the cap off and drained the oil to change it.
|
|
|
|
|
Logged
|
|
|
|
|
Ricky-D
|
|
« Reply #7 on: September 15, 2016, 01:03:46 PM » |
|
Ok, the problem should then be with the right side shock. Did you find resistance when you used the shock slider like a slide hammer, to take the shock apart? Check the bolt in the bottom of the shock to be sure it is tight. It's the damper that holds the shock together and maintains the correct length of the shock assembly. There should have been little to no resistance to take it apart. If there's anything broken, I would think it's the damper assembly. The bolt in the bottom of the shock holds the damper assembly to the bottom, inside the tube. If you remove the bolt you will have difficulty getting it back together, and especially do not remove the bolt while the spring is under compression because it will fly apart.
***
|
|
|
|
|
Logged
|
2000_Valkyrie_Interstate
|
|
|
|
di1213
|
|
« Reply #8 on: September 15, 2016, 02:44:26 PM » |
|
thanks rickyd. I will pull the shock and check that . there was resistance when I seperated the parts.
|
|
|
|
« Last Edit: September 15, 2016, 02:50:04 PM by di1213 »
|
Logged
|
|
|
|
|
Ricky-D
|
|
« Reply #9 on: September 16, 2016, 11:57:09 AM » |
|
One last thing. I know you said the cap is screwed all the way down on the damper rod, but you need to be sure the lock nut is screwed all the way onto the damper shaft. Not having it screwed all the way on can result in the problem such as you are having.
***
|
|
|
|
|
Logged
|
2000_Valkyrie_Interstate
|
|
|
|
di1213
|
|
« Reply #10 on: September 20, 2016, 07:15:46 AM » |
|
Rickyd, thanks. problem is the right side nut is unscrewing when I screw the cap on even though I'm holding the nut with a wrench. The rod has a little damage(either caused by me or preexisting, don't know. ) When screwing on the cap after a 1/4" or so, the rod starts turning and unscrewing the nut to the point it jams against the cap and I was thinking all was correct. Hard for me to see the rod was turning, I ended up putting a drop of whiteout on the treads and saw what was happening.
I'll get a tap and die to chase the treads in the cap and rod. Again, thanks
|
|
|
|
|
Logged
|
|
|
|
|
di1213
|
|
« Reply #11 on: September 20, 2016, 07:49:53 AM » |
|
Even better, I dressed the damaged treads on the rod with a triangular file and used a 1/2" dtlii bit to remove the few slightly damaged treads in the cap . Now all is well.  |
|
|
|
|
Logged
|
|
|
|
|
..
|
|
« Reply #12 on: September 20, 2016, 08:10:16 AM » |
|
|
|
|
|
« Last Edit: September 20, 2016, 08:13:10 AM by Britman »
|
Logged
|
|
|
|
|
carolinarider09
|
|
« Reply #13 on: July 17, 2018, 01:24:44 PM » |
|
Just want to thank you for the pictures. I really appreciate the documentation. Jim |
|
|
|
|
Logged
|
|
|
|
|
Ramie
|
|
« Reply #14 on: July 17, 2018, 05:50:21 PM » |
|
Here's a pretty good video on how to even the forks up. https://www.youtube.com/watch?v=DfIzizdsHY4procedure starts at about 3:30 minutes in. |
|
|
|
« Last Edit: July 17, 2018, 05:53:55 PM by Ramie »
|
Logged
|
“I am not a courageous person by nature. I have simply discovered that, at certain key moments in this life, you must find courage in yourself, in order to move forward and live. It is like a muscle and it must be exercised, first a little, and then more and more. A deep breath and a leap.”
|
|
|
|
RonW
|
|
« Reply #15 on: July 18, 2018, 02:14:19 AM » |
|
Britman, fantastic pictorial. When I worked on my forks, I didn't use a screwdriver to remove the spring seat stopper. Forget already, but maybe the screwdriver kept slipping or I just couldn't find enough leverage or needed four hands. I found the best tool to push down the spring collar is a ¼-inch drive ratchet (second pic). A stubby ¼-inch drive is definitely more comfortable than the standard ¼-inch ratchet. You stick the ratchet's ¼-inch square head into the hole on the spring collar and push down the spring collar. The ¼-inch square head fits in the round hole just about right. (The spring seat stopper has a slot [inset pic] which you can use to stick the screwdriver's tip under the lock nut then pry down the spring collar. When there's a large enough gap, the spring seat stopper pulls out.) Another thing, it'll be simpler if they called the spring seat stopper a *keeper.*  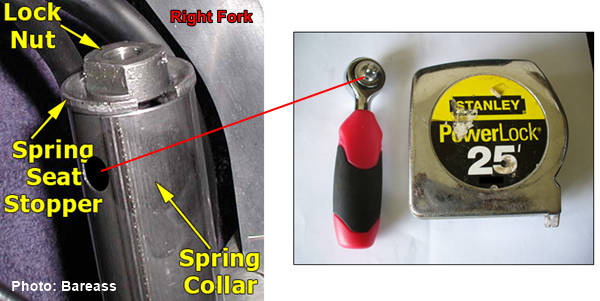 ------------------------------------------------------------------------------------------------------------[edit] ------------------------------------------------------------------------------------------------------------[edit] I used a ¼-inch drive ratchet to push down the spring collar, but there's that slot (red rectangle) that you could use the tip of a screwdriver to pry down the spring collar just the same. It just didn't work for me. The spring collar is stacked on top of the coil spring. The coil spring pushes the spring collar up against the keeper (spring seat stopper). 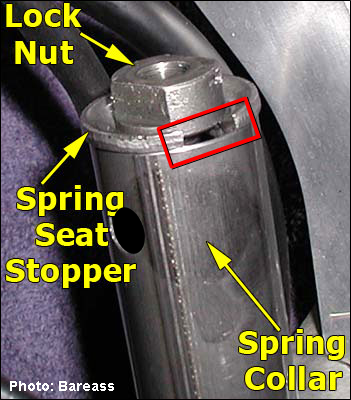 |
|
|
|
« Last Edit: July 25, 2018, 01:13:41 PM by RonW »
|
Logged
|
2000 Valkyrie Tourer
|
|
|
|


