|
|
gordonv
Member

Posts: 5766
VRCC # 31419
Richmond BC
|
 |
« Reply #41 on: May 19, 2019, 04:35:14 PM » |
|
Your pictures are painful for me go look at. I don’t think my bike could even start if it were that dirty   Jeff, you are an inspiration to us all. My intention while parts where off the bike, was to detail clean the hard to reach areas. But doing that was taking SOOO much time for such a small area, I gave up. I have taken some polishes and waxes to the tank and center cover while they where off the bike, and a tooth brush to other areas, along with wiping it down with a rag. But I'm going to try to clean/polish/wax after I get it back on the road and at home, where I can spend an hour or so each night to clean it up. I get enough "grief" from my wife, msb and SteveH. |
|
|
|
|
 Logged
|
1999 Black with custom paint IS   |
|
|
|
Bighead
|
|
« Reply #42 on: May 19, 2019, 05:53:10 PM » |
|
Someone overfilled that tank many times it looks like and the gas under the bib ate away at the paint.
|
|
|
|
|
Logged
|
1997 Bumble Bee
1999 Interstate (sold)
2016 Wing
|
|
|
gordonv
Member
Posts: 5766
VRCC # 31419
Richmond BC
|
|
« Reply #43 on: May 19, 2019, 08:38:53 PM » |
|
Someone overfilled that tank many times it looks like and the gas under the bib ate away at the paint.
I didn't know that could happen. But I suppose that with the bib wet, it would not evaporate as quickly and dry out. I'll take better care in the future, when filling. I will fix it someday, but continue to leave the current bib on it to hide it. Also means my bad painting skills will be hidden. |
|
|
|
|
Logged
|
1999 Black with custom paint IS |
|
|
gordonv
Member
Posts: 5766
VRCC # 31419
Richmond BC
|
|
« Reply #44 on: May 26, 2019, 08:15:44 PM » |
|
Another weekend, and another day working on my bike. Center cover/tilt and the seat latch key back together. No wonder these things break, it's under tension. Seems the wire harness and other things move, and it's putting a little light pressure on the center cover. Got it bolt on the frame, so I just hope it doesn't break. Played with trying to get the rear wheel changed out. I've got more room in the garage now, my brother sold his bike, my old one, a VT1100T ACE Tourer. Was able to roll the IS out and turn it around, so I have room to work on the rear. Took the rear cross members off, then started looking at the rear fender half and ? OK, as I mentioned before, the PO had changed out the bag bolts for studs. It's the rear 2 that hold the rear half of the fender, but how do I take them out? To get to them, I figure I would have to take the whole side off, bags, support and guards. Hmm! I wanted to be able to change tire on the road, using my center stand. That much work seems to make that option almost an impossibility. Decisions, decisions, what to do? Leave it for later, just change that damn tire. If I don't do it now, then it wont be till next year at the earliest. And I do want the Auston on the back. Pull out the MC jack, place it, start pumping, and . . . . it wont go up. No way to check the oil, no way to add oil, but I find a rubber plug. I do get some oil in the cylinder, and it does go up higher, but I need a lot more. I give up for the day, and on the drive home, buy a squirt bottle from the dollar store, so I can get some oil in there (steel and a spring in the way, will need a hose, which I have and can put on the bottle and squeeze oil in). Why does everything take so much time? Once I get the rear wheel out, I'll need to look over the wire harness, and see about fixing/changing it out to a std/T for the rear fender brake light add on. Also find out what those extra wires going through the fender are for. I've already figured things out. 1 more Sat to get this bike done. So this means a lot of 2 hour evenings over there trying to get it done, and only 2 weeks there before I have to have it insured and on the road for our annual rally next month. Almost wanting to just give it up and do it next year . . . decisions again. I know what Jeff would do, clean my darn bike.  |
|
|
|
« Last Edit: June 27, 2020, 05:08:28 PM by gordonv »
|
Logged
|
1999 Black with custom paint IS |
|
|
|
Chrisj CMA
|
|
« Reply #45 on: May 27, 2019, 03:24:38 AM » |
|
Lol. Well I can’t say you are wrong about the cleaning. Hope you get it all together in time. I’m confused by the description of the center cover being under tension to get it in place. It shouldn’t be.
|
|
|
|
|
Logged
|
|
|
|
gordonv
Member
Posts: 5766
VRCC # 31419
Richmond BC
|
|
« Reply #46 on: May 27, 2019, 07:26:44 PM » |
|
I’m confused by the description of the center cover being under tension to get it in place. It shouldn’t be.
My thought too. After getting it into the frame, the bottom seated in it's grommet, I placed it towards the back, and the arms with the bolt holes aren't in the right place. Push/pull/bend/twist, and it's only out like 3/16", but I need to apply pressure to get the bolts in to mount it. There is the main wire harness on the right side top, and it seems to be making contact with it. But I can't move it at all. There was the extra wire from the front, that was running down that side, and I had to move it to get another 1/4" over on the cover. I don't believe there was too much tension on the bolts, and am hoping they won't break the arms. But then, the one I had removed, had both sides broken. So maybe I do need to re-investigate this issue. Maybe add a good strong zap strap on to the wire harness. |
|
|
|
« Last Edit: May 27, 2019, 07:34:36 PM by gordonv »
|
Logged
|
1999 Black with custom paint IS |
|
|
gordonv
Member
Posts: 5766
VRCC # 31419
Richmond BC
|
|
« Reply #47 on: June 01, 2019, 02:33:16 PM » |
|
I made the decision to get that bike back together and running, as there isn't much time and still a lot to do, so I'm bypassing the rear tire change. Started with getting the original exhaust with the 4" truck stacks onto the bike. Messed with it for over an hour, trying to get the left side one on. First it was the kick stand bolt in the way for the headers to rotate onto the studs. Then I couldn't seat them, as the 4" stack was hitting the underside of the bag guards. I was getting too pissed I was going to place a jack under them, and bend them up into place, or remove the whole saddle bags/guards, which should then give me the room. But then I would have to get the guards back on the bike.  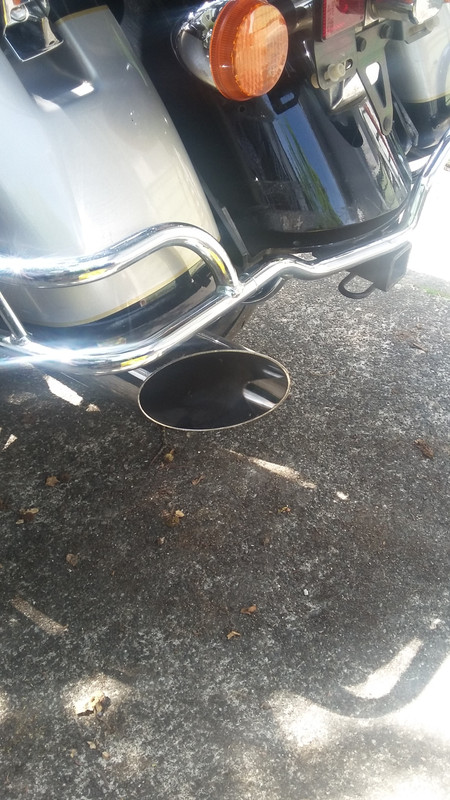 Gave up. Took me 10 min just to get the exhaust off the bike. Grabbed the replacements I had bought NOS OEM for std/T, which I've been using for the last couple of years, and got it in place in 5 mins. Finished the one side, replaced the rear hangers and added in the transformer floor boards, bolted up the rider pegs. Then the right side. Same thing, got it mounted in about 5 min, replaced all the items like the other side.   Started the bike up, warmed it up, turned off the fuel, and waited for it to run out in the carbs. It did. The first time that it died after turning off the fuel. Had some coolant leak, from the cap. Turned it off, bent the tabs down ever so slightly, and put it back on. Ran the bike again, up to full warm up, and seems no further leak. Waiting on the replacement grommets for the pods (old/cracked/missing) before I put them back on. |
|
|
|
« Last Edit: June 05, 2019, 07:23:21 PM by gordonv »
|
Logged
|
1999 Black with custom paint IS |
|
|
|
Dusty
|
|
« Reply #48 on: June 01, 2019, 04:02:12 PM » |
|
When I had issues with exhaust pipes hitting the guards I placed a hydraulic jack under the edge of the bag guard and lifted ever so slightly after loosening all the bag guard bolts . Don't lift too far or you will tip the bike over.
Dusty
|
|
|
|
|
Logged
|
|
|
|
gordonv
Member
Posts: 5766
VRCC # 31419
Richmond BC
|
|
« Reply #49 on: June 05, 2019, 07:35:28 PM » |
|
(added pictures to my recent post above Dusty's reply)
Went back on Tuesday after work. Got the radio plugged in and working. Added the Aux input, threaded through so I can place the player in the tank bib.
Warmed up the bike again, running well except for some "popping" when around 3K rpm. I wonder from exhaust leak, no vacuum lines and new intake o-rings? I just need to snug down the exhaust nuts again. Wanting to do the heat/cooling and snugging those nuts, so I don't loose another one.
I now need to find the wiring schematics for the addition of the trailer plug. I want to confirm the PO has it wired properly. This is the 3rd one for this bike, and I went through one on my GL1500 GW. All the same trailer. So I wonder if the problem is the trailer, more so than the bike? I was going to cut the connector out of the trailer, and hard wire the leads together. Soldier and cover. Then maybe go to LED bulbs, to reduce the draw through the wires.
|
|
|
|
|
Logged
|
1999 Black with custom paint IS |
|
|
|
mrtlc
|
|
« Reply #50 on: June 05, 2019, 07:59:57 PM » |
|
Gordon are you running your trailer direct off your bike wiring? Or do you run a converter off the battery.
|
|
|
|
|
Logged
|
99 Interstate 1500
89 Goldwing sidecar 1500
88 Goldwing 1500
85 Goldwing 1200
84 Gold wing 1200
80 Goldwing 1100
79 Yamaha XT500
78 Honda 750K
+++
|
|
|
|
Paladin528
|
|
« Reply #51 on: June 06, 2019, 09:24:46 AM » |
|
I have heard of trailer converters burning out as well. I had one on mine but since I have no trailer I removed it.
|
|
|
|
|
Logged
|
|
|
|
|
Forge
|
|
« Reply #52 on: June 06, 2019, 12:21:11 PM » |
|
Someone overfilled that tank many times it looks like and the gas under the bib ate away at the paint.
Perhaps they spilled fuel cleaner additives while adding them to the tank. |
|
|
|
|
Logged
|
|
|
|
|
Dusty
|
|
« Reply #53 on: June 06, 2019, 02:51:05 PM » |
|
Someone overfilled that tank many times it looks like and the gas under the bib ate away at the paint.
Perhaps they spilled fuel cleaner additives while adding them to the tank. Or taking a tank off a bike with fuel in it and the bib still in place. When you turn the tank over to store it the fuel leaks out of the filler and soaks the underside of the bib. I didn't have the bib on mine but noticed fuel leaking out of the cap. Mine was turned upside down for checking the petcock screen. Dusty |
|
|
|
|
Logged
|
|
|
|
gordonv
Member
Posts: 5766
VRCC # 31419
Richmond BC
|
|
« Reply #54 on: June 06, 2019, 07:55:32 PM » |
|
Gordon are you running your trailer direct off your bike wiring? Or do you run a converter off the battery.
Yes, the 5 wire to 4 converter. 3rd one on this bike, 5th for the trailer. Maybe I figured out the problem?  Found this broken wire, and there was another one where it goes through the frame. Might be what is causing the right side (side shown) lights to fail. Also the connector I eliminated.  Took the like colored wires, and put them together and soldier them as a group. Then covered with heat shrink and electrical tape. Might go back later sometime and use some liquid electrical tape. As I already mentioned, my bikes wiring is a mess. Some PO changed the wires for a reason. I bought a package of connectors, and I'll rebuild the wires someday. Also need to buy some special Honda (metric) bullet connectors, 3.5 mm, so I can redo the whole rear end, and get that brake light wired in too. As a point of interest, I noticed this before I put the saddle bags back on. The rear drive dust cover, I know there was a bottom, but there also seems to be a top. There's a tab that fits in the top.  |
|
|
|
|
Logged
|
1999 Black with custom paint IS |
|
|
gordonv
Member
Posts: 5766
VRCC # 31419
Richmond BC
|
|
« Reply #55 on: June 06, 2019, 07:58:25 PM » |
|
Someone overfilled that tank many times it looks like and the gas under the bib ate away at the paint.
Perhaps they spilled fuel cleaner additives while adding them to the tank. You mean like brake fluid is supposed to do? |
|
|
|
|
Logged
|
1999 Black with custom paint IS |
|
|
gordonv
Member
Posts: 5766
VRCC # 31419
Richmond BC
|
|
« Reply #56 on: July 21, 2019, 04:09:19 PM » |
|
A follow up on my petcock issue.
As mentioned earlier, my petcock seemed to never turn off the fuel, it wouldn't run out of fuel going down the hwy for 15 min when turned to off.
After removing the tank, and inspecting the functioning of the petcock, it seemed to work fine. No fuel flow in any position, till a vacuum was applied. Then it flowed in run and reserve, but stopped in off. All was well.
Now, I finally tested it on the bike. It's working well. Fuel shut off, and it runs out in about 2 miles. It's never worked like that before. Now I don't need to worry about hydro lock. Still need to test it on a weekly bases.
|
|
|
|
|
Logged
|
1999 Black with custom paint IS |
|
|
|
Bone
|
|
« Reply #57 on: July 21, 2019, 04:24:28 PM » |
|
What about the 6 days and nights before the weekly test ? My luck isn't as good as you believe yours is  |
|
|
|
|
Logged
|
|
|
|
gordonv
Member
Posts: 5766
VRCC # 31419
Richmond BC
|
|
« Reply #58 on: July 21, 2019, 07:23:21 PM » |
|
What about the 6 days and nights before the weekly test ? My luck isn't as good as you believe yours is I feel as long as you know what is the sound of a hydro lock, there is no risk, as long as you only press the starter the once. |
|
|
|
|
Logged
|
1999 Black with custom paint IS |
|
|
gordonv
Member
Posts: 5766
VRCC # 31419
Richmond BC
|
|
« Reply #59 on: August 17, 2019, 01:07:52 PM » |
|
Trying to find out what is causing the lose of power when twisting the throttle to wide open. It's sputtering like spark or fuel. So I tried to get my endoscope working on my new cell phone, but it wont. So I checked the intakes that they where still tight, and they where. Checked the exhaust nuts and tightened them all up. One was loose. Since I couldn't check the intake, I thought I would use my digi-sync for the 1st time. Warmed up the bike. Unpacked the digi, took the pods off, the carb covers, and removed the vacuum lines to the intake runners. I wonder if a failed vacuum plug might be causing my problem?  You see that it was wet. Looks like it collapsed when I installed it. Hooked up the vacuum lines. Added the battery, and fired the bike, and watched what it was reading (centre bottom No. 3).  Tweaked the adjustment screws. Back and forth, one side then the next. Adjusted the rpm too. Was happy with what I could see, so thought I would run up the rpm.  I didn't adjust it at all, just wanted to have some readings. Then let it settle back down and reset the rpm again.  Removed the digi, put everything back together. Got out my new grommets for the pods, found a correct replacement bolt (since I have a lot of spares) to replace a wrong one.  All buttoned up, pulled out the ridding gear, and headed for the highway. The engine seemed smother, and little nicer, responsive. Got on the highway, up to speed, let the traffic clear and then twisted the throttle to wide open. Could still feel that same sputtering/bogging down, not as bad, but still there. Hmmm, more to do with this. |
|
|
|
« Last Edit: August 17, 2019, 01:13:56 PM by gordonv »
|
Logged
|
1999 Black with custom paint IS |
|
|
gordonv
Member
Posts: 5766
VRCC # 31419
Richmond BC
|
|
« Reply #60 on: September 26, 2020, 07:22:31 PM » |
|
Just as a side note. I found this picture of a inner fairing mount repair I did. Thought others might like to see how much breaks away sometimes.  This was on my previous green IS. One item new owners should check, is the condition of their inner fairing screws, and add some anti seize to the screw, so this kind of damage doesn't happen. Repaired with JB Weld. |
|
|
|
« Last Edit: September 27, 2020, 08:36:47 AM by gordonv »
|
Logged
|
1999 Black with custom paint IS |
|
|
|


