|
1NorthRyder
|
 |
« on: November 08, 2017, 07:26:07 AM » |
|
I've taken note that several of you have recommended this, can someone explain to me what all this entails?
|
|
|
|
|
 Logged
|
|
|
|
|
WintrSol
|
|
« Reply #1 on: November 08, 2017, 07:47:34 AM » |
|
|
|
|
|
|
Logged
|
98 Honda Valkyrie GL1500CT Tourer
Photo of my FIL Jack, in honor of his WWII service
|
|
|
|
old2soon
|
|
« Reply #2 on: November 08, 2017, 12:35:09 PM » |
|
desmog indirectly will help-a little-overall performance by eliminating-if desmog done correctly-the vacuum leaks that are inherent with the way our Valkyries left the factory. The rubber vacuum lines dry out with age and leak. You will NOT magically gain 5 H P or 5 M P G. You WILL on the other hand eliminate a LOT of potential vacuum leaks. Never weighed what I removed but a bit more than a pound I'd guess. Take yer time-Not that difficult but do NOT rush it. RIDE SAFE.
|
|
|
|
|
Logged
|
Today is the tommorow you worried about yesterday. If at first you don't succeed screw it-save it for nite check. 1964 1968 U S Navy. Two cruises off Nam.
VRCCDS0240 2012 GL1800 Gold Wing Motor Trike conversion
|
|
|
|
RonW
|
|
« Reply #3 on: November 08, 2017, 12:49:04 PM » |
|
I'm about to do this today, stop by if you want to watch. The biggest decision is whether to cap/crimp the now 6 dangling air tubes to seal it off, or plug the 6 holes where the air tubes use to enter into the cylinder heads eliminating the tubes altogether.
|
|
|
|
|
Logged
|
2000 Valkyrie Tourer
|
|
|
|
da prez
|
|
« Reply #4 on: November 08, 2017, 05:54:38 PM » |
|
14mm freeze plugs and crimp and fill the exhaust tubes if you do not want to make the plates for capping them off.
da prez
|
|
|
|
|
Logged
|
|
|
|
|
1NorthRyder
|
|
« Reply #5 on: November 09, 2017, 05:00:34 AM » |
|
Thanks guys I appreciate the information. I am hesitant to have to re-jet as my technical skills may fail me in that area but the rest looked easy enough.
|
|
|
|
|
Logged
|
|
|
|
|
98valk
|
|
« Reply #6 on: November 09, 2017, 05:34:39 AM » |
|
desmog indirectly will help-a little-overall performance by eliminating-if desmog done correctly-the vacuum leaks that are inherent with the way our Valkyries left the factory. The rubber vacuum lines dry out with age and leak. You will NOT magically gain 5 H P or 5 M P G. You WILL on the other hand eliminate a LOT of potential vacuum leaks. Never weighed what I removed but a bit more than a pound I'd guess. Take yer time-Not that difficult but do NOT rush it. RIDE SAFE.
3 lbs less weight Pair Valves and All plastic and metal tubing 6 lbs less LifePo4 battery 1 lb less plastic more aerodynamic mirrors 1 lb less GL1500 GW rear aftermarket rotor 9 lbs less Viking Exhaust vs OEM |
|
|
|
|
Logged
|
1998 Std/Tourer, 2007 DR200SE, 1981 CB900C 10speed
1973 Duster 340 4-speed rare A/C, 2001 F250 4x4 7.3L, 6sp
"Our Constitution was made only for a Moral and Religious people. It is wholly inadequate to the goverment of any other."
John Adams 10/11/1798
|
|
|
|
da prez
|
|
« Reply #7 on: November 09, 2017, 06:42:23 AM » |
|
Now to start a discussion (another word for fight). Re-jetting is not necessary. A good total rebuild and interstate internals will do wonders. A little relief in the exhaust back pressure will do wonders. round two  da prez |
|
|
|
|
Logged
|
|
|
|
|
98valk
|
|
« Reply #8 on: November 09, 2017, 06:59:34 AM » |
|
Thanks guys I appreciate the information. I am hesitant to have to re-jet as my technical skills may fail me in that area but the rest looked easy enough.
stock airbox, re-jetting is not required. it is actually slightly rich on the top end from the factory. and slightly lean below 3k rpms for emissions testing. |
|
|
|
|
Logged
|
1998 Std/Tourer, 2007 DR200SE, 1981 CB900C 10speed
1973 Duster 340 4-speed rare A/C, 2001 F250 4x4 7.3L, 6sp
"Our Constitution was made only for a Moral and Religious people. It is wholly inadequate to the goverment of any other."
John Adams 10/11/1798
|
|
|
|
cross
|
|
« Reply #9 on: November 09, 2017, 01:43:22 PM » |
|
I just De-smogged mine after carb rebuild. It is running great.
I capped off 6 chrome pipes for now, also capped carb vents but i left the charcoal canister under the bike and fuel tank vent connected to it so that any gas fumes vent into it rather than right below the tank where i would smell it.
It is very straight forward and i didn't re-jet.
Question for the one mentioned Interstate carb internals. Which internals are you referring to and what benefit is it gained with them?
Thanks
Sasha
|
|
|
|
|
Logged
|
|
|
|
|
da prez
|
|
« Reply #10 on: November 09, 2017, 02:14:35 PM » |
|
The interstate springs are a little stronger and give a snappier throttle response. Check ,and the part numbers will be different. There are some other differences the parts breakdown will show.
da prez
|
|
|
|
|
Logged
|
|
|
|
|
98valk
|
|
« Reply #11 on: November 09, 2017, 03:13:27 PM » |
|
The interstate springs are a little stronger and give a snappier throttle response. Check ,and the part numbers will be different. There are some other differences the parts breakdown will show.
da prez
springs are softer, so the vacuum slide and needle moves up faster. similar to an accelerator pump action. ICM has a better curve up to 4k rpms after that all are the same to redline. all other carb parts are the same all models. |
|
|
|
|
Logged
|
1998 Std/Tourer, 2007 DR200SE, 1981 CB900C 10speed
1973 Duster 340 4-speed rare A/C, 2001 F250 4x4 7.3L, 6sp
"Our Constitution was made only for a Moral and Religious people. It is wholly inadequate to the goverment of any other."
John Adams 10/11/1798
|
|
|
|
Leathel
|
|
« Reply #12 on: November 09, 2017, 04:14:05 PM » |
|
all other carb parts are the same all models.
Except those pesky UK models with 78 mains and different main needles in the carbs, also has smaller exhaust tips .. |
|
|
|
|
Logged
|
|
|
|
|
da prez
|
|
« Reply #13 on: November 10, 2017, 07:16:41 AM » |
|
Vaquero , I stand corrected. Right church , wrong pew.
da prez
|
|
|
|
|
Logged
|
|
|
|
|
cross
|
|
« Reply #14 on: November 10, 2017, 11:25:35 AM » |
|
Thank you guys!
Sasha
|
|
|
|
|
Logged
|
|
|
|
|
cross
|
|
« Reply #15 on: November 10, 2017, 07:23:24 PM » |
|
Another question for you Valk gurus,
What is the reason everyone is using hypoid synthetic and not just regular hypoid fluid for the diff?
And second one, when assembling back the diff, manual calls for torquing 4 diff nuts first before installing the wheel but there is a nice write up on here by someone who stated that they need to be only finger tight until axle is torqued first. Can someone explain the reasoning?
I'm ready to put things back together this weekend but i'm having trouble finding hypoid synt gear oil.
Thank you
Sasha
|
|
|
|
|
Logged
|
|
|
|
|
98valk
|
|
« Reply #16 on: November 10, 2017, 07:56:25 PM » |
|
Another question for you Valk gurus,
What is the reason everyone is using hypoid synthetic and not just regular hypoid fluid for the diff?
And second one, when assembling back the diff, manual calls for torquing 4 diff nuts first before installing the wheel but there is a nice write up on here by someone who stated that they need to be only finger tight until axle is torqued first. Can someone explain the reasoning?
I'm ready to put things back together this weekend but i'm having trouble finding hypoid synt gear oil.
Thank you
Sasha
synthetic, 75w90 can be used, slightly better mpg, better wear protection definitely, the final drive can get extremely hot, reason replacement required every 20k miles. Most auto stores sell it. Pg 14-9 of manual is the correct installation procedure for final drive and rear wheel. doing the axle first correctly aligns everything so the final drive hub splines don't wear out. |
|
|
|
|
Logged
|
1998 Std/Tourer, 2007 DR200SE, 1981 CB900C 10speed
1973 Duster 340 4-speed rare A/C, 2001 F250 4x4 7.3L, 6sp
"Our Constitution was made only for a Moral and Religious people. It is wholly inadequate to the goverment of any other."
John Adams 10/11/1798
|
|
|
|
cross
|
|
« Reply #17 on: November 10, 2017, 08:09:51 PM » |
|
Excellent,
Thank you sir
|
|
|
|
|
Logged
|
|
|
|
|
98valk
|
|
« Reply #18 on: November 10, 2017, 08:28:31 PM » |
|
actually manual states 24,000 miles change-out not 20k and that is with dino oil. syn oil will allow a longer change interval. I use amsoil and last change had about 35k miles on the oil. everything looks new with a total of 52k miles.
|
|
|
|
|
Logged
|
1998 Std/Tourer, 2007 DR200SE, 1981 CB900C 10speed
1973 Duster 340 4-speed rare A/C, 2001 F250 4x4 7.3L, 6sp
"Our Constitution was made only for a Moral and Religious people. It is wholly inadequate to the goverment of any other."
John Adams 10/11/1798
|
|
|
|
cross
|
|
« Reply #19 on: November 10, 2017, 09:06:52 PM » |
|
I just bought this bike with 37k on it and it's been sitting for 8 years so I'm changing all fluids.
It was clear until it got toward the end where it became black. All the internal parts look as new.
One thing about me is that I'm firm believer to what the manufacturer specs to use unless there is a serious benefit for using something else. Even new vtx's have the same gear oil spec as our valk, 80w hypoid. I would think that Honda would change what they are using and recommending if there was benefit especially there isn't that big of a price difference between two types of gear fluid.
I'm having a difficulty finding this synthetic hypoid fluid so I may just go with dyno hypoid, I'll have to see
Thank you sir
|
|
|
|
|
Logged
|
|
|
|
|
Leathel
|
|
« Reply #20 on: November 11, 2017, 03:59:05 PM » |
|
I went synthetic on my last bike for final drive as if pushing it in the corners would have oil coming out the breather with Dino...never had it happen again when I went synthetic...so just went syn with the valk too
|
|
|
|
|
Logged
|
|
|
|
|
northernvalk
|
|
« Reply #21 on: November 11, 2017, 04:52:00 PM » |
|
shell make a 75w synthetic hyphiod. I buy it in 5 gal pails for the diffs on the land cruiser.
|
|
|
|
|
Logged
|
|
|
|
|
The emperor has no clothes
|
|
« Reply #22 on: November 11, 2017, 05:22:52 PM » |
|
I went synthetic on my last bike for final drive as if pushing it in the corners would have oil coming out the breather with Dino...never had it happen again when I went synthetic...so just went syn with the valk too
I've never heard of that. Do you think it was foaming up or something ? |
|
|
|
|
Logged
|
|
|
|
|
cross
|
|
« Reply #23 on: November 11, 2017, 06:03:42 PM » |
|
I found Lucas at Home Depot! Who would of thought!
Rear wheel was a major bitch until I figured it out. It was much easier with rear section of the fender removed.
Both wheels cleaned, polished and mounted. Tomorrow brake overhaul and cleaning of chrome exhaust
Thanks guys
Sasha
|
|
|
|
|
Logged
|
|
|
|
|
cross
|
|
« Reply #24 on: November 11, 2017, 06:04:50 PM » |
|
I went synthetic on my last bike for final drive as if pushing it in the corners would have oil coming out the breather with Dino...never had it happen again when I went synthetic...so just went syn with the valk too
I've never heard of that. Do you think it was foaming up or something ? Perhaps it was way overfilled? |
|
|
|
|
Logged
|
|
|
|
|
98valk
|
|
« Reply #25 on: November 11, 2017, 07:41:45 PM » |
|
I found Lucas at Home Depot! Who would of thought!
Rear wheel was a major bitch until I figured it out. It was much easier with rear section of the fender removed.
Both wheels cleaned, polished and mounted. Tomorrow brake overhaul and cleaning of chrome exhaust
Thanks guys
Sasha
I would avoid Lucas oils. Has failed many tests over the yrs. failed for foaming, air provides zero protection, and being out of grade. http://goodsenseoil.com/G2457-GearOilWhitePaper.pdftheir oil has been found to be out of grade http://www.pqiamerica.com/May%202013/lucas.htm |
|
|
|
|
Logged
|
1998 Std/Tourer, 2007 DR200SE, 1981 CB900C 10speed
1973 Duster 340 4-speed rare A/C, 2001 F250 4x4 7.3L, 6sp
"Our Constitution was made only for a Moral and Religious people. It is wholly inadequate to the goverment of any other."
John Adams 10/11/1798
|
|
|
|
Leathel
|
|
« Reply #26 on: November 11, 2017, 07:50:49 PM » |
|
I went synthetic on my last bike for final drive as if pushing it in the corners would have oil coming out the breather with Dino...never had it happen again when I went synthetic...so just went syn with the valk too
I've never heard of that. Do you think it was foaming up or something ? Perhaps it was way overfilled? Not overfull, level set as per spec |
|
|
|
|
Logged
|
|
|
|
|
Leathel
|
|
« Reply #27 on: November 11, 2017, 07:57:08 PM » |
|
I went synthetic on my last bike for final drive as if pushing it in the corners would have oil coming out the breather with Dino...never had it happen again when I went synthetic...so just went syn with the valk too
I've never heard of that. Do you think it was foaming up or something ? I guess so, was after a high speed run followed but some peg scraping corners, wasn't happy to see oil flicked on to the tire (looked bad but would have been very little spread out) checked the levels when home and they were fine so changed to syn, repeated the same run and no issue, that was on my 93VT1100C |
|
|
|
|
Logged
|
|
|
|
|
cross
|
|
« Reply #28 on: November 11, 2017, 08:05:25 PM » |
|
I found Lucas at Home Depot! Who would of thought!
Rear wheel was a major bitch until I figured it out. It was much easier with rear section of the fender removed.
Both wheels cleaned, polished and mounted. Tomorrow brake overhaul and cleaning of chrome exhaust
Thanks guys
Sasha
I would avoid Lucas oils. Has failed many tests over the yrs. failed for foaming, air provides zero protection, and being out of grade. http://goodsenseoil.com/G2457-GearOilWhitePaper.pdftheir oil has been found to be out of grade http://www.pqiamerica.com/May%202013/lucas.htmArgh! Too late! So what do you use, Amsoil severe gear? That one seems to have done good on the tests Thanks |
|
|
|
|
Logged
|
|
|
|
|
98valk
|
|
« Reply #29 on: November 11, 2017, 08:27:56 PM » |
|
I found Lucas at Home Depot! Who would of thought!
Rear wheel was a major bitch until I figured it out. It was much easier with rear section of the fender removed.
Both wheels cleaned, polished and mounted. Tomorrow brake overhaul and cleaning of chrome exhaust
Thanks guys
Sasha
I would avoid Lucas oils. Has failed many tests over the yrs. failed for foaming, air provides zero protection, and being out of grade. http://goodsenseoil.com/G2457-GearOilWhitePaper.pdftheir oil has been found to be out of grade http://www.pqiamerica.com/May%202013/lucas.htmArgh! Too late! So what do you use, Amsoil severe gear? That one seems to have done good on the tests Thanks I use amsoil gear and transmission oils. however other top tier syn brands are just as good, mobil, valvoline, castrol, etc. |
|
|
|
|
Logged
|
1998 Std/Tourer, 2007 DR200SE, 1981 CB900C 10speed
1973 Duster 340 4-speed rare A/C, 2001 F250 4x4 7.3L, 6sp
"Our Constitution was made only for a Moral and Religious people. It is wholly inadequate to the goverment of any other."
John Adams 10/11/1798
|
|
|
|
cross
|
|
« Reply #30 on: November 11, 2017, 10:41:13 PM » |
|
Got it,
Thank you
|
|
|
|
|
Logged
|
|
|
|
|
cross
|
|
« Reply #31 on: November 12, 2017, 08:17:11 AM » |
|
|
|
|
|
|
Logged
|
|
|
|
|
cross
|
|
« Reply #32 on: November 12, 2017, 08:27:39 AM » |
|
I had trouble installing rear wheel yesterday. Once i had it on the final drive I couldn't slide caliper holder, there was about an 8th or so more needed. I tried pulling the wheel against the final drive trying to get on more but it wouldn't go more. Additionally, it wasn't on straight either until I slide axle all the way through. Finally i pulled left side of the swing arm a bit and caliper mount went in. Now, I didn't torque it yet so I have question, the plastic around the final drive where it touches the wheel, should it be in all the way to the ridge? Please see picture 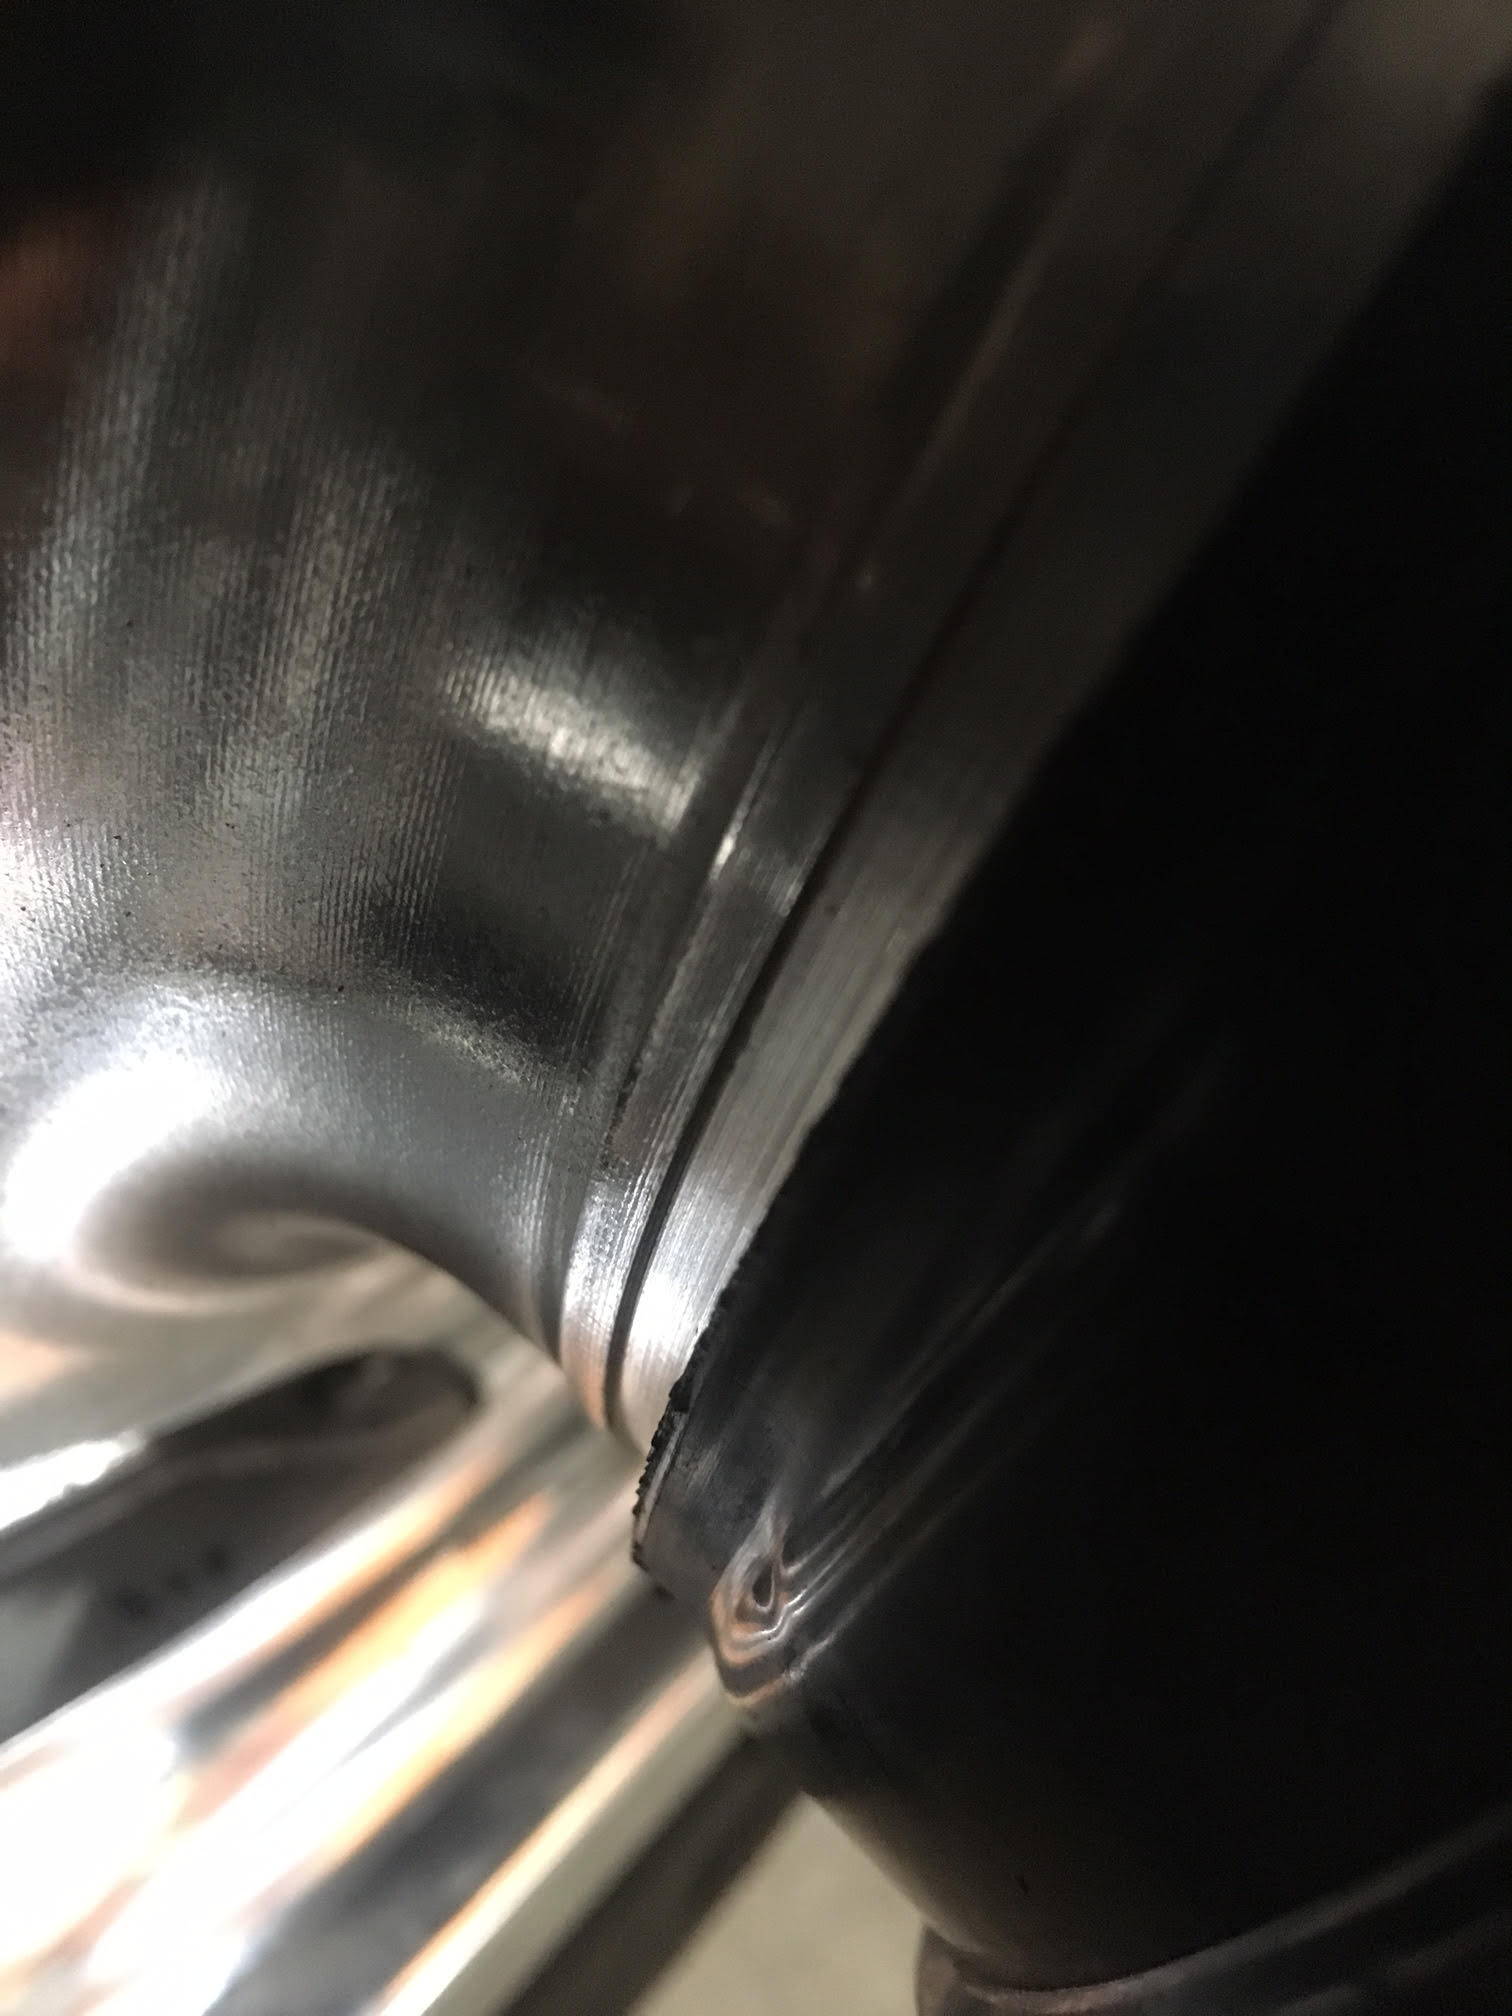 http://photo.vrccservices.com/albums/userpics/28588/2.jpg http://photo.vrccservices.com/albums/userpics/28588/2.jpgThanks Sasha |
|
|
|
|
Logged
|
|
|
|
|
Jess from VA
|
|
« Reply #33 on: November 12, 2017, 09:24:29 AM » |
|
No the dust cover (plastic around the final drive) doesn't go to the groove, and that has thrown many people (me too). Taking pictures before disassembly always seems like a good idea, after you have taken everything apart.  The best trick on reassembly is to push the axle all the way back though without the caliper in place. Get the pumpkin/wheel mated up good (and level), THEN pull the axle back out just enough to get the caliper in. (Especially working alone, that crap gets heavy and hard on the back..... and the patience.) Grease the axle. Best how-to (but you have to have the program to view it): http://www.valkyrieriders.com/shoptalk/rear_end_service.pptx |
|
|
|
« Last Edit: November 12, 2017, 09:28:03 AM by Jess from VA »
|
Logged
|
|
|
|
|
cross
|
|
« Reply #34 on: November 12, 2017, 09:28:45 AM » |
|
That's the way I had to do it, the way you described.
As far as torque sequence goes,
4 final drive nuts finger tight
Torque axle nut
Torque 4 final drive nuts
This all while wheel is off the ground
Correct?
Thank you
|
|
|
|
|
Logged
|
|
|
|
|
Jess from VA
|
|
« Reply #35 on: November 12, 2017, 09:30:06 AM » |
|
Yes, I think that is right.
|
|
|
|
|
Logged
|
|
|
|
|
cross
|
|
« Reply #36 on: November 12, 2017, 09:52:07 AM » |
|
Thank you guys!
|
|
|
|
|
Logged
|
|
|
|
|


