Jersey
Member

Posts: 545
VRCC #37540
Southern Maryland
|
 |
« on: November 25, 2018, 05:59:48 PM » |
|
ADD THIS TO YOUR LIST OF REQUIRED UPGRADES!So, we've successfully completed the first round of group purchase for my Shifter Mod!! The responses from everyone have been great! The improvement makes shifting solid (no more sloppiness or wearing of parts!!), the cost is reasonable and installation is very easy. With this success, I'll be continuing to take orders for group purchases. I'll continue to submit orders for 10 or more pre-paid units for as long as people want to get this. I'll also try to keep a few extra units on hand if I can so folks won't have to wait. If you're reading this, just assume that a new list is being organized and send a PM. HERE'S A VIDEO ON HOW IT WORKS! https://youtu.be/qS00ngInIngNotice how solid and stable the shifting becomes with this second support. The cost is still $70, which includes shipping. Just PM me or paypal as 'friends' to my email address ggatinc@gmail.com.The parts are laser cut from Shiny 304 Stainless Steel and uses all chrome hardware. The goal is for a 'factory look'. Don't hesitate to PM if you have any questions. Also, I encourage those who've already received these to post what they think of the modification.   
|
|
|
|
« Last Edit: January 19, 2019, 10:04:50 AM by Jersey »
|
 Logged
|
Jersey
|
|
|
|
Ken aka Oil Burner
|
|
« Reply #1 on: November 25, 2018, 06:46:08 PM » |
|
Looks good. Looks less "industrial" than mine, which was done with the U-bolt plates from McMaster Carr per the post by ammpro (R.I.P.). Definitely tightened up the freeplay in the shifter.
|
|
|
|
|
Logged
|
|
|
|
Tfrank59
Member
Posts: 1364
'98 Tourer
Western Washington

|
|
« Reply #2 on: November 25, 2018, 08:42:30 PM » |
|
Yeah that's a great looking job. My question to you is does it take much more force to upshift than without it? And would you mind maybe posting some specs as to how you built it? We haven't heard much on this topic for a few years but my shifter has gotten sloppier over that time.
|
|
|
|
|
Logged
|
-Tom
Keep the rubber side down. USMC '78-'84
'98 Valkyrie, ‘02 VTX 1800, '96 Royal Star, '06 Drifter, '09 Bonneville, '10 KTM 530, '04 XR 650, '76 Bultaco, '81 CR 450, '78 GS 750...
|
|
|
MarkT
Member
Posts: 5197
VRCC #437 "Form follows Function"
Colorado Front Range - elevation 2.005 km
|
|
« Reply #3 on: November 25, 2018, 09:42:03 PM » |
|
Yep. This architecture works. Yours appears to have the same fn as Ammpro's, which was to anchor the outter end of the shifter shaft with a pivot point concentric to the rotational axis of the shifter shaft at it's exit from the casing. I did the same mod to 2 of my daily riders (pictured below). Works well.
|
|
|
|
|
Logged
|
|
|
|
|
RonW
|
|
« Reply #4 on: November 26, 2018, 07:28:13 AM » |
|
Jersey, is it possible to post a video? Just a few seconds long video.
|
|
|
|
|
Logged
|
2000 Valkyrie Tourer
|
|
|
Jersey
Member
Posts: 545
VRCC #37540
Southern Maryland
|
|
« Reply #5 on: November 26, 2018, 08:16:51 AM » |
|
All credit goes to Ammpro (R.I.P.), which is the design I used to figure out the dimension for this single piece. http://www.valkyrieforum.com/bbs/index.php/topic,81509.0.html Here are the details for what I did above using the Flange Bushing from McMaster (2938T2):  While the bushing is a good approach I am concerned about the lifespan of that material. Other members have designs using a Heim connector, which I think would be far superior in this regard. I may look into that. Also, the M8 hole must be drilled midway on the shift level to ensure the angle is set correctly for the Bushing hole to line up with the centerline of the shifter rod into the trans TFrank59: Yes, the shifting is MUCH better. Solid. No wiggle and requires much less pressure. We've always joked about the amount of effort to shift our fat ladies... this reduces that quite a lot. |
|
|
|
|
Logged
|
Jersey
|
|
|
Jersey
Member
Posts: 545
VRCC #37540
Southern Maryland
|
|
« Reply #6 on: November 26, 2018, 08:17:59 AM » |
|
Jersey, is it possible to post a video? Just a few seconds long video.
I'll try and post one. Maybe I'll mount my gopro (like) camera down there to see it in action. |
|
|
|
|
Logged
|
Jersey
|
|
|
Tfrank59
Member
Posts: 1364
'98 Tourer
Western Washington
|
|
« Reply #7 on: November 26, 2018, 08:36:24 AM » |
|
Thanks for posting. So I'm a little confused--what does the 7/16-20 cap screw do? what is it threaded into, the shift lever? (can't see behind the plate with 3 holes) Also could you provide a dimension between holes for the short link between the crash bar mount and the plate with 3 holes?
|
|
|
|
|
Logged
|
-Tom
Keep the rubber side down. USMC '78-'84
'98 Valkyrie, ‘02 VTX 1800, '96 Royal Star, '06 Drifter, '09 Bonneville, '10 KTM 530, '04 XR 650, '76 Bultaco, '81 CR 450, '78 GS 750...
|
|
|
Jersey
Member
Posts: 545
VRCC #37540
Southern Maryland
|
|
« Reply #8 on: November 26, 2018, 08:52:56 AM » |
|
Thanks for posting. So I'm a little confused--what does the 7/16-20 cap screw do? what is it threaded into, the shift lever? (can't see behind the plate with 3 holes) Also could you provide a dimension between holes for the short link between the crash bar mount and the plate with 3 holes?
Thanks. Forgot to include that. The dimension on the crash bar part is 1.25" center to center. One hole is M8 (crash bar mount), the other is 3/8" (Bushing) I found that Ammpro's M10 bolt still had some wiggle space, whereas, the 7/16" fits very snug inside. Also, the 7/16x1" bolt needs to be ground down to 7/8" so that it can be tightened to the plate while not pushing too far into the spline area. |
|
|
|
|
Logged
|
Jersey
|
|
|
|
Kaahn
|
|
« Reply #9 on: November 26, 2018, 09:23:14 AM » |
|
I wish I knew someone in Cali that could do this to my bike  |
|
|
|
|
Logged
|
Garage:
1973 Honda C70
1999 Honda Magna
1997 Honda Valkyrie
1995 Honda Goldwing
|
|
|
Jersey
Member
Posts: 545
VRCC #37540
Southern Maryland
|
|
« Reply #10 on: November 26, 2018, 10:06:38 AM » |
|
I wish I knew someone in Cali that could do this to my bike Give me a little time to perfect the design and maybe something can be worked out.  The primary thing is to get it chromed so it doesn't rust. That's always a bit of a cost. Since having it stamped our of 3/16" steel isn't cost effective, there's also a bit of labor to making it so it works and looks good. |
|
|
|
|
Logged
|
Jersey
|
|
|
Tfrank59
Member
Posts: 1364
'98 Tourer
Western Washington
|
|
« Reply #11 on: November 26, 2018, 10:24:29 AM » |
|
well I'm thinking of making mine out of stainless and of course use stainless fasteners. Also, for the bushing material I'd use alum brz which holds up plenty good. But I was wondering if the spacer where it mounts to the crash bar has to be so long--is that for clearance when the lever swings? Just curious. Thanks again.
|
|
|
|
|
Logged
|
-Tom
Keep the rubber side down. USMC '78-'84
'98 Valkyrie, ‘02 VTX 1800, '96 Royal Star, '06 Drifter, '09 Bonneville, '10 KTM 530, '04 XR 650, '76 Bultaco, '81 CR 450, '78 GS 750...
|
|
|
Jersey
Member
Posts: 545
VRCC #37540
Southern Maryland
|
|
« Reply #12 on: November 26, 2018, 10:53:33 AM » |
|
well I'm thinking of making mine out of stainless and of course use stainless fasteners. Also, for the bushing material I'd use alum brz which holds up plenty good. But I was wondering if the spacer where it mounts to the crash bar has to be so long--is that for clearance when the lever swings? Just curious. Thanks again.
My picture includes a longer-than-needed bolt. It was all I had on hand. So I added that black spacer just to make it work. The final version will use a M8x110mm bolt. Thought about the stainless steel. Problem is the cutting/drilling/grinding/sanding will result in rust forming... plus it won't match the rest of the chrome. You can't see it, but I also added a round thin washer in between the two pieces to reduce the contact area and level of friction. I'm figuring once it gets chromed, I'll use something like a hard plastic thin washer as a spacer. |
|
|
|
|
Logged
|
Jersey
|
|
|
|
turtle254
|
|
« Reply #13 on: November 26, 2018, 11:03:59 AM » |
|
I'm in for one
|
|
|
|
|
Logged
|
|
|
|
Tfrank59
Member
Posts: 1364
'98 Tourer
Western Washington
|
|
« Reply #14 on: November 26, 2018, 11:11:52 AM » |
|
Well stainless steel is stainless throughout so it won't rust by drilling it or otherwise machining it. The chromium and nickel content in stainless slows the corrosion process to almost nothing. As far as that thin washer you could also make that out of bronze but nylon would probably also hold up fine for many years.
|
|
|
|
« Last Edit: November 26, 2018, 11:28:30 AM by Tfrank59 »
|
Logged
|
-Tom
Keep the rubber side down. USMC '78-'84
'98 Valkyrie, ‘02 VTX 1800, '96 Royal Star, '06 Drifter, '09 Bonneville, '10 KTM 530, '04 XR 650, '76 Bultaco, '81 CR 450, '78 GS 750...
|
|
|
|
WintrSol
|
|
« Reply #15 on: November 26, 2018, 11:59:52 AM » |
|
I note that, in the original mod by aampro that he used 1-1/4" center to center between the pivot and spline, and spline to the added hole in the shift lever. How did you arrive at your distances of 1-7/32" and 1-1/8" (and the 2-3/8")?
|
|
|
|
|
Logged
|
98 Honda Valkyrie GL1500CT Tourer
Photo of my FIL Jack, in honor of his WWII service
|
|
|
|
Avanti
|
|
« Reply #16 on: November 26, 2018, 02:57:16 PM » |
|
I wish I knew someone in Cali that could do this to my bike Give me a little time to perfect the design and maybe something can be worked out. The primary thing is to get it chromed so it doesn't rust. That's always a bit of a cost. Since having it stamped our of 3/16" steel isn't cost effective, there's also a bit of labor to making it so it works and looks good. You could have each piece, including the holes, laser cut out of polished stainless steel. |
|
|
|
|
Logged
|
|
|
|
gordonv
Member
Posts: 5766
VRCC # 31419
Richmond BC
|
|
« Reply #17 on: November 26, 2018, 05:11:51 PM » |
|
(can't see behind the plate with 3 holes)
At least you can see something, I see nothing but the angle drawing. I know this had come up before, someone posting on another pic host site, and maybe something about my Mozzilla browser. |
|
|
|
|
Logged
|
1999 Black with custom paint IS   |
|
|
|
The emperor has no clothes
|
|
« Reply #18 on: November 26, 2018, 05:37:56 PM » |
|
(can't see behind the plate with 3 holes)
At least you can see something, I see nothing but the angle drawing. I know this had come up before, someone posting on another pic host site, and maybe something about my Mozzilla browser. It's not on your end Gordon. The pic was showing earlier, but now it's gone. |
|
|
|
|
Logged
|
|
|
|
|
WintrSol
|
|
« Reply #19 on: November 26, 2018, 07:38:51 PM » |
|
(can't see behind the plate with 3 holes)
At least you can see something, I see nothing but the angle drawing. I know this had come up before, someone posting on another pic host site, and maybe something about my Mozzilla browser. It's not on your end Gordon. The pic was showing earlier, but now it's gone. Been and gone twice for me; photobucket!  |
|
|
|
|
Logged
|
98 Honda Valkyrie GL1500CT Tourer
Photo of my FIL Jack, in honor of his WWII service
|
|
|
|
pancho
|
|
« Reply #20 on: November 27, 2018, 02:50:36 AM » |
|
Hey Jersey, you picture seems to be gone,,, I had this same problem using Google photos, I fixed it by moving the pictures I wanted to use on this board to a separate album and making that album public.
I have been putting this mod off for too long, I'm going to cut a piece out today (If nothing interferes) and experiment a bit.
|
|
|
|
|
Logged
|
The most expensive things you will purchase, are those things you would not have needed if you had listened and obeyed.
|
|
|
|
indybobm
|
|
« Reply #21 on: November 27, 2018, 04:15:48 AM » |
|
To see the original picture, try right clicking in the blank image space and select 'open image in new tab'.
|
|
|
|
|
Logged
|
So many roads, so little time
VRCC # 5258
|
|
|
Jersey
Member
Posts: 545
VRCC #37540
Southern Maryland
|
|
« Reply #22 on: November 27, 2018, 04:55:03 AM » |
|
Pic should be back up now.
|
|
|
|
|
Logged
|
Jersey
|
|
|
|
pancho
|
|
« Reply #23 on: November 27, 2018, 08:03:23 AM » |
|
I note that, in the original mod by aampro that he used 1-1/4" center to center between the pivot and spline, and spline to the added hole in the shift lever. How did you arrive at your distances of 1-7/32" and 1-1/8" (and the 2-3/8")?
I'm wondering about that too Jersey,,, did you make a more careful measurement of the shifter shaft offset and angle? or what? Picture is being displayed. |
|
|
|
|
Logged
|
The most expensive things you will purchase, are those things you would not have needed if you had listened and obeyed.
|
|
|
Jersey
Member
Posts: 545
VRCC #37540
Southern Maryland
|
|
« Reply #24 on: November 27, 2018, 08:22:25 AM » |
|
I note that, in the original mod by aampro that he used 1-1/4" center to center between the pivot and spline, and spline to the added hole in the shift lever. How did you arrive at your distances of 1-7/32" and 1-1/8" (and the 2-3/8")?
I'm wondering about that too Jersey,,, did you make a more careful measurement of the shifter shaft offset and angle? or what? Picture is being displayed. I started with Ammpro's exact design and then evaluated how well the rotation was on aligned with the support bracket off the engine guard mount. His design allowed for slight adjustments. Once it was looking very solid, I measured the holes (triangle shown) and then fabricated the piece. With that done I mounted and did another inspected of the alignment. It look really good so posted what I found. |
|
|
|
|
Logged
|
Jersey
|
|
|
|
turtle254
|
|
« Reply #25 on: November 27, 2018, 08:27:03 AM » |
|
Looks to me a simpler way would be to say just fold back the 3 hole plate at 90 deg to the back side of shifter arm at the screw for clamp. Using that as a hold point and thus make a very simple 90 deg clip to move around the base pivot point.
|
|
|
|
|
Logged
|
|
|
|
|
Wayn-O
|
|
« Reply #26 on: November 27, 2018, 09:18:53 AM » |
|
Definitely not everyone has the tools or know-how to fabricate something like this. But people would probably buy these as a bolt-on set if it came with instructions.
|
|
|
|
|
Logged
|
2000 GL1500C Valkyrie
2003 VT1100C Shadow Spirit
1998 VT1100C Shadow Spirit
1983 VF750C V45 Magna
|
|
|
Tfrank59
Member
Posts: 1364
'98 Tourer
Western Washington
|
|
« Reply #27 on: November 27, 2018, 09:37:51 AM » |
|
I'd go so far as to buy the instructions, at a reasonable price, if a complete parts list and detailed drawings were included |
|
|
|
|
Logged
|
-Tom
Keep the rubber side down. USMC '78-'84
'98 Valkyrie, ‘02 VTX 1800, '96 Royal Star, '06 Drifter, '09 Bonneville, '10 KTM 530, '04 XR 650, '76 Bultaco, '81 CR 450, '78 GS 750...
|
|
|
|
turtle254
|
|
« Reply #28 on: November 27, 2018, 09:46:30 AM » |
|
Looks like this is year and model specify. My dim. from frame bolt and trans shaft is only 5/8"
The shifter arm is 1 1/2" between holes ( std. dim) This means the bearing will be hard to place
with only 5/8" between frame bolt and trans shaft. 98 Standard
|
|
|
|
|
Logged
|
|
|
|
Jersey
Member
Posts: 545
VRCC #37540
Southern Maryland
|
|
« Reply #29 on: November 27, 2018, 10:08:28 AM » |
|
Looks like this is year and model specify. My dim. from frame bolt and trans shaft is only 5/8"
The shifter arm is 1 1/2" between holes ( std. dim) This means the bearing will be hard to place
with only 5/8" between frame bolt and trans shaft. 98 Standard
This was made for the '99 I/S, so may work on all of the 99-01 series. I just checked the parts listing and both the ARM (24711-MN5-000) and the Pedal (24701-MZ0-000) are the same for All Valkyries 97-03. What will make a difference is exactly which spline each of these parts use in assembly on the shafts. The ARM is 32T ?? and the Pedal is 28T ?? That gives quite a few options of the angles that can be generate. Just to make it fun!! |
|
|
|
« Last Edit: November 27, 2018, 10:35:05 AM by Jersey »
|
Logged
|
Jersey
|
|
|
Jersey
Member
Posts: 545
VRCC #37540
Southern Maryland
|
|
« Reply #30 on: November 27, 2018, 10:13:58 AM » |
|
I wish I knew someone in Cali that could do this to my bike Give me a little time to perfect the design and maybe something can be worked out. The primary thing is to get it chromed so it doesn't rust. That's always a bit of a cost. Since having it stamped our of 3/16" steel isn't cost effective, there's also a bit of labor to making it so it works and looks good. oh, I like that idea! Can you recommend anyone to do this? You could have each piece, including the holes, laser cut out of polished stainless steel. |
|
|
|
« Last Edit: November 27, 2018, 10:20:02 AM by Jersey »
|
Logged
|
Jersey
|
|
|
|
Avanti
|
|
« Reply #31 on: November 27, 2018, 10:43:25 AM » |
|
All credit goes to Ammpro (R.I.P.), which is the design I used to figure out the dimension for this single piece. http://www.valkyrieforum.com/bbs/index.php/topic,81509.0.html Here are the details for what I did above using the Flange Bushing from McMaster (2938T2): While the bushing is a good approach I am concerned about the lifespan of that material. Other members have designs using a Heim connector, which I think would be far superior in this regard. I may look into that. Also, the M8 hole must be drilled midway on the shift level to ensure the angle is set correctly for the Bushing hole to line up with the centerline of the shifter rod into the trans TFrank59: Yes, the shifting is MUCH better. Solid. No wiggle and requires much less pressure. We've always joked about the amount of effort to shift our fat ladies... this reduces that quite a lot. Am I missing something? 1 7/32 (1.21875) + 1 1/8 (1.125) = 2.34375 With a 2 3/8 (2.375) top triangle leg you can not make a triangle with the other two legs. 2.375 - 2.34375 = 0.03125 You need two legs to add up to more than 2 3/8 (2.375) |
|
|
|
|
Logged
|
|
|
|
Jersey
Member
Posts: 545
VRCC #37540
Southern Maryland
|
|
« Reply #32 on: November 27, 2018, 10:49:18 AM » |
|
All credit goes to Ammpro (R.I.P.), which is the design I used to figure out the dimension for this single piece. http://www.valkyrieforum.com/bbs/index.php/topic,81509.0.html Here are the details for what I did above using the Flange Bushing from McMaster (2938T2): While the bushing is a good approach I am concerned about the lifespan of that material. Other members have designs using a Heim connector, which I think would be far superior in this regard. I may look into that. Also, the M8 hole must be drilled midway on the shift level to ensure the angle is set correctly for the Bushing hole to line up with the centerline of the shifter rod into the trans TFrank59: Yes, the shifting is MUCH better. Solid. No wiggle and requires much less pressure. We've always joked about the amount of effort to shift our fat ladies... this reduces that quite a lot. Am I missing something? 1 7/32 (1.21875) + 1 1/8 (1.125) = 2.34375 With a 2 3/8 (2.375) top triangle leg you can not make a triangle with the other two legs. 2.375 - 2.34375 = 0.03125 You need two legs to add up to more than 2 3/8 (2.375) You're probably correct. This was measured with a shop ruler. One of us passed 8th grade Trig!!! Still working on the details and would need more exact measurements if I go the laser cutting route. Thanks!! Just checked my scratch pad. Found the Error: Side B is 1-3/16 (not 1-1/8). |
|
|
|
« Last Edit: November 27, 2018, 10:57:09 AM by Jersey »
|
Logged
|
Jersey
|
|
|
|
pancho
|
|
« Reply #33 on: November 27, 2018, 01:26:09 PM » |
|
Looks like this is year and model specify. My dim. from frame bolt and trans shaft is only 5/8"
The shifter arm is 1 1/2" between holes ( std. dim) This means the bearing will be hard to place
with only 5/8" between frame bolt and trans shaft. 98 Standard
When I examined my bike I saw the same thing, that there is not clearance to place the pivot bushing exactly where it should be for the truest operation with the linkage set where I have mine. Obviously this modification works as you are having good results Jersey, and many have followed Aampros design with good results. I decided to try a different method to get optimal placement of the pivot point. I am making an arm to extend to the pivot point that will be welded to the shifter rod, and will make the other arm to fit between the spacer and crash bar and cut the spacer down... or just make another piece to replace the spacer. If it works out well, I will start a topic.  |
|
|
|
|
Logged
|
The most expensive things you will purchase, are those things you would not have needed if you had listened and obeyed.
|
|
|
|
turtle254
|
 |
« Reply #34 on: November 27, 2018, 01:37:43 PM » |
|
|
|
|
|
|
Logged
|
|
|
|
|
RonW
|
|
« Reply #35 on: November 27, 2018, 01:46:37 PM » |
|
Looks to me a simpler way would be to say just fold back the 3 hole plate at 90 deg to the back side of shifter arm at the screw for clamp. Using that as a hold point and thus make a very simple 90 deg clip to move around the base pivot point.
That's another option but you still gotta figure out the 90° offset. Going on your idea, in the graphic below, the bracket makes two 90° turns. In this rendition the bracket doesn't need to pivot around the engine guard bolt since it doesn't involve a shackle movement. Actually the bracket should be locked in place to prevent slop. Don't know if the engine guard bolt is able to keep the bracket from pivoting on the long term basis but perhaps the bracket could be pinned etc.   |
|
|
|
|
Logged
|
2000 Valkyrie Tourer
|
|
|
|
turtle254
|
|
« Reply #36 on: November 27, 2018, 02:27:43 PM » |
|
No, not center on trans shaft. pivot point has to be center on trans shaft to not bind. circle motion around the shaft.
|
|
|
|
|
Logged
|
|
|
|
mrgeoff
Member
Posts: 193
My 99 CT..."Liahona"
Augusta, GA.
|
|
« Reply #37 on: November 27, 2018, 04:51:10 PM » |
|
These all sound great...would these designs work with the Rattle Bar Heel/Toe Shifter...??? Dimensions are a bit different due to the H/T Shifter...!!!
|
|
|
|
|
Logged
|
mrgeoff/SANDMAN
|
|
|
|
RonW
|
|
« Reply #38 on: November 27, 2018, 08:12:17 PM » |
|
No, not center on trans shaft. pivot point has to be center on trans shaft to not bind. circle motion around the shaft.
opps, I see now. The shifter arm swings in an arc (revolves) instead of rotating on a set axis like an axle sticking out of a wheel. A support bracket then has to duplicate the shifter arm's arc. To avoid binding requires equal radius on both shifter arm bracket and support bracket, plus the support bracket's hole has to be aligned with the trans shaft to clock the radius properly. Perhaps alignment is what turtle254 pancho is trying to do welding that metal piece to the shifter arm. It still requires a second bracket. The second bracket holds the other bracket in place. I had to replace the shifter seal which wasn't all that difficult. Dunno about the level of wear and tear on the bearing on the trans shaft. 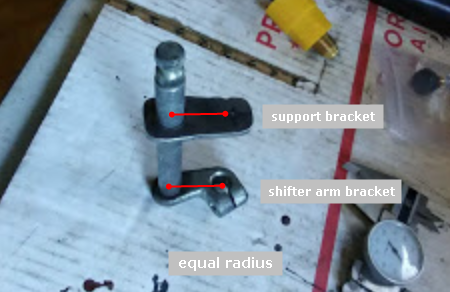 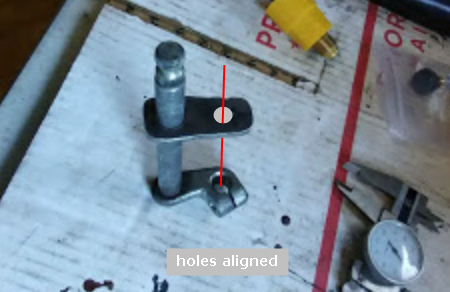 |
|
|
|
« Last Edit: November 28, 2018, 10:12:03 AM by RonW »
|
Logged
|
2000 Valkyrie Tourer
|
|
|
|
pancho
|
|
« Reply #39 on: November 28, 2018, 02:45:53 AM » |
|
Lets keep in mind boys that this is Jerseys topic about HIS improvement to the shifter mod,,, hijacking is frowned upon. Maybe start another topic if there is interest in discussing other modifications.
|
|
|
|
|
Logged
|
The most expensive things you will purchase, are those things you would not have needed if you had listened and obeyed.
|
|
|
|


