gordonv
Member

Posts: 5766
VRCC # 31419
Richmond BC
|
 |
« on: June 24, 2019, 05:30:56 PM » |
|
I inspected my alternator during my projects. Since I didn't have time, I didn't replace the brushes. I figured there was a good 10K miles + of life left, so next winter would be soon enough. Got the bike on the road the other week, in time for our annual Rally. A few days driving it to-from work, nothing long, no issues. 3 days into our 4 day rally, on a 1/4 leg of a circle run, and after fueling up noticed that I only had 11.9V showing on my installed mutli meter on the IS (time/Volt/Temp). You can see it not on, above the instrument display. Or in the link below.  meters http://www.valkyrieforum.com/bbs/index.php/topic,73199.0.htmlPulled over, turn off the heated vest, no change, volt dropped to 11.8V. Talked it over with George, my fellow rider. My volt meter was in my Tupperware, which was in the trailer rather than my saddle bags. I did have 2 sets of brushes with me. The short of it was George volunteered to follow me back the way we had come, the shortest route, back to Merritt, so we could swap batteries if needed and get my bike back, where we had a spare alternator in my trailer. Thank you George for taking the extra hours to do that! Pulled the fuse for the head lights. We made it back the whole 100 Km (60m) without needing to change batteries. Voltage was showing 11.3V on my bikes meter. Got out the volt meter, and confirmed what we suspected after going out and buying a new 9V battery for the digital meter. Compared it to the working Valk, just so we knew we where doing it right. Battery voltage, off and running, alternator at my dog bone fuse (power off the alt), all confirmed my bike wasn't charging.  (pic just before adding on the alt wiring) Out came the spare alt. Moved the bike into some shade, on the centre stand, and out came the tools and remove the failed alternator, then the replacement back in. Thanks Mike for thinking of throwing a spare alternator into my trailer for the Rally, so we wouldn't need it, since we had it with us. But here I was after inspecting my alternator and thinking I was OK, replacing it on my 1st trip. Thanks Dave from Idaho, who offered to drive over to Canadian Tire auto and pick up some grease for me, as the alternator dampeners weren't holding in place. But after "gluing" them in with the grease, for the second time in the same day, I had the alt into the bike frame trying to line up the splines, which took me longer than getting the alt in. I'll get a close up pic of the alternator, but there is a low spot on it, and with the negative cable out of the way, and pushing the hose in towards the center, I got the alt out and in very quickly, after rotating, and lowering it. I figure I didn't take 2 minutes, twice, to get the alt into the point of trying to align it with the engine dampeners. Bolted down, battery reconnected and good to go. Fired it up, and had 13.6V showing on meter now. A job well done.  Ran it for a while. Then suited up and drove out for a quick 20 mile drive down the Hwy to the next exit, turn around and come back. Good reading on the drive, and after parking, showed 12.6V again. Done. Next morning, reading was 12.4V. I'll most likely be buying a new battery one day, when I'm ready to add a spare battery into my trailer, and I'll use the one from the bike for that, lighting for the trailer. |
|
|
|
« Last Edit: March 16, 2024, 06:34:35 PM by gordonv »
|
 Logged
|
1999 Black with custom paint IS   |
|
|
|
Bighead
|
|
« Reply #1 on: June 24, 2019, 05:35:45 PM » |
|
Pretty much happens with out warning.
|
|
|
|
|
Logged
|
1997 Bumble Bee
1999 Interstate (sold)
2016 Wing
|
|
|
gordonv
Member
Posts: 5766
VRCC # 31419
Richmond BC
|
|
« Reply #2 on: June 25, 2019, 06:58:07 PM » |
|
I've been thinking of this, wondering what went wrong. I think it was the brushes where fine, but the tail/wire was short. So the brush only had a little more movement to the armature, which is why I lost output from it.
I'll know soon enough when I fix my alt. This is what I'm expecting.
|
|
|
|
|
Logged
|
1999 Black with custom paint IS |
|
|
|
6adan
|
|
« Reply #3 on: June 26, 2019, 05:13:19 AM » |
|
Can a 90amp alternator be used on a Valkrie? I have had one on my GL1500 and it will charge at idle.
|
|
|
|
|
Logged
|
1970 CB750JDM, 1975 GL1000, 1979 GL1000 semi cafe, 1979 CBX, 1995 GL1500 SE, 2008 GL1800 trike. Several more not running yet.
|
|
|
|
The emperor has no clothes
|
|
« Reply #4 on: June 26, 2019, 07:21:52 AM » |
|
Can a 90amp alternator be used on a Valkrie? I have had one on my GL1500 and it will charge at idle.
I have a 85 amp one. I run my idle kind of low at 800. It doesn’t usually get out of the red till it’s up to about 1100 rpm’s. |
|
|
|
|
Logged
|
|
|
|
|
RWhitehouse
|
|
« Reply #5 on: June 26, 2019, 08:47:32 AM » |
|
Maybe the alt on mine has been swapped by a previous owner, but I show 14.4v across the battery from about as low as 600rpm. Even my dash voltmeter (which is tied to the clearance light circuit) reports 14+v up there at idle, which on mine hovers around 900-950rpm or so. When the fan kicks on that drops to about 13.2v so still charging even with the fan on. Voltage stays locked to no higher than 14.5v at any RPM.
I always thought it was strange how I'd frequently see people saying "Valks don't charge at idle". Mine always has. I don't really have any non stock electrical accessories on the bike besides a USB outlet, and that only pulls a few watts if I happen to have something plugged into it.
Bike has about 50k on it at this point. The alternator's case looks as oxidized/aged as the rest of the engine (bike lived near the gulf coast for most of it's life), so I kind of doubt it's been swapped out. Maybe rebuilt? Dunno.
|
|
|
|
« Last Edit: June 26, 2019, 08:49:44 AM by RWhitehouse »
|
Logged
|
|
|
|
|
Chrisj CMA
|
|
« Reply #6 on: June 26, 2019, 09:15:02 AM » |
|
Maybe the alt on mine has been swapped by a previous owner, but I show 14.4v across the battery from about as low as 600rpm. Even my dash voltmeter (which is tied to the clearance light circuit) reports 14+v up there at idle, which on mine hovers around 900-950rpm or so. When the fan kicks on that drops to about 13.2v so still charging even with the fan on. Voltage stays locked to no higher than 14.5v at any RPM.
I always thought it was strange how I'd frequently see people saying "Valks don't charge at idle". Mine always has. I don't really have any non stock electrical accessories on the bike besides a USB outlet, and that only pulls a few watts if I happen to have something plugged into it.
Bike has about 50k on it at this point. The alternator's case looks as oxidized/aged as the rest of the engine (bike lived near the gulf coast for most of it's life), so I kind of doubt it's been swapped out. Maybe rebuilt? Dunno.
I agree with you on the charging. Mine has always shown 14V at idle (900 or so). Sorry about the corroded engine. Someone not cleaning her regularly. Mine started first five years of life in Ft Lauderdale Fl (thats right on the water) For the last 17 years Ive had her up near Pensacola, still on the gulf coast. But some say I am a clean freak. My engine and alternator still looks new at 165K miles  |
|
|
|
|
Logged
|
|
|
|
|
Paladin528
|
|
« Reply #7 on: June 26, 2019, 09:47:12 AM » |
|
Can the slip rings on the alternator be filed / sanded? I checked my brushes a while back and they will need to be replaced before long but the 2 slip rings are pretty rough. Any issue with cleaning them up?
|
|
|
|
|
Logged
|
|
|
|
|
Chrisj CMA
|
|
« Reply #8 on: June 26, 2019, 10:02:59 AM » |
|
Can the slip rings on the alternator be filed / sanded? I checked my brushes a while back and they will need to be replaced before long but the 2 slip rings are pretty rough. Any issue with cleaning them up?
Are you talking about the brass contacts? you dont want to sand them but Im sure there is a way to clean them up some with maybe a clean cloth and some rubbing alcohol |
|
|
|
|
Logged
|
|
|
|
|
RWhitehouse
|
|
« Reply #9 on: June 26, 2019, 01:38:04 PM » |
|
Do people rebuild these themselves or is it just cheaper/easier to swap the whole thing out? I see Honda sells just the brushes for like $9. I can't imagine a rebuild is much more involved than cleaning up the contacts and armature, new brushes, and maybe bearings if needed.
I noticed the commonly available "new replacement" alternators for the Valk/GW1500 all have identical stock photos and are usually listed as "hitachi style" or "hitachi fitment", inferring to me they are not in fact a Hitachi but a generic copy. I'd probably rather rebuild my OE alternator than replace it with a generic of maybe questionable quality.
Mine is working perfectly fine, but being alt failure is one of the very few things that can leave this bike stranded, I wouldn't mind doing a preventative "refresh", since for all I know it's the 21 year old original, and these seem to just go kaput with essentially zero warning. Kind of like pinion cups that have been ignored for 20+ years.
|
|
|
|
|
Logged
|
|
|
|
Grandpot
Member
Posts: 630
Rolling Thunder South Carolina Chapter 1
Fort Mill, South Carolina
|
|
« Reply #10 on: June 26, 2019, 02:01:10 PM » |
|
Ken Hemming has given us great service for many years. He will exchange a totally rebuilt alternator for you. http://mysite.ncnetwork.net/resp3jbj/ |
|
|
|
|
Logged
|
 Experience is recognizing the same mistake every time you make it. |
|
|
|
oldsmokey
|
|
« Reply #11 on: June 26, 2019, 04:19:58 PM » |
|
My 99 let go last year. 23K original miles. An interstate portable jump pack got it back about fifty miles with a few farts and skips at the final couple miles. Brushes ok. Found an issue in the windings. Was there not a time frame when mfg. locations changed and quality dropped? 1995 maybe. I tossed in a old 89 spare, no new brushes  |
|
|
|
|
Logged
|
|
|
|
baldo
Member
Posts: 6961
Youbetcha
Cape Cod, MA
|
|
« Reply #12 on: June 26, 2019, 04:22:20 PM » |
|
I installed one of his HO units before Inzane. It's working as advertised. |
|
|
|
|
Logged
|
|
|
|
gordonv
Member
Posts: 5766
VRCC # 31419
Richmond BC
|
|
« Reply #13 on: July 06, 2019, 02:32:19 PM » |
|
I've been thinking of this, wondering what went wrong. I think it was the brushes where fine, but the tail/wire was short. So the brush only had a little more movement to the armature, which is why I lost output from it.
I'll know soon enough when I fix my alt. This is what I'm expecting.
Spent the day trying to fix my alt. Since I was expecting the brushes to be bad, I just did that (BIG MISTAKE!). So I removed the brushes, prepped them up, and proceeded to install them.  Have been thinking how hard it was to get the brush's wire tail through the hole, so how could I make this easier? It's been a week, and I thought, run a fine wire through the hole, and soldier it to the brush. The hole is a little small, so tried a small drill bit, but without a drill/holder, it was taking too long. Had a set of needle files in the garage, so used one of them to enlarge the wire hole. Worked great! Old telephone wire through. Soldier brush onto wire.   Pulled. Ready to go.  Service manual shows 18 mm (.71 in) of the brush to be exposed after installed/soldiered. Brush is 20 mm, you want me to get 2 mm into the barrel? Hell no, press it in, till it seemed stable, hold wire, then re-soldier the brush's wire lead, cut wire back to the soldier, and you're done. Just reassemble as required. Insure your alignment marks are good, and button it all up. Then install it in the bike. Took a couple of other pics, showing how I found out that the rounded edge of the alt is what gives you clearance to twist/align the alt into the bike. Pull the negative lead away from the work area, push the drain tubes the other direction, remove alt bolts, pull or pry gently the alt out of the engine. Once you clear the drive, I remove the locating pins, rotate and align alt till you can rotate it 90' towards you. Remove the leads/wires. Remove. Inspect the dampeners, that they're being held firmly in the drive. If not, wipe dry and apply a little grease, then stick them back in. In with the replacement alt. In, wire it up, rotate to get the drive into the engine. Put the alignment pins back on. Being mindful of the rounded edge, insure that is at the horizontal cross member of the frame, the one that is always in the way.   It's easy once you know what it is you're looking for. Got it installed in 2-3 minutes. I use the motor oil resting in the open alt drive, and lube the sides if the engine. Bolt it in. Reconnect the battery, and time to start it up. Start the bike, and it shows no charging! 11.9 V. OK, give the brushes a little time to seat. Rev the engine. Nothing. No joy. Pull the alternator. Get it to the bench. Take it apart, and do what I should have done, get the meter out. Refer to the Service manual. What do I test? The rotor coil. Collar to collar, no reading. Each collar to it's wire, no reading, scrap off the lacquer that is most likely coating the wires, now a reading from the winding to one collar. Same for the other. But from wire-to-wire, nothing. So the rotor coil is kaput, I need a repair shop or a replacement alternator. Dumb ass, I should have saved myself removing the working alt, swapping out the bad rebuild, and back with the spare alt. Would have saved myself 3 hours of work. But I did have some of mom's nice baking, and chatting over a coffee, so it's not totally wasted time. Now to look for a replacement spare to buy. Time to read up to see if there is any follow up reports of those cheap new alts, or if I should buy a used one, or repair my failed unit. Decisions, decisions, decisions. |
|
|
|
« Last Edit: July 06, 2019, 03:00:46 PM by gordonv »
|
Logged
|
1999 Black with custom paint IS |
|
|
|
Dirty Dave
|
|
« Reply #14 on: July 07, 2019, 03:38:21 AM » |
|
Just a heads up to another possible alternator "no charge" problem.
My 97 wasn't charging last year so I swapped out the alternator and still had the same problem.
Alternator was a new GoldWing model that I spun the bracket around on.
Turns out there is a small wire at the alternator that must "see" 12+ volts for charging to
happen. Corrosion at a connector was keeping that from happening so once cleaned all
was well.
BTW, It now charges at a idle which it didn't before.
|
|
|
|
|
Logged
|
It's weird being the same age as old people
|
|
|
gordonv
Member
Posts: 5766
VRCC # 31419
Richmond BC
|
|
« Reply #15 on: July 07, 2019, 06:21:19 AM » |
|
Turns out there is a small wire at the alternator that must "see" 12+ volts for charging to
happen. Corrosion at a connector was keeping that from happening so once cleaned all
was well.
BTW, It now charges at a idle which it didn't before.
So is this wire inside the alt, or the one on the outside that goes from the power lead/plug/condenser? |
|
|
|
|
Logged
|
1999 Black with custom paint IS |
|
|
gordonv
Member
Posts: 5766
VRCC # 31419
Richmond BC
|
|
« Reply #16 on: July 07, 2019, 10:52:25 AM » |
|
Reading a few posts. Found one of mine, about a used GW I picked up for $25. Nothing like that now, that I need one, on ebay. Everyone wants close ot $100 and up. Reading posts, and found this one from BonS, rare electrical. http://www.valkyrieforum.com/bbs/index.php/topic,86618.0.htmlAnother person said they had a high output. I found that. https://www.rareelectrical.com/i-26902595-new-12v-90-amp-alternator-fits-goldwing-high-amp-output-lr140-708c-31100-mt2-005.htmlMy co-rider likes using her (mine) heated vest all the time, wouldn't hurt having those extra 50 amps. I like. Only another $30 than current used ones. It looks like it will all depend on how quickly before I need an alternator in our local parts availability stores, to return the one I'm currently using. |
|
|
|
« Last Edit: August 25, 2020, 05:17:18 PM by gordonv »
|
Logged
|
1999 Black with custom paint IS |
|
|
|
Dirty Dave
|
|
« Reply #17 on: July 07, 2019, 03:36:20 PM » |
|
If you look beside the stud on the alternator that takes a nut for there is a 2 pin connector .
That's the wire I'm referring to. Never noticed it in the past until I had the "no charge" problem.
Got stuck out of the country once when my alternator died. I have 3 now just in case.
No Valkyrie alternators were available in the tri-state area at the time. Didn't realise
at the then the "spin the bracket" trick on a std GoldThing unit. Can you believe the
difference in price between the two? Honda.......
|
|
|
|
|
Logged
|
It's weird being the same age as old people
|
|
|
gordonv
Member
Posts: 5766
VRCC # 31419
Richmond BC
|
|
« Reply #18 on: August 11, 2019, 02:20:18 PM » |
|
Just a little follow up on my dead alternator. Seems the rotor coil would cost a min of $200 to get it rewound. At this price, I went and bought a new replacement via amazon. I've now received it, and will look at installing it, I hope, this week, so it can be tested this weekend drive.
|
|
|
|
|
Logged
|
1999 Black with custom paint IS |
|
|
|
da prez
|
|
« Reply #19 on: August 11, 2019, 03:16:38 PM » |
|
The question on the slip ring. N O sandpaper. I use a smooth fine tooth file to reface them. I have done hundreds of them and electric motors. I chuck them in my drill press or lathe and file just enough off the smooth out the surface. I then have a small tool to slightly cut down the mica (if it is still used) between the segments. It is the same procedure used in rebuild shops.
da prez
|
|
|
|
|
Logged
|
|
|
|
|
Bagger John - #3785
|
|
« Reply #20 on: August 12, 2019, 06:27:58 AM » |
|
The question on the slip ring. N O sandpaper. I use a smooth fine tooth file to reface them.
The thing we're looking for here is known as a commutator dressing stick. Any motor or alternator rebuilding shop should know where to get them (or have them in stock). I'd also check with Grainger. |
|
|
|
|
Logged
|
|
|
|
gordonv
Member
Posts: 5766
VRCC # 31419
Richmond BC
|
|
« Reply #21 on: August 12, 2019, 03:53:14 PM » |
|
I see I hadn't taken a picture of the rotor coil with the slip ring. It was heavily grooved. But then, so was George's, also a 99'. Pictures show a flat surfaced one.
In my case, the rotor being dead, I have no reason to touch it. But I will keep it, in case I get a press and am able to tear it apart and try to rewind it. (and get a picture too)
|
|
|
|
|
Logged
|
1999 Black with custom paint IS |
|
|
gordonv
Member
Posts: 5766
VRCC # 31419
Richmond BC
|
|
« Reply #22 on: August 16, 2019, 05:07:10 PM » |
|
I picked up my new GW alternator via Amazon, and spent yesterday evening installing. OEM style 55A, $120. https://www.amazon.com/gp/product/B0149DSJDI/ref=ppx_yo_dt_b_asin_title_o00_s00?ie=UTF8&psc=1Not having the right size screw driver to remove the 3 long case bolts, I used my impact driver to loosen them with a quick tap. The case halves moved so easily to the next position, to clock the mounting tabs to where they should be for the Valkyrie, then re-tightened. 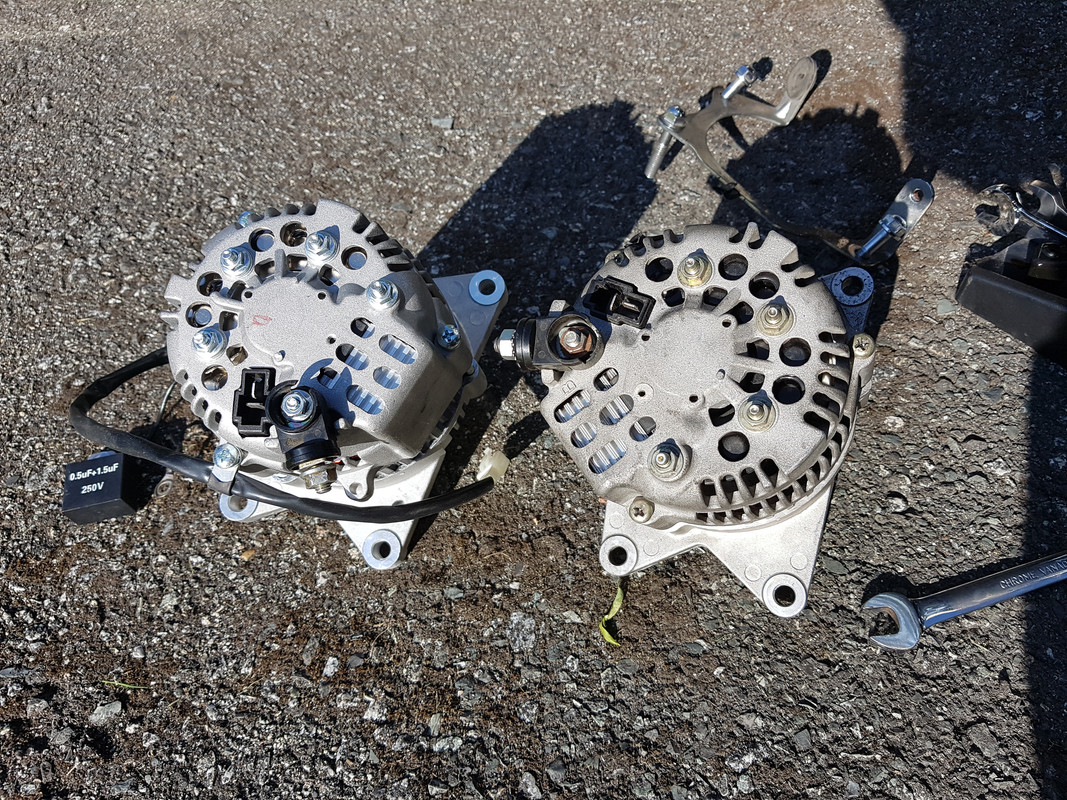 GW on left, OEM on right I then added the capacitor I had for the CB, and swapped the positive bolt and it's housing from my used alt to the replacement (I liked the OEM one better). I tried to replace the connector/condenser cable from the wire harness, but couldn't get my hands to disconnect it, and if I did, I don't think I could reattach the replacement one. I think I would need to remove the batter box to do this operation. I know it says to disconnect, in the service manual, but I've always removed it from the alternator, and left it connected to the bike. I struggled for an hour trying to get the new alternator into the engine, but struggled with the dampeners and alignment. Then I made sure I had the before mentioned negative lead and the drains hose pushed out of the way, and it went in within 1 minute. I then pulled it out as little as I could, installed the alignment pins into the alternator, but they wouldn't go in far enough. Should have installed them while the new alternator was on the bench. So I placed them into the engine side, and pressed the alternator home. It only went so far before I couldn't press it in further. So I took a chance, placed the bolts in, and tightened them up so there was a little pressure on them. Wiggled the alt back/forth and pressed it in more, and those bolts could be tightened up more by hand. Repeated till I was about a 1/8th" gap and then slowly tightened with my wrench. All well. Battery reconnected, and started the bike up. Running at a low idle, 600-700 rpm, and my volt meter showed 13.8v , very nice. Revved and got 14.0v . Will see how well it works in the long term, and the output. I tried to take a picture of my volt meter with the bike running, but it seems the camera eye sees better, and the voltage doesn't display all at once, but was actually flickering on the camera screen. |
|
|
|
« Last Edit: August 16, 2019, 06:51:28 PM by gordonv »
|
Logged
|
1999 Black with custom paint IS |
|
|
mello dude
Member
Posts: 998
Half genius, half dumazz whackjob foole
Dayton Ohio
|
|
« Reply #23 on: August 16, 2019, 10:36:46 PM » |
|
Gordon, thanks for this thread... I looked your Amazon page and there must be 25 choices... how did you choose?
Was wondering what is a typical life for the OEM alternator?
Thanks
|
|
|
|
|
Logged
|
* There's someone in my head, but it's not me.......
* Mr. Murphy was an optimist....
* There's a very fine line between Insanity and Genius.....
* My get up and go, must have got up and went.....
|
|
|
gordonv
Member
Posts: 5766
VRCC # 31419
Richmond BC
|
|
« Reply #24 on: August 17, 2019, 08:23:52 AM » |
|
Gordon, thanks for this thread... I looked your Amazon page and there must be 25 choices... how did you choose? It does? When I click it, I get the one I bought at the top. NEW ALTERNATOR FITS HONDA GOLDWING 31100-MT2-005 LR140-708C 31100-MT2-015 Was wondering what is a typical life for the OEM alternator? Unknown. Every 25-50K miles, it should be opened and blown out. In 2014 my 60K 88' GW brushes stuck from the dust. Cleaned and worked again. My 105K 99' IS should have replaced the brushes. Alternator failed 1K later, replaced brushes without testing (as per my linked post), and found that the rotor coil failed. Ask Bruce (DDT) how many alternators/brushes he's gone through on his 600K+ bike. |
|
|
|
« Last Edit: December 23, 2020, 08:22:19 PM by gordonv »
|
Logged
|
1999 Black with custom paint IS |
|
|
|
HBFL
|
|
« Reply #25 on: August 19, 2019, 04:04:25 PM » |
|
My 99 I/S at 75,000 has 13.6 at idle and 14.3 above. But these threads make me nervous, just like the concerns about the rear left bearing going. So I just got the LActrical 95 amp GW alt off Amazon. Why the 95 amp? It had the most reviews at 82, and the “true review “ site had the same average, 3.7 after kicking out a slew of reviews as questionable. I’m not settled on a plan yet but I think I’ll run it and research reconditioning the stock alt. After that one will be a backup in my trunk. And the next rear tire change I’ll do the double left rear bearing mod. I need at least another 20 years outa the Valk and I’ll be 80 then. My dads 86 and he’s still riding his 1150 beemer. Hope!
|
|
|
|
|
Logged
|
|
|
|
|
Mapper
|
|
« Reply #26 on: August 20, 2019, 02:15:47 PM » |
|
Gordon,
Sounds like applying grease to the spacers helped cut time, right? How long did it take you to swap out alternators from start to finish? I'm getting a direct replacement: what other tips can you offer?
Thanks for the thread!
|
|
|
|
|
Logged
|
|
|
|
gordonv
Member
Posts: 5766
VRCC # 31419
Richmond BC
|
|
« Reply #27 on: August 21, 2019, 04:06:32 PM » |
|
I think I mentioned in the above, when in Merritt it only took me like 1/2 hr to do the whole job. It took longer because I didn't have grease and needed to get some. Alternator when placing back in, with the tubes and neg wire out of the way (George pulled them right out), keeping in mind the alt has a round end corner and a square one, I got it back in in less than 5 min. The GW recommended having the opening of the dampeners at 12-3-6-9. I found it worked for me at the diagonals instead, I thought less gravity to pull down the top dampener. What I just thought about last night, was why not place the dampeners on the alternator instead? With the last one, I think I took about 1-1/2 hrs, and had a hell of a time getting it in. Then I moved the tubes/lead, and it went right in. I'm sure bad eye site, and the sun behind me, then being dark at the dampeners, all helped in making it a long job. Good luck. My 99 I/S at 75,000 has 13.6 at idle and 14.3 above. But these threads make me nervous, just like the concerns about the rear left bearing going.
Rather thinking this a common problem, I would be more likely to add a voltmeter on our Valks to have an early warning system, than to replace the alternator. Maintenance on the alt every 20-25K miles, and inspect the brushes is what I would recommend. I went out on a nice ride last night, 140 miles, and the resting voltage or the ridding voltage, is sitting at 13.8V-13.9V . I don't think I ever saw a 14V or 13.7V . |
|
|
|
« Last Edit: August 21, 2019, 04:18:26 PM by gordonv »
|
Logged
|
1999 Black with custom paint IS |
|
|
gordonv
Member
Posts: 5766
VRCC # 31419
Richmond BC
|
|
« Reply #28 on: August 24, 2019, 07:22:26 PM » |
|
Follow up, 1 week latter and about 250 miles, and the alternator has failed. At 200 miles, I noticed the volt reading was going down to 13.4V, and was getting noisy. By the time we got to our half way point and lunch, I had battery voltage displayed more often than a charging volt. Had a quick lunch, and went out to the bike and swapped it out again for the spare one I just happened to be carrying, Just In Case! (actually to give back to it's owner Mike, on this ride)  I recorded it, so now it's time to contact the Amazon seller and and see how their warranty is.  |
|
|
|
« Last Edit: December 23, 2020, 08:25:20 PM by gordonv »
|
Logged
|
1999 Black with custom paint IS |
|
|
gordonv
Member
Posts: 5766
VRCC # 31419
Richmond BC
|
|
« Reply #29 on: August 25, 2019, 07:09:54 PM » |
|
Reply from Amazon seller, on a Sunday. Amazon Seller - Discount Starter and Alternator Good Evening, Please return the alternator to 5020 Houston RD,Macon, GA 31216. Once you have shipped the unit please contact us with the tracking information,we will issue a replacement. Thank you, -Ashley I'll do this as soon as I can, and keep everyone informed. Fingers crossed.  |
|
|
|
« Last Edit: August 25, 2019, 07:13:38 PM by gordonv »
|
Logged
|
1999 Black with custom paint IS |
|
|
|
RWhitehouse
|
|
« Reply #30 on: August 27, 2019, 07:52:10 AM » |
|
Hmm, not a great sign the first one munched itself in a couple hundred miles. It's good if the warranty holds water, but still the inconvenience of having to swap the spare in, mail it back, wait, and then swap again and hope the second one works.
On a whim I pulled the cover off mine, which I believe to be the original to my '98 with a little over 50k. Grabbed the blowgun and blasted air in all the vents I could get at and a TON of dust blew out.
Voltage was still 14+ before and after, no change there. In all likelihood that was 21 years worth of dust and brush wear in there, but maybe not a bad idea to blow it out every now and then.
|
|
|
|
|
Logged
|
|
|
|
|
rockbobmel
|
|
« Reply #31 on: August 30, 2019, 04:26:00 PM » |
|
|
|
|
|
|
Logged
|
2002 Valkyrie GL1500CD
1996 Shadow 1100 ACE
|
|
|
|
Mapper
|
|
« Reply #32 on: September 04, 2019, 03:19:30 PM » |
|
What I just thought about last night, was why not place the dampeners on the alternator instead?
Your advice was very helpful! While I was trying to put the alternator in, I tried your idea about putting the dampeners on the alternator, and didn't have any luck with that. The original way you mentioned works much better for me! |
|
|
|
|
Logged
|
|
|
|
gordonv
Member
Posts: 5766
VRCC # 31419
Richmond BC
|
|
« Reply #33 on: September 04, 2019, 05:58:23 PM » |
|
Thanks for the follow up Mapper. I just got in from swapping out my alternator, so I can give the spare back to it's owner, so he'll have it for his trip. I had forgotten to try those dampeners on the alt fins.
I also found it's important to wipe off the oil from everything before placing the grease on the dampeners and trying to get them to stick. It took me a little longer to get it in, but then I found 1/2 of a dampener had fallen, but a long screw driver was able to lift it, and in went the alternator.
|
|
|
|
« Last Edit: August 01, 2020, 08:42:03 AM by gordonv »
|
Logged
|
1999 Black with custom paint IS |
|
|
|
The emperor has no clothes
|
|
« Reply #34 on: September 04, 2019, 06:01:39 PM » |
|
Thanks for the follow up Mapper. I just got in from swapping out my alternator, so I can give the spare back to it's owner, so he'll have it for his trip. I had forgotten to try those dampeners on the alt fines.
I also found it's important to wipe off the oil from everything before placing the grease on the dampeners and trying to get them to stick. It took me a little longer to get it in, but then I found 1/2 of a dampener had fallen, but a long screw drive was able to lift it, and in went the alternator.
I don't think there is any chance you'd be able to install the alternator with the dampers on it vs. inside the drive unit. |
|
|
|
|
Logged
|
|
|
|
|
Mapper
|
|
« Reply #35 on: September 06, 2019, 12:13:34 PM » |
|
Thanks for the follow up Mapper. I just got in from swapping out my alternator, so I can give the spare back to it's owner, so he'll have it for his trip. I had forgotten to try those dampeners on the alt fines.
I also found it's important to wipe off the oil from everything before placing the grease on the dampeners and trying to get them to stick. It took me a little longer to get it in, but then I found 1/2 of a dampener had fallen, but a long screw drive was able to lift it, and in went the alternator.
I don't think there is any chance you'd be able to install the alternator with the dampers on it vs. inside the drive unit. It was just an idea Gordon mentioned with using grease... I didn't spend more than about a minute trying to do it that way since the grease isn't sticky enough to keep the dampeners in place while trying to get the alternator in... maybe if you superglue the dampeners in... |
|
|
|
|
Logged
|
|
|
|
gordonv
Member
Posts: 5766
VRCC # 31419
Richmond BC
|
|
« Reply #36 on: September 21, 2019, 06:32:56 PM » |
|
Replacement alternator shipped back to me on the 3rd. Arrived yesterday, and I picked it up today from the US mail house. Opened it up, and I'm sure it was my same alternator. Gave it a quick spin, no noise, but very tight. Tighter than I think it was before when I first got it.
I failed to post, but shipping it back cost me $36 UPS ground. For a $100-$120 alternator, I was thinking it might be cheaper to fix it myself. If it fails again, I defenently will open it up and inspect it, for that possibility. Or just buy another, maybe the 40A one instead for $100 and free shipping.
I'll be busy soon, putting this back into my bike, so I can get some miles on it, before putting the bike away for the winter. An 8 hr day round trip out of the city should get me a nice 3-400 miles.
|
|
|
|
« Last Edit: August 01, 2020, 08:43:47 AM by gordonv »
|
Logged
|
1999 Black with custom paint IS |
|
|
gordonv
Member
Posts: 5766
VRCC # 31419
Richmond BC
|
|
« Reply #37 on: August 01, 2020, 08:46:49 AM » |
|
Just a quick follow up. I didn't insure my bike this year, medical issue and COVID. We've our annual Rally this Sept, so am thinking/hoping to insure it just for a week and ride there. But the first time we went to Grand Forks, I brought my convertible to the MC Rally, and I might do that again too.
I'll try to post again after getting a few thousand miles on the replacement (rebuilt) alternator.
|
|
|
|
|
Logged
|
1999 Black with custom paint IS |
|
|
|
Iswing
|
|
« Reply #38 on: August 01, 2020, 05:48:36 PM » |
|
I just replaced my alternator, and now I have oil leaking (a lot). Is there any other o-ring besides the outside diameter one? What did I do wrong?
|
|
|
|
|
Logged
|
|
|
|
|
The emperor has no clothes
|
|
« Reply #39 on: August 01, 2020, 06:01:28 PM » |
|
I just replaced my alternator, and now I have oil leaking (a lot). Is there any other o-ring besides the outside diameter one? What did I do wrong?
likely cut or nicked the o-ring while installing it. |
|
|
|
|
Logged
|
|
|
|
|


