Valkyrie Riders Cruiser Club
November 25, 2025, 10:52:43 AM *
Welcome, Guest. Please login or register.

Login with username, password and session length
Ultimate Seats Link VRCC Store
Homepage : Photostash : JustPics : Shoptalk : Old Tech Archive : Classifieds : Contact Staff
News: If you're new to this message board, read THIS!
 
VRCC Calendar Ad
Pages: [1]   Go Down
Print
Author Topic: Well, she is (still) a work in progress.........  (Read 813 times)
Strider
Member
*****
Posts: 1409


Why would anyone shave a cow like that?

Broussard, Louisiana


« on: November 28, 2014, 05:35:17 PM »

Traveller that is.  Took the carbs apart when I was home last time but must have had a stuck float and she would go back and forth between idle and full throttle when I put the gas to her.  Then with the float, she started pouring gas out the air rails.  Ran out of time and had to go back to the ebolaland of Africa for a month.  Well, after a month, my time was done and it was time to fly back across the big pond back home.


Right before I left home, I ordered a new set of slow jets, main jets (105/35), pilot screw removal tool and a set of float needles.  They were waiting for me when I got home.


So, again, off came the carb package and air box.........got to clean the gas gunk back off the block from when the gas was coming out the air rail......


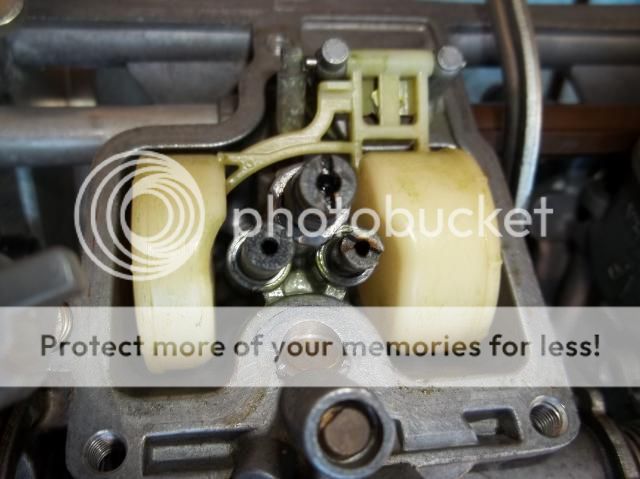
The BEFORE shot......bowls had been cleaned last time, but cleaned and put in the old jets.....time for  new ones.


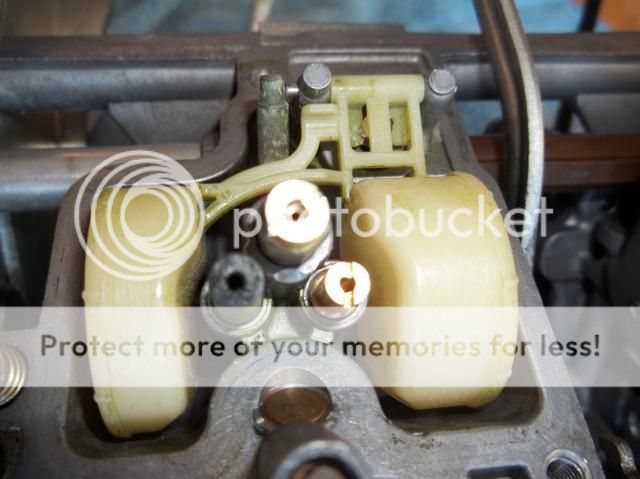
Pulled the pilot screws and replaced with new o rings, washer and springs - that came with the kit, but couldn't do it before due to lack of the tool.........


And changed out the slow and main jets and float needles and adjusted the floats.  This is the after shot.....


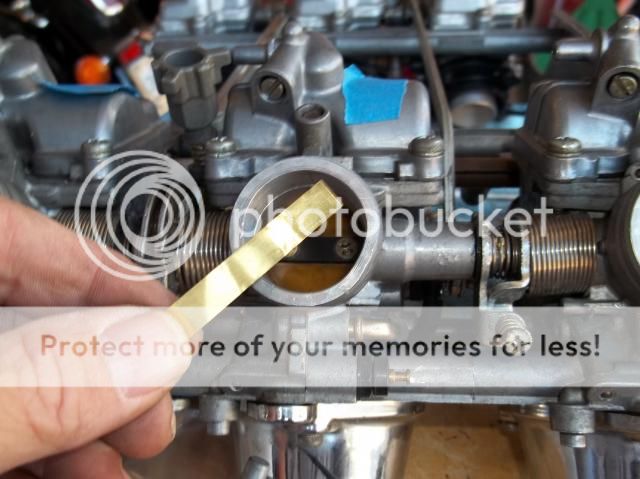
Did a quick sync using the metal strip from the kit........


Time to get everything back together.  This was all I could do....was running out of my technical skills, so put her back together in hopes that she would crank and run this time.......


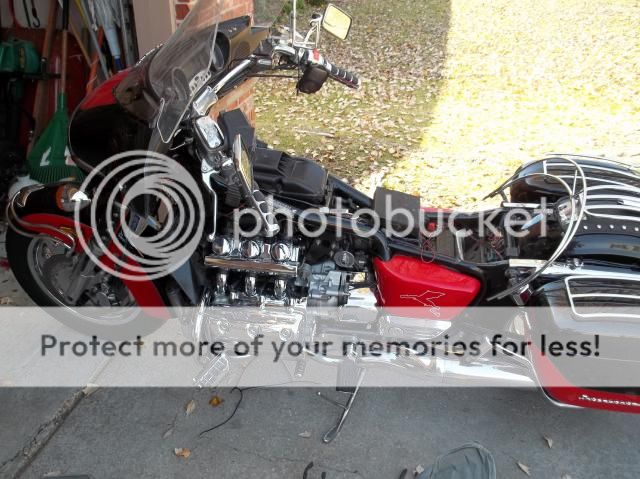
Well, now the moment of truth.........Traveller would either crank or I would sell her for parts since, like I said, I reached the end of my technical knowledge.......Oh, PLEASE, PLEASE, PLEASE, PLEASE..............


WHOOOOOOOOOOOOOOOO-HOOOOOOOOOOOOOOOOOOOO!!!! Charged the new battery to top off, choked her up and with a puff of smoke, she came to life!!!!!!!!  VROOOOOOOM!  Ran a gallon of gas through a funnel into the new fuel lines and she ran like a top.............


Started getting her back together again...........she was purring...........


Adjusted the idle back again...........


Now, I get to tackle the rust in the gas tank and I can finish getting her back together.  Word of advise - dont let a bike sit for 3 years.  But after  just a few miles on the clock......... Grin


I can now say..................... IT"S ALIVE!!!!!!!  ALIVE I SAY!!!!!!!!!!!!!  ALIVE!!!!!!!!!!!!


So, now the tank..........and let me just say, that is going to be a job.......then get her back together and on the road!!!  WHOOOOOOOOOOO-HOOOOOOOOOOOOO!
Logged

Whooray
Member
*****
Posts: 656


Idaho State Rep

Kuna, Idaho


« Reply #1 on: November 28, 2014, 05:50:19 PM »

That's awesome Strider! Looking real good cooldude
Logged

Vietnam Vet 6/68 - 1/70
919th Combat Engineers
11th ACR (Blackhorse)
Smokinjoe-VRCCDS#0005
Member
*****
Posts: 13846


American by Birth, Southern by the Grace of God.

Beautiful east Tennessee ( GOD'S Country )


« Reply #2 on: November 28, 2014, 06:25:26 PM »

Good post  cooldude   


Glad to see you are getting the Ol'Girl glued back together.
Logged


I've seen alot of people that thought they were cool , but then again Lord I've seen alot of fools.
dragonslayer
Member
*****
Posts: 179

palm bay fl.


« Reply #3 on: November 28, 2014, 06:30:38 PM »

I bought a tour that sat for 3 years under a cover and the tank was totally rusted inside.Put a gallon of cider vinegar in the tank and rotated it 90 degrees each day for a week and rinsed it out and no more rust.you must use cider vinegar and if I where to do it again I would use 2 or 3 gallons.After rinsing put enough wd40 in it to keep rust from forming till you fill it with gas.Easy to do and comes out great.
Logged

2k IS
98 Tour
2001 Stand
KY,Dave (AKA Misunderstood)
Member
*****
Posts: 4146


Specimen #30838 DS #0233

Williamsburg, KY


« Reply #4 on: November 29, 2014, 03:31:47 AM »

The one thing I haven't done yet is pull the tank and carbs to do. Carbs don't need attention now, but do need to replace of clean air filter and pulling the tank scares me for some reason........probably just cause I've never done it and read about the frustrations of some.

Good job and write up. Thanks  cooldude
Logged
Hook#3287
Member
*****
Posts: 6675


Brimfield, Ma


« Reply #5 on: November 29, 2014, 06:34:23 AM »

The one thing I haven't done yet is pull the tank and carbs to do. Carbs don't need attention now, but do need to replace of clean air filter and pulling the tank scares me for some reason........probably just cause I've never done it and read about the frustrations of some.

Good job and write up. Thanks  cooldude

Dave, pulling the tank isn't that bad.  The hardest part is getting at the 3 hoses and removing the petcock cover/handle screw.   After getting the screw out, I usually remove the two tank bolts and shim the back of the tank up with a screw driver handle or small rubber block.  Then you can see the tank vent hose under the tank back bottom.  I also use long needle nose from the left side of the bike to get at the petcock vent and fuel hoses .  Those OEM hose clamps are a PITA, so the only one that gets re-installed is the fuel one.

Pull back and up a little to the left and the tank pops right off.

Strider, nice write up and cool pics cooldude cooldude
« Last Edit: November 29, 2014, 06:38:41 AM by Hook#3287 » Logged
Thunderbolt
Member
*****
Posts: 3731


Worthington Springs FL.


« Reply #6 on: November 29, 2014, 07:00:09 AM »

Great news now you are an expert carb man.  Smiley
Logged

jimmytee
Member
*****
Posts: 2036


Elizabethtown,KY


WWW
« Reply #7 on: November 29, 2014, 07:11:53 AM »

 cooldude Enjoyed your wooo hooo pic. Grin
Logged

"Go sell crazy somewhere else,we're all stocked up"
Jess Tolbirt
Member
*****
Posts: 4720

White Bluff, Tn.


« Reply #8 on: November 29, 2014, 07:29:55 AM »

go rent a cement mixer and get some foam and a big box of bb's.. line the mixer with the foam to hold the tank and put the bb's in the tank and let it tumble for about 8 hours,,use a magnet to get the rust out and the bb's..
Logged
TWiesen
Member
*****
Posts: 53

Bennington, Kansas


« Reply #9 on: November 29, 2014, 07:39:16 AM »

i saw another red and black interstate on 49/90 in lafaytte beginning of this week, i was wondering if you had gotten her on the road.  i saw your thread and its looking like you've almost gotten her complete.  i had rust in the tank of mine.  got a bill hirsch tank kit that seems to have worked pretty well.  it cleans etches and coats the tank in three steps.  still got enough left to do another tank if your interested.
Logged
KY,Dave (AKA Misunderstood)
Member
*****
Posts: 4146


Specimen #30838 DS #0233

Williamsburg, KY


« Reply #10 on: November 29, 2014, 10:42:12 AM »

The one thing I haven't done yet is pull the tank and carbs to do. Carbs don't need attention now, but do need to replace of clean air filter and pulling the tank scares me for some reason........probably just cause I've never done it and read about the frustrations of some.

Good job and write up. Thanks  cooldude

Dave, pulling the tank isn't that bad.  The hardest part is getting at the 3 hoses and removing the petcock cover/handle screw.   After getting the screw out, I usually remove the two tank bolts and shim the back of the tank up with a screw driver handle or small rubber block.  Then you can see the tank vent hose under the tank back bottom.  I also use long needle nose from the left side of the bike to get at the petcock vent and fuel hoses .  Those OEM hose clamps are a PITA, so the only one that gets re-installed is the fuel one.

Pull back and up a little to the left and the tank pops right off.

Strider, nice write up and cool pics cooldude cooldude

 cooldude
Logged
ChromeDome
Member
*****
Posts: 2175


Aurora, IL.

60 miles West of Chicago!


« Reply #11 on: November 30, 2014, 06:05:01 PM »

Congratulations and Well Done! Now get out there and Ride!
Logged

salty1
Member
*****
Posts: 2359


"Flyka"

Spokane, WA or Tucson, AZ


« Reply #12 on: December 01, 2014, 03:37:57 AM »

Great job! Try evapo rust in the tank, I have had real good luck with it. Will not harm painted surfaces. IMO tank liners will eventually fail.

http://www.harborfreight.com/catalogsearch/result?q=evapo+rust
Logged

My rides:
1998 GL1500C, 2000 GL 1500CF,2006 GL 1800 3A

Super Santa
Member
*****
Posts: 1907


VRCC #27029

Houston, Texas


WWW
« Reply #13 on: December 01, 2014, 10:24:18 AM »

IF you coat the tank when you are finished with the rust removal, PLEASE, pull the petcock and filter from the tank FIRST.

Wizard and I pulled a petcock and filter from a tank once that had been coated with the filter left in the tank.  Bad!  Bad!  Bad!  I really does a job on the filter.
Logged

G-Man
Member
*****
Posts: 7912


White Plains, NY


« Reply #14 on: December 03, 2014, 12:05:19 PM »

Very cool, Strider.  Miss you, brother!
Logged
hubcapsc
Member
*****
Posts: 16803


upstate

South Carolina


« Reply #15 on: December 03, 2014, 12:46:38 PM »


My buddy Dan just sent me this email:

Hey Mike,

Some months ago, I came to the horrifying conclusion that I’d let the Valk sit with ethanol gas in it.  The inside of the tank was crusty rusty and smelled horrible.  I removed the tank and removed the standpipe/filter/fuel-flow-stopper-thing, and pulled long strings of rubbery goo out of the outlet port.  Everything was so nasty and it stunk so bad, I put the tank in my old truck where I wouldn’t have to smell it and forgot about it for a while to avoid depression.

I was talking to a pilot friend of mine from Habersham county (we share the same radio freq with them) who has a BMW bike, and had a similar issue.  He told me of a radiator shop over his way that specialized in cleaning out rusty crusty motorcycle tanks without harming the paint and without using a tank sealer.

So, I took my tank to him and he took it to his radiator shop guy.  He had the tank for ~3-weeks.  Got it back the other day, and it looks like new metal inside, coated with some kind of oil to keep rust off until I put gas in it..  He cut and re-welded two small holes in the bottom of the tank, otherwise not a scratch.

Next is to see what I’ve got to do with the carbs.  Hoping for a murcle, but who knows.

The shop is Williams Radiator, 1800 Hazel Creek Rd, Mt. Airy, GA 30563 706-778-6141.  He charged $200.

Hope things are good with you.  Take care.

-Dan
Logged

Pages: [1]   Go Up
Print
Jump to: