Valkyrie Riders Cruiser Club
November 23, 2025, 04:38:08 PM *
Welcome, Guest. Please login or register.

Login with username, password and session length
Ultimate Seats Link VRCC Store
Homepage : Photostash : JustPics : Shoptalk : Old Tech Archive : Classifieds : Contact Staff
News: If you're new to this message board, read THIS!
 
Inzane 17
Pages: [1]   Go Down
Print
Author Topic: Ever shorten a throttle cable? Here's what I did on the 1200.  (Read 804 times)
John Schmidt
Member
*****
Posts: 15325


a/k/a Stuffy. '99 I/S Valk Roadsmith Trike

De Pere, WI (Green Bay)


« on: June 26, 2015, 09:19:50 PM »

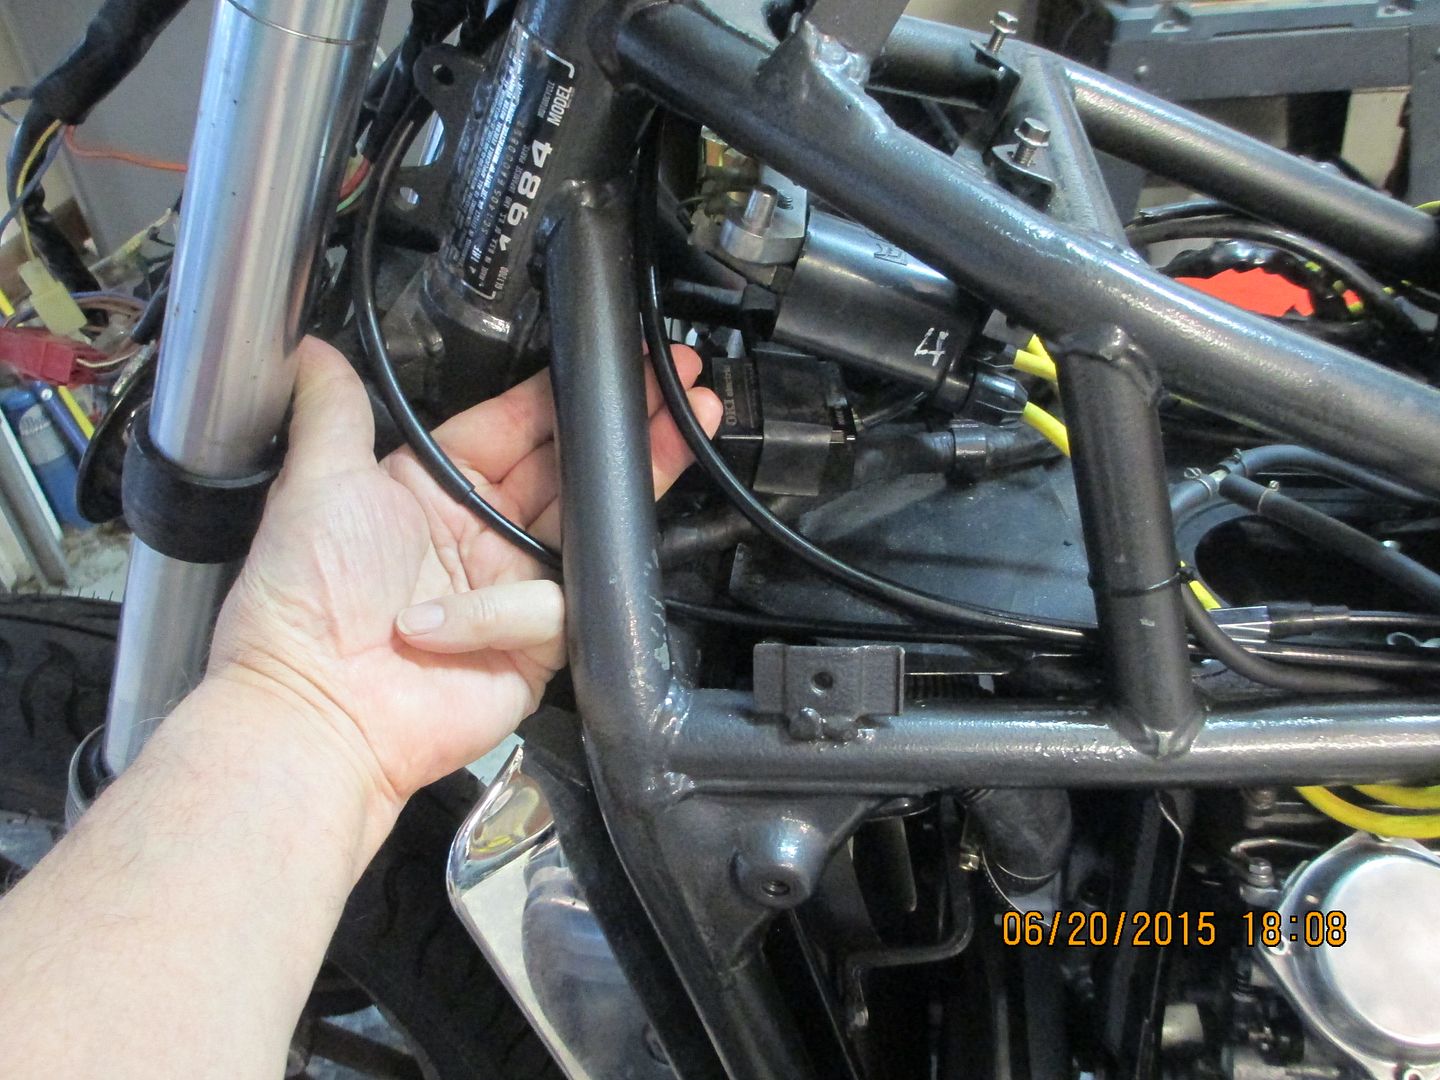
As you can see in the picture, the cable to the left is much longer and I want to dress/route it like the other one. The problem cable is the pull. I ordered new Motion Pro stock cables for the bike, using the Valkyrie handlebars and controls. Turned out the stock length for the "push" cable was just fine, but for the "pull" cable it was ~7" too long unless I routed it by way of the taillight and back around.   Wink So, I started looking at what needed to be done to shorten it without having to special order a new one of a shorter length. I still had the old cable so decided to experiment with removing the various adjusters and other metal parts. Turned out to be quite easy so moved to the new one. In order to remove any portion of the cable housing you have to cut off the small lead nub on one end, creating a new problem....how to replace that lead nub. I shortened the cable by removing 2" from the lower portion and 5" from the upper section of the cable housing. There's an adjuster a short distance beyond the center, the lower portion is the section of housing below that adjuster. The upper portion is from the controls down to the adjuster. Before cutting anything(used a Dremel tool with a cutting disk), make sure you measure how much cable extends beyond the housing. Well, I got the housing shortened and tested the length before inserting the cable. Perfect! Now....about that lead nub. I devised a method of creating one that turned out just fine.


Using some scrap aluminum, I made a sandwish of two sections of it. Drilled all the way through for a bolt to clamp them together. Then when tightened, I drilled a second hole about 2/3 of the way through. That's where the solder will be placed to melt into the shape of the lead nub. Next, about a 3/32" diameter hole was drilled where the two pieces come together. That's where you insert the cable.


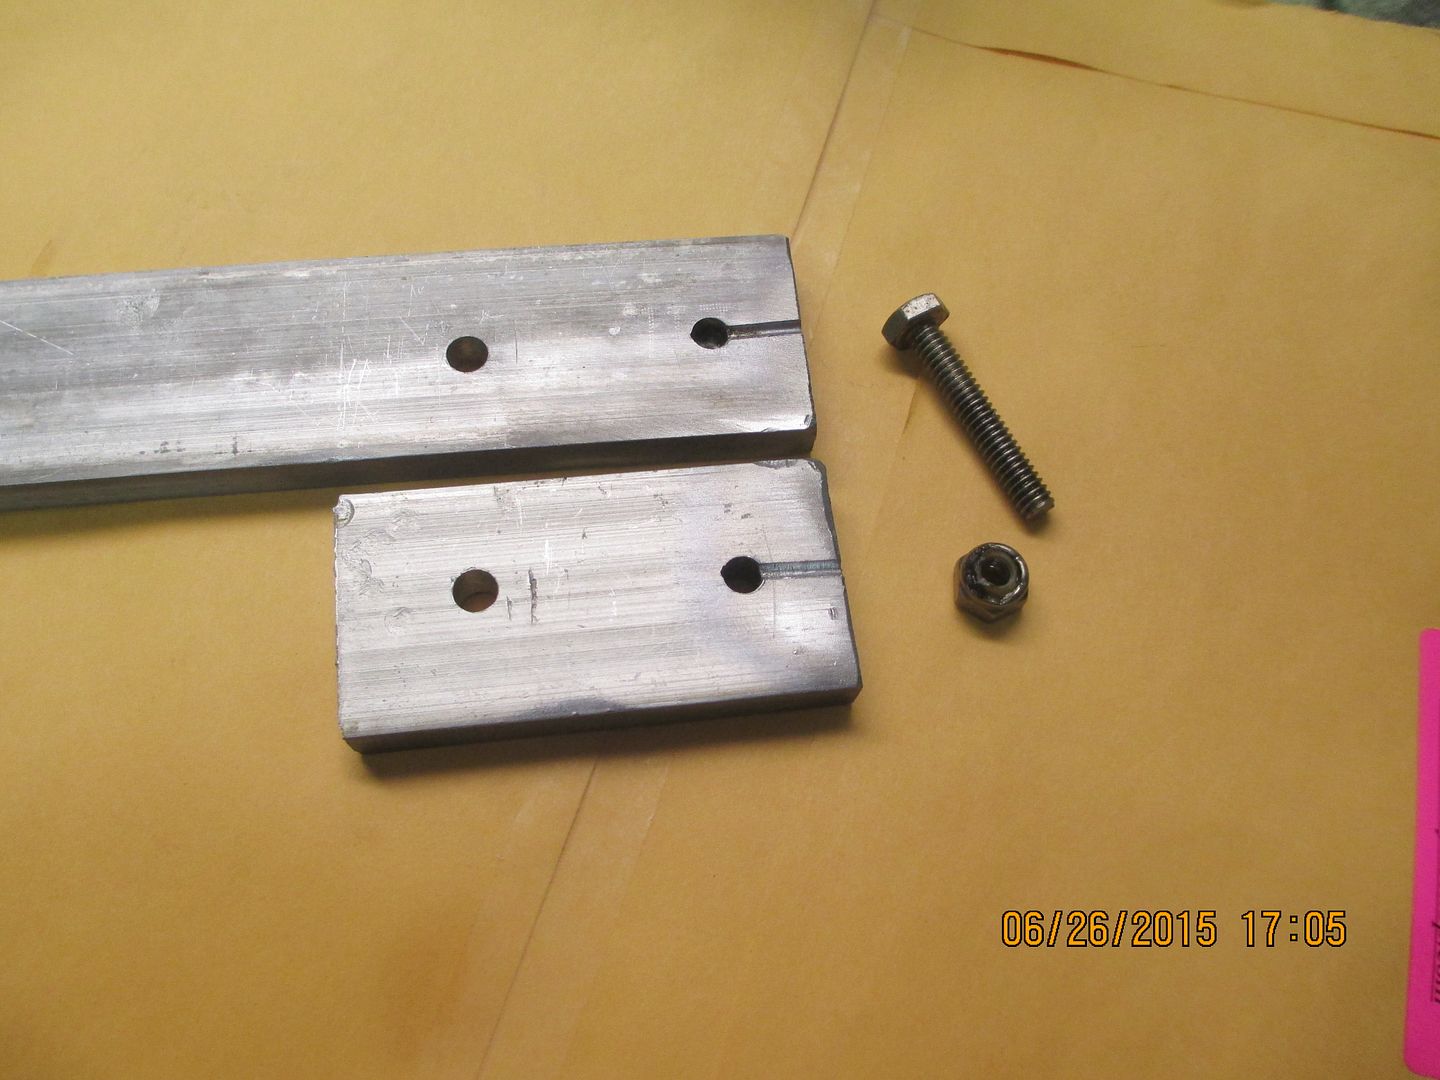
Hole in the end for the cable to be inserted.


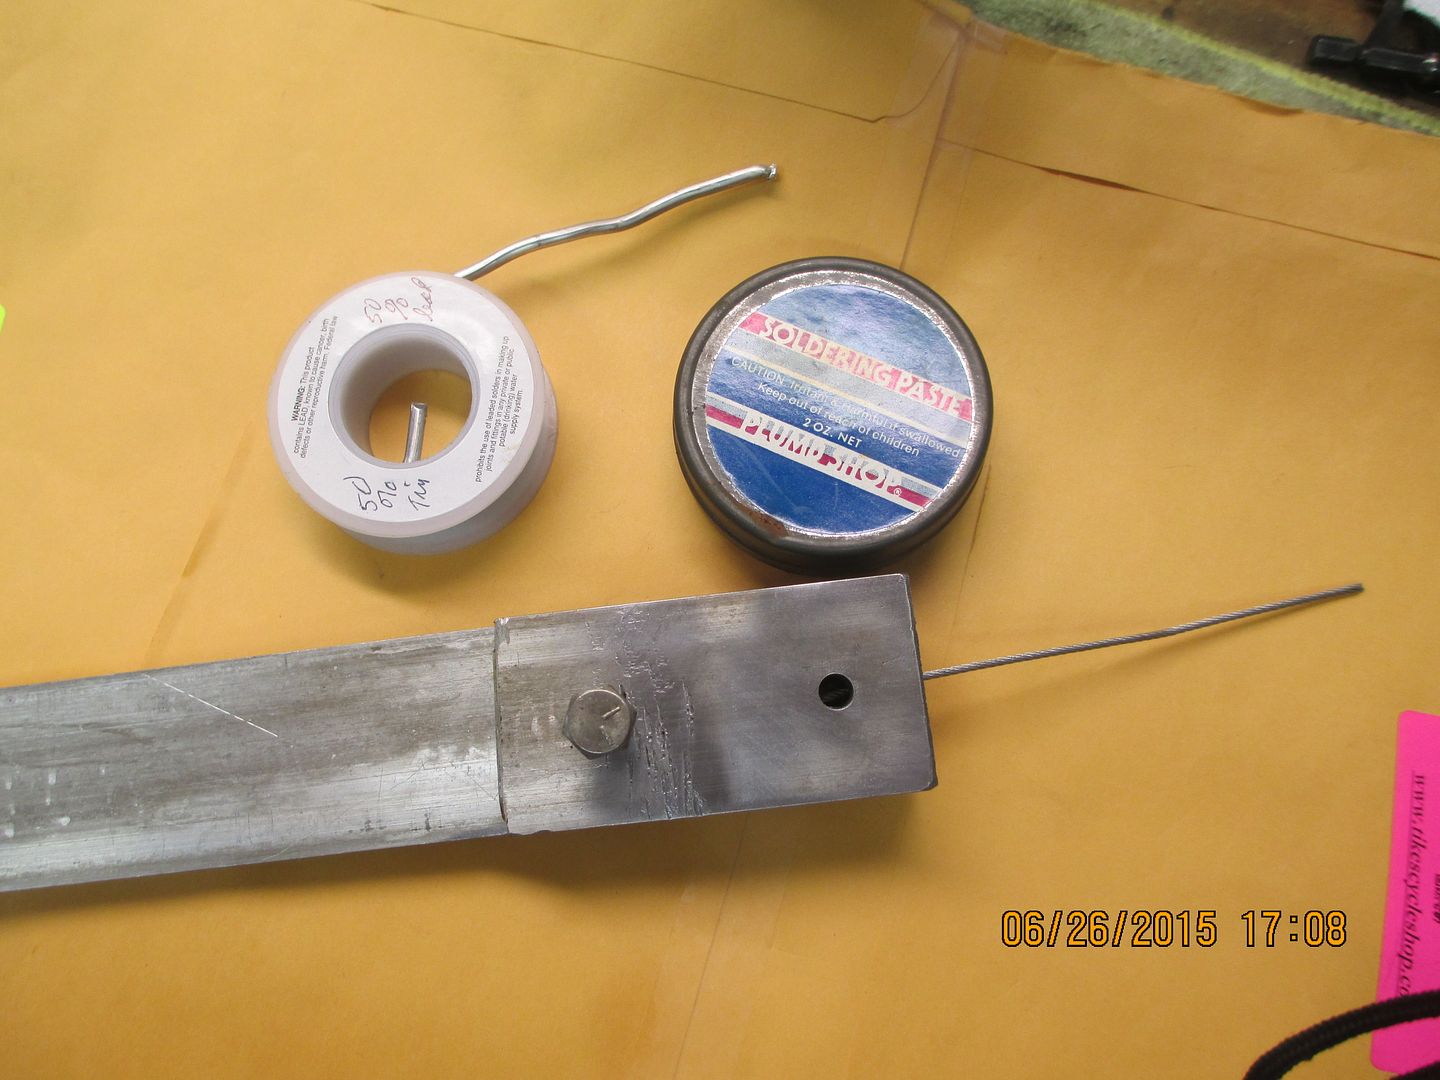
I propped up a Bernz torch and put my device in the vise right above it. I first cleaned the end of the cable with some carb cleaner, then inserted it in the hole in the end as shown with a short piece in the picture. Next, with the cable in place, I used a jeweler's screwdriver to sorta fray out the wires in the cable while it's still visible in the larger hole where the lead will go. I then packed in some regular plumber's paste flux and fired up the torch. After the flux starts to boil and bubble, you know it's hot enough so I remove the heat from underneath and held the flame a bit farther back and started to feed the solder; 50% tin, 50% lead. It melts and fills the hole where you had packed in the flux. When it was full I used a knife to scrape away the excess on top, then removed the flame. I held the calbe in place so it wouldn't pull out while the lead was still melted, but it was only seconds before it was solid. I let it cool for a bit while cleaning up around the area.


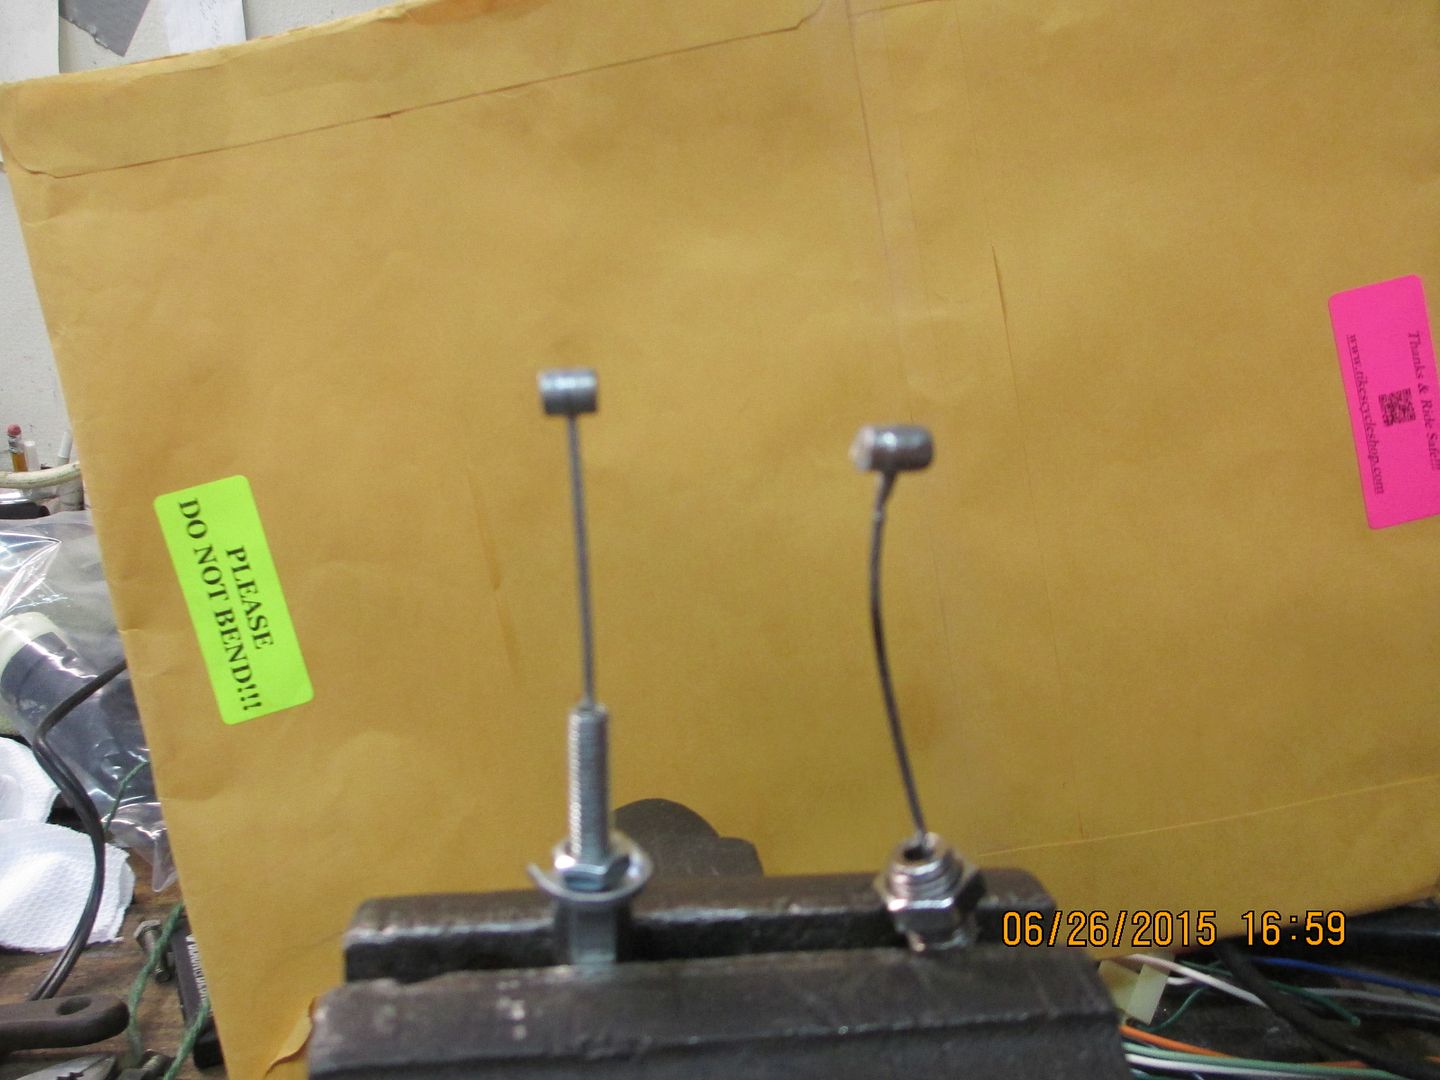
Here's the completed project. On the left is from the Motion Pro factory, on the right is from the Schmidt factory. After a little filing, smoothing, sizing it to fit in the right hand grip/throttle tube, I assembled the right side throttle control and attached the other end to the carb bell crank. Works fine and I didn't have to buy a different cable. Love it when a plan comes together. Took me less than 1/2 hr. to make the lead nub, took me longer to actually dress it down to fit and work smoothly.


The pictures show the bolt as not being tightened down. You do need it really tight so the two pieces don't move. Once you're done melting the solder and it has cooled, just remove the bolt and you can pry the device apart. I found I still had to lay the smaller top section on a slightly open vise and tap the lead slug out with a punch. I was quite pleased with my apparatus, I could actually use smaller holes for the lead and cable but being my first venture of this nature...it worked great. Now I have to pull the carbs out part way to attach the choke cable. Not really looking forward to that.

By the way, in the first picture you can see one of the two coils. I replaced the original 1200 coils with coils off a Valkyrie. Works great, engine fires right up.
« Last Edit: June 26, 2015, 09:22:22 PM by John Schmidt » Logged

pago cruiser
Member
*****
Posts: 534


Tucson - Its a dry heat


« Reply #1 on: June 26, 2015, 09:37:11 PM »

Ingenious idea and excellent execution!
I've had to make cables a few times, but after cutting inner/outer to length I take to one of our local indie shops; who solder on brass lugs as opposed to the factory lead or ???  Looks like lead, maybe it is.  But I thought lead stuff has been really really restricted.  Try finding lead wheel weights anymore...

BTW, on the subject of electricals for these old girls... if you need a new ignition switch, an ST1100 switch bolts right up; just need to do some changing of connectors.  Discovered this by accident a few weeks ago.
Logged

Just because you are not paranoid doesn't mean they're not out to get you
jimmytee
Member
*****
Posts: 2036


Elizabethtown,KY


WWW
« Reply #2 on: June 27, 2015, 02:15:56 AM »

 cooldude That's some good ingenuity there.
Logged

"Go sell crazy somewhere else,we're all stocked up"
John Schmidt
Member
*****
Posts: 15325


a/k/a Stuffy. '99 I/S Valk Roadsmith Trike

De Pere, WI (Green Bay)


« Reply #3 on: June 27, 2015, 06:14:51 AM »

One thing I noticed while melting the solder into the hole....if the device is level it tends to run out of the small hole along the cable. That would make it too stiff to use at the grip 'cuz it wouldn't bend. I had to pause the operation long enough to loosen the vise and tip the end up, no more running out the small hole by the cable.
Logged

Jess Tolbirt
Member
*****
Posts: 4720

White Bluff, Tn.


« Reply #4 on: June 27, 2015, 06:53:48 AM »

i am wondering after you frayed the end if you should make like little hooks on the end of the frayed wires to keep it from pulling out of the newly lead end..
Logged
John Schmidt
Member
*****
Posts: 15325


a/k/a Stuffy. '99 I/S Valk Roadsmith Trike

De Pere, WI (Green Bay)


« Reply #5 on: June 27, 2015, 08:41:33 AM »

Jess, it doesn't need that. Fraying/separating the wires gives good penetration of the solder up into the cable itself. Also gives greater adhesion. After I pulled it out of the device and it cooled, I pulled on it really hard, much more than it will ever have pulling the carb lingage. That sucker isn't moving. Only after I tested it like that did I then start to file/sand it to fit the throttle tube on the right grip.
Logged

flsix
Member
*****
Posts: 1959


South Carolina


« Reply #6 on: June 27, 2015, 06:33:47 PM »

John that is a great solution to a problem many of us has had a least once in our life. cooldude
Logged

2013 F6B    

           ESCHEW OBFUSCATION
The emperor has no clothes
Member
*****
Posts: 29945


« Reply #7 on: June 27, 2015, 07:00:37 PM »

I haven't broke a throttle cable since the 70's (knock on wood). But as I remember they always seemed to break right at the lead nub. I wonder if this could be used in a pinch on the road with no cables available. Granted you would need a few things, but I think just about any shop would have the items you started with.
Logged
da prez
Member
*****
Posts: 4411

Wilmot Wi


« Reply #8 on: June 28, 2015, 03:25:02 AM »

I like your method John, I have in stock a little devise called a cable or wire stop. On the older cars they were used for choke cables. Some had the stop screws in the side and some in the end. There were several sizes available.
  John , I owe you an apology. I said I would send you the tire breaker for changing the valve stems to try and copy if you wish. I (we) got involved in a situation that caused a brain fart. My offer still stands.

                                 da prez
Logged
John Schmidt
Member
*****
Posts: 15325


a/k/a Stuffy. '99 I/S Valk Roadsmith Trike

De Pere, WI (Green Bay)


« Reply #9 on: June 28, 2015, 05:40:56 AM »

I like your method John, I have in stock a little devise called a cable or wire stop. On the older cars they were used for choke cables. Some had the stop screws in the side and some in the end. There were several sizes available.
  John , I owe you an apology. I said I would send you the tire breaker for changing the valve stems to try and copy if you wish. I (we) got involved in a situation that caused a brain fart. My offer still stands.

                                 da prez
Ross, not a problem on the tire breaker, sometimes life gets in the way of our best intentions. I'll PM you my FedEx acc't. # if you want to use it. Re. the cable stop, I had already checked on that and have some in my "stash."  Problem is the size/diameter and length, there isn't much room in that control housing and the screw that clamps down on it was a problem. I have two different types; one scres in from the end, the other screws in on the barrel. Neither worked due to space constrictions.

Logged

Pages: [1]   Go Up
Print
Jump to: