|
pancho
|
 |
« on: November 29, 2018, 06:23:04 AM » |
|
After seeing Jerseys postings on his shifter mod the other day, I got inspired to make one myself. After examining my bike, I saw that where I have my shift pedal and shift rod clocked, there was no clearance for the pivot assembly, so I decided to go a mathematical route. As RonW illustrated on my picture (thank you), I am placing the pivot point on an arm welded to the shift rod (not sure of the proper name), and keeping the rotational axis aligned wherever the rod and shifter are clocked. 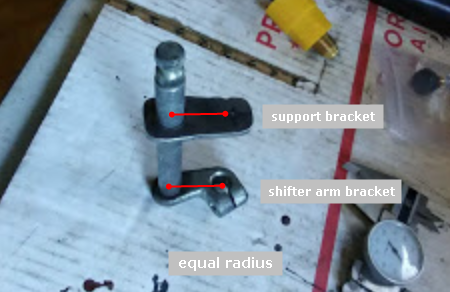 I have some time to work on this today, and the weather is cooperating so off I go. My shifting has been less than ideal since I have had my Valk, and I am expecting an improvement,,,, we will see I hope you don't feel I'm stepping on your toes with another design Jersey,,, as we are all doing the same thing,, trying to improve our riding experience. |
|
|
|
|
 Logged
|
The most expensive things you will purchase, are those things you would not have needed if you had listened and obeyed.
|
|
|
|
Pete
|
|
« Reply #1 on: November 29, 2018, 09:36:13 AM » |
|
I like where you are headed with this.
Think spherical bearing on the shaft for wear and ease of shift.
Greased plain bearing would work also.
|
|
|
|
|
Logged
|
|
|
|
|
pancho
|
|
« Reply #2 on: November 29, 2018, 04:31:02 PM » |
|
Well, I can say that adding an outboard pivot point for support of the shifter rod is a definite improvement to the shifting of the Valkyrie. This is hands down the best modification for overall ease of operation that I have done to this bike,, and I've done a few. I always had a clunky 1/2 shift (I complained about it on this board when I first got a Valk), and other gears preferred certain RPM ranges for the smoothest shift. From the very first shift, the difference was noticeable,,, all shifting quirks are gone. You need to do this, what ever method you use to get it done. Here is how I want about it. I cut out a piece to make an arm to fit the shifter rod that would mimic the center hole to hole distance of the offset arm on the end, approximately 1.225. I bored one hole to .485, the diameter of the shifter rod, and drilled a 3/8 inch hole in the other to accept an old stainless door hinge pin from my Chevy truck, which I cut at approx. 1 inch.  I fit the pieces up and rigged them in a vice for welding.   I made a piece to receive the pivot that fit between the crash bar and the crash bar spacer. The pointy end fits into a recess between two exhaust ports in the head. I milled .180 off one end of the spacer to accommodate the anchor piece.  Yeah, really rough looking and maybe more heavy duty than necessary, but I used what I had. I didn't even finish or paint the pieces yet, just put them on and went for a ride. Here is how it looks assembled on the bike.  I need to take it off to clean it up and paint the steel pieces, but the concept is proven and I am a happy camper...... dramatic difference in shifting. |
|
|
|
|
Logged
|
The most expensive things you will purchase, are those things you would not have needed if you had listened and obeyed.
|
|
|
|
|
|
Factor
|
|
« Reply #4 on: November 29, 2018, 07:46:29 PM » |
|
Dang! I thought you had already welded them in this pic and I figured I had no way of replicating that! Nice job even without the invisible welds! In fact, both setups are well within reach of my modest skills. I'm definitely going to implement over the winter. |
|
|
|
|
Logged
|
Steve
VRCC# 38798
'75 Hoda GL1000 Project
'83 GL1100 MonkeyWing
'70 Suzuki T500 Titan
'99 Valkyrie Tourer
'64 MGB
'89 Isuzu Trooper 3.4L
IBA #58082
All my stuff is old. It makes me feel young.
|
|
|
|
RonW
|
|
« Reply #5 on: November 29, 2018, 10:28:18 PM » |
|
I made a piece to receive the pivot that fit between the crash bar and the crash bar spacer.- The pointy end fits into a recess between two exhaust ports in the head.
it's hard to see in the pic, but the *pointy end* on the anchor piece keeps the anchor piece from rotating? Awesome, btw. |
|
|
|
« Last Edit: November 29, 2018, 11:45:58 PM by RonW »
|
Logged
|
2000 Valkyrie Tourer
|
|
|
Jersey
Member

Posts: 545
VRCC #37540
Southern Maryland
|
|
« Reply #6 on: November 30, 2018, 01:24:34 AM » |
|
Pancho - like the design. Pete suggested a bearing. This is what I'm using on my design and something that might work with yours. SFR188-2RS 1/4"x1/2"x3/16" (this is smaller than your stud diameter, but there are many sizes to fit) https://www.astbearings.com/catalog.html?cid=min_inst_inch#cds-attribute-a02_outer_diaIt has a flange and you can insert it on the stud with a washer and a cotter pin to hold it in place. Just and idea. Looks Good!  |
|
|
|
|
Logged
|
Jersey
|
|
|
|
pancho
|
|
« Reply #7 on: November 30, 2018, 06:43:26 AM » |
|
Dang! I thought you had already welded them in this pic and I figured I had no way of replicating that! Nice job even without the invisible welds! In fact, both setups are well within reach of my modest skills. I'm definitely going to implement over the winter. HA,,, DOn't know what I was thinking, but the weld on the shaft does not need to be on the spline side, it can be on the other and have less chance of messing anything up.
it's hard to see in the pic, but the *pointy end* on the anchor piece keeps the anchor piece from rotating? Awesome, btw.
That was the idea RonW, but I'm not sure it's necessary after implementing it. Pancho - like the design. Pete suggested a bearing. This is what I'm using on my design and something that might work with yours. I have the bushing that goes with the door hinge that I can use by opening up the hole on the anchor piece Jersey, but I'm not sure it is needed. With a 3/8 stainless pin into mild steel on axis I don't expect much wear, there is quite a bit of surface area to ride on for the load now required... I'll keep an eye on it and see what it looks like in a few years. |
|
|
|
« Last Edit: November 30, 2018, 06:47:59 AM by pancho »
|
Logged
|
The most expensive things you will purchase, are those things you would not have needed if you had listened and obeyed.
|
|
|
Jersey
Member
Posts: 545
VRCC #37540
Southern Maryland
|
|
« Reply #8 on: November 30, 2018, 09:04:49 AM » |
|
I believe that the pin would need to be threaded, so the bearing could be placed under lateral torque between a spacer on one side and a washer and nut on the other.
This would insure that the bearing would turn and not the shaft inside the bearing.
I'm going to try Pancho's design as well, but was planing on doing just that. Drill/tap for an SS bolt to screw in instead of welding the door hinge rod. Then make the hole on the receiving Brace match the Bearing OD dimension (.5"). Then use a washer and nyloc nut to hold it in place. I am going to also look at the same kind of Bronze Sleeve Bearing Ammpro used. This one has a very high PSI rating, so should last a long time as well. http://catalog.buntingbearings.com/item/cast-bronze-bearings/cast-bronze-c93200-sae-660-flanged-metric-bearings/cfm008011010 |
|
|
|
« Last Edit: November 30, 2018, 10:16:47 AM by Jersey »
|
Logged
|
Jersey
|
|
|
Tfrank59
Member
Posts: 1364
'98 Tourer
Western Washington

|
|
« Reply #9 on: November 30, 2018, 06:32:19 PM » |
|
Nice job, Pancho. But I'm a machinist not a welder, so I like Jersey's more  |
|
|
|
|
Logged
|
-Tom
Keep the rubber side down. USMC '78-'84
'98 Valkyrie, ‘02 VTX 1800, '96 Royal Star, '06 Drifter, '09 Bonneville, '10 KTM 530, '04 XR 650, '76 Bultaco, '81 CR 450, '78 GS 750...
|
|
|
Jersey
Member
Posts: 545
VRCC #37540
Southern Maryland
|
|
« Reply #10 on: December 01, 2018, 03:23:52 AM » |
|
Good Job Pancho... you got us pulling out the professional drawings to help you! (very nice Avanti)
|
|
|
|
|
Logged
|
Jersey
|
|
|
|
Pete
|
|
« Reply #11 on: December 01, 2018, 03:43:43 AM » |
|
" it's hard to see in the pic, but the *pointy end* on the anchor piece keeps the anchor piece from rotating? Awesome, btw.
That was the idea RonW, but I'm not sure it's necessary after implementing it."
A star washer on either side of the pointy end piece would make pointy end unnecessary and allow adjustment if needed.
|
|
|
|
|
Logged
|
|
|
|
|
pancho
|
|
« Reply #12 on: December 01, 2018, 05:05:56 AM » |
|
Nice job, Pancho. But I'm a machinist not a welder, so I like Jersey's more Hey Tfrank, ever go darkside?? last time I was around here you were seriously contemplating it. I'm not a welder either,, or a machinist for that matter so you have one up on me, but I sure do like playing with my tools. I built this to provide a support for the shift rod to eliminate the problems caused by the cantilever pressure put on the shift shaft by the long extension, it works great for that. It is very straight forward and simple to install once the pieces are constructed, and both pedal and shift rod can be used in all available positions. I just put this out here to show how I went about solving the problem,,, I'm not in competition with anyone. I am going to take mine back off in a day or two to finish the welds and paint the pieces, and probably install the bronze bushing in the anchor piece just because. I put some miles on the bike yesterday, and need to say that while I still stand on my statement "This is hands down the best modification for overall ease of operation that I have done to this bike" the most useful add on is probably my faring as I don't hardly ever shift again once I'm in top gear,, as it says in the owners manual..... I really like the fairing.  A star washer on either side of the pointy end piece would make pointy end unnecessary and allow adjustment if needed. A star washer on either side of the pointy end piece would make pointy end unnecessary and allow adjustment if needed.Hey Pete, star washers my be enough to hold the "anchor" in place, but keep in mind the position of the pivot point is critical, and once set, will not move. It took a few minutes to sink in Pete, but yeah if the anchor was stabilized by star washers only, no "pointy side", swinging it back and forth would give the optimum placement,, good point. If I ever had the time to build a proper jig to set these up for construction, they could be done on an exchange basis, send yours in and mod the shaft and spacer. but I really don't foresee it, maybe someone else out there is so inclined? |
|
|
|
« Last Edit: December 01, 2018, 06:09:01 AM by pancho »
|
Logged
|
The most expensive things you will purchase, are those things you would not have needed if you had listened and obeyed.
|
|
|
Tfrank59
Member
Posts: 1364
'98 Tourer
Western Washington
|
|
« Reply #13 on: December 01, 2018, 10:13:08 AM » |
|
Nice job, Pancho. But I'm a machinist not a welder, so I like Jersey's more Hey Tfrank, ever go darkside?? last time I was around here you were seriously contemplating it. I'm not a welder either,, or a machinist for that matter so you have one up on me, but I sure do like playing with my tools. I haven't gone darkside yet because I couldn't get anyone to mount my CT, which now sits in my shed. I even did the nut cage mod and was all set to "cross over" but alas I've since gone with 2 more MTs on the rear. This reply and my difficulty finding a shop to mount my CT would pertain to another recent post where the person asks about going darkside. I could probably find someone to do it but just lost interest when I hit a brick wall. |
|
|
|
|
Logged
|
-Tom
Keep the rubber side down. USMC '78-'84
'98 Valkyrie, ‘02 VTX 1800, '96 Royal Star, '06 Drifter, '09 Bonneville, '10 KTM 530, '04 XR 650, '76 Bultaco, '81 CR 450, '78 GS 750...
|
|
|
|
pancho
|
|
« Reply #14 on: December 01, 2018, 02:08:24 PM » |
|
You know, changing you own tires is well within a normal guys ability. Once I started, I couldn't believe how easy it is,, and with balance beads there is no need to pay anyone else to do a job that you will do more carefully than they ever would. I found changing a car tire is easier than a bike tire, so for the last few years I buy tires online and put them on my truck, car and bike. I use a Harbor Freight manual machine to hold the wheels for mounting, I just take it out and bolt it to it's specified spot on one of the decks when doing tires, then remove it and put it up when done. I had a bit of time earlier, so I cut another anchor bracket out of .120 aluminum just to try the concept of a simpler bracket with no extension and using internally toothed washers to keep it in place. It really looked flimsy, but the .120 with the two washers equaled the .180 of the steel one so I didn't need to cut the spacer again. I pressed the bronze 3/8 ID bushing into it and elongated the mounting hole so it could be placed where needed.   I installed the piece, moved it to the center of play in the shaft and tightened the crash bar. As flimsy as this piece looks it is probably a better idea overall as it will bend to accommodate any any slight imperfections in the alignment of the pivot on the modified shifter rod assembly, meaning if someone didn't get theirs perfect, it might still work without any problems where steel is unforgiving and any misalignment means it is not going to fit. I ran out a tank of gas today and it seems to be just fine, and makes construction much easier overall. I mean under worst conditions, if it rotated some or deformed, the shifter rod will travel no further than it would without the assembly. I'll use this anchor arm and see how it goes, loosening the lower crash bar bolt once in awhile to check if the alignment has changed. Here it is in place,,,,, thanks Pete  |
|
|
|
« Last Edit: December 01, 2018, 04:49:25 PM by pancho »
|
Logged
|
The most expensive things you will purchase, are those things you would not have needed if you had listened and obeyed.
|
|
|
|
The emperor has no clothes
|
|
« Reply #15 on: December 01, 2018, 02:33:42 PM » |
|
Hi, Pancho. Your last 2 pics don't show. Can you redo them ? Thanks  |
|
|
|
|
Logged
|
|
|
|
Jersey
Member
Posts: 545
VRCC #37540
Southern Maryland
|
|
« Reply #16 on: December 01, 2018, 02:37:20 PM » |
|
I've been wondering the same thing about the brace's thickness. Considering that it's radial loading it shouldn't twist or deform it in anyway... just may want to consider using stainless steel instead of aluminum.
|
|
|
|
|
Logged
|
Jersey
|
|
|
|
pancho
|
|
« Reply #17 on: December 01, 2018, 04:59:05 PM » |
|
Are there pictures now meathead??
Hey Jersey, the thinking on using aluminum on an anchor without a tail for bracing, was it is soft enough for the toothed washers and the splines on the bushing to cut into and grip. We will see how it works out, but I believe it will be fine.It would make it much easier for someone to fabricate if they had a mind to make one of these.
|
|
|
|
|
Logged
|
The most expensive things you will purchase, are those things you would not have needed if you had listened and obeyed.
|
|
|
|
The emperor has no clothes
|
|
« Reply #18 on: December 01, 2018, 05:15:13 PM » |
|
Are there pictures now meathead??
Hey Jersey, the thinking on using aluminum on an anchor without a tail for bracing, was it is soft enough for the toothed washers and the splines on the bushing to cut into and grip. We will see how it works out, but I believe it will be fine.It would make it much easier for someone to fabricate if they had a mind to make one of these.
Just the first one still. |
|
|
|
|
Logged
|
|
|
|
|
Pete
|
|
« Reply #19 on: December 01, 2018, 05:27:27 PM » |
|
Pancho, you are welcome, thanks for trying it with the washers. Good idea on the aluminum.
I really like working with aluminum when it can be used.
For you folks looking for an aluminum supplier look no further than Lowes or Ace.
Looking forward to your use report on the aluminum mod.
Thanks again, Pete.
|
|
|
|
« Last Edit: December 02, 2018, 02:02:00 PM by Pete »
|
Logged
|
|
|
|
h13man
Member
Posts: 1909
To everything there is an exception.
Indiana NW Central Flatlands
|
|
« Reply #20 on: December 02, 2018, 06:51:01 AM » |
|
After seeing Jerseys postings on his shifter mod the other day, I got inspired to make one myself. After examining my bike, I saw that where I have my shift pedal and shift rod clocked, there was no clearance for the pivot assembly, so I decided to go a mathematical route. As RonW illustrated on my picture (thank you), I am placing the pivot point on an arm welded to the shift rod (not sure of the proper name), and keeping the rotational axis aligned wherever the rod and shifter are clocked. I have some time to work on this today, and the weather is cooperating so off I go. My shifting has been less than ideal since I have had my Valk, and I am expecting an improvement,,,, we will see I hope you don't feel I'm stepping on your toes with another design Jersey,,, as we are all doing the same thing,, trying to improve our riding experience. This is the direction I was going also but I was going to use a sintered bronze bearing for the shaft support snap ringed in place on a SS bracket. As for the bolt holding the crash bar, its more long enough to except a 10 gauge SS bracket (.135). And yes I have access to a laser to cut the brackets but this project is on hold as I'm remodeling the garage because I have no more storage to cram a tractor and 3 MC's and 2 cars and all my machinery, etc. I'm installing loft shelving on 46' running length of walls. |
|
|
|
|
Logged
|
|
|
|
Skinhead
Member
Posts: 8763
J. A. B. O. A.
Troy, MI
|
|
« Reply #21 on: December 02, 2018, 12:12:24 PM » |
|
While I'm sure this mod helps stabilize the shifter on our bikes, I just need to ask, is it really necessary? I shift as I accelerate up to speed or down shift to stop or for engine braking on hills. Other than that, I rarely shift my bike. It accelerates just fine in 5th 98% of the time.
Not trying to start a "thing", just wondering about the return on effort.
|
|
|
|
|
Logged
|
 Troy, MI |
|
|
|
RonW
|
|
« Reply #22 on: December 02, 2018, 12:42:05 PM » |
|
I believe it's about the effect any slop has on the bearings on the transmission shaft due to the shifter rod cantilevered as far out as it is. I don't know if the geometry is why the shifter seal wears out and leaks oil. But are the transmission bearings also negatively effected.
Anyways, I have a question ..... Is it easy to place a bushing in the pivot hole? To me, the entire anchor bracket is easy to replace so I don't see a huge problem replacing the anchor bracket every 5+ years if its pivot hole gets out of round too much. By *anchor bracket,* I mean the tie piece that holds the support bracket (pic above) to the engine guard bolt. Er, just my 5¢.
|
|
|
|
« Last Edit: December 02, 2018, 12:46:22 PM by RonW »
|
Logged
|
2000 Valkyrie Tourer
|
|
|
Tfrank59
Member
Posts: 1364
'98 Tourer
Western Washington
|
|
« Reply #23 on: December 02, 2018, 02:41:32 PM » |
|
While I'm sure this mod helps stabilize the shifter on our bikes, I just need to ask, is it really necessary? I shift as I accelerate up to speed or down shift to stop or for engine braking on hills. Other than that, I rarely shift my bike. It accelerates just fine in 5th 98% of the time.
Not trying to start a "thing", just wondering about the return on effort.
Well you're not the first one to raise the question whether this is necessary, and clearly it isn't for everybody. However there are some who have excessive play due to the dog-leg shifter on our bikes, and for some it amounts to more than simply a little oil leaking past the seal. Some have reported a real problem shifting and need some sort of brace on there, not unlike what's been done for goldwings over the years (ex. link below) In my case I'd call it not so much a necessity as a growing concern I'd like to address. I've waited quite a while now for a design that is both elegant (simple) and effective. (I believe Jersey has just such a design) I've also waited to see if somebody would put together a kit reasonably priced that would do the job. In lieu of a kit, I'd settle for detailed instructions and a parts list to build my own https://youtu.be/R_H7p2vfviM |
|
|
|
« Last Edit: December 02, 2018, 02:47:57 PM by Tfrank59 »
|
Logged
|
-Tom
Keep the rubber side down. USMC '78-'84
'98 Valkyrie, ‘02 VTX 1800, '96 Royal Star, '06 Drifter, '09 Bonneville, '10 KTM 530, '04 XR 650, '76 Bultaco, '81 CR 450, '78 GS 750...
|
|
|
Jersey
Member
Posts: 545
VRCC #37540
Southern Maryland
|
|
« Reply #24 on: December 03, 2018, 03:23:46 AM » |
|
While I'm sure this mod helps stabilize the shifter on our bikes, I just need to ask, is it really necessary? I shift as I accelerate up to speed or down shift to stop or for engine braking on hills. Other than that, I rarely shift my bike. It accelerates just fine in 5th 98% of the time.
Not trying to start a "thing", just wondering about the return on effort.
Well you're not the first one to raise the question whether this is necessary, and clearly it isn't for everybody. However there are some who have excessive play due to the dog-leg shifter on our bikes, and for some it amounts to more than simply a little oil leaking past the seal. Some have reported a real problem shifting and need some sort of brace on there, not unlike what's been done for goldwings over the years (ex. link below) In my case I'd call it not so much a necessity as a growing concern I'd like to address. I've waited quite a while now for a design that is both elegant (simple) and effective. (I believe Jersey has just such a design) I've also waited to see if somebody would put together a kit reasonably priced that would do the job. In lieu of a kit, I'd settle for detailed instructions and a parts list to build my own https://youtu.be/R_H7p2vfviMFully Agree. As with anything engineered... rarely is the current design 'perfect'. Operational experience seems to provide that last few percentage points of improvement. Thanks Tfrank5 for the kind words. Out of respect to Pancho's thread here (not wanting to hijack), anyone that interested in the design I'm workong and a kit, feel free to PM me. My plans are to create a kit with laser cut parts for easy installation and can use help in making sure it's as Universal as possible. Again, PM me. |
|
|
|
|
Logged
|
Jersey
|
|
|
|
pancho
|
|
« Reply #25 on: December 03, 2018, 04:24:16 AM » |
|
Anyways, I have a question ..... Is it easy to place a bushing in the pivot hole? To me, the entire anchor bracket is easy to replace so I don't see a huge problem replacing the anchor bracket every 5+ years if its pivot hole gets out of round too much.
Yes,it is easy, the bushings are press fit,, didn't even require the real press,, just used a vice and a socket to back up the bracket RonW.
While I'm sure this mod helps stabilize the shifter on our bikes, I just need to ask, is it really necessary? I shift as I accelerate up to speed or down shift to stop or for engine braking on hills. Other than that, I rarely shift my bike. It accelerates just fine in 5th 98% of the time.
Same here,, rarely shift once in high gear,, but the difference was worth the effort to me,,, but then the "effort" was no more than playing with my toys, er tools, yeah TOOLS, for a couple of hours. Didn't make the shifting perfect, but it is a great improvement on my Bumblebee. (still waiting on those gloves)
Do you feel there is any need for end-play clearance for the Gearshift Spindle?
Hey Avanti,, ??? you always need some clearance with any moving part,, if you are referring to the distance between the bushing and the "pivot arm", you don't need that much, but it doesn't hurt anything in this application. btw nice drawings, I know who to contact if I ever need engineering drawings for a project,,,, what do you use?
|
|
|
|
« Last Edit: December 03, 2018, 05:07:40 AM by pancho »
|
Logged
|
The most expensive things you will purchase, are those things you would not have needed if you had listened and obeyed.
|
|
|
|
pancho
|
|
« Reply #26 on: December 03, 2018, 01:26:09 PM » |
|
I don't know what your getting at Avanti,, you lost me. If you are asking if this modification affects the end play on the shift shaft,, it does not.... the end play is exactly the same as it was. Not sure if that is what you meant ????
|
|
|
|
|
Logged
|
The most expensive things you will purchase, are those things you would not have needed if you had listened and obeyed.
|
|
|
|
turtle254
|
|
« Reply #27 on: December 03, 2018, 03:52:38 PM » |
|
Good point, it is trapped. No way to get around that!
|
|
|
|
|
Logged
|
|
|
|
|
WintrSol
|
|
« Reply #28 on: December 03, 2018, 04:47:55 PM » |
|
Good point, it is trapped. No way to get around that!
Yes there is. The design needs to allow for the same end-play, in the support bracket pivot point, as the shift shaft has. Looking at the diagram at page 2 of the service manual section 10, it doesn't appear there should be much, if any, end play of the gearshift spindle. The image at the top of page 10-7 clarifies how its motion is turned 90 degrees by gearshift arm B to activate gearshift arm A. |
|
|
|
« Last Edit: December 03, 2018, 04:51:38 PM by WintrSol »
|
Logged
|
98 Honda Valkyrie GL1500CT Tourer
Photo of my FIL Jack, in honor of his WWII service
|
|
|
|
pancho
|
|
« Reply #29 on: December 04, 2018, 02:50:30 AM » |
|
Cumon,, take a look at the pictures boys,, see which way the pivot rod is pointing, as you can see there is plenty of clearance,, no trapping anything. End play is exactly the same after installation as before. |
|
|
|
« Last Edit: December 04, 2018, 03:01:42 AM by pancho »
|
Logged
|
The most expensive things you will purchase, are those things you would not have needed if you had listened and obeyed.
|
|
|
|
indybobm
|
|
« Reply #30 on: December 04, 2018, 05:15:46 AM » |
|
You are talking about side to side movement. I can see how a pivot point bolted to the crash bar and a snug bolt at the other end of the pivot plate could severely limit side to side movement.
Best to set it so that the gear shift arm is in the middle of its side to side play?
|
|
|
|
« Last Edit: December 04, 2018, 05:41:36 AM by indybobm »
|
Logged
|
So many roads, so little time
VRCC # 5258
|
|
|
|
pancho
|
|
« Reply #31 on: December 04, 2018, 07:01:40 AM » |
|
Hey Indybobm,, if you are talking about side to side movement, yeah you need to be careful not to jam the anchor piece to one side so that it places things in a bind. While the steel anchor relied on precise dimensions and didn't need to take this into account, the aluminum one is adjustable (swings back and forth) and can be placed in the center of the side to side play as was mentioned here.
I installed the piece, moved it to the center of play in the shaft and tightened the crash bar. As flimsy as this piece looks it is probably a better idea overall as it will bend to accommodate any any slight imperfections in the alignment of the pivot on the modified shifter rod assembly, meaning if someone didn't get theirs perfect, it might still work without any problems where steel is unforgiving and any misalignment means it is not going to fit.
Avanti, that autocad drawing you added is incorrect and could lead one to think the shaft could be "trapped" and remove the end play from the shaft. You show the anchor piece on the wrong side of the pivot arm, thus making the pivot go in the wrong direction. While I appreciate and thank you for your efforts I would ask if you will repair or remove it so others will not be mislead. Nice work BTW.
|
|
|
|
« Last Edit: December 04, 2018, 07:23:26 AM by pancho »
|
Logged
|
The most expensive things you will purchase, are those things you would not have needed if you had listened and obeyed.
|
|
|
|
turtle254
|
|
« Reply #32 on: December 04, 2018, 07:31:02 AM » |
|
End play is trans shaft moving in and out of trans, not side to side movement; which might or not be a problem. Lots of designs out their running with end play limited with no known problems, so I think this is a reach.
|
|
|
|
|
Logged
|
|
|
|
|
RonW
|
|
« Reply #33 on: December 04, 2018, 12:05:06 PM » |
|
just a side note, pancho. those whatchamacallit CAD drawings aren't really drawings per se. the parts are doodled out individually and only then assembled together. They have length width and height. as such can be moved, rotated, flipped, drilled and threaded, etc. It's not a huge hassle to rearrange a given part's placement with the CAD. In comparison, changing a part's placement on a 2D isometric diagram requires doing it over again. (if the graphic below is blurry, it's because your screen setting is on a enlarged view. usually to enlarge the forum's text size but the same setting effects pics resolution.) 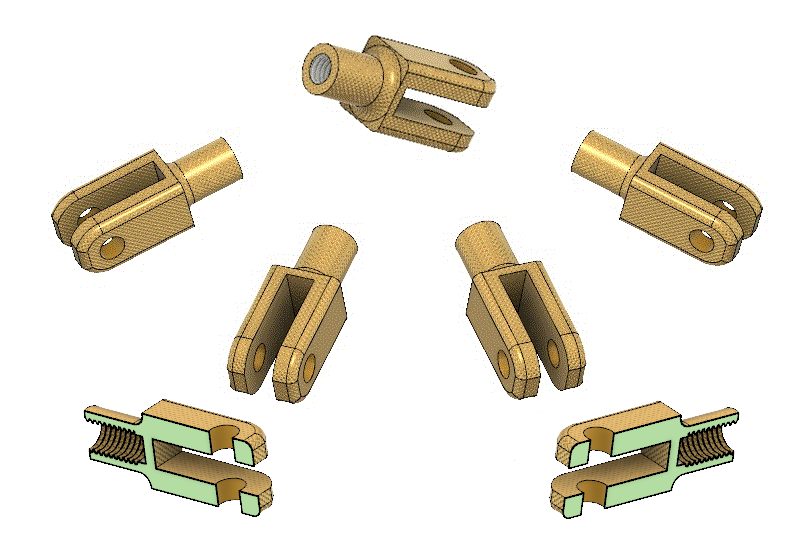 |
|
|
|
« Last Edit: December 04, 2018, 01:05:36 PM by RonW »
|
Logged
|
2000 Valkyrie Tourer
|
|
|
|
pancho
|
|
« Reply #34 on: December 05, 2018, 03:01:47 AM » |
|
Very informative RonW, thanks, but if the the "drawings" don't represent the product accurately, they are worse than useless as they are misinformation.
I remember AutoCAD v 2.6 in the late eighties...... I'd like to see what it can do now.
|
|
|
|
« Last Edit: December 05, 2018, 03:10:20 AM by pancho »
|
Logged
|
The most expensive things you will purchase, are those things you would not have needed if you had listened and obeyed.
|
|
|
|
RonW
|
|
« Reply #35 on: December 06, 2018, 04:16:06 AM » |
|
..... but if the the "drawings" don't represent the product accurately, they are worse than useless as they are misinformation.
I remember AutoCAD v 2.6 in the late eighties...... I'd like to see what it can do now.
Absolutely, the CAD don't guarantee accuracy. Just easier to correct errors. For instance, if Part A (below) was placed on the wrong side of Part B, you could grab Part A with your mouse and move it to the opposite side of Part B. If only the angle on Part A was wrong, Part A can be rotated using your mouse. There's a few steps involved but the entire graphic doesn't need to be erased to correct it. Overall it makes it more congenial for a client to request modifications from the designer as well as to correct errors that slip in. There are lite version of CAD that are affordable. There's a nifty tool that allows you to animate the parts of the same assembly in motion, for example, pistons moving up an down in their cylinders or transmission gears meshing against other gears. CAD ain't natural to me. My trade is carpentry, but the kind of carpentry I do is like one month, I'm working on the roof of a 40 story building, and next month, I'm forming jersey barriers on the highway graveyard shift. Thinkin process is different. 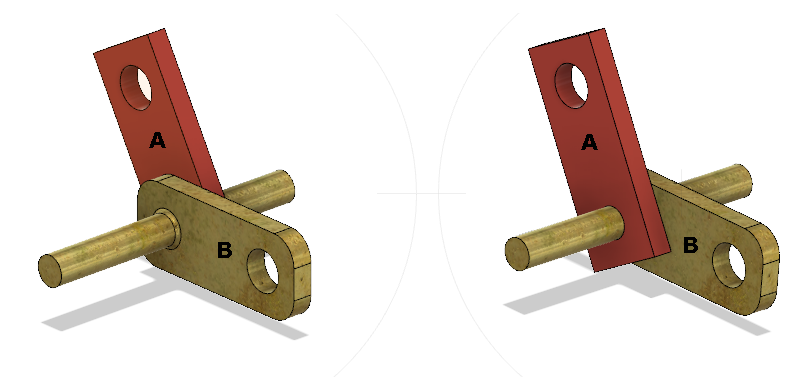 |
|
|
|
« Last Edit: December 06, 2018, 04:17:59 AM by RonW »
|
Logged
|
2000 Valkyrie Tourer
|
|
|
|
indybobm
|
|
« Reply #36 on: December 06, 2018, 07:15:35 AM » |
|
End play is trans shaft moving in and out of trans, not side to side movement; which might or not be a problem. Lots of designs out their running with end play limited with no known problems, so I think this is a reach.
When i was referring to end play I was talking about the gear shift arm, not the splined shaft that it attaches to. It would seem to me that when you bolt the modification together and tighten it down making sure that the gear shift arm is in the center of end play, it does not matter which side the support is on. |
|
|
|
|
Logged
|
So many roads, so little time
VRCC # 5258
|
|
|
|
pancho
|
|
« Reply #37 on: December 06, 2018, 08:04:40 AM » |
|
CAD ain't natural to me. My trade is carpentry, but the kind of carpentry I do is like one month, I'm working on the roof of a 40 story building, and next month, I'm forming jersey barriers on the highway graveyard shift. Thinkin process is different.
Yeah, I can see that it definitely requires a different thinkin process ..... I got a steel workers job once when I was younger,, first day the foreman was taking me out to where he wanted me and stepped out on a beam and told me "the works out here",,,, it was like there was a wall there,,, had to radically change my mindset to do it.
I never used the AutoCAD, we had guys that that was all they did. The results went to graphic plotters that could output results 36" by as many feet long as was necessary for us in engineering to check the work and for the customer. Impressive results, but very labor intensive for the CAD guys, nothing like you are explaining,, just multiple layers. We were using cutting edge technology, but in reality, just a couple of steps from drafting boards and blueprints, and we referred to the results as drawings.. Old school. It does look like a handy skill to have.
|
|
|
|
|
Logged
|
The most expensive things you will purchase, are those things you would not have needed if you had listened and obeyed.
|
|
|
|
turtle254
|
|
« Reply #38 on: December 06, 2018, 09:45:37 AM » |
|
End play is trans shaft moving in and out of trans, not side to side movement; which might or not be a problem. Lots of designs out their running with end play limited with no known problems, so I think this is a reach.
When i was referring to end play I was talking about the gear shift arm, not the splined shaft that it attaches to. It would seem to me that when you bolt the modification together and tighten it down making sure that the gear shift arm is in the center of end play, it does not matter which side the support is on. Avanti was talking about end play on "trans bearing", so I decided to not load the in and out movement of trans shaft by leaving more clearance on the bearing length at frame bolt bracket . Loading a bearing race by bringing end play to "0" can comprise to bearing design, it needs to float and not have pressure in and out on the race. Looks like Avanti has delete his comments, hope he comes back because he was right. |
|
|
|
|
Logged
|
|
|
|
|
WintrSol
|
|
« Reply #39 on: December 06, 2018, 10:19:36 AM » |
|
End play is trans shaft moving in and out of trans, not side to side movement; which might or not be a problem. Lots of designs out their running with end play limited with no known problems, so I think this is a reach.
When i was referring to end play I was talking about the gear shift arm, not the splined shaft that it attaches to. It would seem to me that when you bolt the modification together and tighten it down making sure that the gear shift arm is in the center of end play, it does not matter which side the support is on. Avanti was talking about end play on "trans bearing", so I decided to not load the in and out movement of trans shaft by leaving more clearance on the bearing length at frame bolt bracket . Loading a bearing race by bringing end play to "0" can comprise to bearing design, it needs to float and not have pressure in and out on the race. Looks like Avanti has delete his comments, hope he comes back because he was right. The shift spindle sits in needle bearings, not a conventional bearing with balls and races. It's axial motion is limited only by the fork-shaped part pressed or welded onto it, and by the back end of it pressing against the gearshift arm A. If you apply axial pressure to the end of the spindle, it will rub more on arm A, but no damage can occur to the needle bearings. It would take a lot of pressure on the spindle to create a significant amount of wear on arm A because of the limited range of motion of either; I think this much axial force would be felt in harder shifting. This is from the photos on pages 10.7 and 10.8 of the FSM. The radial forces that these mods seek to reduce, however, will slowly damage the bearing surfaces, while causing stress to the seal. |
|
|
|
|
Logged
|
98 Honda Valkyrie GL1500CT Tourer
Photo of my FIL Jack, in honor of his WWII service
|
|
|
|


