|
NevsMate
|
 |
« on: November 22, 2022, 05:47:10 AM » |
|
Hi Guys n Gals,
Looking for guidance, I am looking to replace both fork seals, but I'm planning NOT to do the 'full' strip down, specially on the left leg.
As I do not have the special socket for the left leg, how do I measure the correct oil Height (and what is the height) as the fork won't be collapsed?
Cheers
Geoff.
|
|
|
|
|
 Logged
|
|
|
|
Valker
Member

Posts: 3051
Wahoo!!!!
Texas Panhandle
|
|
« Reply #1 on: November 22, 2022, 06:39:11 AM » |
|
Pour it in by volume rather than height. I don't currently remember what that volume should be.
|
|
|
|
|
Logged
|
I ride a motorcycle because nothing transports me as quickly from where I am to who I am.
|
|
|
|
RonW
|
|
« Reply #2 on: November 22, 2022, 07:32:13 AM » |
|
"I do not have the special socket for the left leg,"Some notched a heating element wrench for a hot water heater, Home Depot. Factory specs. (some other member's photo). 
|
|
|
|
|
Logged
|
2000 Valkyrie Tourer
|
|
|
|
Speedy Coop
|
|
« Reply #3 on: November 22, 2022, 08:04:25 AM » |
|
Use O.E.M. seals for best results. I learned the hard way.
|
|
|
|
|
Logged
|
|
|
|
|
RonW
|
|
« Reply #4 on: November 22, 2022, 08:27:26 AM » |
|
"Looking for guidance, I am looking to replace both fork seals,"The Right fork has only 4 internal parts when you get in there excluding the oil seal assy. (Enlarge graphic otherwise it's blurry.)
|
|
|
|
« Last Edit: November 22, 2022, 08:41:22 AM by RonW »
|
Logged
|
2000 Valkyrie Tourer
|
|
|
|
|
|
longrider
|
|
« Reply #6 on: November 22, 2022, 12:57:23 PM » |
|
Bike needs to be fairly secure up on a jack. This is by memory so hopefully this is reasonably accurate. Others may chime in. Bit of a messy job but straight forward as well. Remove front fender guard if you have one or any other chrome bits that may get in your way. Remove brake calipers and hang to the side with zip ties. Remove axle bolt, speedo cable then Loosen pinch bolts. Remove axle/front wheel. Remove front fender bolts. Turn the lower fork legs 180 deg to allow the fender to clear. Loosen top bridge clamps. Loosen the top fork caps then slide each lower fork leg up separately a bit and remove the top cap by loosening the lock nut and unscrewing the cap. Leave the lock nuts in their same adjustment. You can install one side at a time. Use a nice sized oil pan straight down from the seal. gently pry and Slide the dust seal down. remove the spring clip holding the fork seal. Now the fun part. slide the lower leg up as far as you can an snap it back down. A few hits to the bottom and the entire leg will slide out as well as oil. hang onto it. Slider bushings and seal will be on the leg. Follow the procedure in the manual for the install of the seals. I always use new slider bushings. Do you have a seal driver? hope this helps Warren
|
|
|
|
|
Logged
|
|
|
|
|
RonW
|
|
« Reply #7 on: November 22, 2022, 03:10:29 PM » |
|
"Remove front fender guard if you have one or any other chrome bits that may get in your way."The fender along with the chrome fork guards don't have to be removed if you do one fork then the other fork. Just leave the fender on the fork that's not being worked on (bottom pic). See Raymore's video. That was a good tip from Raymore, imho. I never liked taking off those fork guards.  
|
|
|
|
|
Logged
|
2000 Valkyrie Tourer
|
|
|
|
NevsMate
|
|
« Reply #8 on: December 01, 2022, 07:39:23 AM » |
|
Hi everyone,
thanks to all of you for your advice.
I have seen the videos & how to's for the strip down etc..,.
I am not a fabricator, so cannot 'make' the tool as, so many suggested but, the answer I was looking for is to this question:
what is the correct height of oil in the forks & how to measure, when NOT completely disassembled?
(ie, springs still inside so cannot compress them)
There has been a 'how to' floating around but, I can't find it after seeing it the first time!
Geoff
|
|
|
|
|
Logged
|
|
|
|
John Schmidt
Member
Posts: 15372
a/k/a Stuffy. '99 I/S Valk Roadsmith Trike
De Pere, WI (Green Bay)
|
|
« Reply #9 on: December 01, 2022, 08:12:59 AM » |
|
I just turn them upside down and pump a few times...sliding the separate sections in/out. Then wrap them in a towel and put them in a vise(doesn't need to be super tight) or something to hold them bottoms up over night while I do something else. It will drain all but an insignificant amount out. Wipe them off and fill by means of a measured amount, not by height. I always fill with about an ounce less than called for. Never have had a problem using this method.
|
|
|
|
|
Logged
|
|
|
|
|
longrider
|
|
« Reply #10 on: December 02, 2022, 06:45:51 AM » |
|
Good advice to the OP John. I usually add oil once ounce short as there is still a coating on the springs etc. Otherwise the ride can be a bit firm.
|
|
|
|
|
Logged
|
|
|
|
John Schmidt
Member
Posts: 15372
a/k/a Stuffy. '99 I/S Valk Roadsmith Trike
De Pere, WI (Green Bay)
|
|
« Reply #11 on: December 02, 2022, 03:33:54 PM » |
|
Good advice to the OP John. I usually add oil once ounce short as there is still a coating on the springs etc. Otherwise the ride can be a bit firm.
In the past a couple times I even dumped half a bottle of plain rubbing alcohol in the fork tubes and slosed it around a bit...then dumped. Cleans the insides real good and evaporates quickly, not leaving a damaging residue. If not in a hurry, I'll set them upside down and blow inside with a heat gun, not super hot and not for long. Never had an issue on any of my bikes or others I've worked on. With that process I still add an ounce to 1.25 oz less than called for. If you're riding in the twisties a lot and ride hard, then I suggest using the full amount of fork oil called for. Hard riding like that works better with stiffer suspension. |
|
|
|
|
Logged
|
|
|
|
|
NevsMate
|
|
« Reply #12 on: December 09, 2022, 07:23:58 AM » |
|
Thanks John & Longrider.... I'll try the 1oz less as you guys suggested. So, why does mother Honda stipulate a set amount of oil & as an afterthought, also add a set height of oil from top of both forks measured when collapsed! stay safe out there...  |
|
|
|
|
Logged
|
|
|
|
hubcapsc
Member
Posts: 16816
upstate
South Carolina
|
|
« Reply #13 on: December 09, 2022, 07:39:42 AM » |
|
So, why does mother Honda stipulate a set amount of oil & as an afterthought, also add a set height of oil from top of both forks measured when collapsed!
I always use the "measure from the top" method. I don't think you can just pour some in or take some out and have anything other than luck of the draw. I think a good job of changing fork seals involves taking the forks apart, changing all the wear parts (not just the seals), properly filling the damper and all the stuff that the manual dictates. -Mike |
|
|
|
|
Logged
|
|
|
|
|
F6Dave
|
|
« Reply #14 on: December 09, 2022, 08:19:08 AM » |
|
This is from the old (older than this one) VRCC board. I used to get regular requests to post it, so I'll share it again. It's a quick way to change the seals (and bushings) without special tools, or even removing the forks. 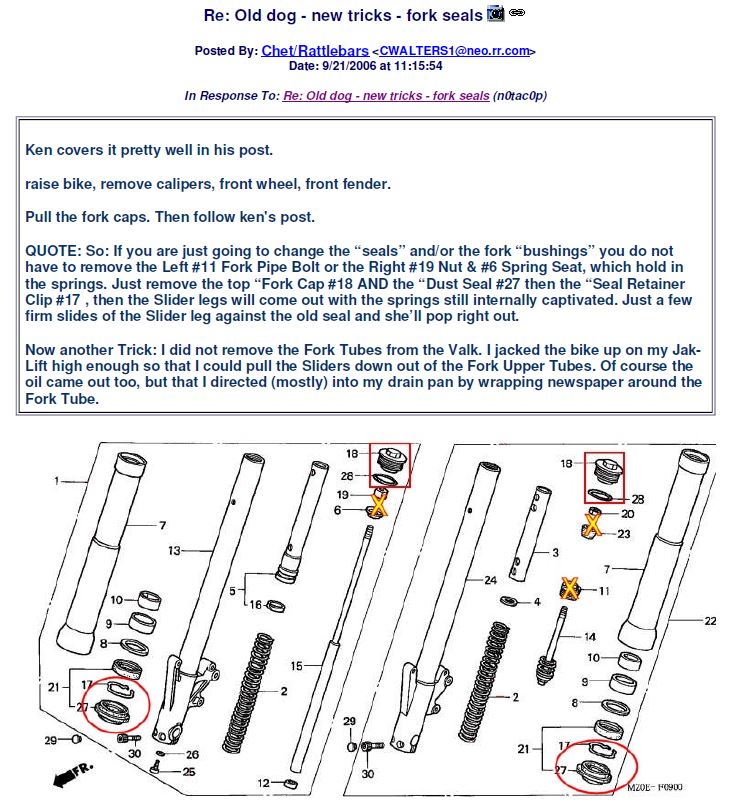 |
|
|
|
|
Logged
|
|
|
|
|
NevsMate
|
|
« Reply #15 on: December 09, 2022, 04:28:26 PM » |
|
Hi F6Dave
I had seen that image you have posted...
During reassembly there's no mention of how much oil you put in:
Volume as per book?
1-2oz less than book?
how to measure height of oil, and measurement as forks are not collapsed (as per book)?
Geoff.
|
|
|
|
|
Logged
|
|
|
|
|
F6Dave
|
|
« Reply #16 on: December 10, 2022, 06:06:44 AM » |
|
Hi F6Dave
I had seen that image you have posted...
During reassembly there's no mention of how much oil you put in:
Volume as per book?
1-2oz less than book?
how to measure height of oil, and measurement as forks are not collapsed (as per book)?
Geoff.
I used to take the whole darn thing apart, but after reading this method I follow it instead. Then I drain the fork as completely as I can, and fill it with the amount Honda recommends in the book. However... Since I bought a Seal Doctor I've ridden a good 100,000 miles since my last seal replacement. A leaky seal can almost always be fixed with a few thorough cleanings. And that tool works far better than anything else. |
|
|
|
|
Logged
|
|
|
|
|
F6Ghostrider VRCC #32501
|
|
« Reply #17 on: December 10, 2022, 08:08:56 AM » |
|
Just my 2 cents. I recently completed seal changes. The castle nut socket is only need if you are hanging your spring. BTW. It is torqued to 98ft lbs and will fly out if you’re not ready. Anyway, not necessary to remove. I removed the entire fork tube. HOLD ON TO IT! If you don’t, the bottom tube will slide out and begin pouring fluid out like the fountains at the Belagio in Vegas. I found out the hard way. Loosen the top cap. Otherwise it is hard to loosen in your vise. Invert your fork and dump out the fluid. Then begin to dismantle your fork. There is a great video on YouTube. This guy works out of his garage. He claims to have been a MC mechanic for over 2 decades. He doesn’t reveal a couple of handy tricks, but there was another video explaining ways around them. I didn’t use fancy drivers. Just the fork tubes to seat the seals. Some may poo poo that, but I saw it, and when done correctly, works perfect. I followed the manual for refilling. I think one side was 22 US oz and the other was 25. I took a day and a half to do this project. But you can literally do this in a few hours depending on how much bling is on your girl.
Good luck. If you have questions, my email is in my info.
Jeff.
|
|
|
|
|
Logged
|
|
|
|
|
Stephenlac
|
|
« Reply #18 on: September 09, 2025, 08:35:18 AM » |
|
Has anyone ever modified the forks to add a drain plug? Is that even feasible in order to make future oil changes much more doable?
I have had many bikers in my 64 years, and all that I can remember had drain plugs. I guess this is because i never had upside down forks before.
|
|
|
|
|
Logged
|
|
|
|
|
NE valkrider
|
|
« Reply #19 on: September 09, 2025, 09:42:10 AM » |
|
Right Fork = 670cc / 22.7oz
Left Fork = 744cc / 25.2oz
|
|
|
|
|
Logged
|
|
|
|
|
turtle254
|
|
« Reply #20 on: September 09, 2025, 08:09:05 PM » |
|
Has anyone ever modified the forks to add a drain plug? Is that even feasible in order to make future oil changes much more doable?
I have had many bikers in my 64 years, and all that I can remember had drain plugs. I guess this is because i never had upside down forks before.
I wonder that too ! Hope someone has tried that. |
|
|
|
|
Logged
|
|
|
|
|
98valk
|
|
« Reply #21 on: September 10, 2025, 04:40:09 AM » |
|
Has anyone ever modified the forks to add a drain plug? Is that even feasible in order to make future oil changes much more doable?
I have had many bikers in my 64 years, and all that I can remember had drain plugs. I guess this is because i never had upside down forks before.
I wonder that too ! Hope someone has tried that. there were few that did it, many yrs ago. might be on this tech board or it was on the archives tech board which was lost yrs ago. |
|
|
|
|
Logged
|
1998 Std/Tourer, 2007 DR200SE, 1981 CB900C 10speed
1973 Duster 340 4-speed rare A/C, 2001 F250 4x4 7.3L, 6sp
"Our Constitution was made only for a Moral and Religious people. It is wholly inadequate to the goverment of any other."
John Adams 10/11/1798
|
|
|
|
98valk
|
|
« Reply #22 on: September 10, 2025, 06:13:00 AM » |
|
|
|
|
|
|
Logged
|
1998 Std/Tourer, 2007 DR200SE, 1981 CB900C 10speed
1973 Duster 340 4-speed rare A/C, 2001 F250 4x4 7.3L, 6sp
"Our Constitution was made only for a Moral and Religious people. It is wholly inadequate to the goverment of any other."
John Adams 10/11/1798
|
|
|
|


