|
James III
|
 |
« on: April 14, 2013, 11:45:03 AM » |
|
Just got my custom made Coyote Tour Tank in last week. It's a 10" diameter, 13" long tank, aprox 4.25 gallon. I would have gone for the belly RPM tank if they were going to be at Inzane. Price wise the belly tank was a little less expensive but didn't want my tank screwed up if the bung was done wrong locally and the added electric fuel pump shyed me a little. I have several mounting options and would like some additional suggestions, comments, and I have a couple of basic questions. Sence we all like pic's, I'll try to bring this up to speed in the next few posts. Question #1: What weight range will the stock backrest / luggage rack mounting stansions support. The wet tank weight is going to be aprox 40 pounds. 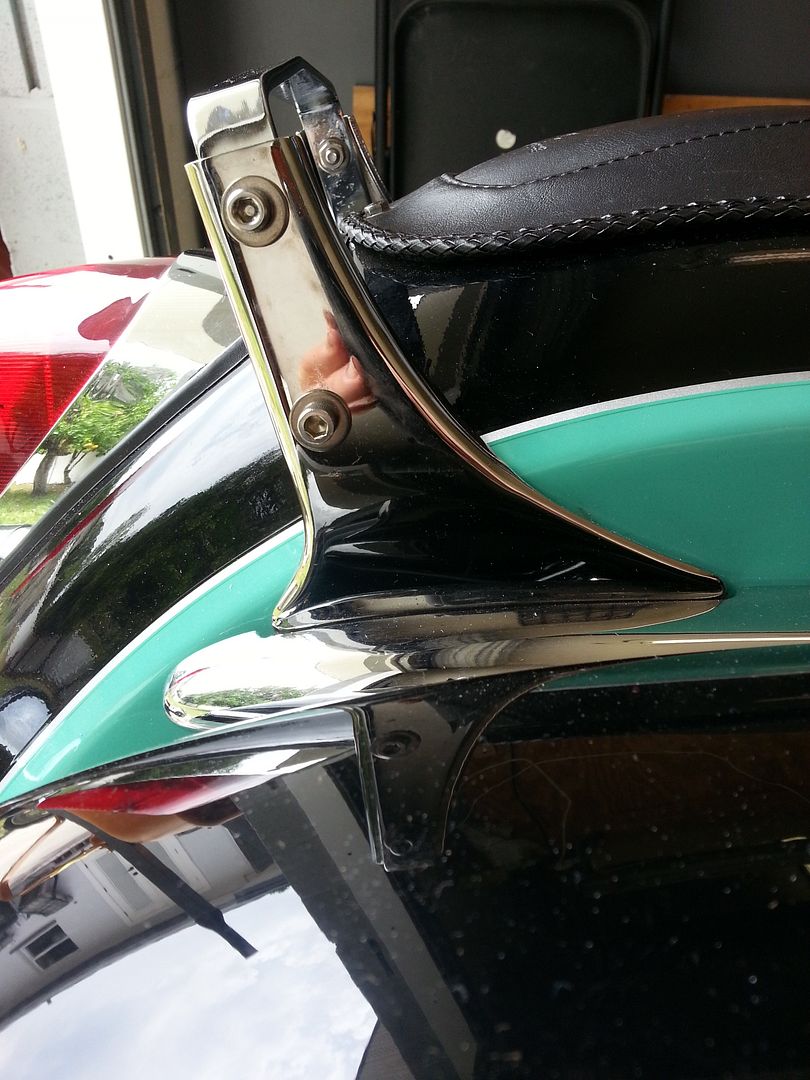 I have made several option templates, several using the stansions, and a couple less desire-able using the bag rail mounts, that I would have to modify the spacers to fit. I want this easily removable. A wompus rack is an option but it mounts the tank farther back and higher than I want, and adds another $220 clams to the project. Here are a few of the templates: 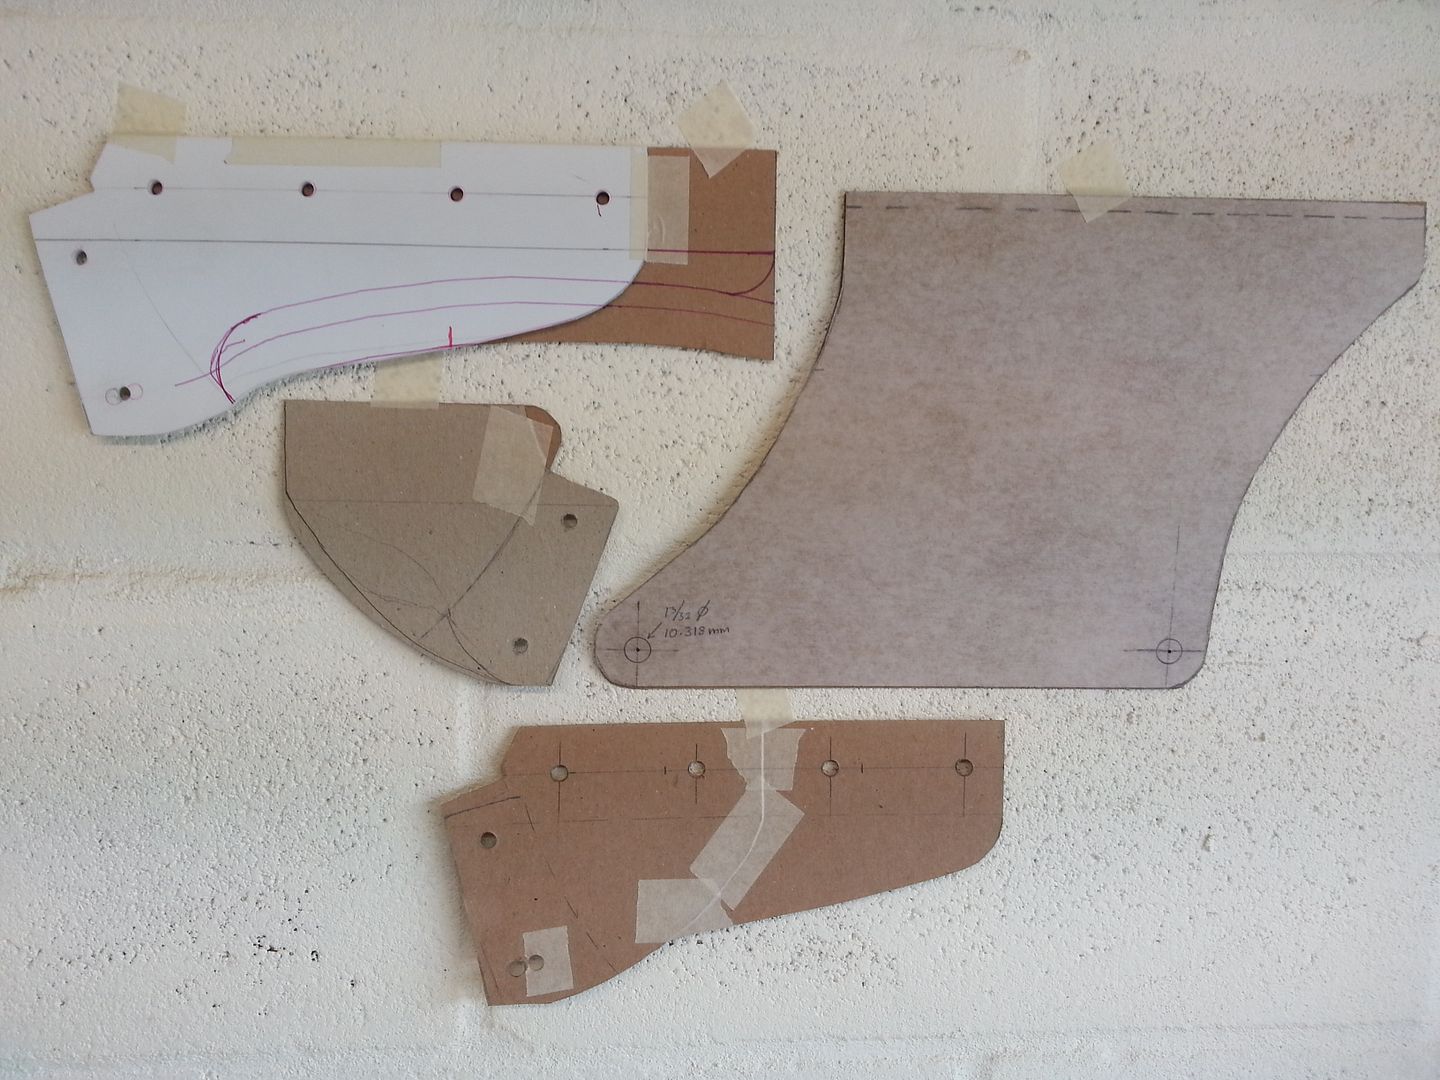 While gravity fed, I will be installing quite a bit of hardware to the installation. Question #2: Several bikes use vacumn operated fuel pumps. Is this an option? Routing the OEM petcock vac line to a vac fuel pump mounted in line of the hardware or just more problems? Here is some of the fuel line hardware: 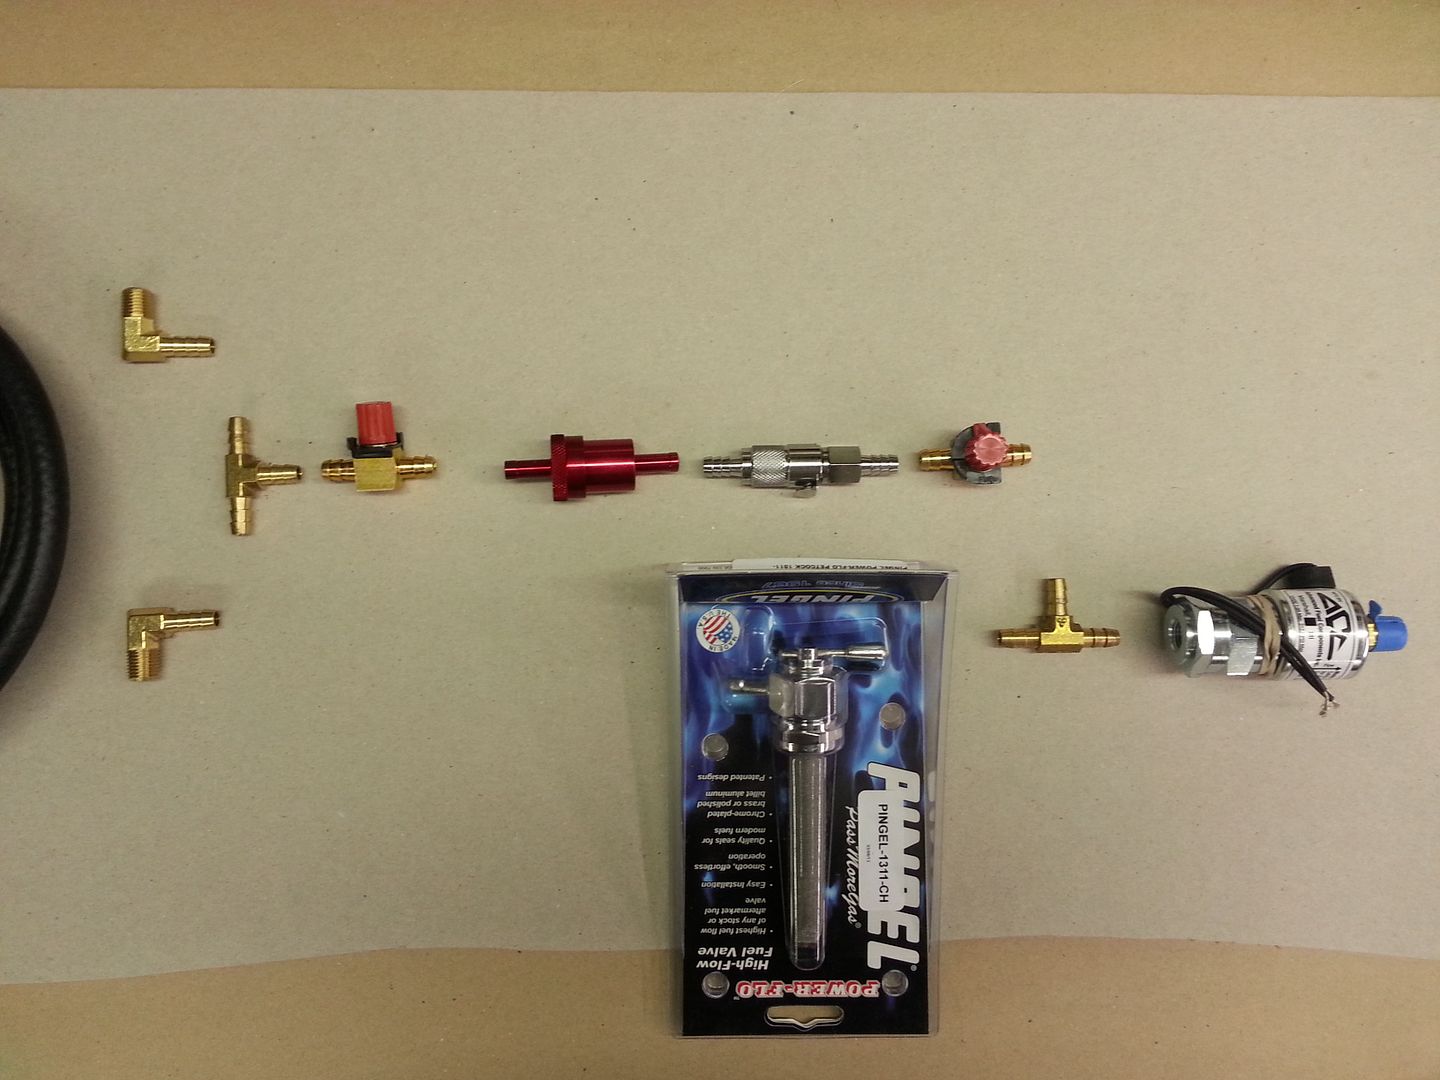 A couple of pics of the tank: with and without the optional cover. 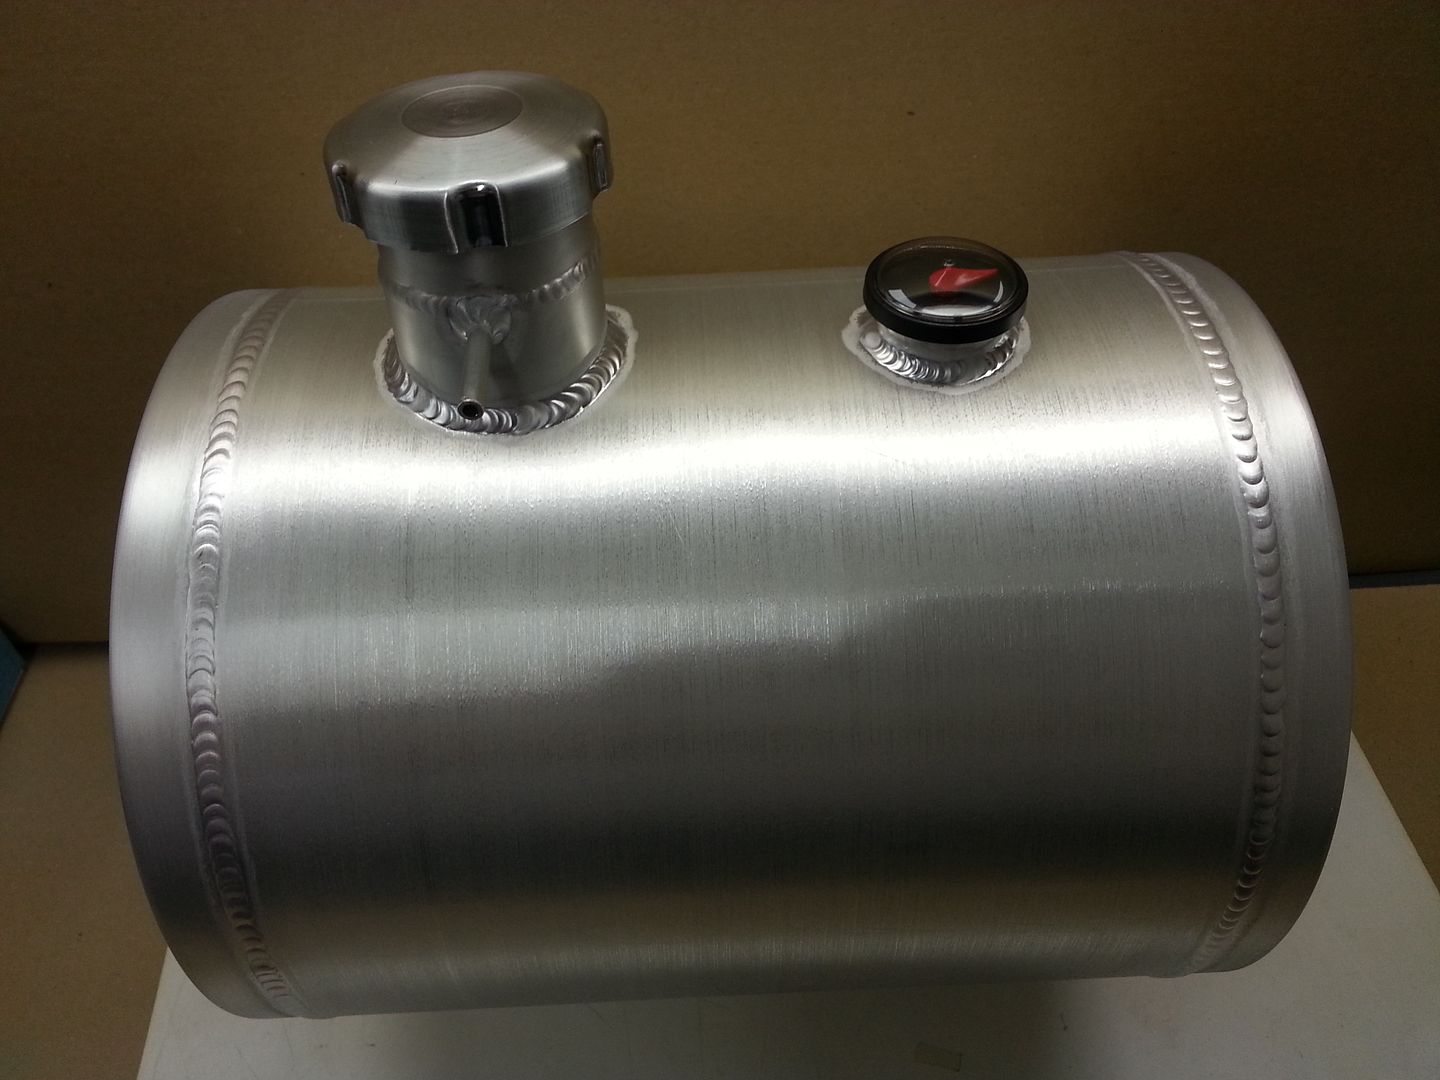 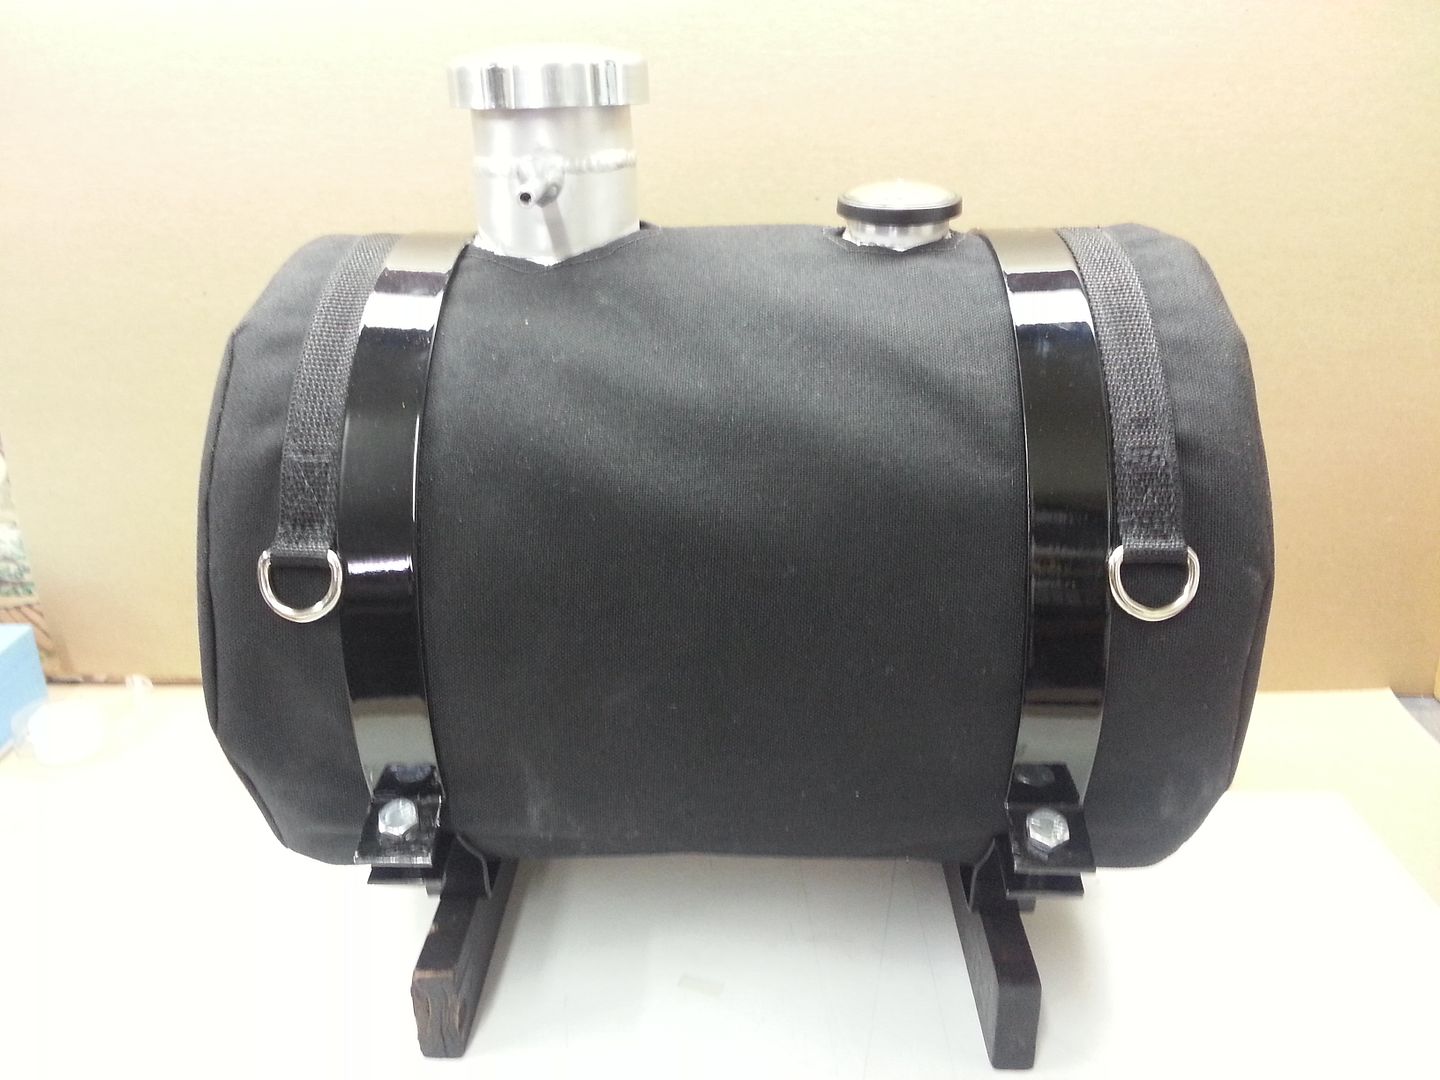 A cross piece is planned with a couple of the bracket templates that will distribute a portion of the weight to the fender and attach in the holes for the passenger seat mounting if needed or advised. A wompus rack is 12 gauge steel; I plan on using .25" aluminum plate as it is easier to work with in my shop. Any feedback and ideas welcome! Thanks, Jim |
|
|
|
|
 Logged
|
James
|
|
|
salty1
Member

Posts: 2359
"Flyka"
Spokane, WA or Tucson, AZ
|
|
« Reply #1 on: April 14, 2013, 12:31:12 PM » |
|
Is your bike desmogged? Great place for your Dan Marc shutoff is where the old PAIR valve system is/was located Interesting project!
|
|
|
|
|
Logged
|
My rides: 1998 GL1500C, 2000 GL 1500CF,2006 GL 1800 3A   |
|
|
|
James III
|
|
« Reply #2 on: April 14, 2013, 12:48:59 PM » |
|
No, Salty, I have not desmoged. Had the carbs off last September and did a rebuild, and thought about it at the time. I will be adding the filtered Dan Marc and may have to desmog for the little added space. Between the Dan Marc and the "T" from the aux tank I might have no choice. I was going to add a filter at that time and just couldn't muster the additional couple of inches that the filter would have taken. She runs like a clock so I hate to pull the carb bank off again if I don't have to. I was also afraid if I did a desmog I might run into some decel back popping and didn't want to fool with any jet changes. A Redeye desmog kit may have to be in order...
Thanks,
Jim
|
|
|
|
|
Logged
|
James
|
|
|
salty1
Member
Posts: 2359
"Flyka"
Spokane, WA or Tucson, AZ
|
|
« Reply #3 on: April 14, 2013, 01:40:59 PM » |
|
Jim no need to pull the carb bank to desmog, but you will have to pull the tank and the air filter housing. I found taking off the intakes also made the job that much easier. Keep us posted on your interesting project.  |
|
|
|
|
Logged
|
My rides: 1998 GL1500C, 2000 GL 1500CF,2006 GL 1800 3A |
|
|
Toledo Mark
Member
Posts: 609
Formerly Zeus661
Rossford, Ohio
|
|
« Reply #4 on: April 16, 2013, 06:50:10 PM » |
|
How is the install going? Any updates?
|
|
|
|
|
Logged
|
 ************************************************************** Dropbox is a neat app I found that I use to store files and pictures of my Valk. ** |
|
|
|
pancho
|
|
« Reply #5 on: April 16, 2013, 08:10:40 PM » |
|
Nice welding on the tank,, looks good.
|
|
|
|
|
Logged
|
The most expensive things you will purchase, are those things you would not have needed if you had listened and obeyed.
|
|
|
O-B-1
Member
Posts: 222
Show ain't over until the Fat Lady sings
Vancouver, WA

|
|
« Reply #6 on: April 17, 2013, 07:29:13 AM » |
|
If mounting on the back of the bike where a rack normally goes, it should gravity feed just fine. Just tee into the stock fuel line with a "this line or that line" selector valve. If you mount it at the OEM rack height the lowest part f that tank will be above the lowest part of the OEM gas tank.
|
|
|
|
« Last Edit: April 17, 2013, 07:31:44 AM by O-B-1 »
|
Logged
|
David W. Mitchell
1999 Honda Valkyrie GL1500C
|
|
|
|
James III
|
|
« Reply #7 on: April 17, 2013, 07:51:31 AM » |
|
No updates yet! Have the rear end out of the bike, waiting on a set of valve stems(no, not OEM's), changing rear brake lines to stainless, doing some cleanup, etc.
Kinda waiting to see if I can get a reply on the weight characteristics of the stock backrest/luggage rack stansions. This has a bearing on which bracket choice I will decide to make. I have not heard of one of those stansions cracking or breaking, have seen quite a load put on the oem attached luggage racks as well as definite pressure from many passengers that rely on the heft of the backrest stansions. I would like to complete my Darkside change over by next week and be able to join the other Florida Chapter members in Leesburg for the bikefest.
I would like to get the tank mountable to do a couple of flow tests before the actual plumbing install. All of the brackets will put the bottom of the tank above the main tanks petcock so flow should not be an issue but will make sure.
Pancho, I also looked the welds over pretty good on the tank, I couldn't weld aluminum like that! I think Bill at Coyote has his system down pretty good. While the nylon cover is optional and probally not supposed to be removable, I removed it anyway to inspect those welds. Had a time putting the cover back on but it did go back on. The tank straps are the real bear to attach. I used a couple of zip ties and slowly pulled the straps closed to install the bolts. Sounds easier than it was!
|
|
|
|
|
Logged
|
James
|
|
|
|
James III
|
|
« Reply #8 on: April 17, 2013, 08:05:13 AM » |
|
Thanks O-B-1, we're on the same page. The above pics show my basic plumbing layout and includes two shut-off valves as I don't want to rely on the quick disconnect for much other than a fast removal. I carry a fire extin. in my bag as I always have; and after reading of another members Valk burning on the side of the road with no chance of saving, this might be a small tip for all of us. I'm adding this tank for the road distance, seems I just get in the groove and have to stop and refuel. The tank must be cleanly separatable and removable from the main system.
|
|
|
|
|
Logged
|
James
|
|
|
|
IamGCW
|
|
« Reply #9 on: April 29, 2013, 03:06:08 AM » |
|
Good meeting you at Perkins. The brackets looked good. I doubt weight will be an issue. I load my rack with more than I should without a worry. I put small marker dots to see if anything moved, it did not.
I have the yellow and black valk.
Gil
|
|
|
|
|
Logged
|
Gil
uıɐƃɐ ʎɐqǝ ɟɟo pɹɐoqʎǝʞ ɐ ʎnq ɹǝʌǝu ןן,ı
|
|
|
|
James III
|
|
« Reply #10 on: May 03, 2013, 10:12:06 AM » |
|
Thanks IAMGCW! I selected my bracket design; simple and I believe effective. At this time I'm not going to add any fender attachment/ brackets. The solo bar as well as the tank itself should provide any sway stability needed. The design will allow adding/ using the OEM rack also if desired, but I am kinda looking at a couple of nicer more square designs available. Grade 8 bolts to mount the brackets to the stansions and nylock nuts on everything. Mounted the tank on the brackets. I picked up some polyurethane sway bar bushings and am going to try them between the tank strap mounting and the brackets; as the stansions are actually cambered inward making the bracket assembly not square. The bushings will provide some amount of "squaring" for the tank to bracket mounting, maybe some slight amount of vibration isolation....not that a Valk vibrates. So these four parts will be taken to Grumpy's to see if he can do a little cleanup/ polish on them before final mounting. At a later time I think I can make a nice exchangeable flat rack for use as trunk mounting or cargo rack with the brackets, other than the fuel tank. A fender support would be added to that. The tank will be removable fairly easily as are the brackets. Let's look at a couple of pic's. Here's the brackets Gil mentioned I was showing at our last Florida Chapter gathering. 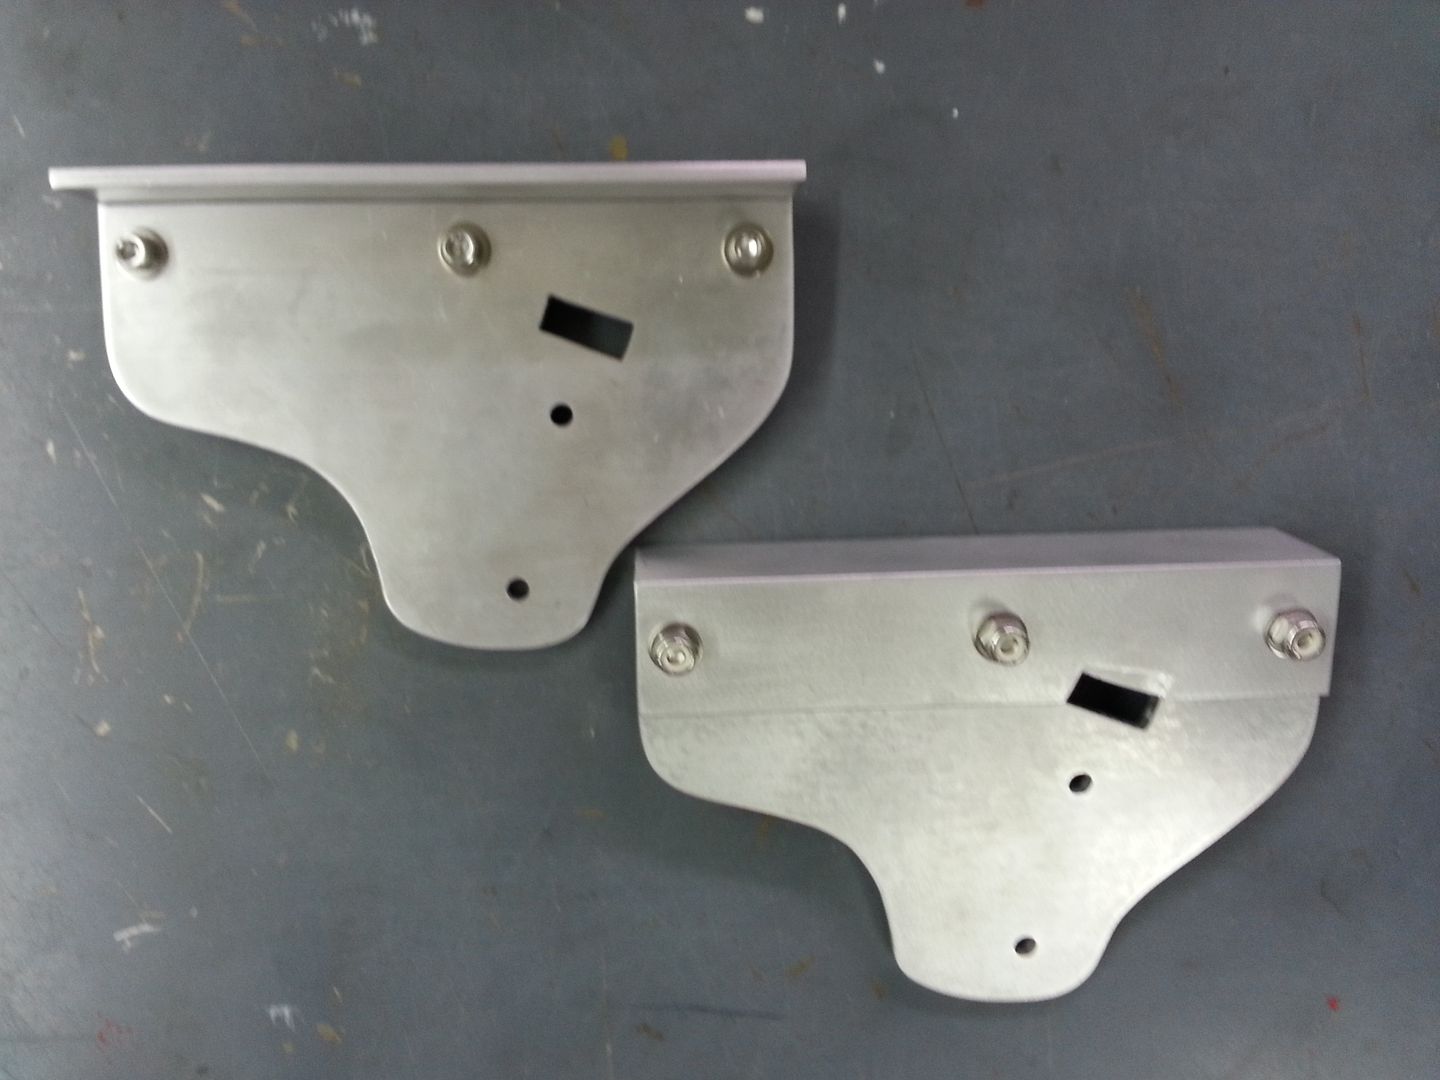 Tank on mounts 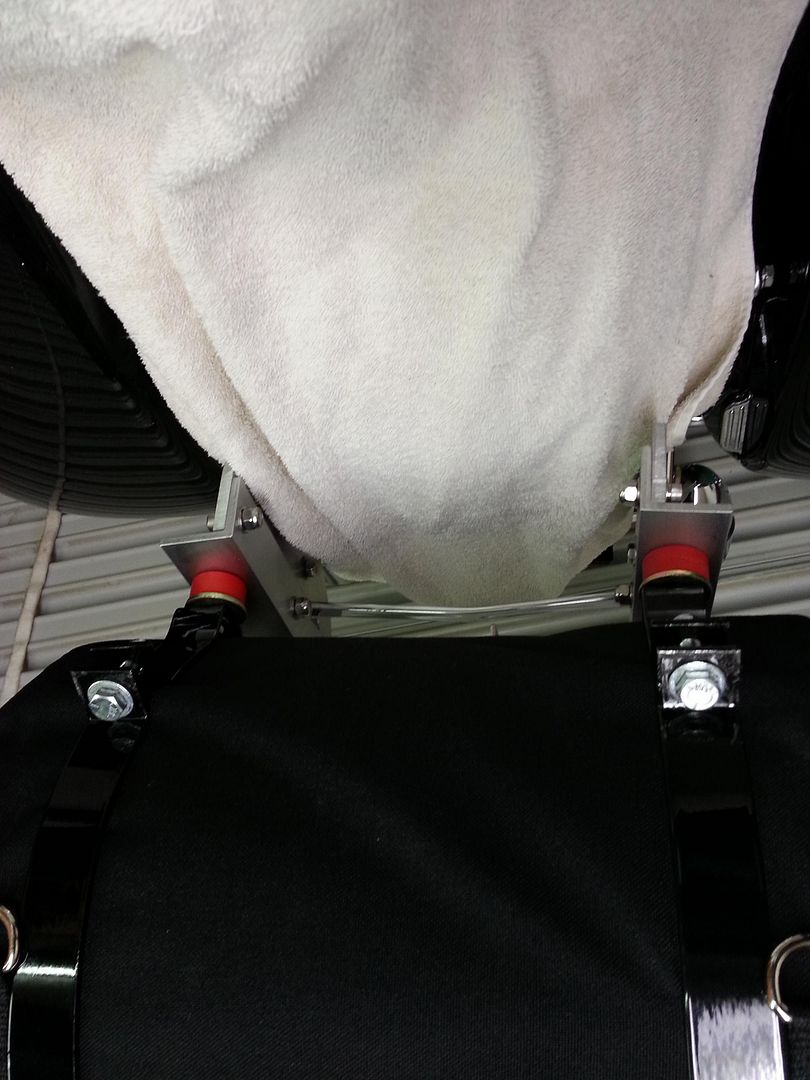 Any comments, suggestions welcome! So next I will start working on the plumbing. I have a basic layout drawn out and I don't expect any flow issues. It's going to be a tight fit to add the filtered Dan Mark valve in line so I think I am going to make my own fittings for the valve. This could save as much as 2"-3" of needed inline space. I'll expand on that as I work in that direction.
|
|
|
|
|
Logged
|
James
|
|
|
|
|
John Schmidt
Member
Posts: 15348
a/k/a Stuffy. '99 I/S Valk Roadsmith Trike
De Pere, WI (Green Bay)
|
|
« Reply #12 on: May 03, 2013, 02:16:34 PM » |
|
James....first a question; are you a solo rider? If so, I have some pictures I'll post re. how I adapted an 1100 Wing trunk mount to my Valk. I cut it down and have it sitting right over the rear fender. If you're solo, it would handle anything you want to set on there, makes a great platform for suitcases or travel bags of any size. I refurbished an 1100 trunk and use it since I can remove it with the turn of a key. However, if you have a corider, won't work....hence the question.  John |
|
|
|
|
Logged
|
|
|
|
|
James III
|
|
« Reply #13 on: May 03, 2013, 07:04:27 PM » |
|
Always solo Mr. Schmidt.
I'd like to have a trunk option, thought about finding a set of OEM bags and cutting and narrowing them as a "matching" trunk to the existing OEM bags. Thought that might be different.
Not had a passenger on any of my bikes for the last 30+ years of riding. Wife has never had an interest as she fell off a mini bike when she was young. I have thought about purchasing or building a trike but that's not big on my list right now.
Thanks,
Jim
|
|
|
|
|
Logged
|
James
|
|
|
John Schmidt
Member
Posts: 15348
a/k/a Stuffy. '99 I/S Valk Roadsmith Trike
De Pere, WI (Green Bay)
|
|
« Reply #14 on: May 03, 2013, 07:19:37 PM » |
|
|
|
|
|
|
Logged
|
|
|
|
|
James III
|
|
« Reply #15 on: May 04, 2013, 06:44:18 PM » |
|
That is a very nice platform setup and I would like a trunk, narrower as needed to be more forward and lower than the OEM Interstate setups. Found a new flat platform at the Webster bike flea but I still would have to have made brackets. Your setup gives great ideas for further development. Thanks for that John! IMGCW, I checked out the multi tank valves, just don't have the space to install much other than the filtered Dan Mark and a "T" for the aux tank feed. My feed hose routing will allow a handy shutoff valve right at my left leg at the seat. Removing tank and airbox tonight to begin plumbing installation and wiring the Dan Mark. I don't expect any issues........a job well planned if half way complete! LOL Jim
|
|
|
|
« Last Edit: May 04, 2013, 06:52:01 PM by James III »
|
Logged
|
James
|
|
|
|
James III
|
|
« Reply #16 on: May 27, 2013, 10:54:44 PM » |
|
Here's a bit of an update: I installed a Dan Mark model 152 (the filtered one), didn't desmog, it's quite the fit but can be done. So to make that installation even tighter, I "T"d the feed from the aux tank in also. I really sweated the installation because I had not separated the carbs when I went through them last year so the fuel rail "O" rings on the right feed rail seemed a little loose as I was "fiddling" the fit. (if that's a mechanical term) Here's a pic, sorry about the blury, just getting used to the phone/camera/computer/do everything devise. 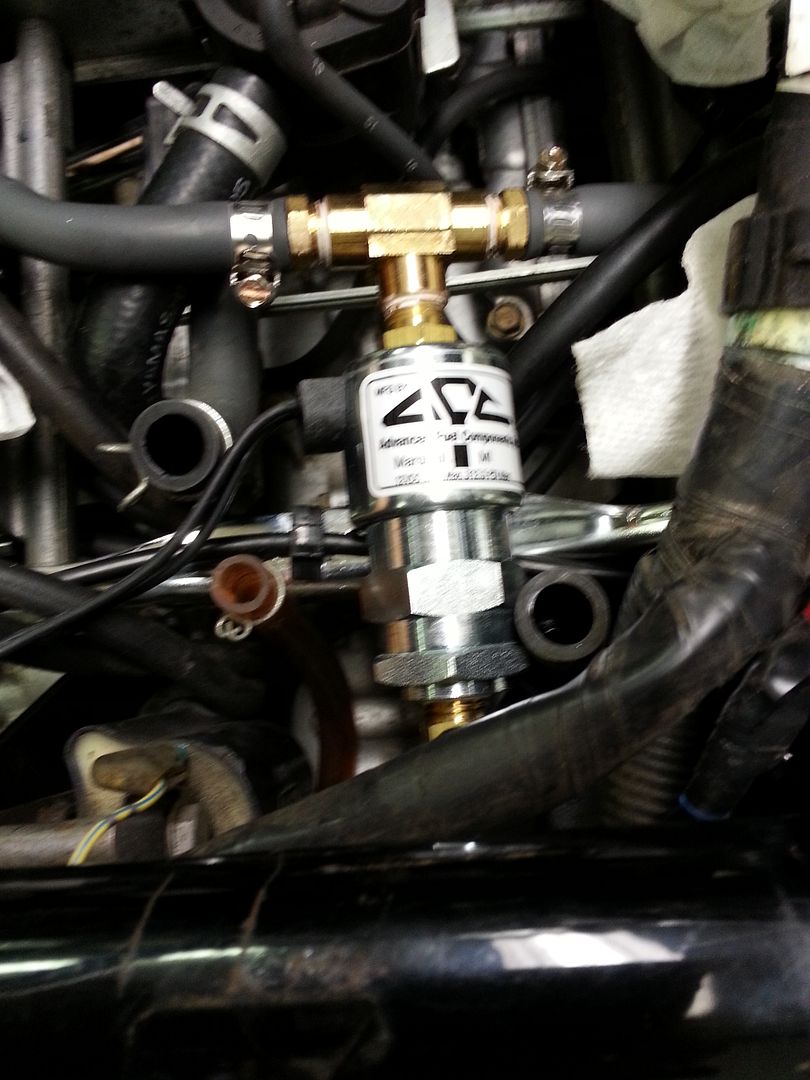 The "T" to the valve is just about fitting to fitting connected by 1-1/4" hose. The "T" to the tank hose is 1-1/2" so its tight, however the tank slips in and is right inline for the mate up. Actually a nice fit. I played with hose clamp screw positions trying to be able to gain access once tank air cleaner and tank were reinstalled........forget that, no easy access. 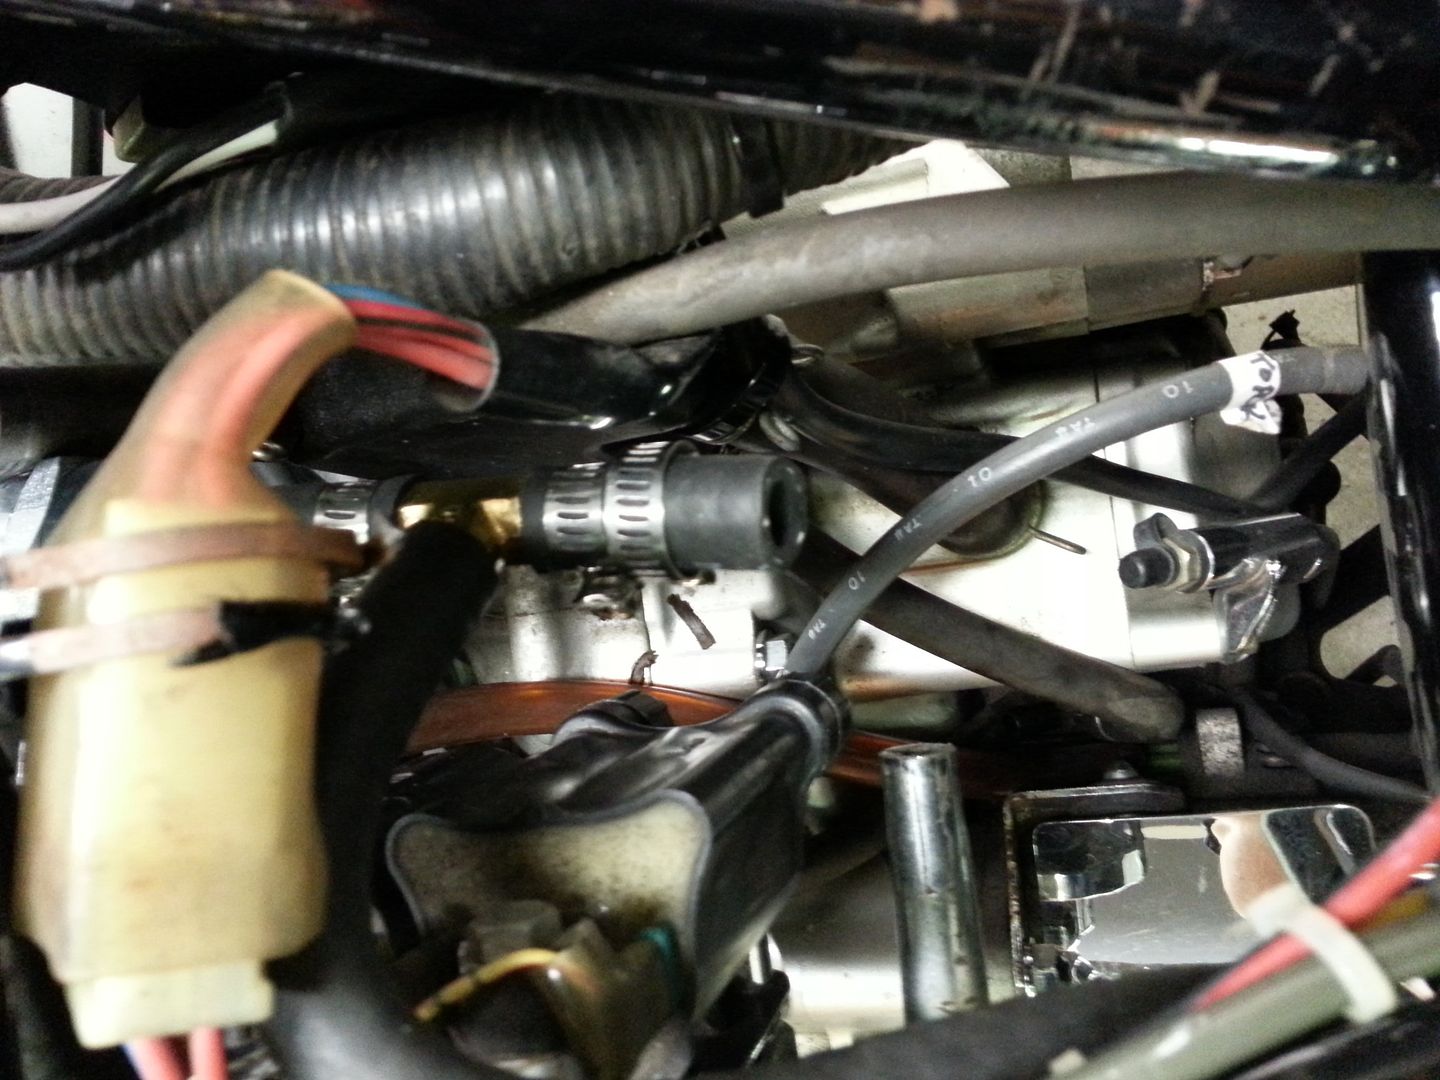 Note that the aux tank feed hose runs over the coil and down. I added an overhose as a precaution of heat or chaffing in that area where I ran the hose. The aux tank is mounted quite high and above the level of the routing. So from the aux tank the fuel runs through 2- 1/4"FPT to 5/15" hose connectors to a 5/16" "T", to a shutoff valve, through a fuel filter, (purchased with the tank), to a quick disconnect, then to another shutoff valve, then to the main fuel line "T". Now granted, this installation isn't going to win any show points, it is however very effective. While installing the Dan Mark, wiring, switch, relay......I also added a set of strip LED lights to the rear of the tank brackets. One 4" set as Turn sigs and a set of 12" for brake lights. Made a harness, soldered all electrical. I'm thinking of adding an additional rear red driving light on the tank.....I really want to be seen and not have a semi run my butt over at night on the superslabs or local cager for that matter. I'll get more pics posted, just took an hour to get the "paid" photobucket flowing, and havn't taken that many pics while I was working on the project. (didn't want to set hopes too high before I did the due or ripped everything off and flung it across the shop). Over the last six or seven months I have had the machine together, apart, together, apart, adding, making changes, cleaning....rear bearings, darkside, services, on and on. Didn't think I'd have it back together for our Florida VRCC chapter meetup this last weekend, pushed until Friday and then time to roll it out of the shop for a Friday late night ride...gonna fill up the tanks. Grabbed a flashlight, fire extinguisher, AAA card, and a pack of smogs. Filled the aux tank with 4 gallons of prem, topped off the main tank, reset odometer, turned off the main tank, turned on the aux and went for a night run. My main concern of any leak was for the "o" rings on the right side fuel rail. No issues, stopped several times to check everything, no leaks and the bike's running great! Did 100 miles, all speeds, turns, twistys (our local versions) and interstate, not a hitch. Dan Mark worked, aux tank no problems. Got up Saturday, meet up with Billyboy for our VRCC chapter meet, still on Aux tank. Ended up running 170 miles on aux tank, an amazing 42.5 MPG, and it was not all economy riding. The change over to the main tank was practiced while in the shop, and valve placement was very important for easy blind actuation. I knew I was getting close to empty but was pushing as far as possible. I could feel the engine gurgle, reached down and turned on the main tank, shut off the front AUX tank valve, never missed a beat, bike perked up right then, no delay, very smooth. Yes, I was impressed and did smile to myself, all while riding with several of our Florida VRCC Chapter members on a beautiful sunny Florida day. (ok, well it was actually getting hot as hell). So the Coyote tour tank works very well, was not a cheap option, but riding the whole day, not stopping for fuel and not even worring about it, I'm happy. The tank, hoses, lighting are all removable, fairly easily. The Dan Mark is also a good move, don't even have to shut off either tank when stopped. I didn't install my Pingle this go round as I just replaced the OEM late last year, and having the off/res/on at hands reach is a plus as is the factory reserve. Overall bike range.....don't know yet but, I really believe that my solo Inzane run in July is going to be really improved by having fuel on board. Just to throw in more "what I'm doing or done"; the car tire (Austone Taxi)....I do like it, it holds the road well, no ill effects, some difference, ya, maybe, time will give a better review, I only have 1100 miles on it so far. I'll get more detailed pics up in the coming time. Have to replace my front tire before Inzane trip in July and still hoping to make a run down state to Flamingo, Fl in the coming weeks. Comments, questions, welcome. |
|
|
|
|
Logged
|
James
|
|
|
|
al v
|
|
« Reply #17 on: May 28, 2013, 04:17:23 PM » |
|
Cool project. Any pics of whole bike with aux tank?
|
|
|
|
|
Logged
|
|
|
|
|
pancho
|
|
« Reply #18 on: May 28, 2013, 07:32:39 PM » |
|
+1 lets see an over all picture. Nice work JamesIII
|
|
|
|
|
Logged
|
The most expensive things you will purchase, are those things you would not have needed if you had listened and obeyed.
|
|
|
|
James III
|
|
« Reply #19 on: June 13, 2013, 07:53:57 AM » |
|
 Sorry for the pic delay, I just had not taken any. Seems I take pics of everything except my ride; anywho.....cloudy Florida morning! 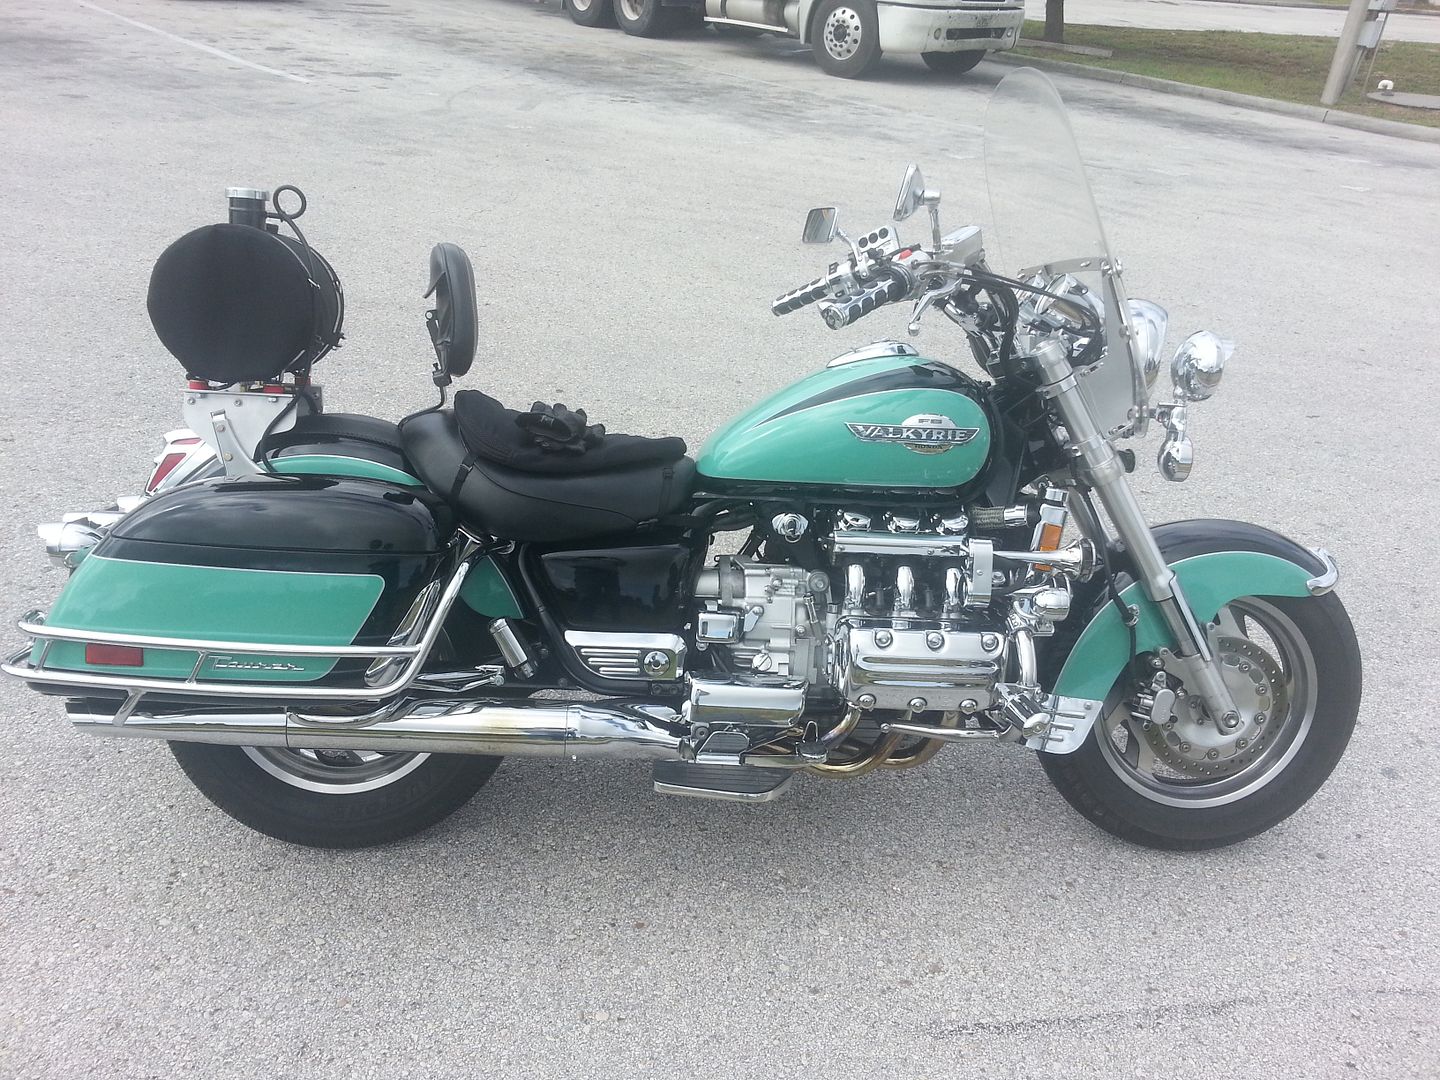 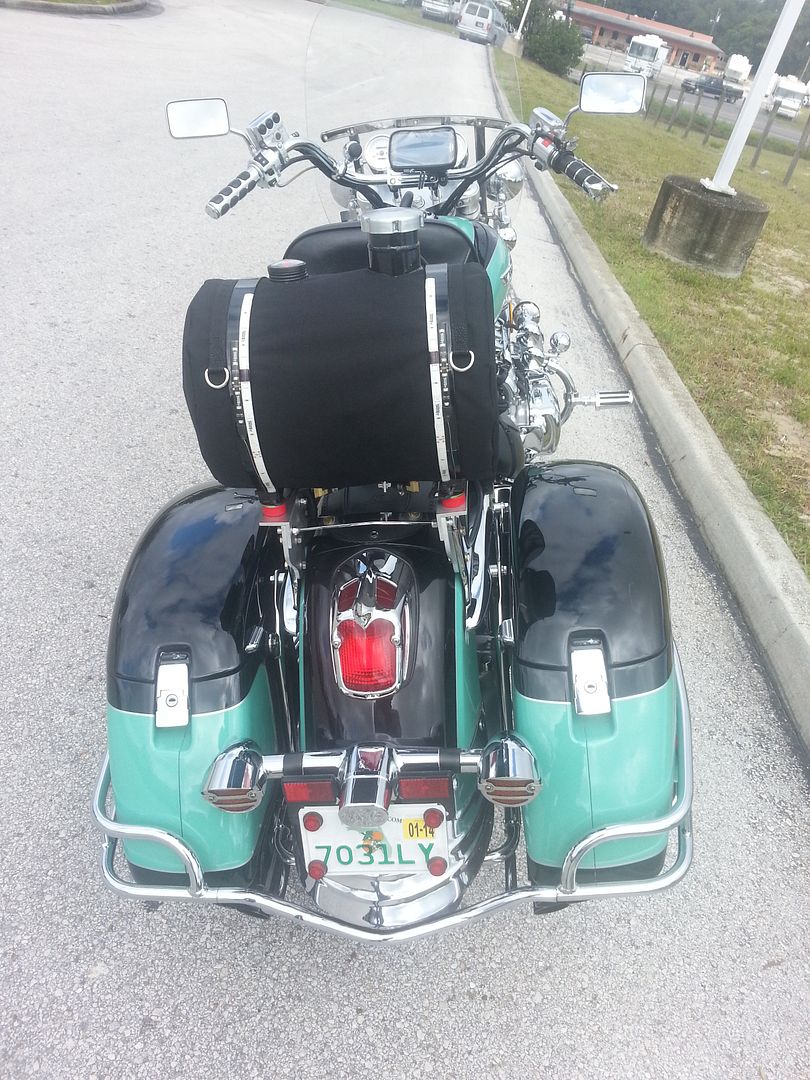 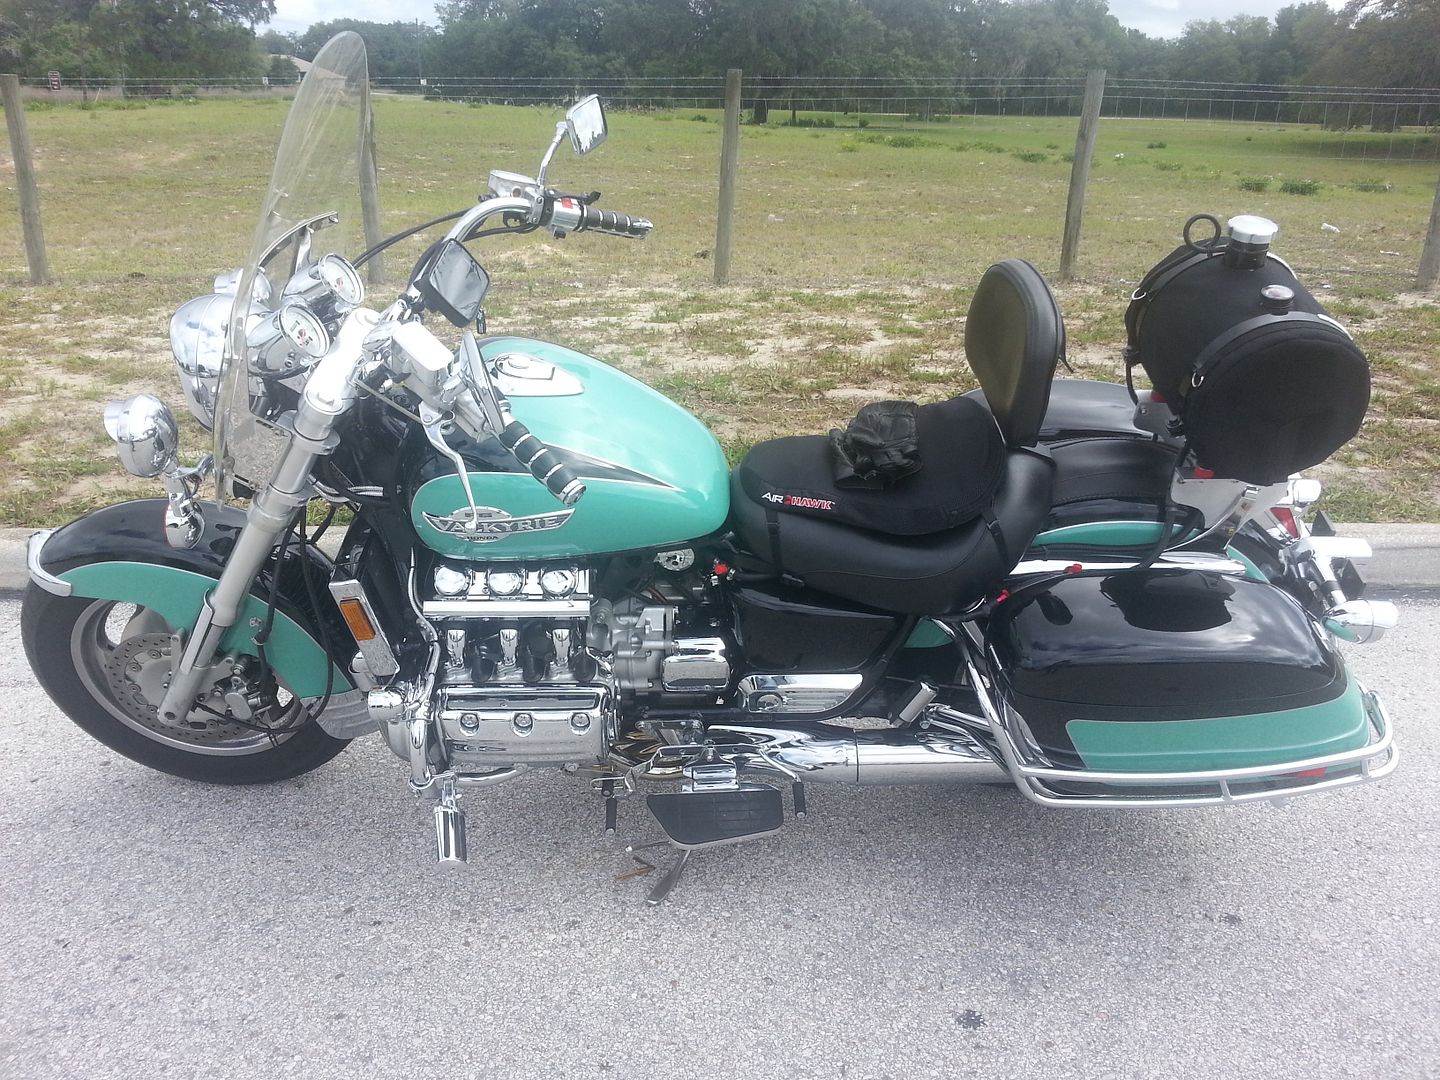 So far I've filled the tank four times, 4 gallons each time, and could probally add another half gallon. I did miss the change over one time; went through heavy rain and not thinking of fuel, thought first I had a plug wire leaking...by the time I realised that wasn't going to happen it was too late. Pulled over, turned on main tank and turned Aux off.......what a double dumbass...the tank has a fuel gauge, I knew what my milage on the tank was....and still ran out.....lol. The first three times it was a seamless changeover at highway to moderate speed. So far so good, a few minor things yet to do with the tank. Adding the filtered Dan Mark was a great addition. Doesn't matter if I turn the fuel off or not! Jim
|
|
|
|
|
Logged
|
James
|
|
|
|
pancho
|
|
« Reply #20 on: June 13, 2013, 07:00:25 PM » |
|
Nice technically involved job James,, I wonder if you are you going to make some trips where you will actually need the reserve capacity, or was it just an involved project so you don't need to gas up as often? Either way, good project.
|
|
|
|
|
Logged
|
The most expensive things you will purchase, are those things you would not have needed if you had listened and obeyed.
|
|
|
|
James III
|
|
« Reply #21 on: June 14, 2013, 02:56:37 AM » |
|
Thanks for following the thread Pancho; and others. Good question. I ride by myself mostly and ride the Blue Ridge a couple times a year among other places. I just get in the groove and have to get off the parkway or where ever and refuel; when the bikes ready, not when I'm ready. Riding at night as I do often coming out of the north, heading south I have pushed the fuel limits more than a few times, it's a discomfort and pucker factor I dislike. If I'm riding with others fueling isn't a big deal, but solo it's a PITA and seems I have to route fill up to fill up. An extra 150 miles for me is a big deal. After I leave Inzane in July, not sure where I will end up going, may ride out to California way or even Maine direction. It's summer, I'm vacationing, and like to see the country, not spending time seeking out gas stations. The tank and plumbing can be easily removed, used on my other bike, or mounted on my lawn tractor for extended mowing capacity......ya never know!
Jim
|
|
|
|
|
Logged
|
James
|
|
|
Toledo Mark
Member
Posts: 609
Formerly Zeus661
Rossford, Ohio
|
|
« Reply #22 on: June 14, 2013, 12:39:54 PM » |
|
James,
Glad to hear you are going to Inzane, I would like to get a better look. I have thought about the same kind of tank but just have not pulled the trigger.
|
|
|
|
|
Logged
|
************************************************************** Dropbox is a neat app I found that I use to store files and pictures of my Valk. ** |
|
|
|
James III
|
|
« Reply #23 on: June 15, 2013, 08:07:28 PM » |
|
Look me up at Inzane Zeus661, the tank does stick out like an extra appendage, and if you think a valk draws HD rider onlookers, this thing is like moths to a forest fire. What is it? Who makes it? Is that an extra tire, Is it an air tank, is that NOX.......no, it's a still; I make shine while I ride! I mentioned before, the belly tank was my first choice, but was not going to risk screwing up my fuel tank adding the bung....ya get one shot or leak city then just problems. This is simple, probably doesn't need the extra inch in height I added by installing a set of dampeners, as well as a few other things I did. Yea, at times I think it's ugly as all get out but, the Gurl does have legs and can travel. For road riding I think it will be a nice tool/option to have in place........now wonder if I add an Interstate tank also.......Always looking for a good, clean, inexpensive one! The most important aspect of this project to me are the brackets. Very simple design, inexpensive to make yourself, and can be used to base a pretty nice usable rack, of which I will work on later in the fall. The rear stansions are much stronger than I originally expected but I would add a fender mounting bolt if other than for the fuel tank. Jim |
|
|
|
|
Logged
|
James
|
|
|
Allan Y
Member
Posts: 29
2003 Honda Valkyrie
Edgewood New Mexico
|
 |
« Reply #24 on: March 10, 2014, 06:29:52 PM » |
|
James III Awesome job on the tank. You have inspired me to give it a try. I agree with you on the pucker factor. Looking for the next fueling station wondering if I can make it is not for me. I ordered a bunch of parts this weekend. I want to do an electric 3way(On Off On) switch installed in a Kuryakyn 7803 master cylinder mounted switch box controlling 2 dan-marc Model 111 Valves. One Valve for each tank. It should give me the ability to switch between tanks easily on the go with the flip of a switch. I will be using 5 Gallon Coyote Gear Tank. I have not figured the mounting yet as I like to fabricate things as I go, but I'm sure your post will come in handy. Now I need all the parts to Show up. Below is my current plan of attack. Let me know if you have any suggestions or things you would do different. Thanks  |
|
|
|
|
Logged
|
2003 Honda Valkyrie Cobra Light Bar Jardine Pipes LeatherLyke Saddlebags CCS100 Cruise Control  |
|
|
|
IamGCW
|
|
« Reply #25 on: March 11, 2014, 04:38:37 AM » |
|
I think James has a disconnect on his tank. He rides without it around here. You may want to consider adding that in your plans.
Gil
|
|
|
|
|
Logged
|
Gil
uıɐƃɐ ʎɐqǝ ɟɟo pɹɐoqʎǝʞ ɐ ʎnq ɹǝʌǝu ןן,ı
|
|
|
BnB Tom
Member
Posts: 1708
Where'd old times go?
Frisco, TX
|
|
« Reply #26 on: March 11, 2014, 05:19:46 AM » |
|
Something else that can assist in reducing the 'pucker factor' :  Sometimes an extra gallon of fuel, safely stored in your saddle bags, would be enough to get you to that next stop! AND, it's available for about $35.00 - no elaborate installation required |
|
|
|
|
Logged
|
|
|
|
|
|
Allan Y
Member
Posts: 29
2003 Honda Valkyrie
Edgewood New Mexico
|
|
« Reply #28 on: March 11, 2014, 03:36:30 PM » |
|
I think James has a disconnect on his tank. He rides without it around here. You may want to consider adding that in your plans.
Gil
I will have to add a disconnect with the line. Possibly something that could double as an easy way to transfer fuel to a bottle to help some one else out if needed. Something else that can assist in reducing the 'pucker factor' : Sometimes an extra gallon of fuel, safely stored in your saddle bags, would be enough to get you to that next stop! AND, it's available for about $35.00 - no elaborate installation required I did look at the Saddlebag Gas Can before I finally decided on the aux tank. I wanted more range then they would provide. Also for me 1/2 the fun of having toys is the processes of modifying them  |
|
|
|
|
Logged
|
2003 Honda Valkyrie Cobra Light Bar Jardine Pipes LeatherLyke Saddlebags CCS100 Cruise Control |
|
|
BnB Tom
Member
Posts: 1708
Where'd old times go?
Frisco, TX
|
|
« Reply #29 on: March 12, 2014, 04:24:38 AM » |
|
I did look at the Saddlebag Gas Can before I finally decided on the aux tank. I wanted more range then they would provide. Also for me 1/2 the fun of having toys is the processes of modifying them You are SO right |
|
|
|
|
Logged
|
|
|
|
|
heavyd
|
|
« Reply #30 on: March 12, 2014, 04:40:14 AM » |
|
I am curious James, what is your total range now? I have made it to a gas station on fumes more than once, this would probably mean I would drive further before I coasted in a fumes. lol. It's not usually an issue because with the stock seat I am more than ready to get off for a break every couple of hours.
|
|
|
|
|
Logged
|
|
|
|
|
|
Allan Y
Member
Posts: 29
2003 Honda Valkyrie
Edgewood New Mexico
|
|
« Reply #32 on: March 12, 2014, 03:56:33 PM » |
|
I did see a few of those out there when I was searching tanks. Seams like all of them had vented gas caps. Figured when riding it could leak fuel out when full. Didn't want to deal with gas all over everything. The tank I decided on has a sealed cap with a vent port on the neck I can attach a line to and rout it out under the bike or Tourtanks offers a catch can for the vent line. http://www.tourtank.com/catchtank.html http://www.coyote-gear.com/instock1016VBD.html http://www.coyote-gear.com/instock1016VBD.html |
|
|
|
|
Logged
|
2003 Honda Valkyrie Cobra Light Bar Jardine Pipes LeatherLyke Saddlebags CCS100 Cruise Control |
|
|
Allan Y
Member
Posts: 29
2003 Honda Valkyrie
Edgewood New Mexico
|
|
« Reply #33 on: March 16, 2014, 01:35:54 PM » |
|
|
|
|
|
|
Logged
|
2003 Honda Valkyrie Cobra Light Bar Jardine Pipes LeatherLyke Saddlebags CCS100 Cruise Control |
|
|
|
IamGCW
|
|
« Reply #34 on: March 16, 2014, 06:06:00 PM » |
|
Nice, replacing those switches was a great idea.
Gil
|
|
|
|
|
Logged
|
Gil
uıɐƃɐ ʎɐqǝ ɟɟo pɹɐoqʎǝʞ ɐ ʎnq ɹǝʌǝu ןן,ı
|
|
|
Allan Y
Member
Posts: 29
2003 Honda Valkyrie
Edgewood New Mexico
|
|
« Reply #35 on: March 17, 2014, 10:01:36 AM » |
|
Nice, replacing those switches was a great idea.
Gil
Thanks. I thought (on/of/on) switch would work best. That way if both tanks were full I could not have them both on at the same time and accidentally overflow the front tank if the back one sets a bit higher. |
|
|
|
|
Logged
|
2003 Honda Valkyrie Cobra Light Bar Jardine Pipes LeatherLyke Saddlebags CCS100 Cruise Control |
|
|
Allan Y
Member
Posts: 29
2003 Honda Valkyrie
Edgewood New Mexico
|
|
« Reply #36 on: March 19, 2014, 09:55:53 AM » |
|
Got the new tank It looks like it should work well. Now to figure out on the mounting.   The tank just setting on the rear rack.  |
|
|
|
|
Logged
|
2003 Honda Valkyrie Cobra Light Bar Jardine Pipes LeatherLyke Saddlebags CCS100 Cruise Control |
|
|
|
James III
|
|
« Reply #37 on: March 20, 2014, 11:25:48 PM » |
|
Congrad on your new tank! Glad to see this thread pop up now and then. As Gil mentioned, I do take my Aux tank off and on quite a bit, no real need for local two or three hundred mile riding. I have aux LED turn and brake lights mounted to the tanks mounting straps, that just plug into a series of connectors, as well as the tanks ground wire. A quick disconnect connects it to a pigtail that goes to the main fuel line. Two inline off and on valves as well as a fuel filter. Also as shown in the above pics I use a filtered Dan Mark fuel valve. A filter from the aux tank is a must. I just cleaned my aux filter a few weeks ago and was shocked by the crap that was in it. Hair, metal shavings(I flushed the tank very well when it was brand new). This stuff was from the gas pumps the last 6 or 7 thousand miles. I have not worried about the Dan Mark filter as I use an OEM petcock with the standard petcock filter on it. I have a pingle but didn't install it because the OEM valve is right at my finger tips to change over. I would have to reach way under to change over with the pingle, so until I make a cam / fulcrum lever for a pingle, it will not be used. So the process goes like this: I run on my Aux tank first; the 2 off/on valves open, the OEM petcock off position. To change I turn off the on/off valve closest to my hand, just behind the OEM tank on/off reserve valve, then turn the OEM valve to on; pretty much all in one motion, and seamless. The other on/off valve is located right before the Aux tank filter, I don't fool with it other than turning it off when I remove the aux tank or if I should have to service the filter on the road for some reason. It's more of a safety cutoff than anything else. The filtered Dan Mark installation is tight. I have a threaded brass "T" for the fuel rail feed screwed into the filtered Dan Mark, A brass threaded 5/16" nipple off the other end of the electric valve. Then 1" of hose to connect to another brass "T", then 1" of hose to the main tank petcock. The Aux tank line is shielded and goes up over the coil and inside the frame rail, then out to the on/off valve and then a quick disconnect. It is actually a very simple setup, with gravity doing the work. I had an extra 2" extension installed when I had the tank made on the filler neck; for the overflow tube. It's ugly as all get out as I have to keep a loop in the overflow/vent tube. I route the overflow tube down the right side then down joining the other factory vents below the bike, nothing really shows. It sounds more complex than it is by my writing about it. As far as range, I have run the spectrum. From 280 miles to 350 miles, as every valk rider knows, fuel mileage is rider dependent. I've gotten fourty two miles per gallon but average 34.5....yes I do actually follow my mileage pretty close. One observation for you Allen. I also rewired my Kuri switch box. The switches and housing are not waterproof, beware.... even the switches that you replaced are prob not waterproof. If water gets on in the switches, they will turn on...this can be a major problem; if not just killing your battery. I learned this one day after washing the bike and my crash bar lights kept coming on...one of the switches I used of the three; the other two are for my deer lights and light bar. The Dan Mark has a separate switch located in the center filler panel. I never fool with it as it is separately powered and relayed as all of my circuits are. I might think twice before using 2 Dan Marks as you have indicated....keep it simple. Use a manual on/off valve from the tank. Never had a fuel starvation issue with the filtered Dan Mark in place but did have a main tank venting issue in a driving flash flood that closed off the OEM tank vent for several minutes...gave me a scare in the middle of Alabama...I put a 5/16" "T" higher up the vent line to eliminate this happening again. As far as the tank mounting, I made them myself from 1/4" Aluminum as shown above. The tank sits back so I can put my duffle bag between the tank and my seat backrest; but still use the factory rear cargo rack.....I strap a small cooler on it. If you need any pics or other info I might be able to provide for you post it on this thread or PM me. I am on the Florida Chapter board a bit more than the Tech or general boards. I'll be at GOTF and Inzane should you or others like to scope out the rig closer. Otherwise, I'm on the road somewhere.....on the Time Machine!! Oh yes, one other thing.....buy a locking fuel cap to use on the road. As a side edit: Allen, I don't believe you will have enough open space to install 2 Dan Mark valves using the "Y". The fuel flow must remain downhill to the carb "T". James
|
|
|
|
« Last Edit: March 21, 2014, 08:35:43 AM by James III »
|
Logged
|
James
|
|
|
Allan Y
Member
Posts: 29
2003 Honda Valkyrie
Edgewood New Mexico
|
|
« Reply #38 on: March 21, 2014, 11:31:31 AM » |
|
James III, Thanks for the info I had not thought about water being an issue in the switch block(I will have to look into possible fixes). I am aware of the limited space being an issue. It might be even worse in my case as I put a vacuum canister in the area for my cruse control. I am thinking I will have to offset the valves. One behind the other. I also purchased both 90 degree and straight fittings for the valves to use in fitment.  For the locking gas cap. I hop not to need one. My plane is to mount the tank inside a locking trunk that will match my current saddle bags. I will have to wait and see how it fits. The trunk wont show up for about another 2 weeks. There is a possibility I might have to mod the trunk lid to make room for the filler port.  |
|
|
|
|
Logged
|
2003 Honda Valkyrie Cobra Light Bar Jardine Pipes LeatherLyke Saddlebags CCS100 Cruise Control |
|
|
|
uturn
|
|
« Reply #39 on: March 23, 2014, 12:47:44 PM » |
|
hehehe...double aux tank... 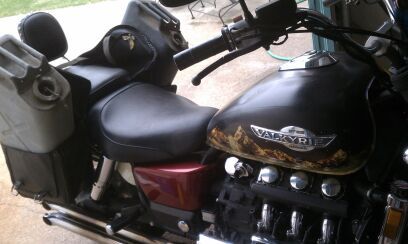 |
|
|
|
|
Logged
|
|
|
|
|


