Skinhead
Member

Posts: 8753
J. A. B. O. A.
Troy, MI
|
 |
« Reply #80 on: January 19, 2021, 02:04:19 PM » |
|
Well, guess I have a K&N air filter. I also noted the hose on the petcock was looking a bit . . . old. Guess I'll replace all the hoses though doing a desmog will help with that. Now I have to pick my poison concerning how I'm going to clean the tank. I was thinking I'd use vinegar but seeing how hard it is to get the rust out I need to find a way to dissolve it so I can rinse it out.  Oxalic Acid. |
|
|
|
|
 Logged
|
 Troy, MI |
|
|
|
|
|
Timbo1
|
|
« Reply #82 on: January 19, 2021, 02:48:43 PM » |
|
I second the suggestion on ultrasonic cleaner. I'd think between the heat and vibration you'd be able to get that pilot screw out. As to not separating the carbs I'd bet more than likely the fuel rail o-rings will leak. You can test that on the bench using a gravity fed fuel bottle as you mentioned. Just hook it up to the fuel rails to fill the bowls and if fuel gushes out the rails you'll know. Clearly the carbs need to be buttoned up with floats, needles bowls installed. You can get fuel rail o-rings from theoringstore.com for a little bit of nothing. I think shipping was more than the o-rings when I ordered them. http://www.valkyrieforum.com/bbs/index.php/topic,113753.msg1148726.html#msg1148726You could also get the intake o-rings from the same place if so desired. http://www.valkyrieforum.com/bbs/index.php/topic,34945.msg1111343.html#msg1111343 |
|
|
|
|
Logged
|
|
|
|
|
RustyValkry
|
|
« Reply #83 on: January 19, 2021, 04:46:03 PM » |
|
The bike is not non-viable unless/until I prove the engine or tranny is severely damaged. What I'm doing now is busy work and is only discouraging because of the little issues I'm running into, like ONE mixture screw that refuses to back out. It may ultimately result in having to find a used carb, just one. I really wanted to be able to clean up the carbs and stick them back in to start the engine (without doing anything to the tank, just use a bottle of gas) to determine it's condition but it's looking like I may have to pull the carb assembly completely apart which complicates the process but only changes the cost to the extent of that carb purchase. And, of course, doing a lot of work on a bike or car makes my sciatica kick up which is part of the process. There's just nothing more fun than that jolt of pain shooting down your leg.  I've never used them but those ultrasonic cleaners are supposed to work really good on carbs. Maybe that would free up that one carb. I think it's a given that you are going to have to take apart the carbs for o-ring replacement. Taking the carbs apart is one thing if the engine is good, totally different if it turns out the engine is bad. Yea, I was looking at an ultrasonic cleaner at Harbor Freight a couple weeks ago. Whether it would free up the pilot screw or not, I don't know but the model I saw was small and I'd have to measure to determine if a complete carb would fit into it. |
|
|
|
|
Logged
|
|
|
|
|
RustyValkry
|
|
« Reply #84 on: January 19, 2021, 05:28:23 PM » |
|
Read through your thread. Yea, it's a lot of work, a lot of setbacks, a lot of head scratching and feelings of helpless insanity. |
|
|
|
|
Logged
|
|
|
|
|
Timbo1
|
|
« Reply #85 on: January 19, 2021, 08:23:39 PM » |
|
Yea, I was looking at an ultrasonic cleaner at Harbor Freight a couple weeks ago. Whether it would free up the pilot screw or not, I don't know but the model I saw was small and I'd have to measure to determine if a complete carb would fit into it.
I wasn't able to completely submerge the carb bodies in the Harbor Freight model, but it would fit 2 carb bodies about 80% submerged so I rotated between cycles and it seemed to work out alright. I would prefer a larger one though. |
|
|
|
« Last Edit: January 19, 2021, 08:38:45 PM by Timbo1 »
|
Logged
|
|
|
|
|
RustyValkry
|
|
« Reply #86 on: January 20, 2021, 01:29:37 PM » |
|
You see, I hear and I obey! I bought one of them there new fangled Harbor Freight ultrasonic cleaners today. I took one of the front calipers with me to be sure they would fit. It did, just barely. Soon as I got home I stuck the caliper in and cranked it up. Did 2 cycles and started a third but the cleaner said not so fast so I'm waiting for it to cool down. I stuck it in a 1 gallon freezer bag filled with hot water and a goodly amount of washing soda. I checked it after 2 cycles and it was greatly improved. Once this next cycle is done I'll pull it out for some pics next to the other front caliper. A couple pics just to tide you over.   |
|
|
|
|
Logged
|
|
|
|
|
|
|
RustyValkry
|
|
« Reply #88 on: January 20, 2021, 02:06:16 PM » |
|
Just checked the rear master, front master and petcock after 8 minutes. Definitely improved so I have them in for another 8 minutes.
|
|
|
|
|
Logged
|
|
|
|
MarkT
Member
Posts: 5196
VRCC #437 "Form follows Function"
Colorado Front Range - elevation 2.005 km

|
|
« Reply #89 on: January 21, 2021, 07:59:13 AM » |
|
I haven't tried this on brake calipers but I'm guessing my newish media blaster would remove all crud visible on those calipers. But have to be careful not to direct the stream at any closely machined surfaces. Or inside passages. Also the media selected would matter. It will remove any rust, crud or paint and leave a mildly satiny finish. Again, depending on how aggressive the media. https://www.youtube.com/watch?v=Ei5iExMcUzg |
|
|
|
« Last Edit: January 21, 2021, 08:08:28 AM by MarkT »
|
Logged
|
|
|
|
|
|
|
RustyValkry
|
|
« Reply #91 on: January 21, 2021, 02:17:09 PM » |
|
This afternoon I wanted to deal with the two trouble carbs; the one with the frozen pilot screw, and the one with the frozen butterfly shaft. I had decided to remove only those 2 and I started with the one with the frozen shaft, #6. Unfortunately the one adapter that joins them was also frozen and while trying to loosen it the #1 carb just came right off -- lovely. The last pic below shows the troublesome connection after I had it moving. In the end I had to tap on #6 for about half an hour to finally work it loose. The second pic below shows #6 after it had finally begun to work it's way off and that was probably after 20 or more minutes of tapping. I don't want to tap any more for a while.  In case nobody cares I just grabbed a little chunk of 2x4 to do my tapping. There are only 2 places on the carb body I wanted to risk tapping on. I kept expecting to see a crack appear on the carb but it seemed to be OK. I decided to keep the right bank of carbs together until I finish rebuilding the left side three. The middle pic shows the inlet of the #6 carb. I noticed a fair amount of rust and wanted to try to get a pic of it. You need to enlarge it to see much.    |
|
|
|
« Last Edit: January 21, 2021, 03:54:09 PM by RustyValkry »
|
Logged
|
|
|
|
|
Timbo1
|
|
« Reply #92 on: January 21, 2021, 03:58:43 PM » |
|
This afternoon I wanted to deal with the two trouble carbs; the one with the frozen pilot screw, and the one with the frozen butterfly shaft. I had decided to remove only those 2 and I started with the one with the frozen shaft, #6. Unfortunately the one adapter that joins them was also frozen and while trying to loosen it the #1 carb just came right off -- lovely. In the end I had to tap on #6 for about half an hour to finally work it loose. The last pic below shows #6 after it had finally begun to work it's way off and that was probably after 20 or more minutes of tapping. I don't want to tap any more for a while. In case nobody cares I just grabbed a little chunk of 2x4 to do my tapping. There are only 2 places on the carb body I wanted to risk tapping on. I kept expecting to see a crack appear on the carb but it seemed to be OK. I decided to keep the right bank of carbs together until I finish rebuilding the left side three. The middle pic shows the inlet of the #6 carb. I noticed a fair amount of rust and wanted to try to get a pic of it. You need to enlarge it to see much. Your making good progress. I don't think it's uncommon for those pilot pins to seize between carbs even for bikes that have been maintained better than that one. Keep plugging away 1 piece at a time and you'll run out of things to work on before you know it. And for your relaxation for the evening speaking of 1 piece at a time, here's an old classic. https://www.youtube.com/watch?v=18cW_yHo3PY |
|
|
|
|
Logged
|
|
|
|
|
RustyValkry
|
|
« Reply #93 on: January 22, 2021, 05:24:04 PM » |
|
Today I spent about 5 hours working on the Valk. It was a nice warm day, very pleasant. I got carbs 2, 4 and 6 stripped and cleaned in the ultrasonic cleaner. I lost count of how many cycles I gave each one but the cleaner got a good workout. These 3 carbs are ready to put back together which is good because my Redeye carb rebuild kit just arrived this afternoon. I need to buy two or 3 new pilot screws so I guess I'd better get that done. Carb # 6 is the one that had the sticky throttle shaft. Initially I tried to remove the 2 screws that hold on the butterfly but they were frozen (surprise, surprise!!!!). After a few sessions in the ultrasonic I was able to get the screws loose. The pics below show that carb.    |
|
|
|
|
Logged
|
|
|
|
|
RustyValkry
|
|
« Reply #94 on: January 22, 2021, 05:32:59 PM » |
|
I also put the front brake calipers through a couple cycles each. I was able to get the pistons out of the one that I had been able to get the hanger pin out of but I had to use a set of channel locks on them so they're toast. The bores looked OK at first glance. I pulled the seals out and put them through another ultrasonic cycle to get the schmutz out the seal seats that I couldn't dig out with a machinists pick. The other front caliper is being a problem because I can't break the hanger pin loose. I'll keep putting it through ultrasonic cycles and trying to break the pin loose until the head finally gives out. I'll be surprised if I get it to break loose.   |
|
|
|
|
Logged
|
|
|
|
|
RustyValkry
|
|
« Reply #95 on: January 22, 2021, 05:40:59 PM » |
|
In addition to the work I got done on the carbs and front calipers I also got the following done.
I broke loose the screws holding the windshield on. It's kinda, sorta a quick release, once you loosen the screws and it wasn't too difficult after the application of some PB Blaster.
I drilled out the stripped head on the screw holding the right control housing on. It went more smoothly than I expected, I used a larger bit to drill out most of the head then a smaller bit to cut the shoulder off and ended up with the remnant of the head on the bit - perfect.
I removed the left control housing - easy peasy.
Disassembled the throttle cables from the control housing and lubed the cables.
|
|
|
|
|
Logged
|
|
|
|
Skinhead
Member
Posts: 8753
J. A. B. O. A.
Troy, MI
|
|
« Reply #96 on: January 23, 2021, 08:02:48 AM » |
|
Have you tried heat on that caliper with the stuck retainer pin? Application of heat to the boss on the caliper to expand it, and maybe whack the pin head with a punch and hammer, apply some PBH Blaster and more heat. Vicegrips on the pin if the head is damaged.
|
|
|
|
|
Logged
|
Troy, MI |
|
|
|
RustyValkry
|
|
« Reply #97 on: January 23, 2021, 05:40:34 PM » |
|
Have you tried heat on that caliper with the stuck retainer pin? Application of heat to the boss on the caliper to expand it, and maybe whack the pin head with a punch and hammer, apply some PBH Blaster and more heat. Vicegrips on the pin if the head is damaged.
Sometimes my posts don't successfully save. I replied to your post and I don't see it. I didn't bring my Bernzamatic or my angle grinder or even my Dremel with me to Florida. I also forgot to bring even 1 of my big C clamps which I realized when I wanted one to try to compress the caliper pistons. Ah well. This afternoon I orderd 6 new pilot screws. I'll keep the 2 or 3 decent ones but I figured I might as well buy all new ones. I also ordered a desmog kit from Redeye. |
|
|
|
|
Logged
|
|
|
|
Skinhead
Member
Posts: 8753
J. A. B. O. A.
Troy, MI
|
|
« Reply #98 on: January 24, 2021, 06:42:34 AM » |
|
A good way to remove stuck caliper pistons is to dismount the caliper (take it off the rotor) and use the brake lever to push them out. Try not to push them all the way out until you are sure all four are free. Then if they aren't out far enough, remove the pads from the caliper and continue pushing with the brake lever. You may want to stick the calipers in a zip lock bag or wrap them in a rag to avoid brake fluid getting on things you don't want it on if the piston(s) happen to pop all the way out.
|
|
|
|
|
Logged
|
Troy, MI |
|
|
|
RustyValkry
|
|
« Reply #99 on: January 24, 2021, 07:31:47 AM » |
|
A good way to remove stuck caliper pistons is to dismount the caliper (take it off the rotor) and use the brake lever to push them out. Try not to push them all the way out until you are sure all four are free. Then if they aren't out far enough, remove the pads from the caliper and continue pushing with the brake lever. You may want to stick the calipers in a zip lock bag or wrap them in a rag to avoid brake fluid getting on things you don't want it on if the piston(s) happen to pop all the way out.
Unfortunately that wasn't an option as I had removed the master already, you can see the picture of what I found in the master earlier in the thread. I finally used a drift to break the ones loose I just got out. Interesting part was there wasn't a build up of nasty goobered up brake fluid in the bores, it appears to have been the salt and dissimilar metal issue again because the seals appear to have still been sealing. Everything nasty I found was from the main seal outward. The picture below provides a better view of the sides of the bore of the caliper I was working on. You can see the difference between the bore walls above the seals. 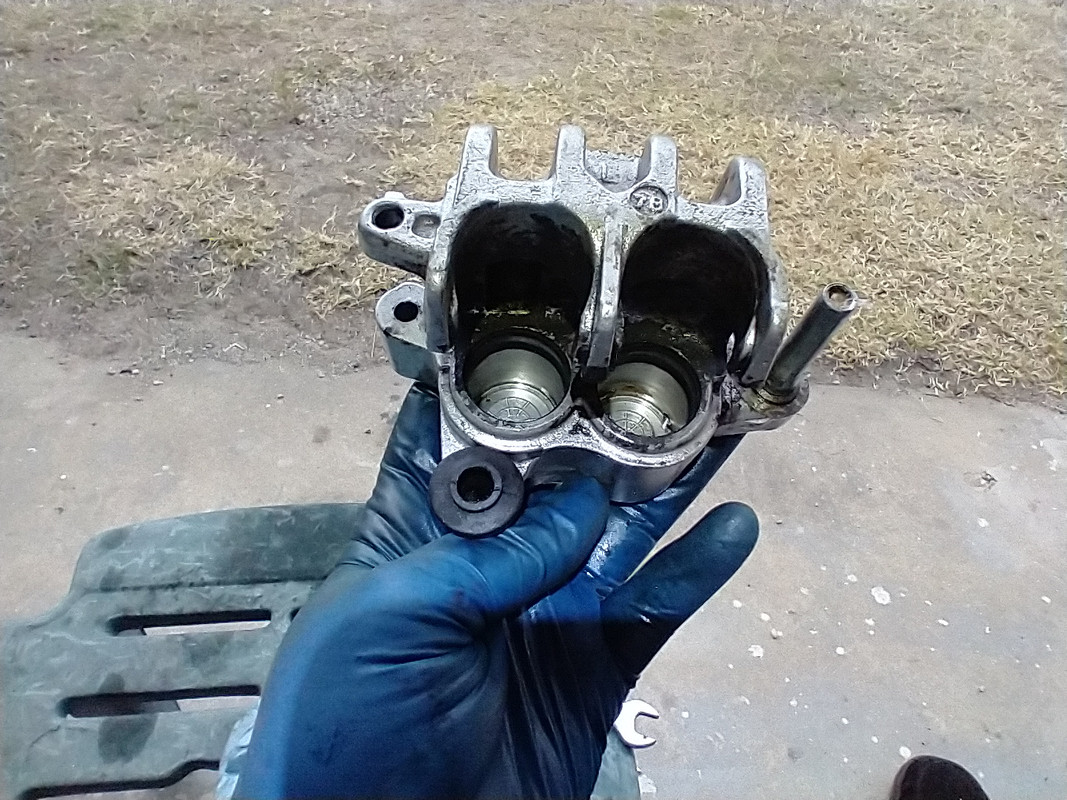 |
|
|
|
|
Logged
|
|
|
|
gordonv
Member
Posts: 5766
VRCC # 31419
Richmond BC
|
|
« Reply #100 on: January 24, 2021, 07:27:42 PM » |
|
I used to have problem saving my posts/replies. After pressing Post, the system would hang or time out, and I would lose it all.
I started to copy (Ctl-A, Ctl-C) what I had written, in case it wouldn't save. All I had to do was reply again, and this time (Ctl-V) paste it back into the window.
|
|
|
|
|
Logged
|
1999 Black with custom paint IS   |
|
|
|
RustyValkry
|
|
« Reply #101 on: January 25, 2021, 07:44:39 AM » |
|
I used to have problem saving my posts/replies. After pressing Post, the system would hang or time out, and I would lose it all.
I started to copy (Ctl-A, Ctl-C) what I had written, in case it wouldn't save. All I had to do was reply again, and this time (Ctl-V) paste it back into the window.
I'll have to start doing that if it happens again. Last night I stripped the innards out of carbs 1, 3 and 5 so I could run the jets through the ultrasonic today. I didn't separate those 3 carbs as I want to be able to reverence them when I assemble 2, 4 and 6. I read through the instructions that came with the Redeye kit. They're very thorough, the kit is very complete and well thought out. I'm glad I went with that kit. |
|
|
|
|
Logged
|
|
|
|
|
RustyValkry
|
|
« Reply #102 on: January 25, 2021, 01:01:10 PM » |
|
Can anyone tell me how to get this POS off? It doesn't appear to be threaded. I don't find a set screw anywhere on it. I can get it to move out so far then it stops. I don't want to get too heavy duty on it since everything it's touching or near is aluminum. Any hints? Thanks.  |
|
|
|
|
Logged
|
|
|
|
|
The emperor has no clothes
|
|
« Reply #103 on: January 25, 2021, 01:22:19 PM » |
|
There are 2 set screws. 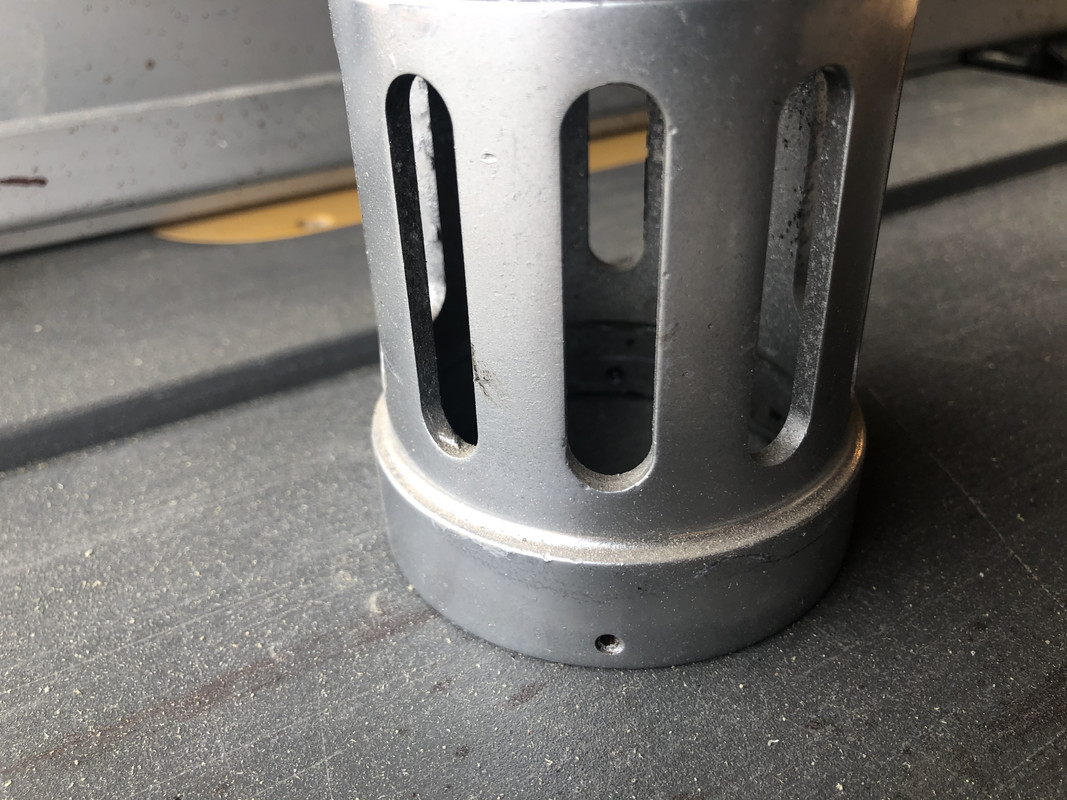  Yours might also be stuck with corrosion. |
|
|
|
|
Logged
|
|
|
|
|
RustyValkry
|
|
« Reply #104 on: January 25, 2021, 04:15:19 PM » |
|
There are 2 set screws. Yours might also be stuck with corrosion. Thanks, I'm sure this will turn out to be a lot of fun starting with finding the set screws among all that corroded, flaking chrome. |
|
|
|
|
Logged
|
|
|
|
|
RustyValkry
|
|
« Reply #105 on: January 28, 2021, 01:55:38 PM » |
|
Thanks Meathead, I was able to locate one of the set screws, or maybe better to say the one set screw I found was accessible. There was so much bubbled chrome that I couldn't feel the set screw hole when I initially felt around for one. Yesterday I pulled the engine guard off to give me access to the air system hold down bolt on the #2 cylinder. I then started pulling the system off to desmog it. I got the connections off the exhaust manifolds underneath as well. I noticed the front exhaust manifold bolt was broken off the #1 cylinder. I'm thinking there might be enough left to make it not a horrible job to get the stub out. I got my first look at the infamous shifter shaft, yea, what were they thinking, it's way too long to be unsupported. It was in the low 50s today in my part of Florida so I didn't do much. I was puttering around in the garage, largely out of boredom, and I decided to grab an allen wrench and try to break the rider footpegs loose. I succeeded and discovered, as I suspected, the right side one was cracked all the way through the mounting socket. I've included pictures. My plan was to clean off all the bad chrome, prep and paint them black. Discovering the broken one may put the kabosh to that plan unless I can find ONE (right side) replacement. Question is, what brand of peg is it? It doesn't look like the stock one in the parts diagram? Can anyone tell me what I have? Does anyone have spare they'd care to part with? I know I could just buy new ones but that doesn't comport with my intent to salvaging as much on this one as I can. I was just browsing on Ebay and found pegs that look like the ones I have - no name, no brand. Are stock foot pegs for these bikes good quality? I think I've already seen posts about the stock pegs not being wide enough for comfort on long trips, can anyone confirm that? I tend to prefer stock unless there's a compelling reason to move away from it. Having sore feet from too narrow pegs would be a legitimate reason to replace stock pegs. https://www.ebay.com/itm/Rubber-Front-Foot-Pegs-for-HONDA-GoldWing-GL1500-ACE-1100-Tourer-Valkyrie/312575198945?fits=Year%3A1998%7CModel%3AValkyrie+1500%7CSubmodel%3AGL1500C%7CMake%3AHonda&epid=19023233243&hash=item48c6ef06e1:g:86AAAOSwY45UQ7nq  |
|
|
|
« Last Edit: January 28, 2021, 02:07:13 PM by RustyValkry »
|
Logged
|
|
|
|
|
Jess from VA
|
|
« Reply #106 on: January 28, 2021, 02:10:23 PM » |
|
Those used to be Kuryakyn Dually Iso Pegs ( without ends, with the correct Valk driver's peg adapters). Probably the most common aftermarket peg replacements used on Valks. Holy crap, was that bike stored at the bottom of some lake? https://www.kuryakyn.com/products/4747/dually-iso-pegsThe ones in your ebay link won't work (with integral end mounts), but the same basic pegs. Without ends (commonly referred to as clevises), and with bike specific adapters. 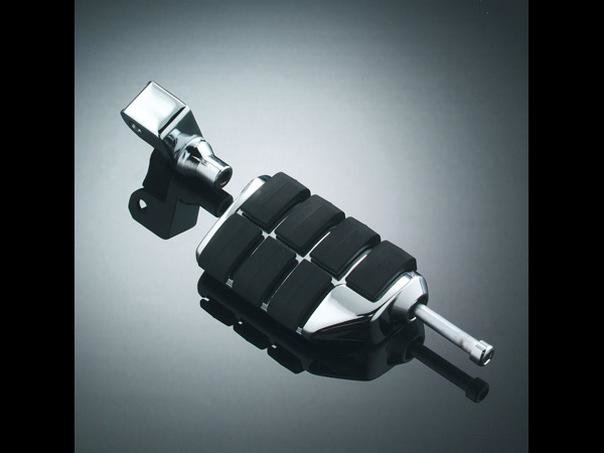 |
|
|
|
« Last Edit: January 28, 2021, 02:21:57 PM by Jess from VA »
|
Logged
|
|
|
|
|
RustyValkry
|
|
« Reply #107 on: January 28, 2021, 02:52:36 PM » |
|
I've been sitting here studying the parts diagram for my bike and perusing Ebay and now realize the rider footpeg brackets on my bike are stock. It appears the only thing the PO changed was the footpegs bothe rider and passenger. I'll have to see if I can find some stock pegs for a reasonable price. If I have to buy new it won't be the same POS's the PO put on it.
|
|
|
|
|
Logged
|
|
|
|
|
Chrisj CMA
|
|
« Reply #108 on: January 28, 2021, 03:18:50 PM » |
|
I've been sitting here studying the parts diagram for my bike and perusing Ebay and now realize the rider footpeg brackets on my bike are stock. It appears the only thing the PO changed was the footpegs bothe rider and passenger. I'll have to see if I can find some stock pegs for a reasonable price. If I have to buy new it won't be the same POS's the PO put on it.
You already have the adapters. Get new Kury pegs like what was on there you will like them |
|
|
|
|
Logged
|
|
|
|
|
RustyValkry
|
|
« Reply #109 on: January 28, 2021, 04:17:06 PM » |
|
I've been sitting here studying the parts diagram for my bike and perusing Ebay and now realize the rider footpeg brackets on my bike are stock. It appears the only thing the PO changed was the footpegs bothe rider and passenger. I'll have to see if I can find some stock pegs for a reasonable price. If I have to buy new it won't be the same POS's the PO put on it.
You already have the adapters. Get new Kury pegs like what was on there you will like them If I had real Kuryakyn pegs on it I don't want them again. If someone can tell me how to tell the difference between Chinese knock off crap and real Kuryakyn pegs I'd love to hear. |
|
|
|
|
Logged
|
|
|
|
|
RustyValkry
|
|
« Reply #110 on: January 28, 2021, 04:23:34 PM » |
|
Those used to be Kuryakyn Dually Iso Pegs ( without ends, with the correct Valk driver's peg adapters). Probably the most common aftermarket peg replacements used on Valks. Holy crap, was that bike stored at the bottom of some lake? https://www.kuryakyn.com/products/4747/dually-iso-pegsThe ones in your ebay link won't work (with integral end mounts), but the same basic pegs. Without ends (commonly referred to as clevises), and with bike specific adapters. Jess, I didn't see your post until I replied to Chrisj. The adapter in your picture is on my mounting brackets. Are you saying that adapter indicates the pegs I have are REAL Kuryakyn pegs? If so it's kinda disappointing at how badly they corroded. If that's how well Kuryakyn pegs hold up I'd just as soon find used stock pegs even if they're not as comfortable. Heck for me riding a motorcycle is never comfortable anyway.  |
|
|
|
|
Logged
|
|
|
|
hubcapsc
Member
Posts: 16818
upstate
South Carolina
|
|
« Reply #111 on: January 28, 2021, 04:29:42 PM » |
|
the pegs I have are REAL Kuryakyn pegs? If so it's kinda disappointing at how badly they corroded. If that's how well Kuryakyn pegs hold up I'd just as soon find used stock pegs even if they're not as comfortable.I have Kuryakyn pegs as highway pegs... I busted (or saw a busted?) Kuryakyn highway arm once, they're just made out of some kind of chromed pot metal looking stuff. But they workgreat as highway pegs  For the normal pegs, I much prefer OEM. There's nothing uncomfortable (to me) about them. -Mike
|
|
|
|
|
Logged
|
|
|
|
|
..
|
|
« Reply #112 on: January 28, 2021, 06:22:35 PM » |
|
I've been sitting here studying the parts diagram for my bike and perusing Ebay and now realize the rider footpeg brackets on my bike are stock. It appears the only thing the PO changed was the footpegs bothe rider and passenger. I'll have to see if I can find some stock pegs for a reasonable price. If I have to buy new it won't be the same POS's the PO put on it.
I think I've got some in the garage. Let me take a look over the weekend and I'll post a couple of pics here. |
|
|
|
|
Logged
|
|
|
|
|
Jess from VA
|
|
« Reply #113 on: January 28, 2021, 07:30:02 PM » |
|
Your pegs are/were Kuryakyn. 1) If they say Kuryakyn on a website (and look up the 4 digit part number for verification) then they're probably Kuryakyn pegs. Knockoffs are mostly on Ebay, not mainstream sellers (who will always be cheaper than Kuryakyn themselves, nobody buys from them direct at full MSRP). Amazon generally has about the best prices for Kuryakyn, if they have the part numbers you need. You search Kuryakyn for part numbers, then shop the part numbers elsewhere. 2) Get whatever pegs you want, but I've never seen any Kuryakyn Duallys that look as bad as yours (they look like acid was poured on them), and I've seen hundreds, including mine on two bikes for 15 years or so (and mine are a clearly worn but nice enough for me). 3) The Honda OE pegs new will cost more (and are actually 6-9 parts), but are better pegs, and have feeler bolts on the bottom that hit before the peg, unlike Kuryakyn. But don't look as good as the Kuryakyn (which only require the peg and the adapter - 2 parts). Also, the Kuryakyn pegs may be rotated to any angle you may like on the mount bolt, but OE pegs are not so adjustable (just flat). https://www.procaliber.com/oem-parts?aribrand=HOM&arian=MOTORCYCLE#/Honda_Powersports/GL1500CA_(98)_VALKYRIE%2c_USA%2c_VIN%23_1HFSC340-WA100001/STEP/26dd8082-9114-4fe4-9c2d-973414052afb/256f3bb2-49c4-483f-b0d3-3a2a4b2bdaa0/yBut you may find some used OE pegs in not bad shape, and Pinwall Cycle in OH is the place to look, but navigating their site is a big PITA, so just call and ask and save some time (everything they have is rarely on their MANY web pages) . Also true for any used parts you may want. https://pinwallcycle.com/advanced_search_result.php?keywords=valkyrie+foot+pegs |
|
|
|
« Last Edit: January 28, 2021, 07:41:17 PM by Jess from VA »
|
Logged
|
|
|
|
|
RustyValkry
|
|
« Reply #114 on: January 28, 2021, 08:11:44 PM » |
|
Thanks Jess, I bookmarked the Pinwall site. I've got time before I need them to make a decision about which way to go.
|
|
|
|
|
Logged
|
|
|
|
|
RustyValkry
|
|
« Reply #115 on: January 29, 2021, 05:19:22 PM » |
|
I've been sitting here studying the service manual about carburetor disassembly and was reminded of something. When I took the carbs apart, in every carb the needle holder stuck in the carb body, some more stuck than others, a couple I had to spray/soak to get them loose. This thing wouldn't have run without tearing the carbs down. It would have been a hot mess if I'd tried.
I'm done soaking the jets and next step is cleaning the top of the engine which is filthy -- and smelly. I didn't find any rodent nests but from time to time I catch a whif of varmint. In a few days, if I get time to work on it, I should make good progress with getting the carbs reassembled and remounted with the desmog kit installed as well.
|
|
|
|
|
Logged
|
|
|
|
|
..
|
|
« Reply #116 on: January 30, 2021, 06:05:23 AM » |
|
|
|
|
|
|
Logged
|
|
|
|
|
RustyValkry
|
|
« Reply #117 on: January 30, 2021, 07:01:04 AM » |
|
I just PM'd you. Thanks. BTW, your post reminded me that yesterday, after an overnight soak in vinegar, I went to work on the good foot peg with sand paper to see what I can do to clean that one up. It was as I expected, most of the remaining chrome came off easily but a few patches are holding on like their lives depended on it. If the left footpeg hadn't broken I'd seriously consider cleaning them up, painting and reusing them but the amount of effort would be high and since I only have one what's the point. |
|
|
|
« Last Edit: January 30, 2021, 07:05:28 AM by RustyValkry »
|
Logged
|
|
|
|
|
RustyValkry
|
|
« Reply #118 on: January 30, 2021, 03:46:12 PM » |
|
Today I got the top of the engine cleaned. Below are some before and after pictures. I also wiped down the plug wires, cleaned out the spark plug wells some more and pulled the plugs for a look. I'll replace them but they actually look pretty good. The #5 plug was rusty which tells me the cap wasn't sealing the well from water infiltration. I'll have to keep my eye on that one once I get the bike on the road. I put the 4 buttons in the ports for the desmog and I removed the left exhaust pipe and cleaned the gasket off the desmog port on the exhaust manifold. I got the left pipe loose but discovered I can't get it off the bike because it's hitting the jack. Tomorrow I'll see how I'll have to deal with that. Not sure I mentioned it before but there is a broken bolt on the left foot peg bracket, the front one. Something else I have to fix. While I was under the bike cleaning off the right side desmog port I took a closer look at the coolant hose that crosses the block. It's very hard. The top hose feels pretty good. I'm thinking the shop the PO took his bike to for service must have changed the top hose somewhere along the line but didn't bother with the bottom hose. Assuming the engine proves to be good I'll replace all three hoses.     |
|
|
|
|
Logged
|
|
|
|
|
Hook#3287
|
|
« Reply #119 on: January 30, 2021, 03:51:12 PM » |
|
Well, it sure looks better. I like the yellow caps, where'd you get those? |
|
|
|
|
Logged
|
|
|
|
|


