|
RustyValkry
|
 |
« Reply #160 on: March 10, 2021, 03:09:58 PM » |
|
|
|
|
|
|
 Logged
|
|
|
|
|
Jess from VA
|
|
« Reply #161 on: March 10, 2021, 03:56:02 PM » |
|
|
|
|
|
|
Logged
|
|
|
|
Skinhead
Member

Posts: 8753
J. A. B. O. A.
Troy, MI
|
|
« Reply #162 on: March 10, 2021, 05:15:18 PM » |
|
That is very good progress on your part. Congrats on a job well done thus far.
|
|
|
|
|
Logged
|
 Troy, MI |
|
|
|
RustyValkry
|
|
« Reply #163 on: March 11, 2021, 07:39:28 AM » |
|
Last night I was looking at tires and found Shinkos for both ends. Given that the RustyValkyrie is on probation I'm not going to put the high priced tires on it till I know it's a keeper so I decided the Shinkos will work for now. This will be my first tires from Shinko so I'll decide for myself if they're any good. I'm not too concerned because I'm an old guy, I don't ride fast or hard anymore.
I typed a post last night but I don't see it here, not sure what happened to it.
I ordered all the overhaul kits for brakes from Ron Ayers including new pins and plugs for all three calipers.
I was trolling around on Ebay and found a used Pingel to replace the 2 broken petcocks that came with the bike.
I ordered new O-rings for the rear that I'll change when I replace the rear tire.
|
|
|
|
« Last Edit: March 11, 2021, 07:45:54 AM by RustyValkry »
|
Logged
|
|
|
|
|
RustyValkry
|
|
« Reply #164 on: March 11, 2021, 04:08:56 PM » |
|
Today I got the wheels off. As usual there were some issues I had to overcome. The PO did some weird stuff with the rear fender bolts. He put in hex socketed cap screw and of the 4 screws he's got 3 different size hexes mixing SAE and metric. I'm going to have to figure it out before I have to reassemble it. The nuts don't match either and it looks like he pried open the brackets that capture the nuts for some reason. I'm going to guess he had to make those changes because of installing the quick release saddlebag brackets but I'd have thought the saddlebags would have come with replacement screws that worked with the existing captured nuts. Does anyone have a picture of the rear fender showing the captured nuts in place? It'd be helpful to see how it SHOULD look. The anchor for the speedo cable to the hub drive is broken. Whatever moron decided a plastic anchor would hold should be drawn and quartered. Can anyone tell me if there is an aftermarket part available? Here are some pictures. Can you say 'dirty'? 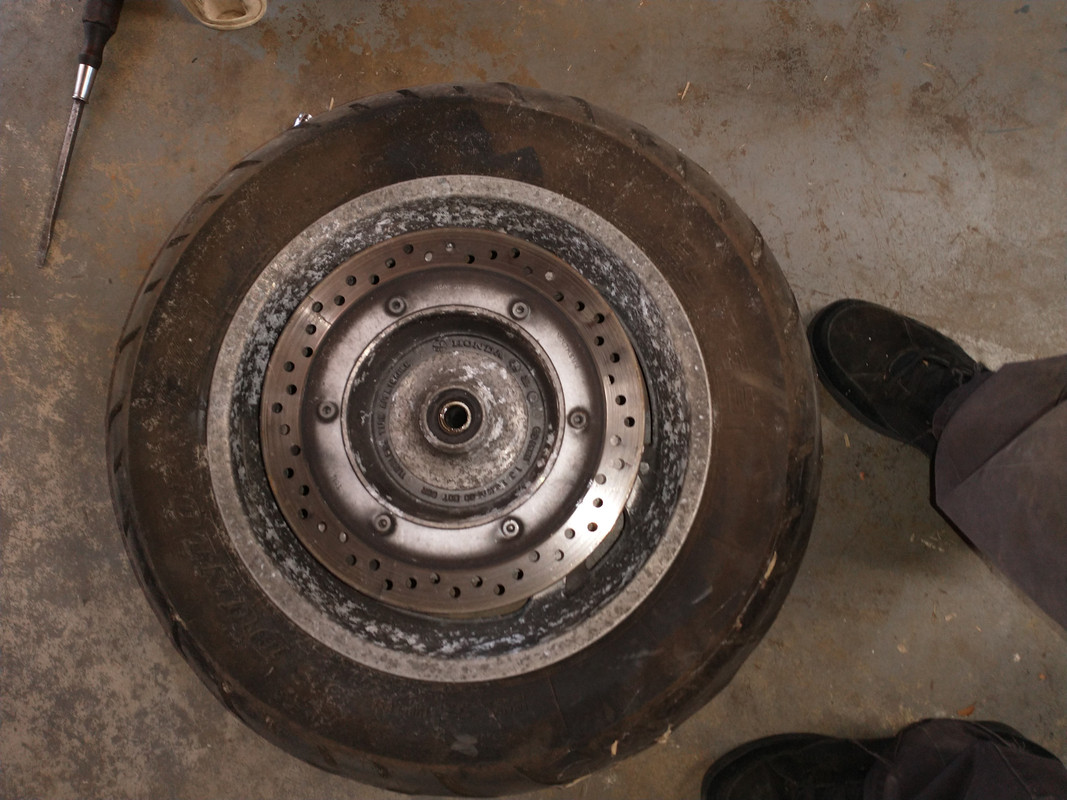 How about 'dirtier'?   |
|
|
|
|
Logged
|
|
|
|
|
The emperor has no clothes
|
|
« Reply #165 on: March 11, 2021, 04:17:14 PM » |
|
You are going to have to change your handle. RustyValkyrie doesn’t due it justice.  The captured nut for the rear fender is just a flat piece of brass with a threaded hole in it. (I don’t have a pic) |
|
|
|
|
Logged
|
|
|
|
|
RustyValkry
|
|
« Reply #166 on: March 11, 2021, 04:42:07 PM » |
|
I pulled the shocks off today just because I'm a glutton for punishment. I should probably replace them but as nasty as they are they only have 22K miles on them. I'm wondering, do the chrome covers come off them? I spent a couple minutes rapping on the coves with the plastic handle of a big screw driver and I tried gently prying at the top cover but I was reluctant to chance damaging them at this point. If they look better without the covers and I could get the covers off I'd go that way until I decide whether to buy new aftermarket, used stock or even paint the covers.  It looks like the top cover might be pressed on.  As well as the bottom cover. I had a set of Harley shocks that I was able to take the covers off. I actually prefer the look of the bare shock anyway.  |
|
|
|
|
Logged
|
|
|
|
|
|
|
Jess from VA
|
|
« Reply #168 on: March 11, 2021, 05:55:46 PM » |
|
Was the spider deceased, or only resting?  Valkyrie archaeology. |
|
|
|
|
Logged
|
|
|
|
|
RustyValkry
|
|
« Reply #169 on: March 11, 2021, 06:50:30 PM » |
|
I had a pair of shocks just like those. The aluminum will clean up perfect. Emory cloth and then polish. I sanded the rust off then painted the shocks and added carbon fiber tape and pin striping. They look kinda cool   Your bike looks great. I'd be satisfied with mine running well, it'll never look good. |
|
|
|
|
Logged
|
|
|
|
|
RustyValkry
|
|
« Reply #170 on: March 11, 2021, 06:53:08 PM » |
|
Was the spider deceased, or only resting? Valkyrie archaeology. LOL, I didn't notice it until I had the picture posted in this thread. I have no idea if it's still alive or not. |
|
|
|
|
Logged
|
|
|
|
|
RustyValkry
|
|
« Reply #171 on: March 13, 2021, 04:17:57 PM » |
|
|
|
|
|
|
Logged
|
|
|
|
|
RustyValkry
|
|
« Reply #172 on: March 13, 2021, 04:22:24 PM » |
|
This afternoon I did some cleanup since I'm waiting for the caliper and master overhaul kits. I decided to work on the rear wheel as it was, by far the worst. You can see the before in a previous post, here's the after. I'm pleased with it though it's far from pristine. I think I'll eventually paint the wheels if I do anything. I'm not going to do all the sanding needed to get the pits out of it.  |
|
|
|
|
Logged
|
|
|
|
|
RustyValkry
|
|
« Reply #173 on: March 13, 2021, 04:47:23 PM » |
|
I flushed out the front brake lines in preparation to switch to Dot 5. I was able to get a meat syringe tip into the hole of the front master cylinder connector. I couldn't get it to fit into the rear so I'll have to figure out something else. I ran into my first unexpected problem today. I pulled the drive flange off the wheel and cleaned it up a bit. I then had a look at the gear teeth and it wasn't good. Somebody did something wrong at some point in this rear end and the teeth misaligned. I think you can see it in the picture below, uneven wear on the side of the teeth. There is a corresponding wear pattern on the ring gear teeth. Given that the price of just those 3 parts is listed at over $400 I'm going to think about it for a while. I also need to figure out how to properly setup the drive flange when installing as it looks like the flange didn't go far enough into the diff assembly. Comments would be appreciated.  |
|
|
|
|
Logged
|
|
|
|
|
Chrisj CMA
|
|
« Reply #174 on: March 13, 2021, 05:20:34 PM » |
|
I’ve seen worse. Use a lot of good grease and the correct assembly sequence. You should get a lot more miles from that
How are the pinion cup splines?
|
|
|
|
« Last Edit: March 13, 2021, 05:23:00 PM by Chrisj CMA »
|
Logged
|
|
|
|
|
RustyValkry
|
|
« Reply #175 on: March 13, 2021, 06:24:52 PM » |
|
I’ve seen worse. Use a lot of good grease and the correct assembly sequence. You should get a lot more miles from that
How are the pinion cup splines?
If by pinion cup splines you mean the teeth with which the final driven flange teeth mesh, they're about like the flange teeth. It looks like the final driven flange wasn't deep enough into the diff. to properly mesh. I've been reading the service manual and looking at parts diagrams trying to understand if there is some washer that controls how deeply the flange teeth seat but it doesn't look like there is. I'll keep reading but I was already entertaining the thought of just going with it because I'm not prepared to break into the diff. at this juncture, it requires tools I don't have and more time than I have left here in FL. |
|
|
|
|
Logged
|
|
|
|
|
RustyValkry
|
|
« Reply #176 on: March 13, 2021, 06:27:45 PM » |
|
Wow, I just looked at the price of a new rear rotor and the list is $277. I don't see a way around this one since two of the cracks are all the way through the rotor and the whole way across the face. Maybe I can find on used in decent shape.
15 minutes later:
I found one on Ebay for $15.95. I figure it's worth the chance to save that kind of money.
|
|
|
|
« Last Edit: March 13, 2021, 06:37:17 PM by RustyValkry »
|
Logged
|
|
|
|
|
The emperor has no clothes
|
|
« Reply #177 on: March 13, 2021, 07:03:56 PM » |
|
The pinion cup teeth Jeff is referring to are where the driveshaft mates with the rear end. I don’t think you have any problem with the depth of the mating surface. The PO likely didn’t sequence a rear tire assembly correctly. Torquing down stuff in the correct order is pretty important with Honda’s Valkyrie design. Also like Jeff says, those teeth are about half gone. But, you could still end up getting many more miles out of them. I have never seen a rotor like that. I hope the fronts are better.
|
|
|
|
|
Logged
|
|
|
|
hubcapsc
Member
Posts: 16818
upstate
South Carolina
|
|
« Reply #178 on: March 13, 2021, 07:09:23 PM » |
|
Wow, I just looked at the price of a new rear rotor and the list is $277. I don't see a way around this one since two of the cracks are all the way through the rotor and the whole way across the face. Maybe I can find on used in decent shape.
15 minutes later:
I found one on Ebay for $15.95. I figure it's worth the chance to save that kind of money.
I'm running a good cheap eBay rotor. There's two kinds of rotors... hope you got the right kind  ... -Mike |
|
|
|
|
Logged
|
|
|
|
|
Chrisj CMA
|
|
« Reply #179 on: March 13, 2021, 07:19:50 PM » |
|
You cannot use that rotor. Pm me if you have trouble finding a replacement
|
|
|
|
|
Logged
|
|
|
|
|
RustyValkry
|
|
« Reply #180 on: March 13, 2021, 07:47:10 PM » |
|
You cannot use that rotor. Pm me if you have trouble finding a replacement
Wow, I just looked at the price of a new rear rotor and the list is $277. I don't see a way around this one since two of the cracks are all the way through the rotor and the whole way across the face. Maybe I can find on used in decent shape.
15 minutes later:
I found one on Ebay for $15.95. I figure it's worth the chance to save that kind of money.
I'm running a good cheap eBay rotor. There's two kinds of rotors... hope you got the right kind ... -Mike Yes, the one I have is toast I wouldn't ride a block with it. The one I ordered indicated it would fit a C, I guess I'll find out when it gets here. |
|
|
|
|
Logged
|
|
|
|
hubcapsc
Member
Posts: 16818
upstate
South Carolina
|
|
« Reply #181 on: March 13, 2021, 08:04:58 PM » |
|
You cannot use that rotor. Pm me if you have trouble finding a replacement
Wow, I just looked at the price of a new rear rotor and the list is $277. I don't see a way around this one since two of the cracks are all the way through the rotor and the whole way across the face. Maybe I can find on used in decent shape.
15 minutes later:
I found one on Ebay for $15.95. I figure it's worth the chance to save that kind of money.
I'm running a good cheap eBay rotor. There's two kinds of rotors... hope you got the right kind ... -Mike Yes, the one I have is toast I wouldn't ride a block with it. The one I ordered indicated it would fit a C, I guess I'll find out when it gets here. Standards and Tourers had one kind of wheel (and the associated rotor) through 99. The Interstate model first came out in 99, and it had a new kind of wheel/rotor. All wheels/rotors were the new kind 2000 and after. -Mike |
|
|
|
|
Logged
|
|
|
|
|
pancho
|
|
« Reply #182 on: March 14, 2021, 06:21:57 AM » |
|
Your picture shows that you have a 1 J rear wheel, the rotor for that wheel has button bolts that sit on top of the rotor. The rotor for a 2 J wheel has the bolts recessed in the rotor. While it will bolt onto your wheel, it will not mount as the clearances are different and it will not align correctly with the caliper. Hope you got the right one first try. I have never seen a rotor cracked up like the one on your bike,, makes me wonder if the PO was riding with metal to metal bakes on the back.   |
|
|
|
|
Logged
|
The most expensive things you will purchase, are those things you would not have needed if you had listened and obeyed.
|
|
|
|
pancho
|
|
« Reply #183 on: March 14, 2021, 06:40:58 AM » |
|
I’ve seen worse. Use a lot of good grease and the correct assembly sequence. You should get a lot more miles from that
How are the pinion cup splines?
If by pinion cup splines you mean the teeth with which the final driven flange teeth mesh, they're about like the flange teeth. It looks like the final driven flange wasn't deep enough into the diff. to properly mesh. I've been reading the service manual and looking at parts diagrams trying to understand if there is some washer that controls how deeply the flange teeth seat but it doesn't look like there is. I'll keep reading but I was already entertaining the thought of just going with it because I'm not prepared to break into the diff. at this juncture, it requires tools I don't have and more time than I have left here in FL. You will need to remove the final drive from the swing arm (four nuts) to access the pinion cup and drive line splines, one last area that will need attention. There is a nylon thrust washer that sits between the wheel and the driven flange, it must be in place to keep from tearing up the face of the wheel around the bearing on the drive side. It may be stuck inside the flange, it has some to do with the depth of penetration of the flange into the final drive. There are dome other parts you will see as you get into the final drive. The flange is not under torsion from the axle, it has a bit of room to move laterally, and it also rotates slightly as allowed by the rubber dampers, this is where the nylon thrust is critical. The wear on the driven flange splines, also suggest wear in the final drive which can all be addressed, but as CHris said, you can go with what you have for the time being with a good lubrication,, as long as the thrust washer is present. |
|
|
|
« Last Edit: March 14, 2021, 06:55:05 AM by pancho »
|
Logged
|
The most expensive things you will purchase, are those things you would not have needed if you had listened and obeyed.
|
|
|
Skinhead
Member
Posts: 8753
J. A. B. O. A.
Troy, MI
|
|
« Reply #184 on: March 14, 2021, 06:54:01 AM » |
|
There are a couple members of this board that have pretty decent old parts collections. One is Troutdude, (Dennis Scott) in Mandeville, LA. If I were you I would PM him and see if he has any of the parts you need. He's a great guy and I'm sure will help you if he can.
As far as the rear splines go, you can find a used 1500 Goldwing final drive, disassemble and remove the ring gear and press the splines out of the ring gear. Do the same to your valk final and press the Goldwing splines into the Valk ring gear, and then reassemble it. Just make sure you assemble everything in exactly the same way it came apart, (all the parts in the same order/location). This has been done by HubcapSC and I just did one myself. A new or good used star flange would also be needed, and I think one from a 1500 wing would work (but not sure about that), some one else may be able to confirm that, or look up the part numbers for both bikes and see if they match. Make sure you install the plastic thrust washer between the wheel and the star flange when you install the wheel. I would also consider doing the double row bearing mod while you are going through all this.
|
|
|
|
|
Logged
|
Troy, MI |
|
|
|
RustyValkry
|
|
« Reply #185 on: March 14, 2021, 07:21:00 AM » |
|
Your picture shows that you have a 1 J rear wheel, the rotor for that wheel has button bolts that sit on top of the rotor. The rotor for a 2 J wheel has the bolts recessed in the rotor. While it will bolt onto your wheel, it will not mount as the clearances are different and it will not align correctly with the caliper. Hope you got the right one first try. I have never seen a rotor cracked up like the one on your bike,, makes me wonder if the PO was riding with metal to metal bakes on the back. Appreciate your post Pancho. Last night when you guys first mentioned there were multiple rotors for my year bike I messaged the seller and asked him to hold the shipment until I could confirm what I needed. I think the one I ordered is the correct one but I want to be sure. Below is a picture of it off the listing. It DOES have button head bolts I reall because when I was looking it over I immediately wondered if they started as button head or had been rubbing and got cut down. Here's the rotor I 'bought'.  |
|
|
|
|
Logged
|
|
|
|
|
RustyValkry
|
|
« Reply #186 on: March 14, 2021, 07:43:04 AM » |
|
I’ve seen worse. Use a lot of good grease and the correct assembly sequence. You should get a lot more miles from that
How are the pinion cup splines?
If by pinion cup splines you mean the teeth with which the final driven flange teeth mesh, they're about like the flange teeth. It looks like the final driven flange wasn't deep enough into the diff. to properly mesh. I've been reading the service manual and looking at parts diagrams trying to understand if there is some washer that controls how deeply the flange teeth seat but it doesn't look like there is. I'll keep reading but I was already entertaining the thought of just going with it because I'm not prepared to break into the diff. at this juncture, it requires tools I don't have and more time than I have left here in FL. You will need to remove the final drive from the swing arm (four nuts) to access the pinion cup and drive line splines, one last area that will need attention. There is a nylon thrust washer that sits between the wheel and the driven flange, it must be in place to keep from tearing up the face of the wheel around the bearing on the drive side. It may be stuck inside the flange, it has some to do with the depth of penetration of the flange into the final drive. There are dome other parts you will see as you get into the final drive. The flange is not under torsion from the axle, it has a bit of room to move laterally, and it also rotates slightly as allowed by the rubber dampers, this is where the nylon thrust is critical. The wear on the driven flange splines, also suggest wear in the final drive which can all be addressed, but as CHris said, you can go with what you have for the time being with a good lubrication,, as long as the thrust washer is present. Thanks again Pancho. I was sitting here last night looking at parts diagrams wondering why I wasn't seeing that plastic washer in either the rear wheel or final drive diagrams. I thought I remembered it coming off the flange but I couldn't remember and I was kicking myself for not taking pictures. I've been reading here about the lube to use, molybdenum disulfide paste/grease. It's not something I've ever specifically bought but, for this purpose it's specifically specified. I see a lot of brands varying in price from $8 for a tub to $21 for a tiny tube from Honda. Is there any (a silly question I bet) agreed to preference with this stuff for this application. I really don't want to spend $21 for a tube from Honda. |
|
|
|
|
Logged
|
|
|
|
|
RustyValkry
|
|
« Reply #187 on: March 14, 2021, 07:49:17 AM » |
|
There are a couple members of this board that have pretty decent old parts collections. One is Troutdude, (Dennis Scott) in Mandeville, LA. If I were you I would PM him and see if he has any of the parts you need. He's a great guy and I'm sure will help you if he can.
As far as the rear splines go, you can find a used 1500 Goldwing final drive, disassemble and remove the ring gear and press the splines out of the ring gear. Do the same to your valk final and press the Goldwing splines into the Valk ring gear, and then reassemble it. Just make sure you assemble everything in exactly the same way it came apart, (all the parts in the same order/location). This has been done by HubcapSC and I just did one myself. A new or good used star flange would also be needed, and I think one from a 1500 wing would work (but not sure about that), some one else may be able to confirm that, or look up the part numbers for both bikes and see if they match. Make sure you install the plastic thrust washer between the wheel and the star flange when you install the wheel. I would also consider doing the double row bearing mod while you are going through all this.
Thanks for that Skinhead. I'm not at home and don't have what I need to do that but I'm going to keep that in mind. Guess that's a good reason to hit swap meets. |
|
|
|
|
Logged
|
|
|
|
hubcapsc
Member
Posts: 16818
upstate
South Carolina
|
|
« Reply #188 on: March 14, 2021, 07:56:57 AM » |
|
There's a giant difference between moly grease and moly paste. Moly paste seems to be unobtainable at the auto parts store, the little honda tubes or jars of stuff from Loctite and other vendors is where to find it. I've bought the Loctite stuff locally from Graingers and on-line at Amazon. 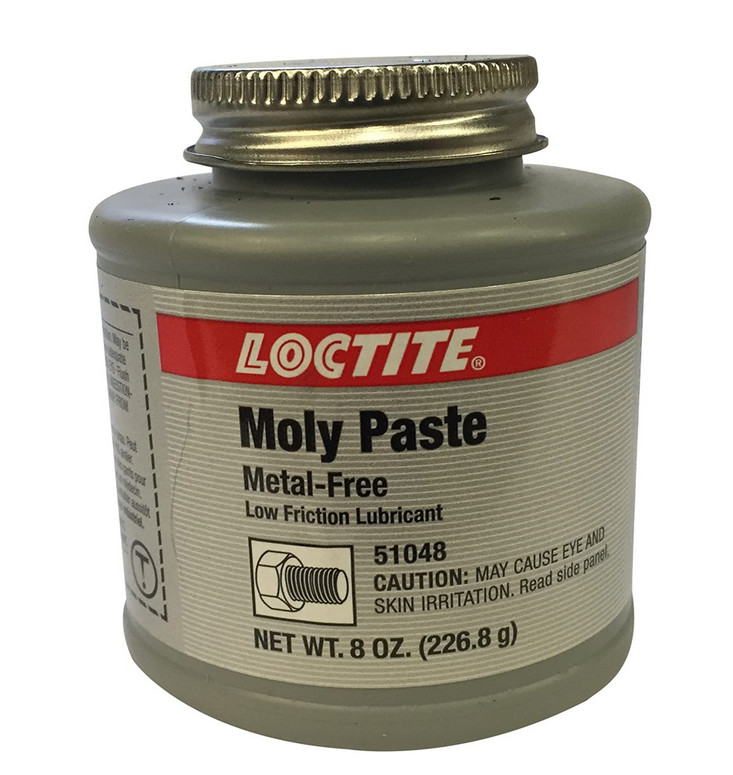 Numerous people here have GIANT success at just foo-fooing moly paste and using that waterproof blue belray grease everywhere... both ends of the drive shaft, pinion cup, flange and final... -Mike |
|
|
|
« Last Edit: March 14, 2021, 07:58:39 AM by hubcapsc »
|
Logged
|
|
|
|
|
Jess from VA
|
|
« Reply #189 on: March 14, 2021, 08:11:30 AM » |
|
Numerous people here have GIANT success at just foo-fooing
moly paste and using that waterproof blue belray grease
everywhereYep, me too. Though I will brush on a bit of moly before using a spatula to load on the good Belray on top of it.  Looking ahead, you are going to want a new OE Ujoint rubber boot. Lots of drive train water damage can occur (despite best cleaning and lubrication) when water gets in there from the top and runs down inside the drive train. And getting new flexible boots to fit on there is easier than doing it with old stiff boots. But they all can me a PITA to get fitted, and no matter how irritated you get, do not tear it getting it on, or you need another one. (ask how I know) New (52104-MZ0-A40)  Used (just say no)  Also, here is a very nice link to servicing the Ujoint and drive train. Clicking on each picture gets more information. https://web.archive.org/web/20160523032210/http://www.rattlebars.com/mtz/ujoint.html
|
|
|
|
« Last Edit: March 14, 2021, 08:28:31 AM by Jess from VA »
|
Logged
|
|
|
|
|
pancho
|
|
« Reply #190 on: March 14, 2021, 09:31:15 AM » |
|
I believe that rotor you are "buying" is the correct one for your bike Rusty. The picture shows the outline from the bolt heads, so it is a picture of the outside and there is no recess. Looks like a good one with little wear, not much of a lip on the outer edge.
|
|
|
|
|
Logged
|
The most expensive things you will purchase, are those things you would not have needed if you had listened and obeyed.
|
|
|
|
RustyValkry
|
|
« Reply #191 on: March 14, 2021, 02:22:17 PM » |
|
I believe that rotor you are "buying" is the correct one for your bike Rusty. The picture shows the outline from the bolt heads, so it is a picture of the outside and there is no recess. Looks like a good one with little wear, not much of a lip on the outer edge.
Thanks, you just reminded me to reply to the seller again to tell him to send it which I just did. I just came in from working on it. I pulled the final drive off. Below are some pictures. One thing I want to clarify. When you say pinion and cup you're talking about the pinion and cup on the diff. end of the drive shaft? You don't mean the pinion IN the diff. which would require pulling the diff. cover off which I DON'T want to do. If you ARE talking about the end of the drive shaft you can see the pinion in the pics below. The U joint boot promises to be a colossal PITA to put back on. I don't want to have to wait for a new boot so I'll try to reuse the original which isn't in too bad a shape.    |
|
|
|
|
Logged
|
|
|
|
|
RustyValkry
|
|
« Reply #192 on: March 14, 2021, 02:24:20 PM » |
|
I decided to sit in the shade and sand the front wheel. After forever it looks like what you see below. Certainly not perfect but lots better than it was.  |
|
|
|
|
Logged
|
|
|
|
|
pancho
|
|
« Reply #193 on: March 14, 2021, 03:44:46 PM » |
|
The pinion cup is the receptacle on the final drive that the drive line plugs into. Your picture of the drive line end with the oil seal on it shows that those pieces are in good condition,, even though the drive line has weird machining patterns on it.
The picture of the bottom of the rusty shock looks like it has been leaking.
|
|
|
|
« Last Edit: March 14, 2021, 03:47:37 PM by pancho »
|
Logged
|
The most expensive things you will purchase, are those things you would not have needed if you had listened and obeyed.
|
|
|
|
RustyValkry
|
|
« Reply #194 on: March 14, 2021, 04:23:02 PM » |
|
The pinion cup is the receptacle on the final drive that the drive line plugs into. Your picture of the drive line end with the oil seal on it shows that those pieces are in good condition,, even though the drive line has weird machining patterns on it.
The picture of the bottom of the rusty shock looks like it has been leaking.
Actually, I believe I got PB Blaster on it. On the other hand if I can convince myself that they're bad I can justify buying a better (prettier) set.  I'm thinking, after I take the Evapo-Rust out of the gas tank I might put it into a long flat container and try soaking the shocks in it to see if it will dissolve the rust. |
|
|
|
|
Logged
|
|
|
|
|
RustyValkry
|
|
« Reply #195 on: March 15, 2021, 07:25:31 PM » |
|
Today the new front tire arrived as did the bottle of moly paste. Tomorrow I'll see how much of the final drive I can reassemble and see if I can find somewhere to have tires mounted.
The brake overhaul kits won't be here until next week so I'll be focusing on the tires and gas tank.
|
|
|
|
|
Logged
|
|
|
|
|
RonW
|
|
« Reply #196 on: March 16, 2021, 02:26:47 AM » |
|
This was another member's photo. difference between later and earlier rear rotors. As others already said, don't forget the thrust washer.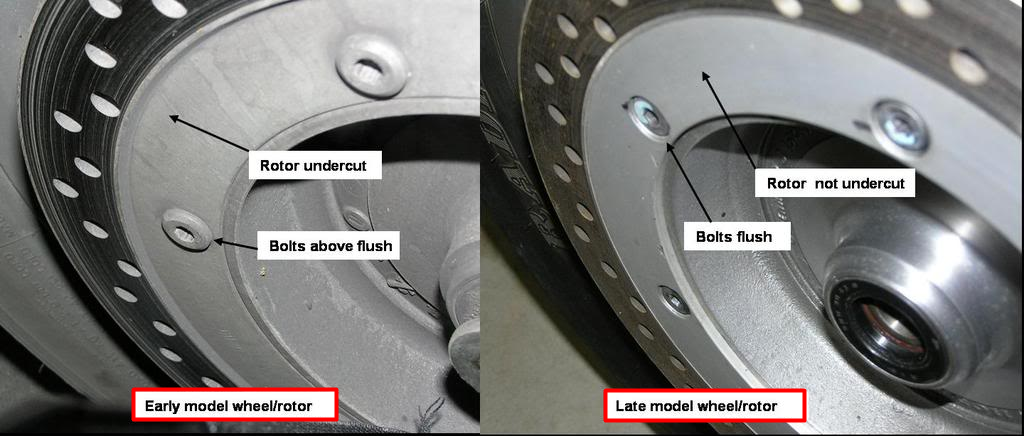 |
|
|
|
|
Logged
|
2000 Valkyrie Tourer
|
|
|
|
RustyValkry
|
|
« Reply #197 on: March 16, 2021, 07:27:36 AM » |
|
This was another member's photo. difference between later and earlier rear rotors. As others already said, don't forget the thrust washer.Thanks for that picture of the thrust washer. That's where I was going to put it so it's confirmation, always a good thing. I think the rotor is the correct one but you just never know till it's in your hands. The brake parts had an estimated delivery date of between 3/23 - 3/27 but I just got an e-mail saying they'll be here tomorrow. That would be good. I'm thinking I might not be able to find a shop here to do the tires so I took the precaution of ordering new valve stems and dyna beads in case I have to mount them myself. For me the hardest part of doing my own tires is being on my knees and at my snowbirding location there isn't any alternative. |
|
|
|
|
Logged
|
|
|
|
|
|
|
RustyValkry
|
|
« Reply #199 on: March 16, 2021, 05:19:19 PM » |
|
Have you compiled a list....of all the GOOD parts found on that bike? Must be a pretty short list!! I just cannot believe what has all happened to that thing!! You don't learn anything buying a bike that doesn't need anything. I've enjoyed working on the RustyValkyrie and, assuming I finally get it on the road, I'll have the satisfaction of knowing I saved a bike that would probably have been parted out. |
|
|
|
|
Logged
|
|
|
|
|


